Door latch pillar repair?
#1
 05-22-2013, 12:12 AM


98 Blazer 4x4 LS
Door has been saggy, waited too long to scrape up $$$ to get complete new hinge. Not sure of proper part name ..... the "latch bar" mounted on the door pillar where the door locks onto got banged too many time. Sheet metal got pushed in.

Bar is a bit gnarly because I had to grab it with pliers and pry it back "straight" so the door would actually stay closed!
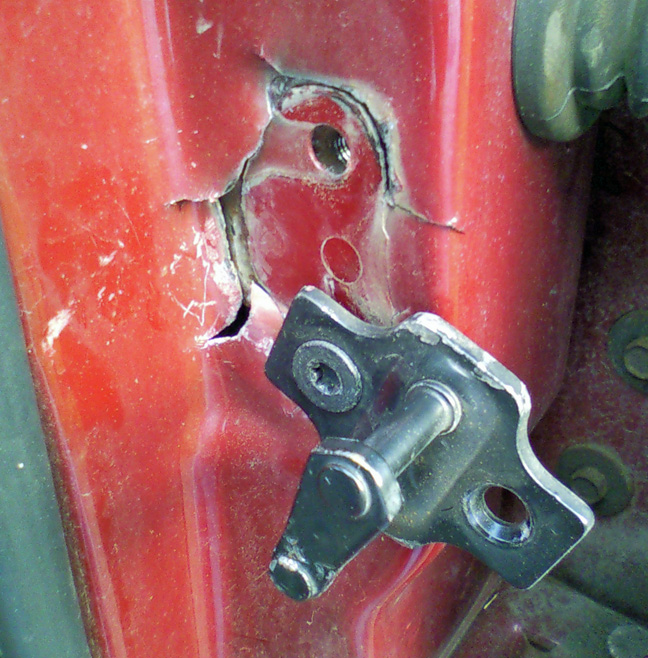
At this point I just really need the door to be functional , not "show room quality" perfect repair. Seriously, I have no money at all right now - property taxes due in 8 days.
Any ideas how to fix this simply and cheaply?
Door has been saggy, waited too long to scrape up $$$ to get complete new hinge. Not sure of proper part name ..... the "latch bar" mounted on the door pillar where the door locks onto got banged too many time. Sheet metal got pushed in.
Bar is a bit gnarly because I had to grab it with pliers and pry it back "straight" so the door would actually stay closed!
At this point I just really need the door to be functional , not "show room quality" perfect repair. Seriously, I have no money at all right now - property taxes due in 8 days.
Any ideas how to fix this simply and cheaply?
#2
05-22-2013, 12:51 AM

Yes,you waited too long-but a cheap easy fix is this:
Hit a salvage yard and using a sawzall cut out the entire area around the donor latch assembly,take as much as you can because you can trim it down later. Remove your existing latch(you did) and simply weld the new panel right on top. The additional thickness won't affect latch operation and will make this whole area stronger and will never happen again. This happened to a friend of mine and we did this in about 3 hours including the trip to the yard and priming and painting the heat damaged area. A plus was we found a donor the same color so it really didn't look that noticeable! But fix the hinges if you plan on keeping the car. Good luck!
Hit a salvage yard and using a sawzall cut out the entire area around the donor latch assembly,take as much as you can because you can trim it down later. Remove your existing latch(you did) and simply weld the new panel right on top. The additional thickness won't affect latch operation and will make this whole area stronger and will never happen again. This happened to a friend of mine and we did this in about 3 hours including the trip to the yard and priming and painting the heat damaged area. A plus was we found a donor the same color so it really didn't look that noticeable! But fix the hinges if you plan on keeping the car. Good luck!
#3
05-22-2013, 07:27 AM

Yes,you waited too long-but a cheap easy fix is this:
Hit a salvage yard and using a sawzall cut out the entire area around the donor latch assembly,take as much as you can because you can trim it down later. Remove your existing latch(you did) and simply weld the new panel right on top. The additional thickness won't affect latch operation and will make this whole area stronger and will never happen again. This happened to a friend of mine and we did this in about 3 hours including the trip to the yard and priming and painting the heat damaged area. A plus was we found a donor the same color so it really didn't look that noticeable! But fix the hinges if you plan on keeping the car. Good luck!
Hit a salvage yard and using a sawzall cut out the entire area around the donor latch assembly,take as much as you can because you can trim it down later. Remove your existing latch(you did) and simply weld the new panel right on top. The additional thickness won't affect latch operation and will make this whole area stronger and will never happen again. This happened to a friend of mine and we did this in about 3 hours including the trip to the yard and priming and painting the heat damaged area. A plus was we found a donor the same color so it really didn't look that noticeable! But fix the hinges if you plan on keeping the car. Good luck!
You can still pull it out, repair the "new" piece, and then make the needed repair with your newly repaired striker assembly to your truck.
#4
05-22-2013, 08:26 AM
Great idea thanks!

I was envisioning using an L-brace or something. But a donor "skin-graft" already has the right contours.
Probably would help to have a cordless sawzall to use at the salvage yard??
.
#5
05-22-2013, 04:06 PM
So I have an alternative for you ! I had the same problem about a month ago and did a quick simple fix myself for a few bucks. Had a friend drive my car for a week and when I got it back my door wouldn't shut (never again) and noticed the same pictures that you have posted there.
What I did was cut out the mess of pushed in pilar(or rubber hammer it inwards, thats what I did). Cleaned up the sharp edges and put a piece of 1/8" sheet metal with four 3/4" sheet metal self drilling screws 10mm I believe. Seat belt trim piece will need to be removed to hold the backing of the plate. Well mine had one that fell into the inside pillar when I took the hinge off.
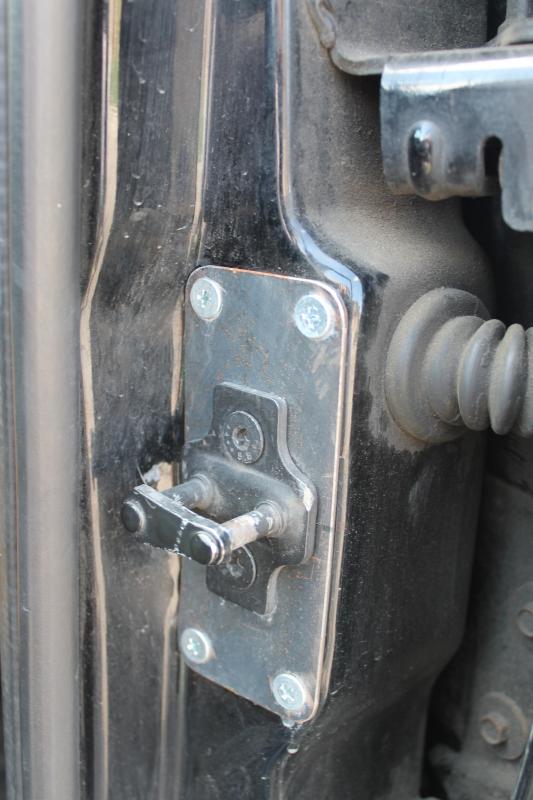
I know I know, needs to be cleaned, my big boy is dirty haha, but that shows about what it looks like now. The edges were cut to fit that contour a bit where the pillar was. The 1/8" sheet metal replaced the washers that were already there. Only thing left to do is paint that piece. I'm lazy hence the quick fix. I had been driving for a few days holding the door closed on right turns (left door) ...not fun....
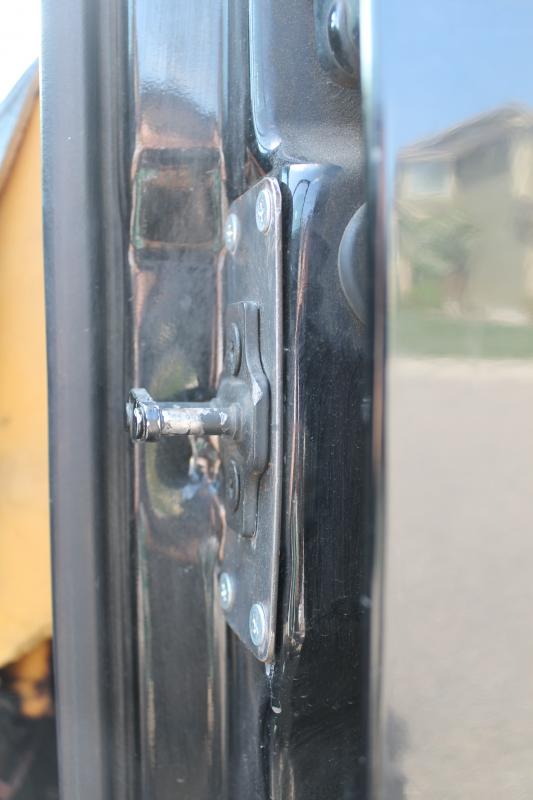
One more shot of this, but from the side angle, the fit is perfect. I think with that whole piece covering a good portion of existing metal it's pretty strong. Hope this helps man. Total cost was 8 bucks for some sheet metal and those particular fasteners, oh and a 6 pack for my buddy the metal worker haha.
What I did was cut out the mess of pushed in pilar(or rubber hammer it inwards, thats what I did). Cleaned up the sharp edges and put a piece of 1/8" sheet metal with four 3/4" sheet metal self drilling screws 10mm I believe. Seat belt trim piece will need to be removed to hold the backing of the plate. Well mine had one that fell into the inside pillar when I took the hinge off.
I know I know, needs to be cleaned, my big boy is dirty haha, but that shows about what it looks like now. The edges were cut to fit that contour a bit where the pillar was. The 1/8" sheet metal replaced the washers that were already there. Only thing left to do is paint that piece. I'm lazy hence the quick fix. I had been driving for a few days holding the door closed on right turns (left door) ...not fun....
One more shot of this, but from the side angle, the fit is perfect. I think with that whole piece covering a good portion of existing metal it's pretty strong. Hope this helps man. Total cost was 8 bucks for some sheet metal and those particular fasteners, oh and a 6 pack for my buddy the metal worker haha.
Last edited by Horton; 05-22-2013 at 06:03 PM. Reason: bad links
#6
05-23-2013, 01:29 AM
Thats a nice job Horton!
The salvage yard I went to had dozens of S Blazers and about half were either bad or had the piece cut out already,we got lucky as I stood on top of a junk and spotted a Blazer in the Pontiac section! I brought my generator to this yard as my sawzall is electric. Very few pull your own yards left that let you drive right in,however!
The salvage yard I went to had dozens of S Blazers and about half were either bad or had the piece cut out already,we got lucky as I stood on top of a junk and spotted a Blazer in the Pontiac section! I brought my generator to this yard as my sawzall is electric. Very few pull your own yards left that let you drive right in,however!
#7
05-23-2013, 09:21 AM
Are those screws a low-profile screw head? They look almost flush, in the picture.
Did you use any extra backing for the new screws to grab into, on the inside of the pillar?
Thanks for posting! Again, this is an awesome fix.
Last edited by WalkGood; 05-23-2013 at 09:26 AM. Reason: typo
#8
05-23-2013, 05:24 PM
No extra backing was used, the hinge piece has a backing in the pillar already, that was enough.
The screws we used were #10 flush head, self-drilling, sheet metal screws. The holes were counter-sunk in the plate before attaching to the pillar.

Thread
Thread Starter
Forum
Replies
Last Post
Ugly_Monkey
Paint, Body, & Interior
5
02-15-2009 09:56 PM