Hit Bump.. Fuel Pump dies. Fixed
#1
 09-23-2011, 10:34 AM


my own personal Fuel Pump saga.
Wife driving to work, drives over a pavement edge in resurfacing zone five hundred yards down road the truck starts acting up. Then it dies altogether.
It's fixed now.. This thread is going to be about what I encountered replacing the pump.
Including the need for patience against frustrating issues and how I screwed up; broke then fixed the front tank vent nipple, the RIGHT way.
And what to do when the pump lock ring and lock tabs are just a blob of rust.
I'm starting the thread as an incentive to finish it.. I took some {not very good} photos and these are the attachments as used to get them on site.
Last edited by pettyfog; 09-24-2011 at 01:31 PM.

#3
09-24-2011, 03:31 PM
First thing I did was verify the problem was the fuel pump. I couldn't hear it at key on but I couldn't remember hearing it anyway so the first thing after dropping the wife off at work was buy a Fuel Pressure gauge: $52 at O'Reilly's.
No reading at key on.
Checked Fuse ECM B 20A. 12v to grd both sides = good
Swapped FP relay with adjacent same p/n .. no result.
pulled relay out a little for access to pins
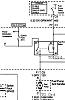
EDIT: Actually that wasnt necessary on my 99. Locate the FP relay. From over the fender, just to the left and next to the relay is a single set of contacts. That fuel pump test connector is the same as relay '87'.
With key off you can check resistance of the pump to ground. Should be 10 ohms or less. Turn key on - should be 12v for two seconds.
Click image to Enlarge
Jumped pin 30 to pin 85 BE CAREFUL.. make sketch minding that pins will be mirrored when base down. Might want to NOT do this.
- relay clicked, no fuel pressure.
Ohmmed out pin 87 to GRD. No continuity.. meaning FP not getting power or grd, open circuit somewhere.
Now was the moment of truth. Did I want to do it myself or pay a shop. Went home and checked local price of Delphi pump. $368. Argghhh.. Decided to do it myself, might be harness elect problem, at 106 Kmiles when I bought it, pump MIGHT have already been changed.
Called for flatbed {AWD must be carried, cant be towed} Had it in driveway in an hour $69
Bought pump on assurance I could return it if not installed.
Fuel gauge read tank was between 1/4 and half full. Disconnected Filter positioned both ends fuel line/filter over cleaned up 10 qt oil-drain bucket and got out shop vac, put on 'blow' thought I saw some dust come out so I checked vac filter.. nasty! Removed filter and left vac motor off tank, wrapped end of hose with shop rag and turned on with end in filler, wrapped rest of rags to form a seal. Many empties to gas can later decided that a few gallons wouldnt be a problem to handle. should have drained it all the way.
Put truck up on stands, back only and just enough room to move underneath.
Recalled another poster saying loosen front band halfway, then remove rear.
- note: found threads on front band real rusty and Pblaster plus wire brush necessary and still had probs. Could move nut a few threads at time and had to back up and brush again. Tried air impact wrench {home garage type} same thing.
- In old days, I'd have found another nut to fit and used small triangular file to cut cleaner-grooves in its threads. But I didnt... just moved nut up and down repeatedly. First step of building impatience index.
Finally halfway.. removed rear strap. Saw tank was being held in rear by filler and vent hoses. And that remaining gas was heavier than expected.
Also couldnt figure out how to get FP connector off without seeing it outright. As well as finding I couldnt move harness enough anyway for some reason.
Decided to drop tank all the way
Put some boxes under tank and went back to work on front strap nut.
Dropped the front of tank to box and went to work on rear. Had real probs getting large hose off tank, removed upper end instead, and lower end {couldn't get to upper clamp} of vent hose.
Now I HAD known about the FRONT TANK vent from reading another poster but in all the frustration of spending three hours and not having the tank on the ground yet, I didnt even look, and I kicked the front box out and the tank fell with the vent tubing attached and I saw gas dripping on the ground!
$%$$$%#@$@!!!!! Cracked the vent nipple
IIRC, the other guy had to find another tank! The front vent is not replaceable and it sonic welded into the tank. My brain went into problem solve mode and fortunately I'd had a similar problem with a dishwasher.
The answer would be to fix it with hobby brass tubing!
-more on the fix later. Suffice to say, DONT FORGET THE FRONT VENT..either disconnect it at the frame side or just cut the tubing at 1 inch from clamp.
I do suggest removing the filler hose at top, though. you'll get an idea of the ravages of rust in unexpected places and mitigate it somewhat.
It also made it easier to pour out the remainder of the gas.
At any rate,now I had the tank out, I saw the pump was the original. The lock ring was nothing but a cluster of rust. So another trip. Checked the parts stores, they dont have either the ACDelco {P/n TR 14} or the Dorman equiv.
To the dealer.. $26 for the ring
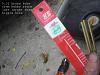
To the Hobby Lobby store 5/32" brass tube, package of three for $3.99.
- I'd checked the vent nipple ID with drill bits. 9/64 passed, 5/32 wouldnt, so 5/32" is what I wanted.

Click image to enlarge
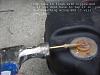
The first thing to do was test the stuff I wanted to use for crack sealer. I've never had much luck with epoxies on plastics, especially slick plastics that would flex, as this nipple surely would. The idea was to smear a thin layer of Plumber's Goop (TM) and let it dry while I was tending to removing the pump.
I cleaned an area on the vent valve and primed it with the standard purple plumbing primer. It's rated for PVC and ABS but I'd used it to remount mirrors with standard gel superglue and it seemed to work fine.
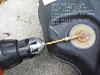
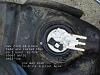
Then started on getting the fuel pump ring loose. The secret is to clear the rust out of the intersecting points of the ring and tabs that are molded into the tank. To do that I used an old screwdriver and hammer at a 45 deg angle. The caked rust will fall off as you tap it but it's tedious and you dont want to destroy the tabs. Once I could see the actual lines where the tabs come trough, I tapped firmly down on the ring next to tabs.
Then tapped the ring around until there was pressure on the plastic 'keeper' flip the keeper out and it's easy.
Now I got out my compressor and blew away all the rust and debris. Else use a shop vac or steel brush with vacuum cleaner.
- Dont be in a hurry here, lots easier to keep junk from getting in tank than get it back out.
Once the ring was loose the pump came out with little effort. A quick look inside the tank and I was pleased to see that other than a few flecks of rust, the inside was nearly immaculate. No need to clean it.
__________Sidenote: you can skip this___________
Cleaning a filthy tank is really frustrating so I'm borrowing from a post from TCCOA:
Filthy Gas Tank - TCCoA Forums
Rinse it really well
Actually a couple quarts of 91% isopropyl (rubbing) Alcohol should do it. When you get it home find a handful of clean old towels, Tap the tank on the ground to shake the water down to where you can reach it through the opening.
Wipe it out as far as you can reach and repeat tap-down several times. Then pour in half the alcohol and swish around as much as possible, trying to rinse top of tank, too.
Drain.
Tap down and wipe as above.
Pour rest of alcohol in and repeat.
If you want to you could set the tank in the sun a couple hours to get it dry, or use the shopvac on blow {suggest with clean filter} for a half an hour or so
____________________resume saga__________
I put the new pump and lock ring in immediately and started on the vent nipple fix.
I scratched the test spot and saw the Goop adhered pretty well. I put a few drops of gasoline on it and found it held up well, just got a little slick on the surface.
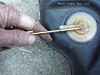
Then I marked the 5/32 bit for penetration and made one pass through the nipple, keeping the drill running as I withdrew it. Only took out a thin shaving.

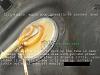
Click images to enlarge
I drilled the length of the passage but realized later it would have been better to stop just a little past the crack so the tubing would have sealed even better.
Then I primed and, while lifting nipple a little, sealed the area just around the crack using the Plumber's Goop.
I marked the 5/32 tubing for the full length of the nipple passage, cut and deburred then tapped it in till it was even with the end.

Click image to enlarge
Then I went back to the ring and installed several sheet metal screws due to the tabs being rusted thin.
- If you break off tabs, I'd use #10 x 3/4 sheet metal screws after drilling pilot holes.
Now it was time to address the wiring issues. Since I changed the pump anyway, all I cared about was that the wiring was sound from the underhood FP relay to the end of the harness (gray wire) and back through the ground (larger black wire). I uncovered and cut back the factory harness staggering the snips about 1.5 inches so that it would tape and go back into the loom better without huge lumps at the splices.
I stripped the gray and black FP power wires and twisted them together then went to the relay pin 87 and verified I had good continuity to ground.. well under 1 ohm.
I soldered the splices rather than use the crimp barrel connectors supplied. With the typical radio shack/harbor freight type tool, crimp barrel connections are not reliable over the long term.
-If I had not soldered them I would have used yellow or blue twist connectors filled with silicon lube. The lube is to keep moisture, thus corrosion out. I suggest you do the same, if it passes a tug test it's a far more reliable connection.
- If you solder make sure the solder joint is shiny and there are no sharp tags to pierce adjacent wires.
Taped individual splices then taped all the harness wires together and worked them back into the loom.
------ more to come-----
No reading at key on.
Checked Fuse ECM B 20A. 12v to grd both sides = good
Swapped FP relay with adjacent same p/n .. no result.
pulled relay out a little for access to pins
EDIT: Actually that wasnt necessary on my 99. Locate the FP relay. From over the fender, just to the left and next to the relay is a single set of contacts. That fuel pump test connector is the same as relay '87'.
With key off you can check resistance of the pump to ground. Should be 10 ohms or less. Turn key on - should be 12v for two seconds.
Click image to Enlarge
- relay clicked, no fuel pressure.
Ohmmed out pin 87 to GRD. No continuity.. meaning FP not getting power or grd, open circuit somewhere.
Now was the moment of truth. Did I want to do it myself or pay a shop. Went home and checked local price of Delphi pump. $368. Argghhh.. Decided to do it myself, might be harness elect problem, at 106 Kmiles when I bought it, pump MIGHT have already been changed.
Called for flatbed {AWD must be carried, cant be towed} Had it in driveway in an hour $69
Bought pump on assurance I could return it if not installed.
Fuel gauge read tank was between 1/4 and half full. Disconnected Filter positioned both ends fuel line/filter over cleaned up 10 qt oil-drain bucket and got out shop vac, put on 'blow' thought I saw some dust come out so I checked vac filter.. nasty! Removed filter and left vac motor off tank, wrapped end of hose with shop rag and turned on with end in filler, wrapped rest of rags to form a seal. Many empties to gas can later decided that a few gallons wouldnt be a problem to handle. should have drained it all the way.
Put truck up on stands, back only and just enough room to move underneath.
Recalled another poster saying loosen front band halfway, then remove rear.
- note: found threads on front band real rusty and Pblaster plus wire brush necessary and still had probs. Could move nut a few threads at time and had to back up and brush again. Tried air impact wrench {home garage type} same thing.
- In old days, I'd have found another nut to fit and used small triangular file to cut cleaner-grooves in its threads. But I didnt... just moved nut up and down repeatedly. First step of building impatience index.
Finally halfway.. removed rear strap. Saw tank was being held in rear by filler and vent hoses. And that remaining gas was heavier than expected.
Also couldnt figure out how to get FP connector off without seeing it outright. As well as finding I couldnt move harness enough anyway for some reason.
Decided to drop tank all the way
Put some boxes under tank and went back to work on front strap nut.
Dropped the front of tank to box and went to work on rear. Had real probs getting large hose off tank, removed upper end instead, and lower end {couldn't get to upper clamp} of vent hose.
Now I HAD known about the FRONT TANK vent from reading another poster but in all the frustration of spending three hours and not having the tank on the ground yet, I didnt even look, and I kicked the front box out and the tank fell with the vent tubing attached and I saw gas dripping on the ground!
$%$$$%#@$@!!!!! Cracked the vent nipple
IIRC, the other guy had to find another tank! The front vent is not replaceable and it sonic welded into the tank. My brain went into problem solve mode and fortunately I'd had a similar problem with a dishwasher.
The answer would be to fix it with hobby brass tubing!
-more on the fix later. Suffice to say, DONT FORGET THE FRONT VENT..either disconnect it at the frame side or just cut the tubing at 1 inch from clamp.
I do suggest removing the filler hose at top, though. you'll get an idea of the ravages of rust in unexpected places and mitigate it somewhat.
It also made it easier to pour out the remainder of the gas.
At any rate,now I had the tank out, I saw the pump was the original. The lock ring was nothing but a cluster of rust. So another trip. Checked the parts stores, they dont have either the ACDelco {P/n TR 14} or the Dorman equiv.
To the dealer.. $26 for the ring
To the Hobby Lobby store 5/32" brass tube, package of three for $3.99.
- I'd checked the vent nipple ID with drill bits. 9/64 passed, 5/32 wouldnt, so 5/32" is what I wanted.
Click image to enlarge
I cleaned an area on the vent valve and primed it with the standard purple plumbing primer. It's rated for PVC and ABS but I'd used it to remount mirrors with standard gel superglue and it seemed to work fine.
Then started on getting the fuel pump ring loose. The secret is to clear the rust out of the intersecting points of the ring and tabs that are molded into the tank. To do that I used an old screwdriver and hammer at a 45 deg angle. The caked rust will fall off as you tap it but it's tedious and you dont want to destroy the tabs. Once I could see the actual lines where the tabs come trough, I tapped firmly down on the ring next to tabs.
Then tapped the ring around until there was pressure on the plastic 'keeper' flip the keeper out and it's easy.
Now I got out my compressor and blew away all the rust and debris. Else use a shop vac or steel brush with vacuum cleaner.
- Dont be in a hurry here, lots easier to keep junk from getting in tank than get it back out.
Once the ring was loose the pump came out with little effort. A quick look inside the tank and I was pleased to see that other than a few flecks of rust, the inside was nearly immaculate. No need to clean it.
__________Sidenote: you can skip this___________
Cleaning a filthy tank is really frustrating so I'm borrowing from a post from TCCOA:
Filthy Gas Tank - TCCoA Forums
On the way home stop at the pharmacy and buy a gallon or two of alcohol (91% if possible).
...
RwP
...
RwP
Wipe it out as far as you can reach and repeat tap-down several times. Then pour in half the alcohol and swish around as much as possible, trying to rinse top of tank, too.
Drain.
Tap down and wipe as above.
Pour rest of alcohol in and repeat.
If you want to you could set the tank in the sun a couple hours to get it dry, or use the shopvac on blow {suggest with clean filter} for a half an hour or so
____________________resume saga__________
I put the new pump and lock ring in immediately and started on the vent nipple fix.
I scratched the test spot and saw the Goop adhered pretty well. I put a few drops of gasoline on it and found it held up well, just got a little slick on the surface.
Then I marked the 5/32 bit for penetration and made one pass through the nipple, keeping the drill running as I withdrew it. Only took out a thin shaving.
Click images to enlarge
I drilled the length of the passage but realized later it would have been better to stop just a little past the crack so the tubing would have sealed even better.
Then I primed and, while lifting nipple a little, sealed the area just around the crack using the Plumber's Goop.
I marked the 5/32 tubing for the full length of the nipple passage, cut and deburred then tapped it in till it was even with the end.
Click image to enlarge
- If you break off tabs, I'd use #10 x 3/4 sheet metal screws after drilling pilot holes.
Now it was time to address the wiring issues. Since I changed the pump anyway, all I cared about was that the wiring was sound from the underhood FP relay to the end of the harness (gray wire) and back through the ground (larger black wire). I uncovered and cut back the factory harness staggering the snips about 1.5 inches so that it would tape and go back into the loom better without huge lumps at the splices.
I stripped the gray and black FP power wires and twisted them together then went to the relay pin 87 and verified I had good continuity to ground.. well under 1 ohm.
I soldered the splices rather than use the crimp barrel connectors supplied. With the typical radio shack/harbor freight type tool, crimp barrel connections are not reliable over the long term.
-If I had not soldered them I would have used yellow or blue twist connectors filled with silicon lube. The lube is to keep moisture, thus corrosion out. I suggest you do the same, if it passes a tug test it's a far more reliable connection.
- If you solder make sure the solder joint is shiny and there are no sharp tags to pierce adjacent wires.
Taped individual splices then taped all the harness wires together and worked them back into the loom.
------ more to come-----
Last edited by pettyfog; 04-20-2012 at 08:02 AM.
#4
09-29-2011, 11:36 AM
Finally... I attached the front vent tube to the vent nipple and used care while installing the tank to not stress it. I did that because I was installing the front band first and wouldnt be able to get at the nipple easily.
Summary:
And the expected one in the Bravada. I did my homework before I even bought the car.
The 4.3L fuel system was designed for peak economy both to produce {cheap} and to drive the first 100k miles.
It operates at nominal 60 lb pressure. Higher the pressure the better the atomization thus fuel economy.
Reliable Bosch injection systems operate at about 40 lbs pressure. and that's what almost all in-tank pumps are designed for.
GM primary suppliers Delphi {the OEM} and AC Delco understand the need for extra mfg precision. Wells/Airtex knows but long as their pumps last a year they dont GAF!
- Not only that but the 4.3L system is one of few EFI's subject to vapor lock because of the lack of fuel rail and use of in-plenum tubes. That's why leakdown rate is very important. Thus NEEDS a GOOD pump check valve to keep the fuel in plenum from vaporizing.
In Fords, if it holds pressure a few seconds, that's good enough and no one ever notices a bad check valve, it's just an extra second or so of crank time.
Non-brand pumps are simply Chinese knockoffs and they will work for limited time in just about anything.
Warranty doesnt mean diddly when it comes to generic brand pumps, becuase there's always the improper use/installation get out clause. And a little research reveals that in high labor time DIY's most dont apply for the warranty anyway. They just want it behind them.
Final note: Dropping the tank is a supreme PITA. I thought the TBird was bad because the exhaust has to be removed first, but the Blazer is worse because of the clearance and access issues
IOW, you do not want to do it again soon.. especially with winter coming on.
Good Luck to all who read this, hope it helps.
BTW, if I had to do it again, I'd buy one of those Delco rebuild kits.. but THEN I'd have been pissed because the specific fail was in the connector.
Summary:
Why I expected to have to do this job and why I bit the bullet and bought the expensive pump
I hadnt changed a FP in 15 years of driving hi-mile fords for over est 300kmiles. Then did two in two months .. one in Tbird got noisy. That was sort of a surprise.. Got almost 300kmile out of prev bird, with nary a peep from the OE WalbroAnd the expected one in the Bravada. I did my homework before I even bought the car.
The 4.3L fuel system was designed for peak economy both to produce {cheap} and to drive the first 100k miles.
It operates at nominal 60 lb pressure. Higher the pressure the better the atomization thus fuel economy.
Reliable Bosch injection systems operate at about 40 lbs pressure. and that's what almost all in-tank pumps are designed for.
GM primary suppliers Delphi {the OEM} and AC Delco understand the need for extra mfg precision. Wells/Airtex knows but long as their pumps last a year they dont GAF!
- Not only that but the 4.3L system is one of few EFI's subject to vapor lock because of the lack of fuel rail and use of in-plenum tubes. That's why leakdown rate is very important. Thus NEEDS a GOOD pump check valve to keep the fuel in plenum from vaporizing.
In Fords, if it holds pressure a few seconds, that's good enough and no one ever notices a bad check valve, it's just an extra second or so of crank time.
Non-brand pumps are simply Chinese knockoffs and they will work for limited time in just about anything.
Warranty doesnt mean diddly when it comes to generic brand pumps, becuase there's always the improper use/installation get out clause. And a little research reveals that in high labor time DIY's most dont apply for the warranty anyway. They just want it behind them.
Final note: Dropping the tank is a supreme PITA. I thought the TBird was bad because the exhaust has to be removed first, but the Blazer is worse because of the clearance and access issues
IOW, you do not want to do it again soon.. especially with winter coming on.
Good Luck to all who read this, hope it helps.
BTW, if I had to do it again, I'd buy one of those Delco rebuild kits.. but THEN I'd have been pissed because the specific fail was in the connector.

Thread
Thread Starter
Forum
Replies
Last Post
Poligono
2nd Generation S-series (1995-2005) Tech
5
11-03-2008 06:01 PM
sindy1232
2nd Generation S-series (1995-2005) Tech
4
08-22-2008 09:38 AM

