rear hatch would not open


#72
 10-13-2013, 03:20 PM

I recently joined this site in hopes of finding out how to fix my hatch/tailgate on my 95 Blazer LT. The ole gal has about 118,000 on her. You know, just getting broke in! Actually I am the third owner so it is a little rough in some ways and she does use a little oil, thru the 4.6 liter. V6 Vortec engine.
The pictures for the fix for the tailgate have been removed at the beginning of this thread and the answers for fixes seem to be all over the place with slightly different models and years. So I was unable to determine exactly how to get the glass open from this thread.
I had just been into the back of my Blazer the day before but, today when I hit the button I hear the actuator move but the glass hatch never popped open.
Puzzled I hit the key fob a couple of more time but still the glass never pops! I went to the dash and hit the button, same results, I tried the key in the back lock and I hear the actuator move again but, no release on the hatch still!
Note, if your actuator has gone out. You will hear nothing when you hit the button on the key fob, the dash button, or when you try the key in the hatch lock.
If you can hear the actuator when you try these methods to open the glass hatch but, the glass hatch still does not release. Then the problem is most likely the plastic part that goes from the actuator to the hatch release has broken as you will see a little later!
Just below the plastic part of the interior trim panel about midway feel the carpet directly under that trim panel. You will feel and indentation about 1� long and about a �� wide. I stuck an old steak knife through carpet and if you push to the left or passenger side it will release the glass just as if the actuator had been triggered. This only works if your actuator has gone out!

This is a picture taken after the inside trim has been completely removed and this is the arm you will feel with the steak knife and it will trigger the release if your actuator has gone out!

If the problem is the broken plastic piece that goes from the actuator to the release, this action will not help you.
You will hear the actuator kick because you have just caused it too trigger but, the rear glass hatch still will still not open.
I thought if I lifted the latch from the inside and haunched on the tailgate maybe, just maybe it would give enough to release the glass. Wrong the very first thing I did was pull the inside latch off through the handle! You got to love plastic.
Here is the handle as well as piece of sheet metal I formed into a slight L shaped bracket, too act as a fender washer for the screws I ripped through the latch when I haunched on it. This L shaped bracket will allow me to reinstall the damaged inside latch handle back on later.
I even painted the sheet metal piece black to make it not stand out!
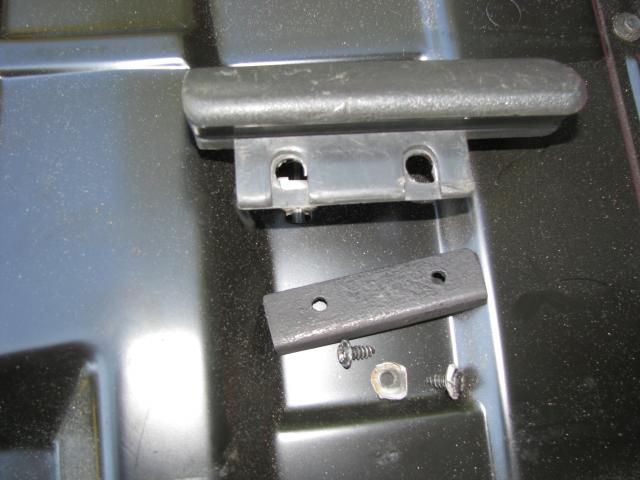
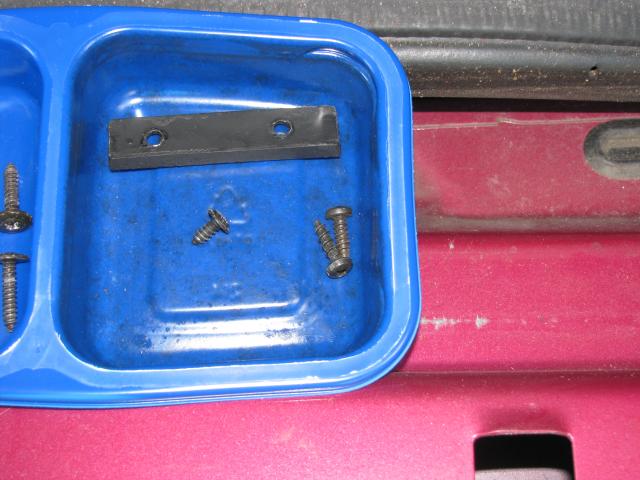
I also had to locate a couple of longer screws when I reassembled the latch to accommodate the extra thickness of the new sheet metal/fender washer because the original ones are now too short, pictured here!
So here are the steps to do this jib without damage!
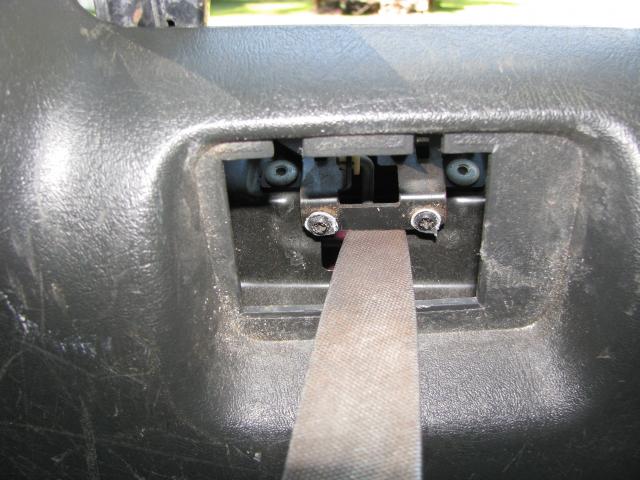
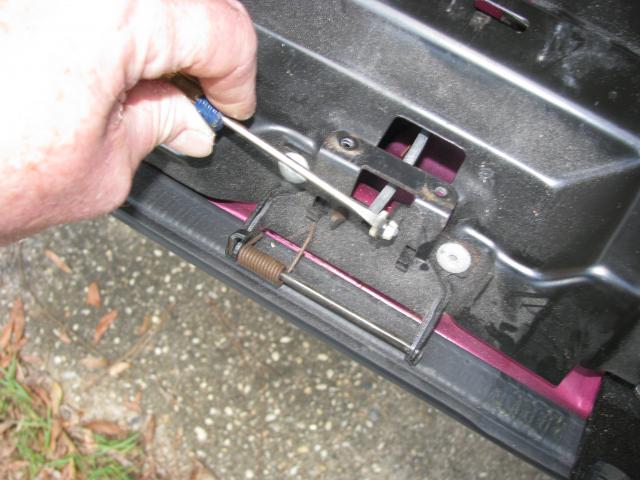
1st step Lift up on the inside latch as if you were opening the tailgate and carefully remove the two screws underneath it that hold it on!

Note, You will see these two screws in this picture, this is after I already broke the inside latch as you can see where the screws pulled through the latch handle!
You will have to hold under the latch to be able to remove these screws completely; otherwise it will rotate downward as the screws come out! A flat bar or in this case I used an old file underneath the latch. This will hold catch the lifting bracket the inside handle mounts too, and hold it up while you completely remove those two screws!
2nd step Pull firmly but do not ****** too hard on the center of the plastic trim panel. The upper compression clips that hold the trim panel on will release enough to let you bow out the center of the trim panel without damage. Here is a picture of the compression clips that are at the top and in the middle of the panel!
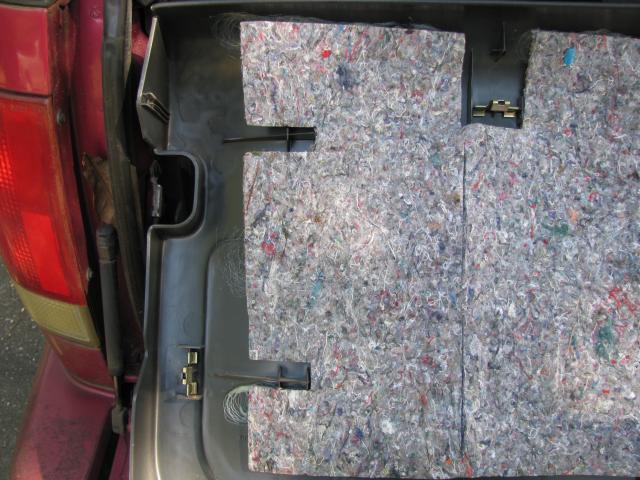
I then wedged this old sandpaper block in it too give me room to work. This is looking down from the top of the tailgate and the sandpaper block I refer to is the object is the black object in the upper left hand corner of the picture!
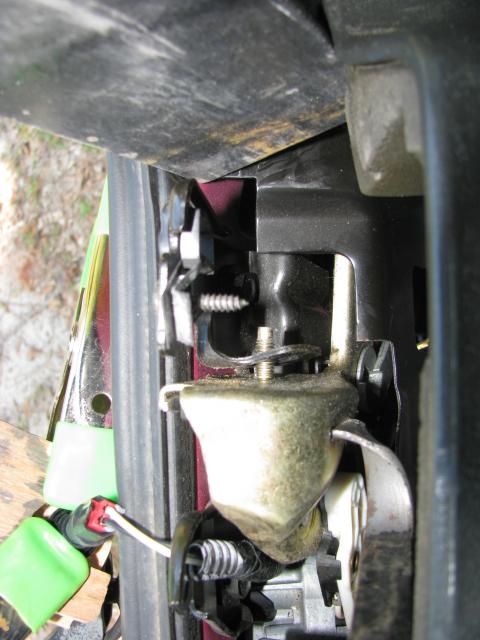
Now I still had to release the glass and try as I may I couldn�t see how that lock released. I couldn�t get my finger or a screwdriver down in there and make the glass release.
I even removed the nut from the bolt on the side of the lock thinking maybe it would allow enough slack in the lock to open the glass.
Note, this is how you adjust the back glass closure and I will re-address this later on! This bolt can be seen in this same picture. It is the bolt pointing up in this picture that goes trough the black bracket with no nut on it!
Then I noticed there is a small slot in the back of the piece of metal that covers the lock. Seeing no good reason why they would have put that slot in there I decided that it must be the release for the glass. It is how you access the release for the glass! You can see the slot best in this picture that was take after the glass had been opened and tailgate dropped and the trim panel totally removed!

3rd step I made the tool you see sticking out of that slot. It is just a piece of flat bar, about 3/8" wide and bent into an L shape and I then had to thin the end that is inserted into the lock as this slot is pretty thin. Slide the tool into the slot and pull back towards you, this action will lift the lock�s release and the glass hatch will then open!
Once the glass is open using the flat bar or file. Pushing down on the file, raises the latch and releases the tailgate, and it will drop into the open position!
4th step Once the tailgate is down you can take out the block you had in the center of the trim piece and relive some of that pressure.
There are two screws, one at each end of the top part of the trim panel on the outside edge, remove those screws. As seen in this picture below.
Then gently pull upward on the rear panel and the compression clips in the middle of the panel will release.
There are plastic L clips made into the bottom of the inside trim panel that slide into the bottom of the tailgate from the bottom of the trim panel, as seen in picture below. Slide the panel upwards, as if you were sliding the whole panel towards the top edge of the tailgate to unlock those bottom L clips and finish removing the panel from the tailgate.

Then you can see the inner workings of the tailgate. There are about a dozen screws around the perimeter of the inside panel. Remove those screws as seen in the picture below.

Release the tailgate lift rod from its plastic bushing by pushing it sideways carefully so as not to break the plastic bushing. It is the silver looking rod coming up from the top of the picture and then it turns right, through the plastic bushing!
Note, Do not forget to slide this rod back into the bushing when reassembling or the tailgate release will not work after assembly.
After removing the screws around the perimeter of the inner panel it will allow you to remove the entire inside panel.
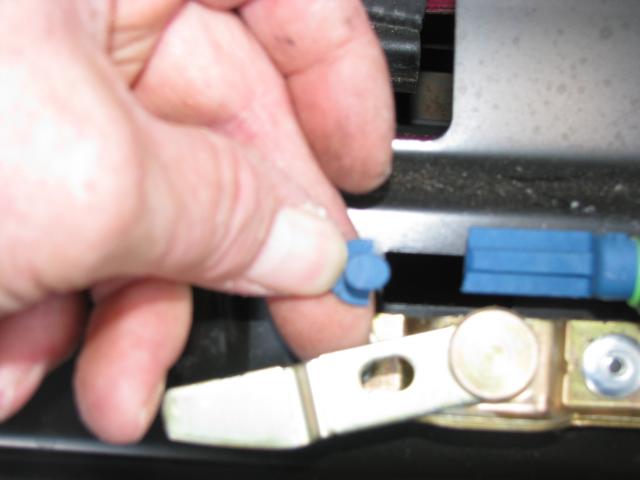
There are plastic guides on both sides for the lock release of the tailgate itself. Pushing downward gently on the rods going to the lock release will pop those rods out of the guides. You will see my finger under the rod and the guide is just too the left of my finger.

Note, When you get ready to put the inner panel back lay the panel back in and hand start all those dozen screws. Then you can reach through the holes and pop those rods back into the guides, before you tighten the screws back again.
If your actuator is still working when you get into the inner workings of the tailgate, then all you have to do is fix or replace the plastic piece, shown in picture below.
Some that have done this repair, by drilling the remaining piece and then wiring it the hole in the release. One said he drilled the part still on the actuator and used a zip tie to tie it too tie it to the release.
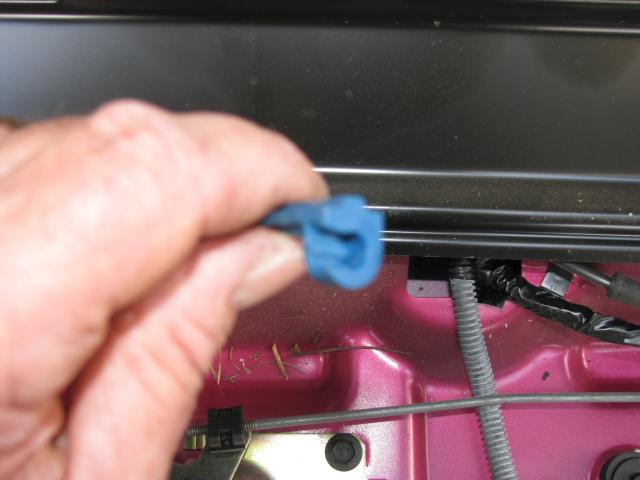
I choose too remove the part still on the actuator. It has a slot in it as seen in this photo and just slide off of the actuator!
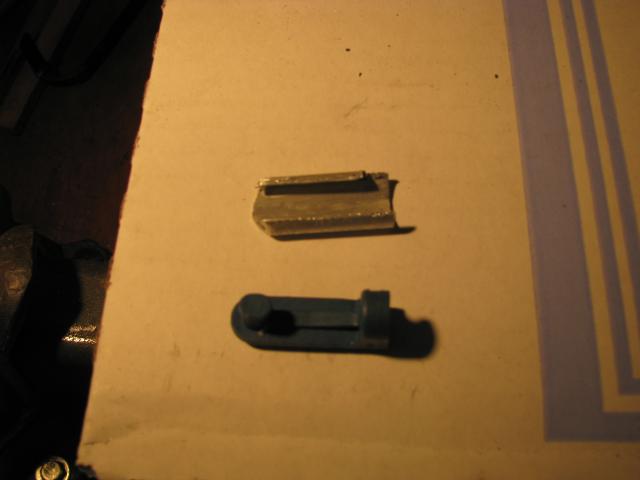
I then super glued the broken plastic piece back together. Not wanting to trust only the superglue I made a clip out of aluminum that slides over the whole plastic piece and then back filled the clip with JB weld.
Note, Nowadays they even have an aftermarket replacement plastic piece available, from what I have seen in this thread for about $8.00+ dollars. I can�t say that for sure as I never even checked on the part at the local parts supply stores!
If you have to replace your actuator because it has gone bad, then you can now replace the actuator for around $80.00 according to this thread and it comes with the plastic piece!
Since I chose to re-build the plastic piece. Once the JB weld had set up I used to bond the aluminum clip to the plastic piece for extra strength, I re-installed it.
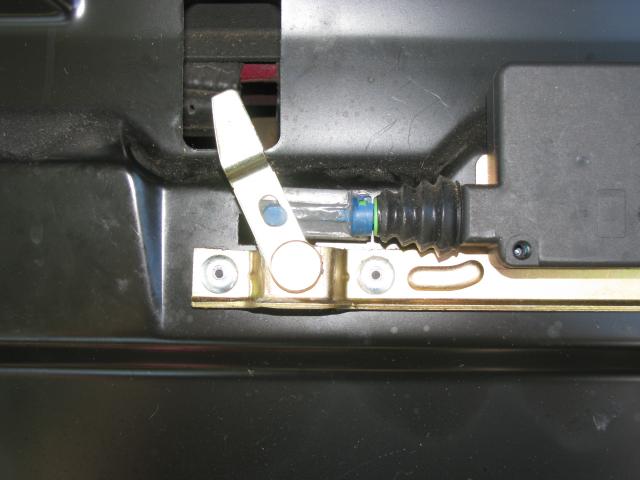
Here is picture of the repaired piece back in place!
Note, for the time it took to make the aluminum clip and wait for the JB weld too dry it would have been worth the $8.00 or so to buy the replacement clip. Sometimes it doesn�t pay too be cheap!
5th step Now it is basically replace the parts in the reverse order and check for alignment on the lock and you are good to go, for another 100,000 miles!
Make sure when you replace the inside trim panel for the tailgate that you slide those plastic clips downward into their slots on the bottom of the panel before you start trying to lock the compression clips back or you will break those plastic clips at the bottom of the panel off!
Note, once all back together the glass would not close tight enough too shut off the light switch in the tailgate, and therefore the inside light for the hatch wanted to stay on.
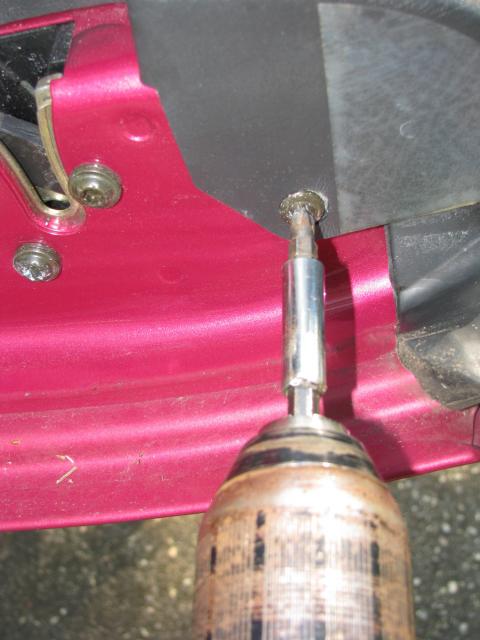
That bolt I had originally loosened in hopes of opening the glass now had allowed the latch for the glass to get out of alignment. The bolt is pictured in this photo. It is that brass looking bolt protruding to the left through the black bracket, with no nut on it!
I had to drop the tailgate back down, then remove the two screws in each end of the top of the trim piece, to get back into the nut to re-adjust the catch for the glass hatch to close properly!
Then popping open the compression clips at the top of trim piece in the center again to allow access back to the adjsutment nut again.
By loosening the nut and pushing inward towards the inside of the Blazer, on the lock and holding while tightening down the nut. This will re-adjust the lock that catches the glass hatch, making it close tighter.
This adjustment is somewhat critical. As I had to be re-loosen it one more time!
The glass was now closing too tight after the first adjustment and you really had to slam the glass to make the lock catch.
So a little movement one way or another here is critical to getting a properly closing glass hatch!
This was a lot of work to get all these photos and info uploaded correctly. I have tried to explain this as plainly as possible and I hope the pictures are good enough to show what I am talking about.
So in short I hope this info and the pictures help someone do this job the easy way! However feel free to ask if I have left out something or did not make it clear how to do a step. It is a relatively easy fix when you know how to go about it. Probably can be done in 30 minuted or less with the right tools and having the parts on hand, when you start!!!
Now my Blazer and me both are HAPPY, HAPPY, HAPPY as Phil Robertson would say!!!!!!!!!

The pictures for the fix for the tailgate have been removed at the beginning of this thread and the answers for fixes seem to be all over the place with slightly different models and years. So I was unable to determine exactly how to get the glass open from this thread.
I had just been into the back of my Blazer the day before but, today when I hit the button I hear the actuator move but the glass hatch never popped open.
Puzzled I hit the key fob a couple of more time but still the glass never pops! I went to the dash and hit the button, same results, I tried the key in the back lock and I hear the actuator move again but, no release on the hatch still!
Note, if your actuator has gone out. You will hear nothing when you hit the button on the key fob, the dash button, or when you try the key in the hatch lock.
If you can hear the actuator when you try these methods to open the glass hatch but, the glass hatch still does not release. Then the problem is most likely the plastic part that goes from the actuator to the hatch release has broken as you will see a little later!
Just below the plastic part of the interior trim panel about midway feel the carpet directly under that trim panel. You will feel and indentation about 1� long and about a �� wide. I stuck an old steak knife through carpet and if you push to the left or passenger side it will release the glass just as if the actuator had been triggered. This only works if your actuator has gone out!
This is a picture taken after the inside trim has been completely removed and this is the arm you will feel with the steak knife and it will trigger the release if your actuator has gone out!
If the problem is the broken plastic piece that goes from the actuator to the release, this action will not help you.
You will hear the actuator kick because you have just caused it too trigger but, the rear glass hatch still will still not open.
I thought if I lifted the latch from the inside and haunched on the tailgate maybe, just maybe it would give enough to release the glass. Wrong the very first thing I did was pull the inside latch off through the handle! You got to love plastic.
Here is the handle as well as piece of sheet metal I formed into a slight L shaped bracket, too act as a fender washer for the screws I ripped through the latch when I haunched on it. This L shaped bracket will allow me to reinstall the damaged inside latch handle back on later.
I even painted the sheet metal piece black to make it not stand out!
I also had to locate a couple of longer screws when I reassembled the latch to accommodate the extra thickness of the new sheet metal/fender washer because the original ones are now too short, pictured here!
So here are the steps to do this jib without damage!
1st step Lift up on the inside latch as if you were opening the tailgate and carefully remove the two screws underneath it that hold it on!
Note, You will see these two screws in this picture, this is after I already broke the inside latch as you can see where the screws pulled through the latch handle!
You will have to hold under the latch to be able to remove these screws completely; otherwise it will rotate downward as the screws come out! A flat bar or in this case I used an old file underneath the latch. This will hold catch the lifting bracket the inside handle mounts too, and hold it up while you completely remove those two screws!
2nd step Pull firmly but do not ****** too hard on the center of the plastic trim panel. The upper compression clips that hold the trim panel on will release enough to let you bow out the center of the trim panel without damage. Here is a picture of the compression clips that are at the top and in the middle of the panel!
I then wedged this old sandpaper block in it too give me room to work. This is looking down from the top of the tailgate and the sandpaper block I refer to is the object is the black object in the upper left hand corner of the picture!
Now I still had to release the glass and try as I may I couldn�t see how that lock released. I couldn�t get my finger or a screwdriver down in there and make the glass release.
I even removed the nut from the bolt on the side of the lock thinking maybe it would allow enough slack in the lock to open the glass.
Note, this is how you adjust the back glass closure and I will re-address this later on! This bolt can be seen in this same picture. It is the bolt pointing up in this picture that goes trough the black bracket with no nut on it!
Then I noticed there is a small slot in the back of the piece of metal that covers the lock. Seeing no good reason why they would have put that slot in there I decided that it must be the release for the glass. It is how you access the release for the glass! You can see the slot best in this picture that was take after the glass had been opened and tailgate dropped and the trim panel totally removed!
3rd step I made the tool you see sticking out of that slot. It is just a piece of flat bar, about 3/8" wide and bent into an L shape and I then had to thin the end that is inserted into the lock as this slot is pretty thin. Slide the tool into the slot and pull back towards you, this action will lift the lock�s release and the glass hatch will then open!
Once the glass is open using the flat bar or file. Pushing down on the file, raises the latch and releases the tailgate, and it will drop into the open position!
4th step Once the tailgate is down you can take out the block you had in the center of the trim piece and relive some of that pressure.
There are two screws, one at each end of the top part of the trim panel on the outside edge, remove those screws. As seen in this picture below.
Then gently pull upward on the rear panel and the compression clips in the middle of the panel will release.
There are plastic L clips made into the bottom of the inside trim panel that slide into the bottom of the tailgate from the bottom of the trim panel, as seen in picture below. Slide the panel upwards, as if you were sliding the whole panel towards the top edge of the tailgate to unlock those bottom L clips and finish removing the panel from the tailgate.
Then you can see the inner workings of the tailgate. There are about a dozen screws around the perimeter of the inside panel. Remove those screws as seen in the picture below.
Release the tailgate lift rod from its plastic bushing by pushing it sideways carefully so as not to break the plastic bushing. It is the silver looking rod coming up from the top of the picture and then it turns right, through the plastic bushing!
Note, Do not forget to slide this rod back into the bushing when reassembling or the tailgate release will not work after assembly.
After removing the screws around the perimeter of the inner panel it will allow you to remove the entire inside panel.
There are plastic guides on both sides for the lock release of the tailgate itself. Pushing downward gently on the rods going to the lock release will pop those rods out of the guides. You will see my finger under the rod and the guide is just too the left of my finger.
Note, When you get ready to put the inner panel back lay the panel back in and hand start all those dozen screws. Then you can reach through the holes and pop those rods back into the guides, before you tighten the screws back again.
If your actuator is still working when you get into the inner workings of the tailgate, then all you have to do is fix or replace the plastic piece, shown in picture below.
Some that have done this repair, by drilling the remaining piece and then wiring it the hole in the release. One said he drilled the part still on the actuator and used a zip tie to tie it too tie it to the release.
I choose too remove the part still on the actuator. It has a slot in it as seen in this photo and just slide off of the actuator!
I then super glued the broken plastic piece back together. Not wanting to trust only the superglue I made a clip out of aluminum that slides over the whole plastic piece and then back filled the clip with JB weld.
Note, Nowadays they even have an aftermarket replacement plastic piece available, from what I have seen in this thread for about $8.00+ dollars. I can�t say that for sure as I never even checked on the part at the local parts supply stores!
If you have to replace your actuator because it has gone bad, then you can now replace the actuator for around $80.00 according to this thread and it comes with the plastic piece!
Since I chose to re-build the plastic piece. Once the JB weld had set up I used to bond the aluminum clip to the plastic piece for extra strength, I re-installed it.
Here is picture of the repaired piece back in place!
Note, for the time it took to make the aluminum clip and wait for the JB weld too dry it would have been worth the $8.00 or so to buy the replacement clip. Sometimes it doesn�t pay too be cheap!
5th step Now it is basically replace the parts in the reverse order and check for alignment on the lock and you are good to go, for another 100,000 miles!
Make sure when you replace the inside trim panel for the tailgate that you slide those plastic clips downward into their slots on the bottom of the panel before you start trying to lock the compression clips back or you will break those plastic clips at the bottom of the panel off!
Note, once all back together the glass would not close tight enough too shut off the light switch in the tailgate, and therefore the inside light for the hatch wanted to stay on.
That bolt I had originally loosened in hopes of opening the glass now had allowed the latch for the glass to get out of alignment. The bolt is pictured in this photo. It is that brass looking bolt protruding to the left through the black bracket, with no nut on it!
I had to drop the tailgate back down, then remove the two screws in each end of the top of the trim piece, to get back into the nut to re-adjust the catch for the glass hatch to close properly!
Then popping open the compression clips at the top of trim piece in the center again to allow access back to the adjsutment nut again.
By loosening the nut and pushing inward towards the inside of the Blazer, on the lock and holding while tightening down the nut. This will re-adjust the lock that catches the glass hatch, making it close tighter.
This adjustment is somewhat critical. As I had to be re-loosen it one more time!
The glass was now closing too tight after the first adjustment and you really had to slam the glass to make the lock catch.
So a little movement one way or another here is critical to getting a properly closing glass hatch!
This was a lot of work to get all these photos and info uploaded correctly. I have tried to explain this as plainly as possible and I hope the pictures are good enough to show what I am talking about.
So in short I hope this info and the pictures help someone do this job the easy way! However feel free to ask if I have left out something or did not make it clear how to do a step. It is a relatively easy fix when you know how to go about it. Probably can be done in 30 minuted or less with the right tools and having the parts on hand, when you start!!!
Now my Blazer and me both are HAPPY, HAPPY, HAPPY as Phil Robertson would say!!!!!!!!!
Last edited by C Craft; 10-13-2013 at 03:30 PM.
#73
01-14-2020, 06:04 PM


Thread
Thread Starter
Forum
Replies
Last Post
jakegaisser
1st Generation S-series (1983-1994) Tech
4
06-08-2012 02:46 PM
kdavenport316
2nd Generation S-series (1995-2005) Tech
1
11-23-2007 06:17 AM