Road Warrior Build (Sort of)
#1
 04-21-2015, 09:10 PM


Road Warrior is a 2001 GMC Jimmy SLE. This is my first and only car and I love it. Bought back in the summer of 2010 with 58,000 on the clock, she now has over 90,000, most of which are going back and forth to and from college.
I've seen a number of builds on this site and love reading them to see what others like doing to their vehicles. I've done a few things here and there but nothing crazy.
My ultimate goal is to maintain my Jimmy for a long time. I don't have any intentions of making this a lifted truck or anything like that. Mainly comfortable and keep it looking clean.
So quick story on the name.
My "claim to fame" is always being road trip ready at a drop of the hat. Mainly for the intention of bailing people out or just going to have a bit of fun. On top of that I love taking road trips, and while a Jimmy isn't the most fuel efficient machine in the world, its a very comfortable ride, with room to bring stuff along without much worry of what the weather might do along the way.
Now "Road Warrior" earned the name in 2012 in December. Just before Christmas there was a massive blizzard that moved through the area and I along with two others were looking to get home. While most others were cancelling plans to head to their various homes, I loaded up and packed the others in because I had to be downstate the next day for family reasons. Over the next 13 and a half hours we punched through some crazy snow and eventually made it home. At which point my car has been known as the Road Warrior because there is very little that keeps it off the road.
So here she is about a day or so after I brought her home.


I will follow this up with some of the things I've done up to this point over the next few day
I've seen a number of builds on this site and love reading them to see what others like doing to their vehicles. I've done a few things here and there but nothing crazy.
My ultimate goal is to maintain my Jimmy for a long time. I don't have any intentions of making this a lifted truck or anything like that. Mainly comfortable and keep it looking clean.
So quick story on the name.
My "claim to fame" is always being road trip ready at a drop of the hat. Mainly for the intention of bailing people out or just going to have a bit of fun. On top of that I love taking road trips, and while a Jimmy isn't the most fuel efficient machine in the world, its a very comfortable ride, with room to bring stuff along without much worry of what the weather might do along the way.
Now "Road Warrior" earned the name in 2012 in December. Just before Christmas there was a massive blizzard that moved through the area and I along with two others were looking to get home. While most others were cancelling plans to head to their various homes, I loaded up and packed the others in because I had to be downstate the next day for family reasons. Over the next 13 and a half hours we punched through some crazy snow and eventually made it home. At which point my car has been known as the Road Warrior because there is very little that keeps it off the road.
So here she is about a day or so after I brought her home.
I will follow this up with some of the things I've done up to this point over the next few day
#2
04-21-2015, 09:44 PM
So things that I've got done on Road Warrior:
-Replaced the Parking Break peddal assembly when the ratchet broke.
-Unhooked the lights in the sun visors when the covers broke off

-Replaced the rear wiper when it failed


-Converted radio to double din and added a rear-view camera


That's what is done so far!
-Replaced the Parking Break peddal assembly when the ratchet broke.
-Unhooked the lights in the sun visors when the covers broke off
-Replaced the rear wiper when it failed


-Converted radio to double din and added a rear-view camera
That's what is done so far!
#4
04-22-2015, 05:09 PM
#5
04-22-2015, 05:31 PM
So my to do list as it stands in no particular order:
-Replace the grill insert after it received damage this past winter from a chunk of flying freeway. In addition it had a few cracked plastic fins when I bought the car. I may also go with an aluminum grill, but based on a limited budget and wanting to do it right, that may have to wait. Currently the hole is filled with expanding foam (hard to see in the picture) to prevent the trim from whistling


-Replace the headlight housings. They've started clouding over, and originally I was going to clean them up but this past winter while working on the car, I ended up cracking the back of the housing on the driver side and now the fog light is duct taped in. So if I'm going to replace that one, I'll replace the other one too. Might remove the amber reflector in it as well.
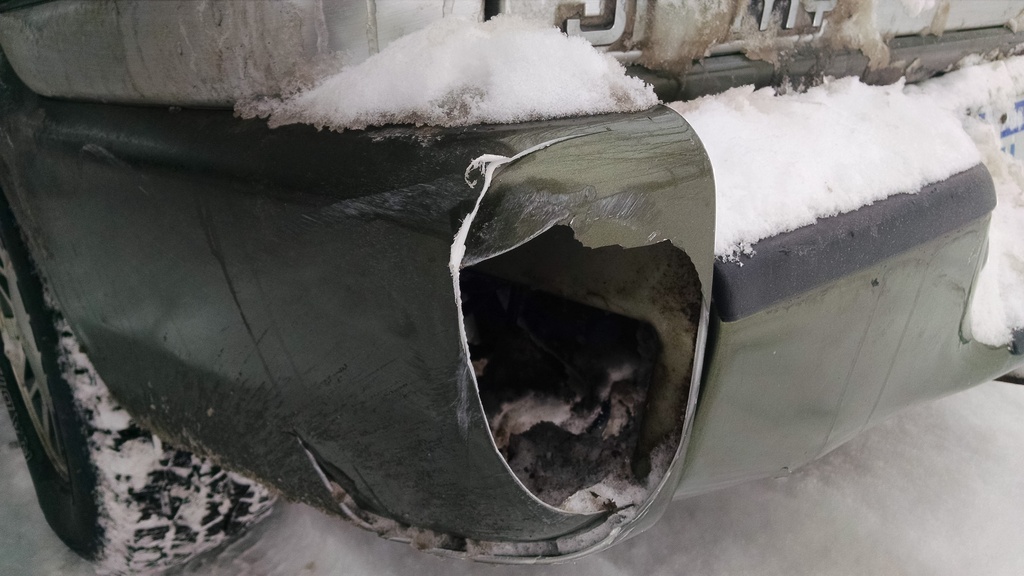
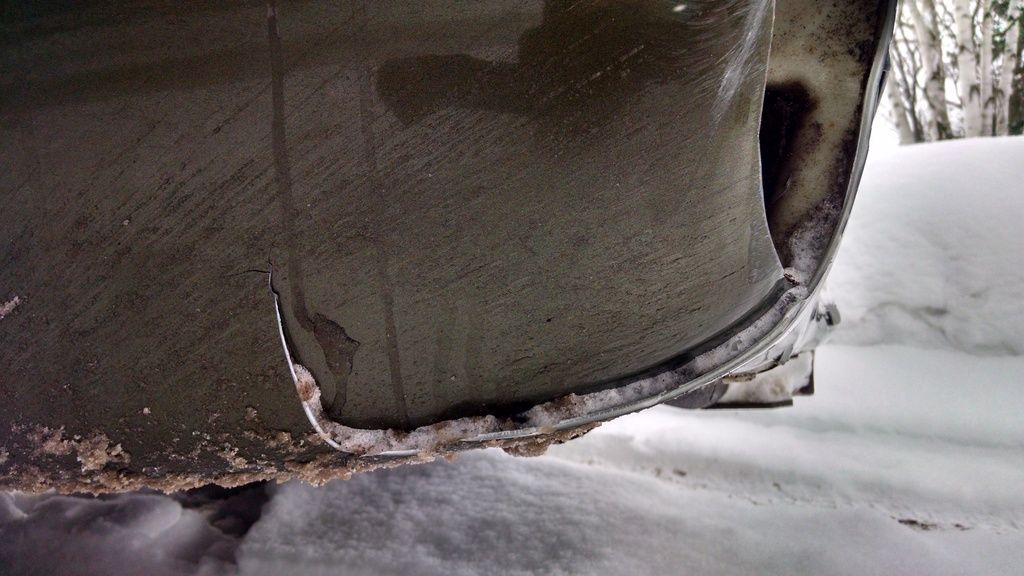
-Repair/Replace rear bumper cap. Friend borrowed the car and decided to fight a street sign. Jimmy won. Though I want to get this "blemish" taken care of this summer
-LED Lights: Replace lights with LED wherever appropriate probably as things burn out or I get extra time and money.
-Rust: Fight the rust, or try to keep up on it. I want to start treating the rust places starting with the bigger more important places and work my way down. Again as a college student, it will come down to available extra money.
-Door Pins: Bushings are bad and doors strted sagging so Will be doing that this spring and re painting the hinges.
-Replace the grill insert after it received damage this past winter from a chunk of flying freeway. In addition it had a few cracked plastic fins when I bought the car. I may also go with an aluminum grill, but based on a limited budget and wanting to do it right, that may have to wait. Currently the hole is filled with expanding foam (hard to see in the picture) to prevent the trim from whistling
-Replace the headlight housings. They've started clouding over, and originally I was going to clean them up but this past winter while working on the car, I ended up cracking the back of the housing on the driver side and now the fog light is duct taped in. So if I'm going to replace that one, I'll replace the other one too. Might remove the amber reflector in it as well.
-Repair/Replace rear bumper cap. Friend borrowed the car and decided to fight a street sign. Jimmy won. Though I want to get this "blemish" taken care of this summer


-LED Lights: Replace lights with LED wherever appropriate probably as things burn out or I get extra time and money.
-Rust: Fight the rust, or try to keep up on it. I want to start treating the rust places starting with the bigger more important places and work my way down. Again as a college student, it will come down to available extra money.
-Door Pins: Bushings are bad and doors strted sagging so Will be doing that this spring and re painting the hinges.
Last edited by tenorsaxdude; 04-22-2015 at 10:44 PM.
#6
05-06-2015, 03:57 PM
After returning home from University this past week, I need to add chipped windshield to the list of repairs. Want to get that chip filled before it turns to a crack
In other news, I got 23mpg on my trip home!
Also new bushings have been ordered to fix my disintegrating ones. Thanks for the write up blazen_red_4x4
https://blazerforum.com/forum/paint-...stalled-89003/
In other news, I got 23mpg on my trip home!
Also new bushings have been ordered to fix my disintegrating ones. Thanks for the write up blazen_red_4x4
https://blazerforum.com/forum/paint-...stalled-89003/
#7
05-24-2015, 11:10 PM
After picking up a job at a local winery, I haven't had time to install the door hinge bushings yet (also new pins).
However I've had time to fine tune the custom dash on my touch screen with all the driving I've had to do recently


Many other gauges I'm deciding on but more or less that is what I have at my finger tips these days.
By the end of the week I hope to have some new headlight housings ordered, and restart my hunt for a new grill.
I want to get all my parts accumulated together and just spend a good day off putting everything together
#9
05-25-2015, 09:02 PM
It is the free Torque App.
I also had some difficulty at first. Here's what I did to get it to work.
1.Go into the bluetooth manager from the home settings menu. Clear out all bluetooth pairing histories/unpair all bluetooth devices from the HU.
2. turn the ignition off, open the door and let it shutdown all the way. let it sit for about 10 seconds cold before turning the key again. You want to have a fresh boot
3. Once booted up pair the OBDII sensor with the device. You should get a blue OBD logo on the top of the menu once this has occurred. If the HU can not find the sensor, unplug the sensor, plug it back in and rerun the search. This causes the sensor to start searching for a device to pair with.
If you have paired the sensor with your phone or another device before, be sure to unpair that device from the sensor while its plugged in. Sometimes this causes those sensors to only look for that other device and ignore the HU's request to pair
4. Once paired, cycle the power off again and allow a fresh boot to occur. once booted up ensure the OBD logo appears in the menu bar again before continuing.
5. Open Torque. Enter the settings and go to OBDII adapter settings. Select the bluetooth device option and select the bluetooth device. Having only the OBDII device paired and in its memory, there should be only one bluetooth device to select. Click on that one and save those settings.
6. From there let Torque have a moment to sync with the sensor and the ECU. Once everything is working Torque should send an "ECU ok" message back, and/or you will see some of the default gauges come alive.
7. Once you confirm that the Torque app and sensor recognize each other on their own, you can pair in your phone or other devices to the HU without any issues
After this initial setup, you should be able to leave your sensor plugged in and it should automatically pair with every start. I haven't had any issues with Torque or the sensor once this initial setup was completed.
Let me know how that goes and if there are any other hiccups along the way. I highly recommend anyone with an android interface to go this route as there are so many options available for live feed information and on the fly diagnostics.
Last edited by tenorsaxdude; 05-25-2015 at 09:06 PM.