4L60E Corvette Servo Install; Walkthrough with pictures and details!!
#1
 02-03-2014, 08:14 PM


I recently installed a Corvette Servo in my transmission, and thought I'd take the time to make a walkthrough, since I know how it can be nerve-wracking digging into your trans. Before you begin, I just want to reassure you, its not very hard to do!! It took me about an hour, and thats with taking my time to clean my hands so I could take pictures.
Now, your probably thinking "what the hell would I need this for?!" Well, basically, all this does is gives you a firmer 1st-2nd, 2nd-3rd gear shift, and gives you 50% better holding power in second gear. It uses a bigger piston to apply against the band, which in turn holds the drum alot better. Its not going to chirp the tires every gear like a shift kit would, but it will give you an improvement in shift quality, which is good for towing and such.
For starters, your gonna need your corvette servo, I got mine off of ebay from a company called CT Powertrain, it costed a whopping $14 bucks.
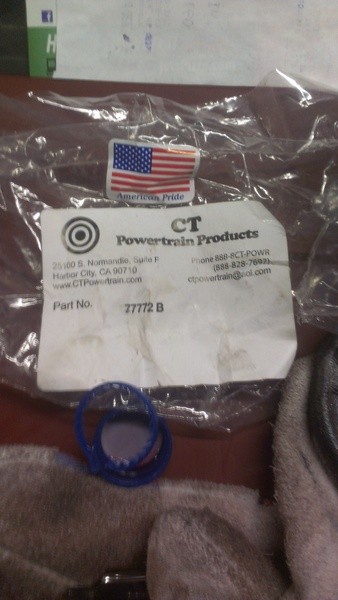
http://www.ebay.com/itm/700-700R4-4L...e1e231&vxp=mtr
For tools, all you need is some picks, a couple flathead screwdrivers, channel locks, a big c-clamp, some brake clean, and a quart of FRESH trans fluid.
BE SURE TO CLEAN ALL PARTS WITH BREAK CLEAN AND A LINT FREE TOWEL!!!
The valvebody in the trans has very tight tolerances, and even a small piece of lint can screw up its operation, so everything has to be PERFECTLY CLEAN!! I used paper towels to wipe everything down, and I suggest you do the same!!
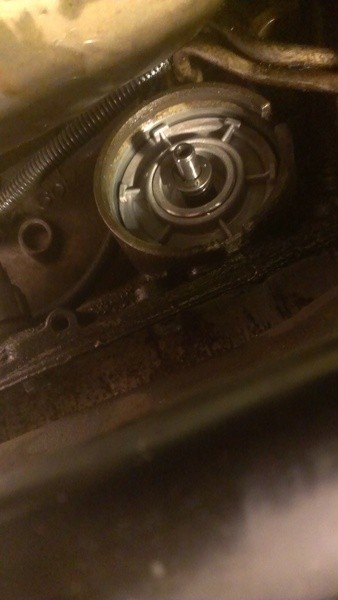
First, jack up the passenger side of the vehicle, get under, and this is what your looking for.
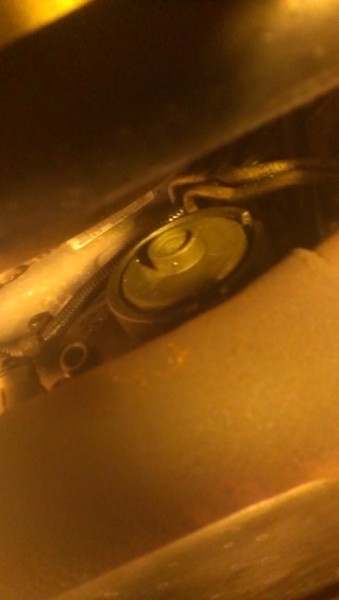
Now get your big screwdriver, and pry that cover in. I went against the torsion bar on my blazer, and that worked great! Now look closely, see the notch? Theres a big c clip you need to pull. I got that out with a smaller flathead. Now you can pull the cover off! Chances are, its not just gonna pop out, so use your channel locks on that little circle part, and rotate it back and forth until it walks out.

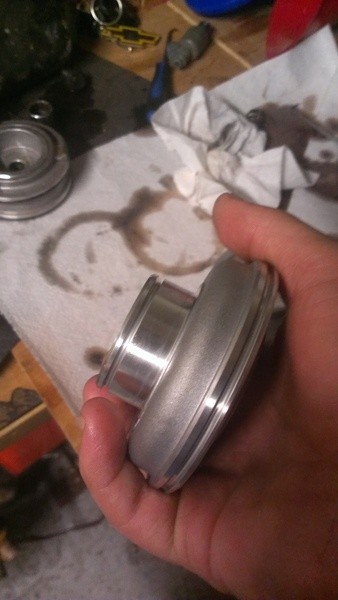
After you get that off, this is what your gonna be looking at. This is the 4th gear apply piston.
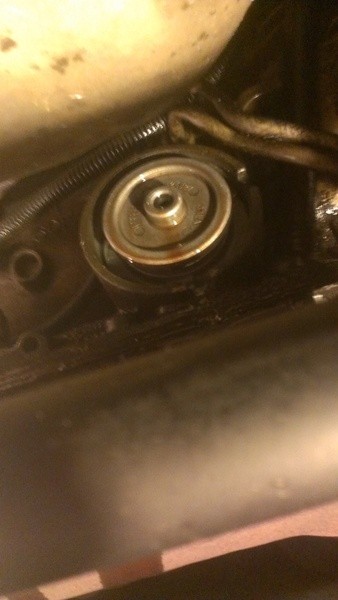
Now pull it out! It just slides right off

What your looking at now

Out of the trans!
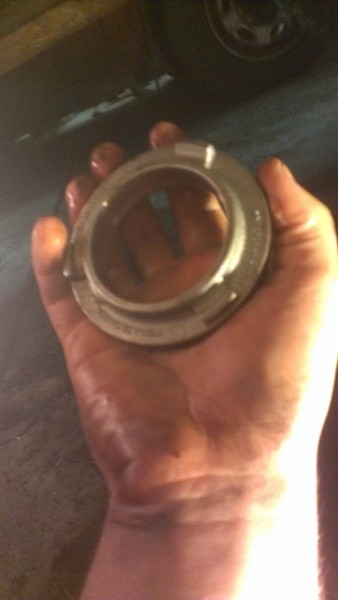
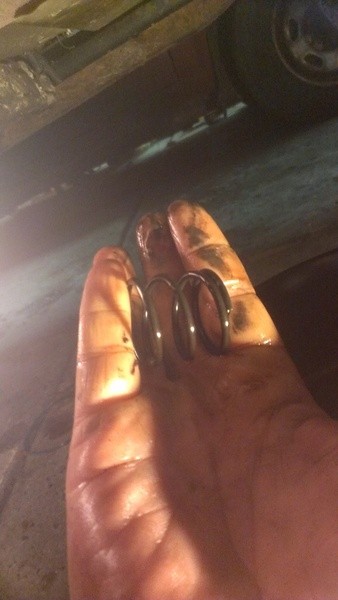
Now pull the rest of the servo

Then this spring. Don't loose this!!
Now that you have the assembly out, its time to swap some parts. First pull this e-clip, careful because it has a tendency to fly across the garage and go missing. Save yourself the headache and cover it with your hand while you pull it. This is where your 90 degree pick tool comes in handy!!

Now you should have these parts lying out on your workbench

Next, pull the piston rod out. This is what physically touches the band

Compress the spring with your c-clamp

Pull the snap ring

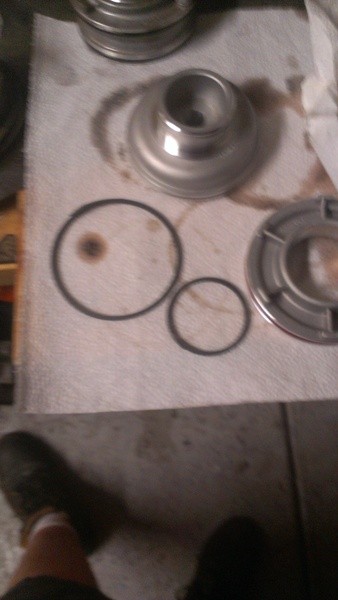
Now pull this cover off, and the big spring. You'll be transfering these to the new servo


Comparing old parts (left) to new (right)

The new servo, install your new teflon rings into the grooves

Slide the piston back in

Install the spring

Washer

And finally the e-clip

Now for re-installation! First install the spring...

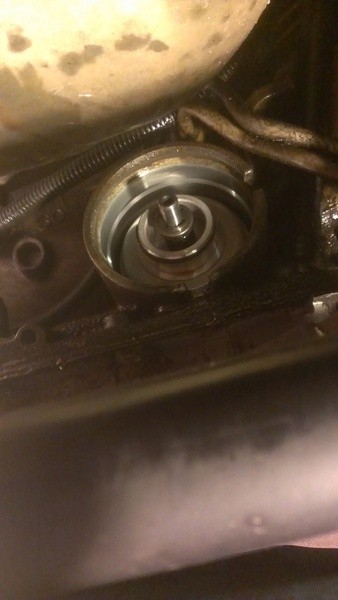
Then the second gear servo assembly
Then this thing (don't know the name of it) MAKE SURE the notches on it point OUTWARDS!!
Then the 4th gear apply piston. Make sure you install it the right way, or you'll have to pop the cover off and turn it around to get overdrive back

Then the servo cover!! Be sure to throw your new o-ring on, and lube everything with trans fluid!

Now, all you have to do is pop the servo cover on, throw on the snap ring then take it for a test drive. If it doesn't leak on the first startup, then you should be fine! Now take it for a test drive and enjoy your nice crisp shifts!!
Now, your probably thinking "what the hell would I need this for?!" Well, basically, all this does is gives you a firmer 1st-2nd, 2nd-3rd gear shift, and gives you 50% better holding power in second gear. It uses a bigger piston to apply against the band, which in turn holds the drum alot better. Its not going to chirp the tires every gear like a shift kit would, but it will give you an improvement in shift quality, which is good for towing and such.
For starters, your gonna need your corvette servo, I got mine off of ebay from a company called CT Powertrain, it costed a whopping $14 bucks.
http://www.ebay.com/itm/700-700R4-4L...e1e231&vxp=mtr
For tools, all you need is some picks, a couple flathead screwdrivers, channel locks, a big c-clamp, some brake clean, and a quart of FRESH trans fluid.
BE SURE TO CLEAN ALL PARTS WITH BREAK CLEAN AND A LINT FREE TOWEL!!!
The valvebody in the trans has very tight tolerances, and even a small piece of lint can screw up its operation, so everything has to be PERFECTLY CLEAN!! I used paper towels to wipe everything down, and I suggest you do the same!!
First, jack up the passenger side of the vehicle, get under, and this is what your looking for.
Now get your big screwdriver, and pry that cover in. I went against the torsion bar on my blazer, and that worked great! Now look closely, see the notch? Theres a big c clip you need to pull. I got that out with a smaller flathead. Now you can pull the cover off! Chances are, its not just gonna pop out, so use your channel locks on that little circle part, and rotate it back and forth until it walks out.
After you get that off, this is what your gonna be looking at. This is the 4th gear apply piston.
Now pull it out! It just slides right off
What your looking at now
Out of the trans!
Now pull the rest of the servo
Then this spring. Don't loose this!!
Now that you have the assembly out, its time to swap some parts. First pull this e-clip, careful because it has a tendency to fly across the garage and go missing. Save yourself the headache and cover it with your hand while you pull it. This is where your 90 degree pick tool comes in handy!!
Now you should have these parts lying out on your workbench
Next, pull the piston rod out. This is what physically touches the band
Compress the spring with your c-clamp
Pull the snap ring
Now pull this cover off, and the big spring. You'll be transfering these to the new servo
Comparing old parts (left) to new (right)
The new servo, install your new teflon rings into the grooves
Slide the piston back in
Install the spring
Washer
And finally the e-clip
Now for re-installation! First install the spring...
Then the second gear servo assembly
Then this thing (don't know the name of it) MAKE SURE the notches on it point OUTWARDS!!
Then the 4th gear apply piston. Make sure you install it the right way, or you'll have to pop the cover off and turn it around to get overdrive back
Then the servo cover!! Be sure to throw your new o-ring on, and lube everything with trans fluid!
Now, all you have to do is pop the servo cover on, throw on the snap ring then take it for a test drive. If it doesn't leak on the first startup, then you should be fine! Now take it for a test drive and enjoy your nice crisp shifts!!
#2
02-03-2014, 10:02 PM
Good walk thru! If you had to do it again would you go straight to the corvette or sonething in between, a little less aggressive? Also do you know how to fool the electronic pressure regulator with a resistor?
#4
02-03-2014, 10:34 PM
Thanks!! I feel like it was well worth the effort to take the time so others can feel confident doing this mod!
#5
02-04-2014, 10:25 AM
The thread is kind of old but I think it is THE $4.00 TRANS MOD or something like that. It also speaks about too much pressure. My trans parts man suggested that the vette servo is too much and the stock one is too cush. I think he said there were 4 stock sizes
Last edited by LeWhite; 02-04-2014 at 10:34 AM.
#6
02-04-2014, 12:19 PM

I read last week that you were waiting on your vette servo... thanks so much for posting this walk through, if I don't use it this weekend... well, that means I found out it's not my servo- but I'm sure it will come in handy for someone!
#8
02-04-2014, 02:49 PM
That's what I said!! I can almost chirp second when I get on it! The back end just squats when it shifts under WOT now..