Shop Tips and Tricks
#11
 12-29-2016, 07:44 PM


While enjoying the "Brain Freeze" of that Ice cold one I have actually figured out some pretty ridiculously easy "work arounds"
Yesterday I started replacing the water pump in my 96 4.3 4x Blazer. Things were going great until I needed to break the bolts loose on the water pump pully. The belt was not tight enough to keep the pulley from rolling and I needed two hands to do it so I locked a box wrench on one of them and wedged it against the tensioner. It kept slipping off the tensioner and if I had hit it with a hammer it might have rounded a bolt. Halfway through the cold one it came to me.
On one end I wrapped duct tape to the box end to keep it around the bolt. The other end taped to the tensioner with a little pull to the rear. When I broke three bolts loose I just untaped the box end and fastened it onto one of the loose ones and got the last one loose.
#12
12-29-2016, 08:36 PM
Another aha moment came in this project when I was trying to line up the bolts to secure the new water pump. I pride myself on using something slightly smaller to go down the hole that one of the bolts goes in. On the left side I used one of those really long headlight bolts [the 3/32" end in case I need it again]. In this case, holding the pump up with a bungee cord took most of the weight off.
i moved the other three "hole points" to guide one bolt at a time tipping the whole thing right, left, up and down.This is usually a great way of making an awkward thing easier to deal with while working alone. This pump felt like 8 or so lbs.
I rounded about 1/4" of the tip of the bolt nearest the power steering so I could feel it drop in before I could start threading. When I say rounded, it looked more like the tip of a 7.62 bullet. It popped into place and threaded right in. This is where things got real frustrating. I modified another bolt for the tensioner side but could not get it to pop in the top or bottom holes at all. These bolts were .35. My headlight long bolt was .23 and phillips head was .30 - I had the right tools but even the upper bolt on the PS side would not drop in and I could see it. Today was sunny, clear and 79 degrees and I had my shop light too. The idler pully was the only thing blocking my view of the other side. Time for another cold one
Then it came to me. I removed the Idler pully and used a small vanity mirror. It came with a real pretty handle on it for self haircuts and such but has been dropped so many times over the years that only the glass survived. Now I could se what I thought I understood before. The left side was not only crooked but the motor had recesses that felt like the probe bolts were going through. The rest of the reassembly was actually easier than my 79 full sized Jimmy so I changed the oil as well as the coolant and belt.
Last edited by ekaye1; 12-31-2016 at 06:39 PM.
#13
12-30-2016, 06:23 AM
If you are really fighting a bolt that has no right being that tight while trying to remove it, make absolutely sure you are turning it the correct way. Been burned a few times fighting trying to loosen a bolt, while actually tightening it. Several that come to mind: fighting an upper ball joint castle nut for 45 min, starter bolt, and broke the head off a thermostat bolt while doing this too.  Added about 5hrs of extra work getting that nub out of the block.
#14
12-30-2016, 10:26 AM
I want to second what Thogert posted about checking the direction of the bolt or nut to remove it. I think we've all been there!
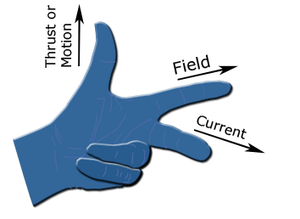
When I am under the truck or contorted in some way to get to a fastener where the old rule "righty-tighty, lefty-loosey" is hard to apply, I use the Right-Hand-Rule.
The RHR is that if you curl your fingers on your right hand as if to make a fist, the direction your thumb points when pointing away from the hand (e.g. as if you were hitch-hiking) is the direction the bolt or nut will move when rotated the way your fingers have curled.
Of course this only works with fasteners that have right-hand threads. Those of you who work with pressurized gas cylinders know that for some specialty gases, the threads for the regulators have left-handed threads. Apparently in about 1970 Dodge thought it a good idea to use left-handed threads on some of their lug nuts/bolts! You have been warned! ;-)
Here is a picture:
Note this works for loosening or tightening.
Christine
#16
01-03-2017, 11:27 PM

I buy those tin foil type turkey basting pans from the grocery store. They have many uses but my two most common are: 1) put one under my brake rotor when I am spraying the caliper and rotor down with brake clean; 2) when I am doing a complete coolant drain, two or three of them can be strategically you positioned under the engine block when I pull the block drain plugs to catch most of the coolant. The pans are very cheap and reusable for quite awhile. Of course they could be used for a oil change. But I use a regular oil drain container for that.
#17
01-06-2017, 01:22 PM

A real good home penetrating fluid can be made from a 50-50 mix of ATF and acetone.....works allot better than some of the purchased brands.
#18
01-29-2017, 02:19 PM

I write the vin, chassis and rpo codes in a composition book. Then include everything I do to my jimmy. Date, mileage, part, warranty and store. Keep it with my envelope of receipts.
#19
01-29-2017, 06:50 PM
Here's a safety tip that may be obvious to some. Recently I met someone who's face looked like someone had whipped him with red hot ****** wire and he had varying shades of red to black thick scabs all over his face with some of the wounds oozing dark fluid. He was self conscious of it and before he even greeted me he said "I had grinder explode in my face and this why I look like this." He proceeded to tell me that he put to hard of an angle on his angle grinder (cutting wheel if I remember correctly). Apparently this had happened a couple weeks prior and there will still splinter of the wheel working their way out of his face. He stated it had exploded into teenie splinters. Besides the obvious tip of "don't put too hard an angle on your cutting wheel", for a few dollars you can by a clear full face protector at Harbor Freight. I always where safety glasses, but up until then I really only used the face shield when I was doing some serious work (I do a lot of metal work on occassion). After that day, I add the full face shield even if I am doing only a few seconds of a cut or grind. Still wear my safety glasses under the shield also.

Thread
Thread Starter
Forum
Replies
Last Post
Wexy21
Full Size K5 (1969-1991) GMT415 (1992-1994) Tech
8
11-29-2012 10:05 PM
nicco89blazer
Full Size K5 (1969-1991) GMT415 (1992-1994) Tech
0
07-09-2010 09:28 PM
ohsofly
1st Generation S-series (1983-1994) Tech
18
02-13-2010 02:21 AM