Replacing LIM gasket, posting here if I need help


#2
 12-13-2013, 08:41 PM

I did mine last week and a few things that I ran into:
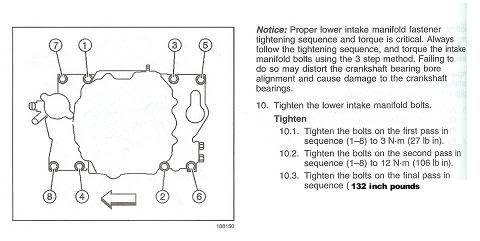
1. Make sure the manifold bolts are not warped. A few of mine were messed up and when I was tightening up the manifold, they started to strip out the block. I went to local junk yard and got a few good ones.
2. Use a lot of sealant on front and back of manifold.
3. Slice heater lines at manifold and heater core instead of pulling them out. It will save time and prevent you from breaking heater core.
4. Distributor hold down bolt is a pain and watch you do not strip it. Furthermore, properly mark the distributor twice before pulling out. It seems that a lot of DYI people mess this up and cause timing problems. Place a mark before you start pulling it out, and mark it when the rotor stops moving before completely pulling it from the manifold. Upon installation, my distributor went right back in without any hicupps.
Other then that, this project its time consuming, but not too difficult. Just hope its not a freeze plug because they are a real bitch to replace.
Good luck
Bizzs
#3
12-13-2013, 09:42 PM
Felpro MS98002T gasket set will not leak if clean up, installation, and fastener torque is done properly. Clean the threads on the bolts, and in the heads, with a tap and die. Then apply sealer to the threads:1 so the don't leak and 2 so they don't "walk out" due to the low torque.
A tip for removing the distributor is manually rotate the crankshaft clockwise, using a socket & ratchet, until the rotor points to the "6". Then remove the distributor, and DON'T move the crankshaft while the distributor is out.
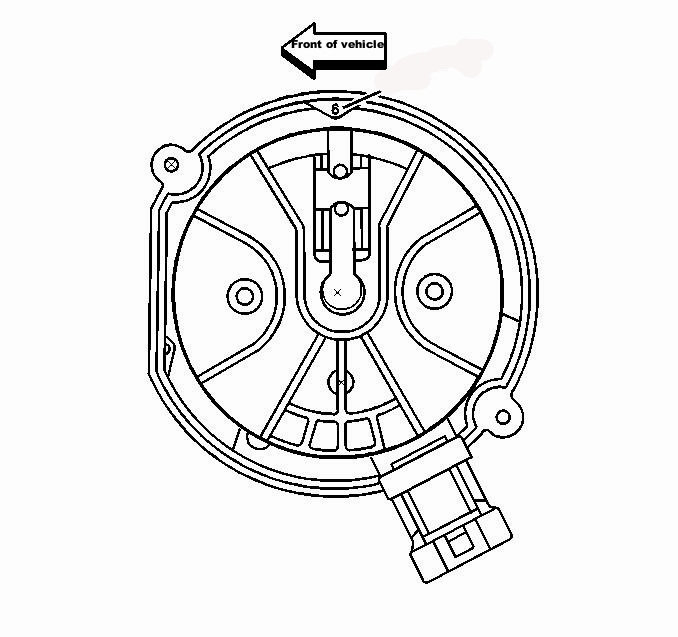
After the distributor is reinstalled, (rotor lined up with the "6") check and adjust camshaft retard with a capable scan tool. The basic install of the distributor gets you in the ball park, camshaft retard fine tunes it. Spec is zero degrees plus or minus 2 degrees. Adjustment is done by rotating the distributor. The adjustment aligns the camshaft position sensor and does not affect ignition timing, but it will greatly affect engine performance and fuel mileage if it's out of spec.... and NO check engine light alerting you of a problem
A tip for removing the distributor is manually rotate the crankshaft clockwise, using a socket & ratchet, until the rotor points to the "6". Then remove the distributor, and DON'T move the crankshaft while the distributor is out.
After the distributor is reinstalled, (rotor lined up with the "6") check and adjust camshaft retard with a capable scan tool. The basic install of the distributor gets you in the ball park, camshaft retard fine tunes it. Spec is zero degrees plus or minus 2 degrees. Adjustment is done by rotating the distributor. The adjustment aligns the camshaft position sensor and does not affect ignition timing, but it will greatly affect engine performance and fuel mileage if it's out of spec.... and NO check engine light alerting you of a problem
Last edited by Captain Hook; 12-13-2013 at 09:53 PM.
#7
12-14-2013, 01:22 PM
Electrical to the fuse panel doesn't have to be disconnected. Just swing the harnesses above the plenum out of the way to remove the plenum & manifold.
Un bolt the AC compressor and move it aside, don't need to discharge the AC. PS bracket... one nut near the forward end of the exhaust manifold holding the PS bracket, (neatly tucked out of sight). Don't need to remove it, just loosen it and slide the bracket & pump assembly up and off the stud.
Un bolt the AC compressor and move it aside, don't need to discharge the AC. PS bracket... one nut near the forward end of the exhaust manifold holding the PS bracket, (neatly tucked out of sight). Don't need to remove it, just loosen it and slide the bracket & pump assembly up and off the stud.
#9
12-16-2013, 02:13 PM
If you do not have that manifold clean, it will leak. Make sure that you stick paper towels down in the blocks ports so none of the old gasket debris drop into the motor. I actually used a light wired wheel on a drill and it did a nice job. Additionally, use a lot of sealant on front and back of manifold, or a leak could occur there too.
bizzs
bizzs