
How to Vac gauge


Thread Starter
|
Banned
Joined: Aug 2009
Posts: 1,162

this is an old school tech. usually these gauges are used for diagnostic purposes but also serve as a gauge to minimize gas consumption.
*vac tee should be on engine side.(the pictures show it on right side of tee,pic will be changed )
Stuff to buy
1. Vac gauge kit (mines a sunpro one of the cheapest but it works)
1.vacuum tee kit
*the air tube in the kit is going to be hard plastic in order to connect to the tee kit its going to have to be rubber.
3 1/2 feet of rubber tubing slightly bigger then the tubing that came in the vac kit.
1. add a circuit mini fuse
1. extra vacuum line that is the same size as factory vac line**
Stuff your gonna have to do BEFORE
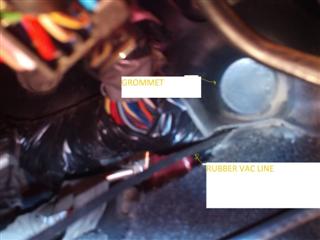
Remove the kick panel on the driver side. this is where your going to have to go through a grommet for the air tubing.
Begin:
First you're gonna have to locate the vacuum lines on the right side of the engine bay behind the fuse box
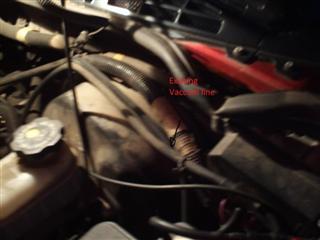
there is going to be a white tee that already splits your vacuum lines one goes to your vacuum booster the other one (the one you want) goes into the fender you will separate this line off the tee, do not cut the line. this is where the extra vac line** you bought. put one side of the line on the white tee and the other onto the vacuum tee kit you purchased.then plug in the existing vac line that runs into the fenter into the vacuum tee kit.
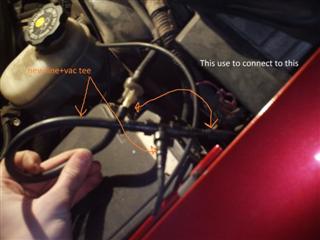
after this is completed use the extra rubber line you purchased onto the vac tee kit. the plastic vac line that came with the gauge will not work i dont know why they did it this way but this was the only way i could figure out to make it work. now run the rest of the the rubber line back through the grommet, i had an existing one i was able to get though i believe its the same one the booster uses for the brake.
now your rubber line you ran through the grommet needs to be connected to the white plastic line that came with the gauge kit. i stretched the rubber line over the plastic white line. then i used a zip tie to hold together (just in case really doesnt need a zip tie unless you turbo it because vacuum is gonna suck the lines together not boost apart, but none the less always safe than sorry) now next to the a pillar this is a little bit of room next to the windshield where you need to snake the line through in order to connect to the gauge. once you've done that there is a solid nut with a hole through it ( i dont know the exact name for it, it comes in the vac gauge kit) slide your plastic vac line throught this "solid nut" , put your ferrel on then line the threads up and tighten on to the backside of the gauge.
Know my sparky friends ELECTRICAL TIME
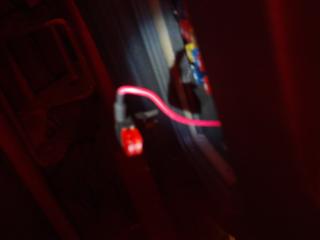
the bulb for the backlight has 1 positive (red) and 1 negative (black). take your negative and attach to a good ground. now this is where your add a circuit (got 1 from advance auto) comes in. this nifty little thing make your life easier by not splicing into existing wiring. before you get ahead of yourself snake the red wire down and to your fuse block. make it look neat. now simply crimp the red into the splice provided on the add a circuit. if you want to do some sick clearance lights later on then make another wire off the splice of the add a circuit and tape w/electrical tape for if you decide to add another gauge backlight or low drawing lights (your circuit is only 10amps so dont go to crazy)
i believe its number 5 is the parking light. double check though. what the add a circuit does it creates a new circuit but uses the existing power from the existing circuit. in this case the only part of the gauge that is electrical is the backlight. so when ever your auto lights come on or you turn your parking lights on, the backlight of the vac gauge will come on also.

now coil your leftover plastic vac line and zip tie up underneath. make sure your tee and line under the hood are away from and underneath where the hood makes contact. replace kick panel and look at your new gauge. i'll add a video later of how to use the gauge on the road. the basic idea is when your engine vac pressure is at its highest it is working the least. high vac pressure=less gas. also if you know about vac gauges and how they work you can know diagnose engine problems. hope this helps you all out. im gonna get a pod gauge put in later on. gauge still serves the same purpose with our with out it but it looks like a cleaner install with . any questions or improvements submit below. yes my grammars not great or my spelling. if one of the admins want to move this to a how to or a DIY go ahead.
*vac tee should be on engine side.(the pictures show it on right side of tee,pic will be changed )
Stuff to buy
1. Vac gauge kit (mines a sunpro one of the cheapest but it works)
1.vacuum tee kit
*the air tube in the kit is going to be hard plastic in order to connect to the tee kit its going to have to be rubber.
3 1/2 feet of rubber tubing slightly bigger then the tubing that came in the vac kit.
1. add a circuit mini fuse
1. extra vacuum line that is the same size as factory vac line**
Stuff your gonna have to do BEFORE
Remove the kick panel on the driver side. this is where your going to have to go through a grommet for the air tubing.
Begin:
First you're gonna have to locate the vacuum lines on the right side of the engine bay behind the fuse box
there is going to be a white tee that already splits your vacuum lines one goes to your vacuum booster the other one (the one you want) goes into the fender you will separate this line off the tee, do not cut the line. this is where the extra vac line** you bought. put one side of the line on the white tee and the other onto the vacuum tee kit you purchased.then plug in the existing vac line that runs into the fenter into the vacuum tee kit.
after this is completed use the extra rubber line you purchased onto the vac tee kit. the plastic vac line that came with the gauge will not work i dont know why they did it this way but this was the only way i could figure out to make it work. now run the rest of the the rubber line back through the grommet, i had an existing one i was able to get though i believe its the same one the booster uses for the brake.
now your rubber line you ran through the grommet needs to be connected to the white plastic line that came with the gauge kit. i stretched the rubber line over the plastic white line. then i used a zip tie to hold together (just in case really doesnt need a zip tie unless you turbo it because vacuum is gonna suck the lines together not boost apart, but none the less always safe than sorry) now next to the a pillar this is a little bit of room next to the windshield where you need to snake the line through in order to connect to the gauge. once you've done that there is a solid nut with a hole through it ( i dont know the exact name for it, it comes in the vac gauge kit) slide your plastic vac line throught this "solid nut" , put your ferrel on then line the threads up and tighten on to the backside of the gauge.
Know my sparky friends ELECTRICAL TIME
the bulb for the backlight has 1 positive (red) and 1 negative (black). take your negative and attach to a good ground. now this is where your add a circuit (got 1 from advance auto) comes in. this nifty little thing make your life easier by not splicing into existing wiring. before you get ahead of yourself snake the red wire down and to your fuse block. make it look neat. now simply crimp the red into the splice provided on the add a circuit. if you want to do some sick clearance lights later on then make another wire off the splice of the add a circuit and tape w/electrical tape for if you decide to add another gauge backlight or low drawing lights (your circuit is only 10amps so dont go to crazy)
i believe its number 5 is the parking light. double check though. what the add a circuit does it creates a new circuit but uses the existing power from the existing circuit. in this case the only part of the gauge that is electrical is the backlight. so when ever your auto lights come on or you turn your parking lights on, the backlight of the vac gauge will come on also.
now coil your leftover plastic vac line and zip tie up underneath. make sure your tee and line under the hood are away from and underneath where the hood makes contact. replace kick panel and look at your new gauge. i'll add a video later of how to use the gauge on the road. the basic idea is when your engine vac pressure is at its highest it is working the least. high vac pressure=less gas. also if you know about vac gauges and how they work you can know diagnose engine problems. hope this helps you all out. im gonna get a pod gauge put in later on. gauge still serves the same purpose with our with out it but it looks like a cleaner install with . any questions or improvements submit below. yes my grammars not great or my spelling. if one of the admins want to move this to a how to or a DIY go ahead.
Last edited by swartlkk; Mar 29, 2010 at 10:13 AM. Reason: *OP Deleted Images - Restoring to BF.com
Thread Starter
|
Banned
Joined: Aug 2009
Posts: 1,162
haha your one of the guys too. sorry if i made it sound like that. really didnt mean it like that. if everyone gives a little insite in what they know we learn from each other which is awesome.
BF Veteran
Joined: Jul 2009
Posts: 2,229
From: Central Il
Yea... this forum actually thrives... from the member to member activity... Everyone helps us with the tech... and then everyone also tells sisk to paint something... last time it was his tow hooks
Thread Starter
|
Banned
Joined: Aug 2009
Posts: 1,162