
2001 Blazer Sticking Valve?????

Junior Member
Joined: Apr 2012
Posts: 368
From: Vancouver, BC, Canada

If the crank sensor is hitting the reluctor while the crank is moving then it will misfire like crazy and the tach will be messed up and most likely give you a P0335 code. Brake torque it and see what happens.

Thread Starter
|
Moderator
Joined: Oct 2014
Posts: 4,347
From: North Central Indiana
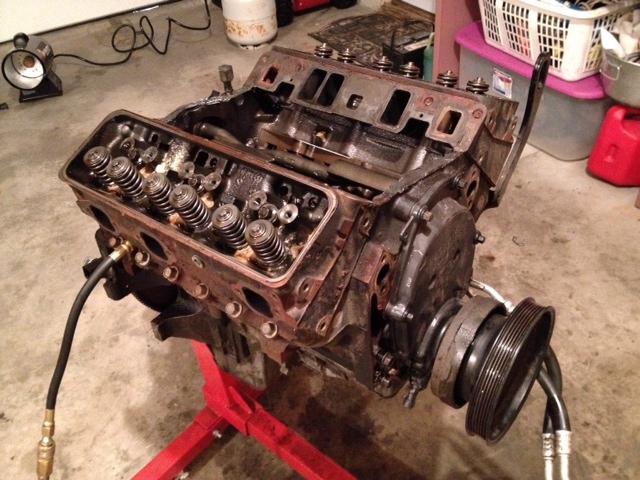
Well, I finally fully committed and decided to pull the engine and go through it. I'm simply tired of jacking with it. Plan is to have it out tomorrow, tear down Tues/Wed, to maching shop on Friday. Back in the vehicle at Christmas time when I have more vacation.
I was able to get all the trans bolts and wiring loom bolts on the back of the heads with the engine in place, except for the one in front of the driver's foot. I did pull the intake manifold in the process. Everything is now off the front of the motor. What is up with that stupid clutch fan (a statement not a question)! Service manual say to pull the trans to tilt the engine down to get at the bolts. I'm NOT going to pull the driveshafts/crossmembers/transfer case/trans just to take out one bolt. That's simply NOT going to happen, especially with all those rusty bolts underneath. So I'm going through the cab floor with my Dremel cutter wheel for that one remaining trans bolt. Plan to cut a small flap and then bend it back afterwards and seal.
No way are the nuts are coming off the exhaust studs, so I plan to take the exhaust manifold to head bolts loose and pry/spread the manifolds apart just a smidge. Engine should then come out forward with the exhaust and manifolds left in place.
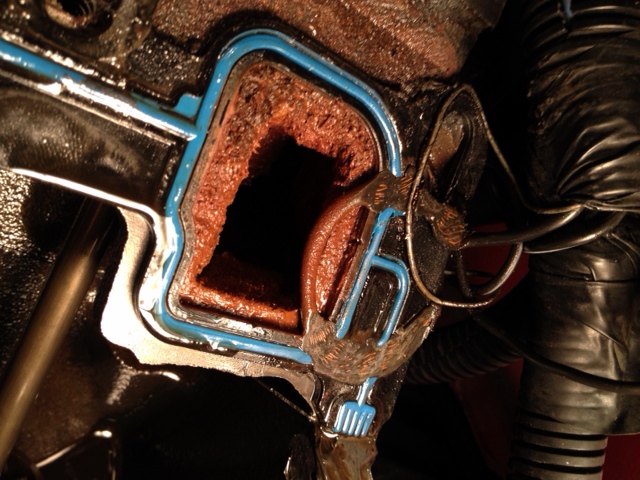
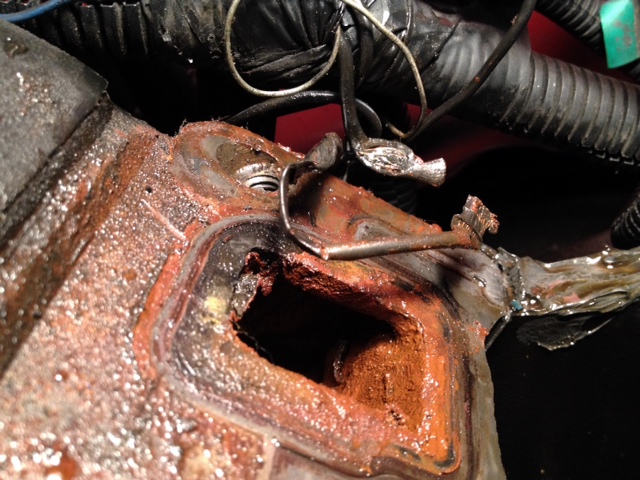
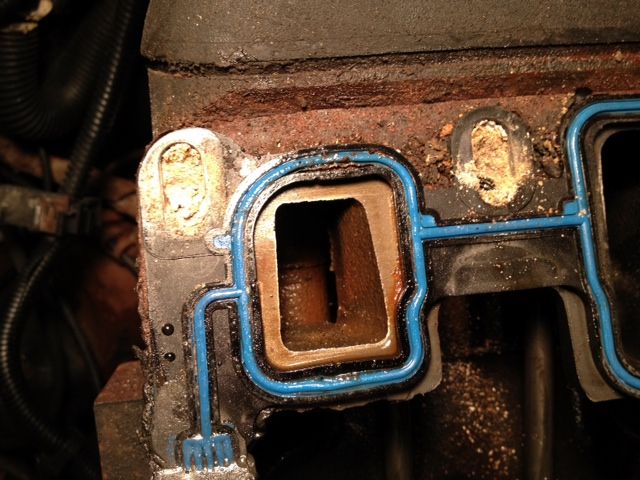
Here is some things I noticed when coming apart. Idiot that had intake manifold off pinched a ground wire (even pinched it in two) underneath the intake manifold and into the coolant port. I'm really surprised it didn't leak more. So much for the reason for changing intake gaskets. Also noticed that it already has the upgraded injectors. Crank thrust is pretty bad (did not yet measure). I can make it audibly clunk by pushing back and forth on the crankshaft, so I really think the main bearings are probably out of it. Will know much more in a couple of days.
You know what I just realized when looking at these photos. I should go back and make sure it really was a ground wire that was pinched. Also...... even if it was a ground wire that was pinched in two, that might help explain strange misfire codes being set!
Les
I was able to get all the trans bolts and wiring loom bolts on the back of the heads with the engine in place, except for the one in front of the driver's foot. I did pull the intake manifold in the process. Everything is now off the front of the motor. What is up with that stupid clutch fan (a statement not a question)! Service manual say to pull the trans to tilt the engine down to get at the bolts. I'm NOT going to pull the driveshafts/crossmembers/transfer case/trans just to take out one bolt. That's simply NOT going to happen, especially with all those rusty bolts underneath. So I'm going through the cab floor with my Dremel cutter wheel for that one remaining trans bolt. Plan to cut a small flap and then bend it back afterwards and seal.
No way are the nuts are coming off the exhaust studs, so I plan to take the exhaust manifold to head bolts loose and pry/spread the manifolds apart just a smidge. Engine should then come out forward with the exhaust and manifolds left in place.
Here is some things I noticed when coming apart. Idiot that had intake manifold off pinched a ground wire (even pinched it in two) underneath the intake manifold and into the coolant port. I'm really surprised it didn't leak more. So much for the reason for changing intake gaskets. Also noticed that it already has the upgraded injectors. Crank thrust is pretty bad (did not yet measure). I can make it audibly clunk by pushing back and forth on the crankshaft, so I really think the main bearings are probably out of it. Will know much more in a couple of days.
You know what I just realized when looking at these photos. I should go back and make sure it really was a ground wire that was pinched. Also...... even if it was a ground wire that was pinched in two, that might help explain strange misfire codes being set!
Les
Last edited by LesMyer; Nov 24, 2014 at 04:56 PM.

Junior Member
Joined: Sep 2010
Posts: 329
Well, I finally fully committed and decided to pull the engine and go through it. I'm simply tired of jacking with it. Plan is to have it out tomorrow, tear down Tues/Wed, to maching shop on Friday. Back in the vehicle at Christmas time when I have more vacation.
I was able to get all the trans bolts and wiring loom bolts on the back of the heads with the engine in place, except for the one in front of the driver's foot. I did pull the intake manifold in the process. Everything is now off the front of the motor. What is up with that stupid clutch fan (a statement not a question)! Service manual say to pull the trans to tilt the engine down to get at the bolts. I'm NOT going to pull the driveshafts/crossmembers/transfer case/trans just to take out one bolt. That's simply NOT going to happen, especially with all those rusty bolts underneath. So I'm going through the cab floor with my Dremel cutter wheel for that one remaining trans bolt. Plan to cut a small flap and then bend it back afterwards and seal.
No way are the nuts are coming off the exhaust studs, so I plan to take the exhaust manifold to head bolts loose and pry/spread the manifolds apart just a smidge. Engine should then come out forward with the exhaust and manifolds left in place.
Here is some things I noticed when coming apart. Idiot that had intake manifold off pinched a ground wire (even pinched it in two) underneath the intake manifold and into the coolant port. I'm really surprised it didn't leak more. So much for the reason for changing intake gaskets. Also noticed that it already has the upgraded injectors. Crank thrust is pretty bad (did not yet measure). I can make it audibly clunk by pushing back and forth on the crankshaft, so I really think the main bearings are probably out of it. Will know much more in a couple of days.
You know what I just realized when looking at these photos. I should go back and make sure it really was a ground wire that was pinched. Also...... even if it was a ground wire that was pinched in two, that might help explain strange misfire codes being set!
Les
Moderator
Joined: Mar 2009
Posts: 8,453
From: Belleville, Michigan
Amazing it didn't leak! I'll bet the last guy had to work at it to get it back together with that wire in there  Better check the intake surface for flatness. Lose those cheezy intake gaskets too! The ones with plastic frames and silicone port seals are junk. Use Felpro MS98002T gasket set.
The coolant passages actually look good. Have the machine shop clean all passages in the heads, block, and intake manifold, (now's the time to do it). The coolant passages close to the firewall tend to crud up because they dead end at the intake manifold and the coolant gets stagnant. DON'T use ethylene glycol, (green) coolant. Dexcool only.
Better check the intake surface for flatness. Lose those cheezy intake gaskets too! The ones with plastic frames and silicone port seals are junk. Use Felpro MS98002T gasket set. The coolant passages actually look good. Have the machine shop clean all passages in the heads, block, and intake manifold, (now's the time to do it). The coolant passages close to the firewall tend to crud up because they dead end at the intake manifold and the coolant gets stagnant. DON'T use ethylene glycol, (green) coolant. Dexcool only.
Thread Starter
|
Moderator
Joined: Oct 2014
Posts: 4,347
From: North Central Indiana
Engine came out out of the vehicle pretty much as planned, with the trans and exhaust system completely in place. Cut a very small flap (about 1.5"x1.5") in the cab floor and bent it back to get the remaining trans bolt out - easy peasy (the only thing that was easy)! Did finally get the exhaust manifold stud nuts off - had to work at it for a while with penty of WD40 soakings and time. With those nuts off I preferred to pull engine with the exhaust manifolds on. Had to move the engine forward as far as the oil pan would allow, in order to get at the fuel line retainer bolt on the driver's side head. With the engine forward, found another ground strap attached to the passenger side head. Took the steering shaft loose at the gear so could move it for additional clearance. So engine came out by first twisting the passenger side forward for the manifold to clear underneath the evaporator case - then lifting until oil pan cleared and the whole thing came forward and out. I may install the right manifold after the engine is on the mount when it goes back in - probably much easier than trying to get all back in as an assembly. I also really doubt that the fuel line retaining bolt will be going back in on re-assembly. Engineers certainly don't seem to care anymore about how vehicles are serviced - only how they go together at the factory.
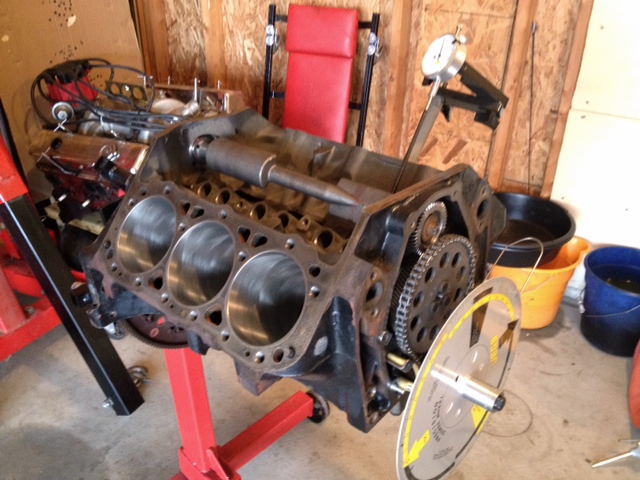
Before teardown, I did perform the leakdown test (photo) Captain Hook mentioned. The valves seemed to be quite good on this engine. With the exhaust and intake manifolds off the engine it was very easy to hear if there were any leaks past any of the valves when a cylinder was pressurized. I also took a small prybar and wiggled the valve retainer back and forth with the cylinder pressurized to check the valve guides and also the sealing of the valve on the seat when rocked. All seemed tight and no leaks when rocked. Finally I tapped each valve with a heavy dead blow hammer to actuate it and observed that it resealed. Makes quite a pop with the cylinder pressurized when that valve comes off the seat!
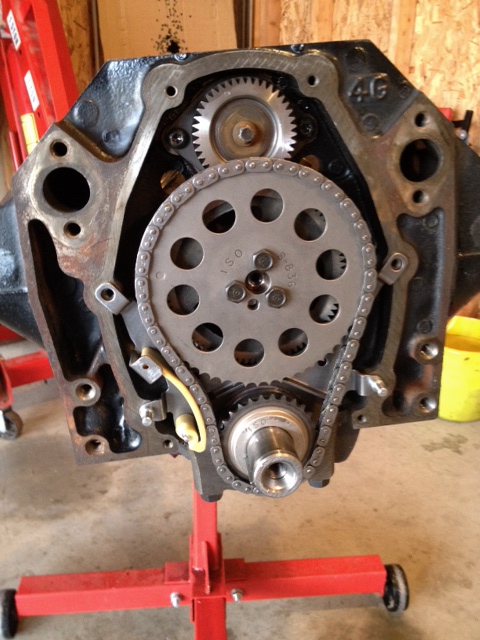
The crankshaft sensor and reluctor did not have any marks on them from hitting anything and nothing was rubbing on the timing cover anywhere. Chain was a little loose, but within the deflection limit specified in the factory manual (11mm if I remember correctly). Timing gears did not appear worn. Distributor drive and driven gears were also unworn. So the -4� Cam Offset Retard must be from timing chain stretch and normal wear.
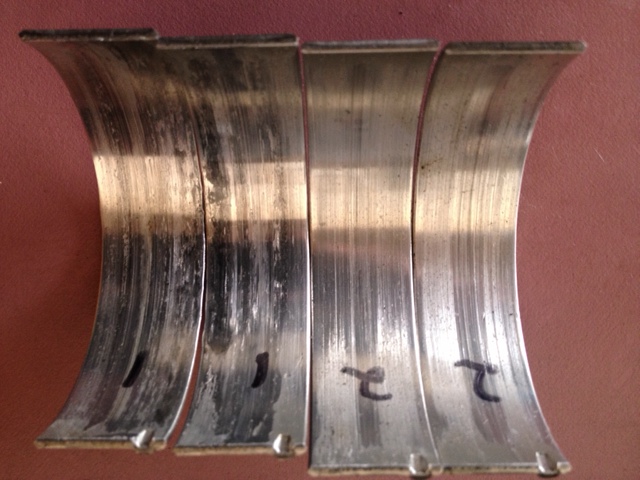
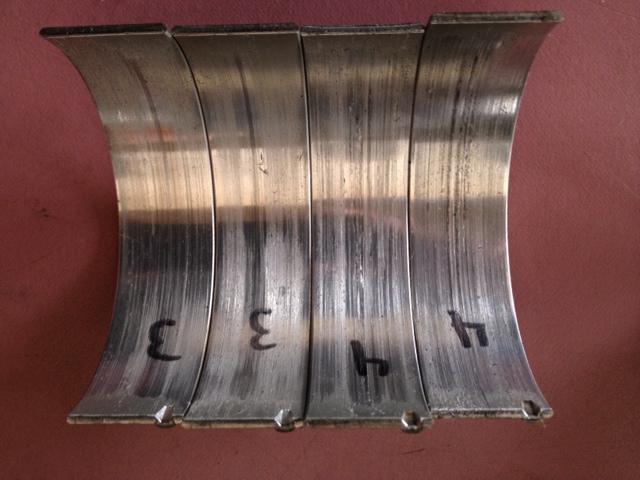
Took the heads off and there was virtually no ridge in any of the cylinders. Balance shaft bearings seemed tight and rear balance shaft journal seems smooth. Popped the pistons/rods out. Cylinder #1 rod cap bearing was sprung and would not retain itself in the rod cap. This bearing was noticeably more worn than the others (photos). Crank thrust measured >0.020" (2x+ too much). Took the crank out. #3 Main cap bearing was sprung and would not retain itself in the main cap. However, this bearing did not really look any different than the others (photos). Took the cam out. Cam bearings look pretty bad IMHO. Some side loading wear. A couple have a rough appearing surface in maybe 1/3 of the circumference at the top. Pretty strange. Both cam and crank journals have circumferential ridges worn into them that you can feel with your fingernail.
So took things to my machinist at Shaker Racing this morning. We're going to do it up right and he promised to get things back quickly. He had previously cut me a deal for the machine work ($1200). When I asked him to itemize this morning, he said "You don't really want me to do that"! We had a good laugh and I didn't press further or ask him to cut out anything he had planned to do. Seems like a lot, but apparently I am getting a pretty good deal so I'm going to let him do what he wants. Probably has the time right now and wanted the work. He did the machine work on the 383 in my S10 pickup, so we do have a little history and I paid him plenty for that one.
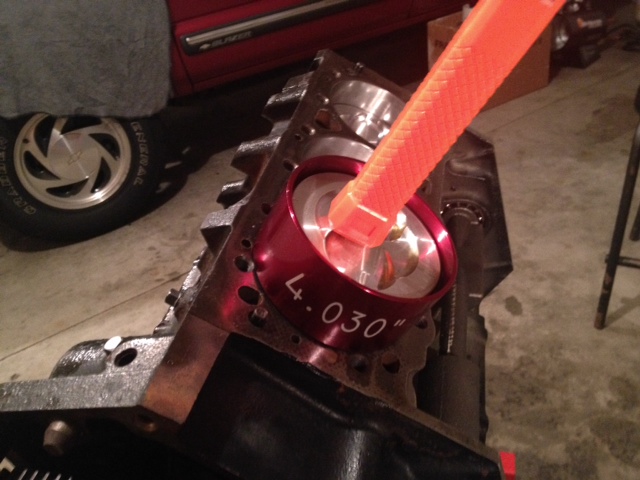
0.030 oversize on the bore + hone to fit individual pistons
line hone mains
resize and rebush rods
install and fit balance shaft rear bearing
install and hand-fit cam bearings
grind crank including thrust surfaces (should go 0.010/0.010/0.010 but will have to see)
surface heads and install new bronze valve guides, springs, and seals with valves (or grinding), valve seats (or grinding), and valve guides as required.
balance rotating assembly
hot tank all + any other parts that I want
I'm going to assemble with name brand parts Sealed Power / Clevite / FelPro / Manley / GM. New pistons, moly rings, cam/lifters, cam/main/rod/balance shaft bearings, timing chain/gears with tensioner kit and GM cover, FelPro gasket sets top/bottom with the premium head gaskets. All should be here except for the main/rod bearings (waiting for crank grinding) by tomorrow or Wednesday. Northern Auto Parts, Summit, Amazon, and Advance Auto Parts. Can you believe that Advance Auto Parts had by far the best deal on the Sealed Power camshaft - $158.88 with tax + the discount they were running online on Black Friday. I'll take the rest of the parts in for cleaning when I deliver the pistons, cam, valve stem seals, valve springs, and balance shaft bearing. I'll have him check the intake surfaces for flatness at that point.
Machinist has promised to mike everything and write it down for me so with my measurements of bearings I can do a little analysis of the clearances the engine was running with. I think it will be interesting to figure out what that #1 rod and #3 main clearances were at.
Why am I spending so much when I could buy a completely assembled rebuilt engine (with warranty) for this kind of money? I am a firm believer in knowing exactly what I am working with and the quality of the parts/machine work/labor going into it. And yes, I'm planning to go back using the Dexcool. Glad to hear someone else say it, with all the mis-information on the Internet! I have acutally heard Dex-cool being blamed for the intake gaskets leaking!
Les


Before teardown, I did perform the leakdown test (photo) Captain Hook mentioned. The valves seemed to be quite good on this engine. With the exhaust and intake manifolds off the engine it was very easy to hear if there were any leaks past any of the valves when a cylinder was pressurized. I also took a small prybar and wiggled the valve retainer back and forth with the cylinder pressurized to check the valve guides and also the sealing of the valve on the seat when rocked. All seemed tight and no leaks when rocked. Finally I tapped each valve with a heavy dead blow hammer to actuate it and observed that it resealed. Makes quite a pop with the cylinder pressurized when that valve comes off the seat!
The crankshaft sensor and reluctor did not have any marks on them from hitting anything and nothing was rubbing on the timing cover anywhere. Chain was a little loose, but within the deflection limit specified in the factory manual (11mm if I remember correctly). Timing gears did not appear worn. Distributor drive and driven gears were also unworn. So the -4� Cam Offset Retard must be from timing chain stretch and normal wear.
Took the heads off and there was virtually no ridge in any of the cylinders. Balance shaft bearings seemed tight and rear balance shaft journal seems smooth. Popped the pistons/rods out. Cylinder #1 rod cap bearing was sprung and would not retain itself in the rod cap. This bearing was noticeably more worn than the others (photos). Crank thrust measured >0.020" (2x+ too much). Took the crank out. #3 Main cap bearing was sprung and would not retain itself in the main cap. However, this bearing did not really look any different than the others (photos). Took the cam out. Cam bearings look pretty bad IMHO. Some side loading wear. A couple have a rough appearing surface in maybe 1/3 of the circumference at the top. Pretty strange. Both cam and crank journals have circumferential ridges worn into them that you can feel with your fingernail.
So took things to my machinist at Shaker Racing this morning. We're going to do it up right and he promised to get things back quickly. He had previously cut me a deal for the machine work ($1200). When I asked him to itemize this morning, he said "You don't really want me to do that"! We had a good laugh and I didn't press further or ask him to cut out anything he had planned to do. Seems like a lot, but apparently I am getting a pretty good deal so I'm going to let him do what he wants. Probably has the time right now and wanted the work. He did the machine work on the 383 in my S10 pickup, so we do have a little history and I paid him plenty for that one.
0.030 oversize on the bore + hone to fit individual pistons
line hone mains
resize and rebush rods
install and fit balance shaft rear bearing
install and hand-fit cam bearings
grind crank including thrust surfaces (should go 0.010/0.010/0.010 but will have to see)
surface heads and install new bronze valve guides, springs, and seals with valves (or grinding), valve seats (or grinding), and valve guides as required.
balance rotating assembly
hot tank all + any other parts that I want
I'm going to assemble with name brand parts Sealed Power / Clevite / FelPro / Manley / GM. New pistons, moly rings, cam/lifters, cam/main/rod/balance shaft bearings, timing chain/gears with tensioner kit and GM cover, FelPro gasket sets top/bottom with the premium head gaskets. All should be here except for the main/rod bearings (waiting for crank grinding) by tomorrow or Wednesday. Northern Auto Parts, Summit, Amazon, and Advance Auto Parts. Can you believe that Advance Auto Parts had by far the best deal on the Sealed Power camshaft - $158.88 with tax + the discount they were running online on Black Friday. I'll take the rest of the parts in for cleaning when I deliver the pistons, cam, valve stem seals, valve springs, and balance shaft bearing. I'll have him check the intake surfaces for flatness at that point.
Machinist has promised to mike everything and write it down for me so with my measurements of bearings I can do a little analysis of the clearances the engine was running with. I think it will be interesting to figure out what that #1 rod and #3 main clearances were at.
Why am I spending so much when I could buy a completely assembled rebuilt engine (with warranty) for this kind of money? I am a firm believer in knowing exactly what I am working with and the quality of the parts/machine work/labor going into it. And yes, I'm planning to go back using the Dexcool. Glad to hear someone else say it, with all the mis-information on the Internet! I have acutally heard Dex-cool being blamed for the intake gaskets leaking!
Les
Last edited by LesMyer; Dec 1, 2014 at 03:19 PM.
Thread Starter
|
Moderator
Joined: Oct 2014
Posts: 4,347
From: North Central Indiana
Attached is the analysis of the rod/main bearing and thrust clearances. Note #1 and #4 rods, #1 and #3 mains. Also note that #1 rod bottom bearing and #3 main bottom bearing were the ones that were sprung so they were not retained in the bearing caps. As far as the thrust bearing, I think grooves in the surface of crank and bearing prevented accurate measurement - the true thrust clearance being a lot more. Machinist says crank thrust surface will probably take 0.020 to clean it up. Surprisingly the cam bearings were not all that bad for clearances.
43v6.xls
I am now firmly convinced that crankshaft bearings was the entire problem with my Blazer - low oil pressure, ticking when hot, false hard P0304, and poor gas mileage. Supposed to get the engine back next week from the machinist. Guess I'll find out for sure around Christmas. Thanks for listening.
Les
Last edited by LesMyer; Dec 2, 2014 at 08:08 PM.
Thread Starter
|
Moderator
Joined: Oct 2014
Posts: 4,347
From: North Central Indiana
In excel spreadsheet attachment in last post I found errors (if anyone cares). All but one of the crankshaft journals and the rear balance shaft journal should have been color coded as out of specification.
Engine comes back from machine shop this week. Machine shop says the crankshaft turned 10/10 on rods/mains but required 20 to clean up the thrust surfaces. Bearings should be here on Thursday or Friday and I start going back together this weekend!!
Les
Engine comes back from machine shop this week. Machine shop says the crankshaft turned 10/10 on rods/mains but required 20 to clean up the thrust surfaces. Bearings should be here on Thursday or Friday and I start going back together this weekend!!
Les
Last edited by LesMyer; Dec 11, 2014 at 09:28 AM.
Thread Starter
|
Moderator
Joined: Oct 2014
Posts: 4,347
From: North Central Indiana
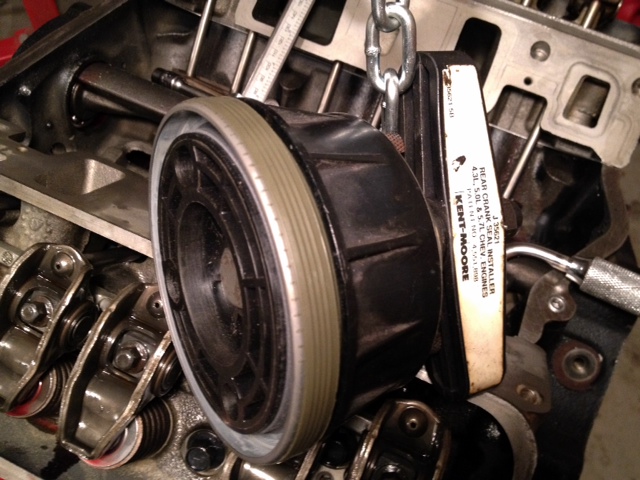
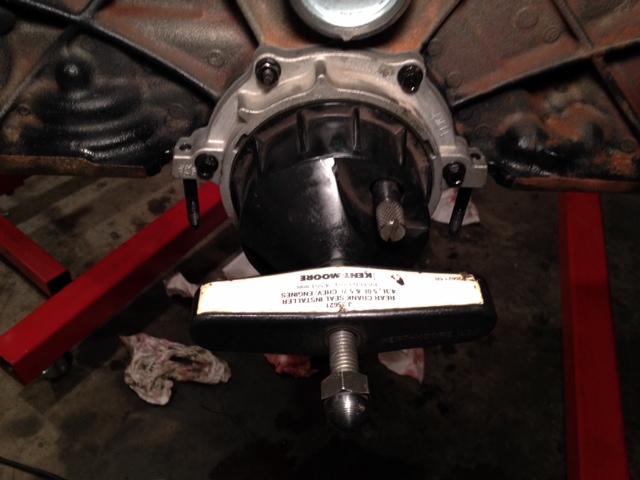
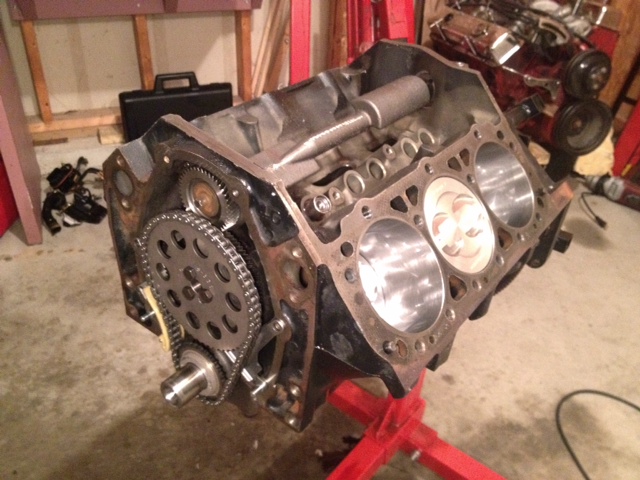
Engine is now pretty much complete and ready to go back in. Went with the Clevite P-series tri-metal bearings. Rods/mains all plastigauge between 0.0015" and 0.002". Thrust is 0.005". Pistons are Sealed Power H640DCP30 with the premium rings. Note that the piston/pin weighs about 20g more than the originals. Piston skirts at 0.0015". Compression ring gaps at 0.020". Went with the Manley timing set and chain tensioner with GM timing cover. Degreed new Sealed Power cam/lifters in on both intake and exhaust lobes and cam was exactly on both the the 106� and 116� lobe centerline spec. Reused the balance shaft, front bearing, and balance shaft gears. Also reused the pushrods and rockers. Went with all Felpro gaskets with the SD head gaskets. New Manley standard pressure/volume oil pump and screen. New Felpro headbolts after chasing holes with a tap. Used an angle gauge to tighten head bolts, mains, and rod bearings. Bought a used Kent-Moore tool to install the rear main seal ($$$ - plan to sell it). Leaving the intake off until after engine is in the truck. Painted all up yesterday with GM satin black and aluminum color caliper paint for the oil pan and intake.
So my crank sensor is one that had a shim on the original cover. Does anyone have a spec for the crank sensor to reluctor clearance? I think I can check that with a smidge of modeling clay between the two. I can't seem to find anything on this clearance in my shop manual. Want to get this right, as the original problem propagating this build was a false P0304.
Thanks in advance,
Les
Trial fitting of Manley timing gears with tensioner (yes I removed and lubricated thoroughly before installing timing cover)
Difference in timing covers to clear tensioner and pound-in tensioner locating studs

Degreeing the cam (#1 piston installed to locate TDC#1)
Preparing piston assembly

Installing the piston
Rod onto crank
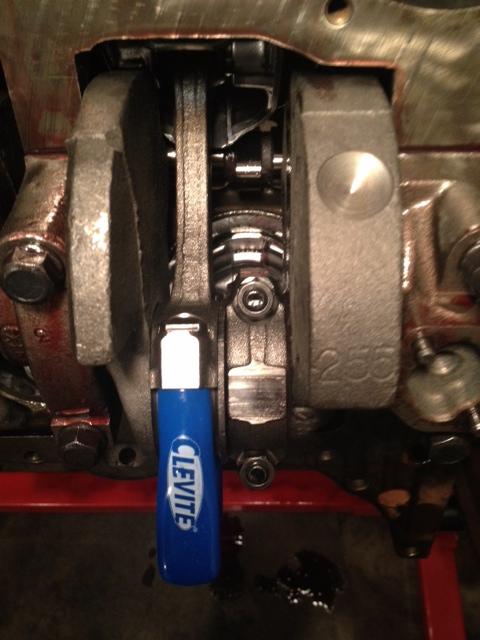
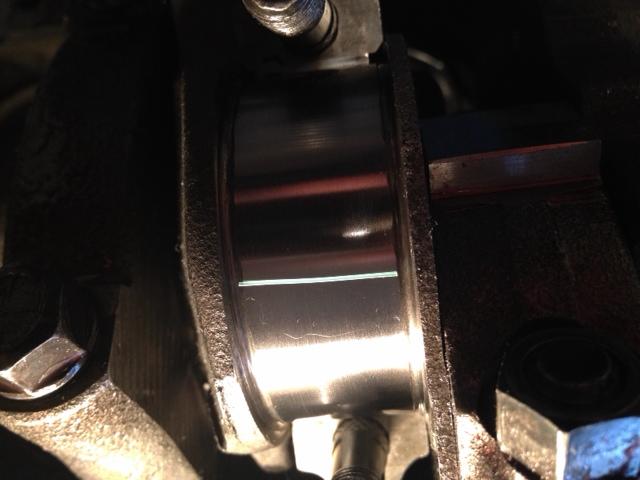
Plastigauge before
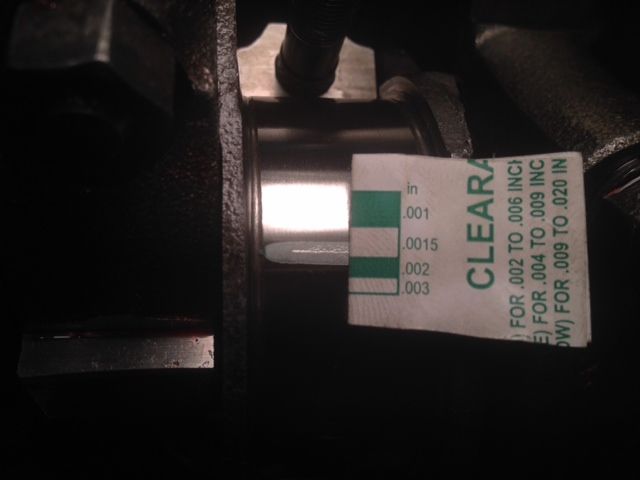
Plasigauge after
Rear main seal installer w/seal
Installing seal
Completed short block (painted with heads and oil pan later)
So my crank sensor is one that had a shim on the original cover. Does anyone have a spec for the crank sensor to reluctor clearance? I think I can check that with a smidge of modeling clay between the two. I can't seem to find anything on this clearance in my shop manual. Want to get this right, as the original problem propagating this build was a false P0304.
Thanks in advance,
Les
Trial fitting of Manley timing gears with tensioner (yes I removed and lubricated thoroughly before installing timing cover)
Difference in timing covers to clear tensioner and pound-in tensioner locating studs
Degreeing the cam (#1 piston installed to locate TDC#1)
Preparing piston assembly
Installing the piston
Rod onto crank
Plastigauge before
Plasigauge after
Rear main seal installer w/seal
Installing seal
Completed short block (painted with heads and oil pan later)
Last edited by LesMyer; Dec 22, 2014 at 01:38 PM.
