
Official DIY Body Lift
#1
 12-09-2007, 01:33 PM


Alright guys and girls here is my write up of a how to "Do It Yourself" body lift.
this can save you a good chunk of money as im sure any 4 wheel drive store would charge probally anywhere from 100-300 to install a body lift. its pretty simple, but it is time consuming and i wouldnt expect to get it all done in one night in your garage.
ok so here we go.
I started off with a 2" Performace Accessories body lift
this kit has decent instructions but the pictures in it are horrible. you just kind of have to refer to it.
first off you need to pull off your grill, front bumper, battery and battery tray and rear bumper.
take your top fan shroud off and loosen up your lower fan shroud
once you get all this done pull your oil filter off the mounting point on the frame
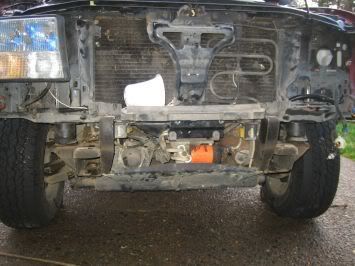
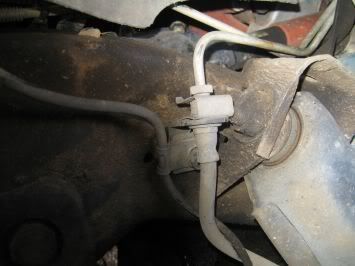
then you need to check all the brake lines along your frame rail and pull them out of the plastic blocks holding them down secure. also pull off the ground strap on the firewall inthe engine compartment.
then you need to pull out your vacuum diff acuator to make sure the lines dont get stretched or torn.
go around and loosen up all the bolts holding the body to the frame. there should be 5 on each side 10 in all.
pull all the bolts out on one side and get a floor jack with a piece of wood on it. slowly lift that side of the body, watching both sides to make sure your not pinching/stretching/breaking any lines.
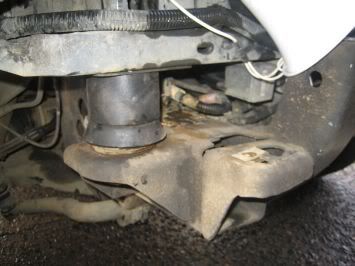
lift the body JUST enough to fit in the lift pucks. i started at the back and worked my way to the front putting them in one at a time. once you get them all in on one side (LEAVING THE BOLTS LOOSE) go to the other side, jack it up and install that side of lift pucks.(when doing this side apply locktite.
then go back to the first side you did and pull the bolts out and put locktite on them.
tighten all the bolts back down. just make sure there good and snug with the loctite you dont have to crank on it super super tight just good and snug.
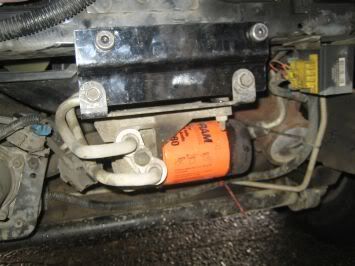
once this is all done its time to install your oil filter drop bracket.
take the supplied hardware and mounting brackets and bolt your oil filter to the bracket. then making sure not to pinch or stretch the oil lines mount the bracket to the original oil filter mounts
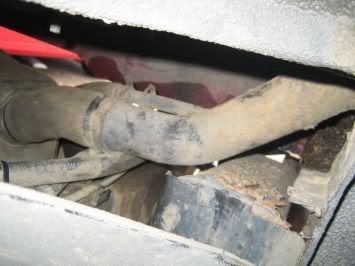
now the fuel neck mod. this is kind of tricky. loosen all of the hose clamps on the fuel filler and breather tube. take the 3 screws out that are inside the gas cap dooryou will have to squirt some wd40 up in there to get the lines to loosen up. once you do this pull out the whole fuel filler neck assembly
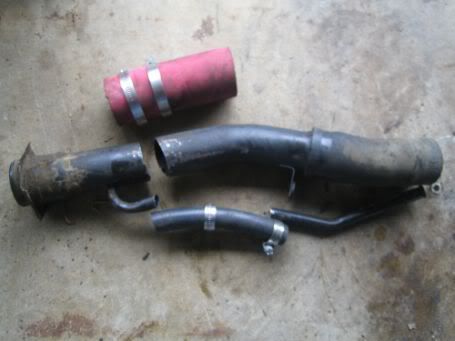
once its out cut the fuel filler and the breather tube in half like this
then take the supplied hose clamps and hose extensions and add them to make it look like this
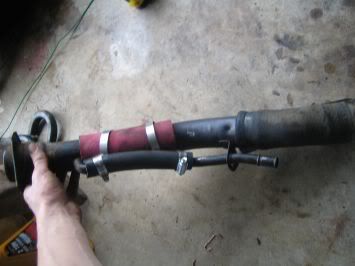
leave the hose clamps loose so you can adjust it to fit back in how it should.
now you have the acutual lift in. the fuel neck done. the oil filter done. now its time for the rear bumper.
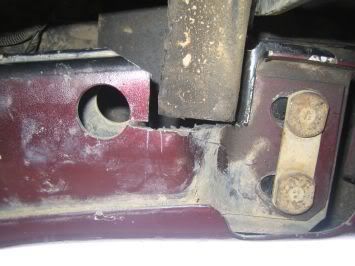
mount the provided brackets on the bumper and try to put it on. ofcourse it wont go on but this will give you an idea of what you need to trim off of it. i tried to take as little off as possible to keep my rear bumper strength for rear impact protection. this is what i ended up cutting out
[IMG]http://img.photobucket.com/albums/v218/abbott
this can save you a good chunk of money as im sure any 4 wheel drive store would charge probally anywhere from 100-300 to install a body lift. its pretty simple, but it is time consuming and i wouldnt expect to get it all done in one night in your garage.
ok so here we go.
I started off with a 2" Performace Accessories body lift
this kit has decent instructions but the pictures in it are horrible. you just kind of have to refer to it.
first off you need to pull off your grill, front bumper, battery and battery tray and rear bumper.
take your top fan shroud off and loosen up your lower fan shroud
once you get all this done pull your oil filter off the mounting point on the frame
then you need to check all the brake lines along your frame rail and pull them out of the plastic blocks holding them down secure. also pull off the ground strap on the firewall inthe engine compartment.
then you need to pull out your vacuum diff acuator to make sure the lines dont get stretched or torn.
go around and loosen up all the bolts holding the body to the frame. there should be 5 on each side 10 in all.
pull all the bolts out on one side and get a floor jack with a piece of wood on it. slowly lift that side of the body, watching both sides to make sure your not pinching/stretching/breaking any lines.
lift the body JUST enough to fit in the lift pucks. i started at the back and worked my way to the front putting them in one at a time. once you get them all in on one side (LEAVING THE BOLTS LOOSE) go to the other side, jack it up and install that side of lift pucks.(when doing this side apply locktite.
then go back to the first side you did and pull the bolts out and put locktite on them.
tighten all the bolts back down. just make sure there good and snug with the loctite you dont have to crank on it super super tight just good and snug.
once this is all done its time to install your oil filter drop bracket.
take the supplied hardware and mounting brackets and bolt your oil filter to the bracket. then making sure not to pinch or stretch the oil lines mount the bracket to the original oil filter mounts
now the fuel neck mod. this is kind of tricky. loosen all of the hose clamps on the fuel filler and breather tube. take the 3 screws out that are inside the gas cap dooryou will have to squirt some wd40 up in there to get the lines to loosen up. once you do this pull out the whole fuel filler neck assembly
once its out cut the fuel filler and the breather tube in half like this
then take the supplied hose clamps and hose extensions and add them to make it look like this
leave the hose clamps loose so you can adjust it to fit back in how it should.
now you have the acutual lift in. the fuel neck done. the oil filter done. now its time for the rear bumper.
mount the provided brackets on the bumper and try to put it on. ofcourse it wont go on but this will give you an idea of what you need to trim off of it. i tried to take as little off as possible to keep my rear bumper strength for rear impact protection. this is what i ended up cutting out
[IMG]http://img.photobucket.com/albums/v218/abbott


#3
12-09-2007, 03:51 PM

are those tires 235/75's? cause they look hella small with your 2" lift... :O

#5
12-09-2007, 06:32 PM
yep there the stock 235/70's my 31x10.50 bfg mud terrains should come in wensday along with my pro comp wheels. they had to have my wheels custom built i guess so its taking forever to get them. but yea it does look kind of stupid being so high with strock tires and wheels. thats why its just sittin in the driveway for now. i think to fix my shifting problems me and my dad are going to build a new shift lever that isnt as fat as the stock one and maybe add a bend in it to give it more clearance of the console. but for now i have to drive it with my console pulled back from the normal position so i can get into 2nd 4th and reverse.
#6
12-09-2007, 07:57 PM
i think it should be said that this is for 98+ blazers only. I believe (someone confirm this) that with the 95 through 97 BL you do not have to drop the oil filter nor lengthen the filler neck. (Atleast that's what I have heard) ???????
#7
12-09-2007, 09:50 PM

ORIGINAL: kankoon52
yep there the stock 235/70's my 31x10.50 bfg mud terrains should come in wensday along with my pro comp wheels. they had to have my wheels custom built i guess so its taking forever to get them. but yea it does look kind of stupid being so high with strock tires and wheels. thats why its just sittin in the driveway for now. i think to fix my shifting problems me and my dad are going to build a new shift lever that isnt as fat as the stock one and maybe add a bend in it to give it more clearance of the console. but for now i have to drive it with my console pulled back from the normal position so i can get into 2nd 4th and reverse.
yep there the stock 235/70's my 31x10.50 bfg mud terrains should come in wensday along with my pro comp wheels. they had to have my wheels custom built i guess so its taking forever to get them. but yea it does look kind of stupid being so high with strock tires and wheels. thats why its just sittin in the driveway for now. i think to fix my shifting problems me and my dad are going to build a new shift lever that isnt as fat as the stock one and maybe add a bend in it to give it more clearance of the console. but for now i have to drive it with my console pulled back from the normal position so i can get into 2nd 4th and reverse.
#8
12-10-2007, 01:21 PM
yes this IS for a 1998-2003 chevy blazer or gmc jimmy
as for now i just moved my console back a little to allow me to drive it while i make a new shifter. i plan to get a piece of stainless steel and weld a thread to the bottom and one to the top for a shift ****. and i may put a bend in it or something. but i cant do that till i have my dads help which i think will be this coming weekend or the next one.
as for now i just moved my console back a little to allow me to drive it while i make a new shifter. i plan to get a piece of stainless steel and weld a thread to the bottom and one to the top for a shift ****. and i may put a bend in it or something. but i cant do that till i have my dads help which i think will be this coming weekend or the next one.
#9
12-11-2007, 03:11 PM
UPDATE: I added pics with the gap gaurds installed and a few more pics including another rear bumper modification pic, a ground strap bracket pic, and a negative battery cable modification pic.
please let me know asap if there is anything you would like to see added to this that i left out. im trying to cover as much as i can and at this point im pretty sure i covered every major part. but if you find something please let me know!
please let me know asap if there is anything you would like to see added to this that i left out. im trying to cover as much as i can and at this point im pretty sure i covered every major part. but if you find something please let me know!
#10
12-18-2007, 04:35 PM
finally got my wheels and tires. i think to fix the shift problem im just going to move the counsel back a little.
[IMG]local://upfiles/7265/9C51702EFBEC4C7B88DF566F2A9762DF.jpg[/IMG]
[IMG]local://upfiles/7265/2335E83FE246439897EEF04860519E95.jpg[/IMG]
[IMG]local://upfiles/7265/F34A54B687EF40F9949A7512CFC1BCAF.jpg[/IMG]
[IMG]local://upfiles/7265/9C51702EFBEC4C7B88DF566F2A9762DF.jpg[/IMG]
[IMG]local://upfiles/7265/2335E83FE246439897EEF04860519E95.jpg[/IMG]
[IMG]local://upfiles/7265/F34A54B687EF40F9949A7512CFC1BCAF.jpg[/IMG]