
How to clearance lights/roof marker lights/ lots of pics and 2 videos


Thread Starter
|
Banned
Joined: Aug 2009
Posts: 1,162

tools/materials & info
drill
drill bits
self tapping screws
screwdriver
torx
tape measure
clearance lights (avalible at advance auto) if you do go with these they come with an ugly silver base, i painted mine black with a sharpie marker, talk about cheap touch up paint
add a circuit fuse (also availible at advance auto)
a friend
and about 2hrs of time
Prep work
the headliner has to be partially removed to do this. first remove your overhead console if you have one. remove the 1 screw in the front and the 2 in the back after you remove the plastic lens cover

gently lower the overhead console. there is a few harnesses that need to be unplugged. set it aside in a safe place. next the visors need to be removed. this is where the torx come into play. there is 3 torx for each visor.

gently lower the visor and gently pull on the wire to where you can unclip the harness that is hidden above the headliner. the clips also have a torx but might need some persuasion with a flat bladed screwdriver to remove. be careful and do not gouge your headliner.
now gently pull down on your headliner until you have enough room to get your hands in to make a few splices.
math time
now you have to make a decision. do you want the equally spaced out look or the ford superduty look. i chose the ford look because that is what my measurements are based on and scaled down. if you want to do equally spaced take a look at the trim pieces underneath the roof rack. they make a good reference

now here are my measuerments for the superduty look

from left to right: 5.5", 8.5", 5.5",5.5", 8.5", 5.5"
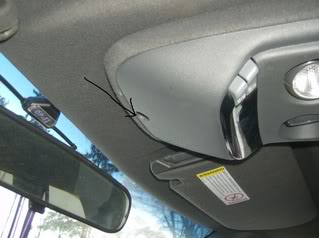
just to clarify where i measured from. the metal piece where the arrow is pointing.

also the lights have to sit back a little. that measurement is 1.75" and is measured from the back piece of the black trim to the front of the light shown below.

now here is where your friend comes into place. have them adjust the lights side to side and you stand in front to verify they are in fact straight. triple check your measurements and that you like the placement before you continue. then mark with a pencil where your will be drilling. then remove your lights and mark the spot halfway between the two holes. this third hole will be where your power wire enters your cab. the power wire hole only has to be big enough to fit the wire through.(so make it the smallest of your holes)
the scary part
now its time to drill. like i said triple check your measurements. make sure your drill bit is slighty smaller then your self tapping screw. then drill your 15 holes. yes thats right 15 holes. before putting your lights on. apply a small dab of silicone to the power wire hole and the NON GROUND self tapping screw. if you put silicone on the ground your lights will not work because silicone is an insulator. silicone is a really cheap insurance for leaks too. the light company claims you do not need silicone but i highly recommend putting it on. the self tapping screw on the right is the non ground screw.

sparky time
the best way to wire these lights up is in parallel. if you purchase the advance auto kit it will include the correct splices. best way i know how to describe the splice is a trailer splice where 1 wire becomes 2. here is a very crude drawing i drew to illustrate the basic hook up of the lights.

after that run the power wire down and along the drivers a-pillar. in the pic my wire is yellow

run this down to where the windshield meets the dash. here there is a small space to feed the power wire down behind the dash and essentially hiding it from plain site. now remember that kick panel you removed. this is where you can get access to reach the wire then feed it to the fuse block. here crimp the power wire into the add-a circuit. dont pay any attention to those black vac lines.

make sure to read the instrucctions included with the add-a-circuit to properly hook up your existing factory parkling lights. the correct fuse can be found in your owners manual.
the nice thing about the add-a-circuit: you run the clearance lights off the factory switch, the lights can be flashed with keyless entry,
finishing touches
remember all that stuff you tore apart to get these lights in. thats all got to go back together, oh man is right.lol
alright heres the final product.


video:
http://www.youtube.com/watch?v=MQi7j...eature=channel
http://www.youtube.com/watch?v=9vXb0...eature=channel
keyless entry flash in 2nd video
any questions or comments, just post below.
all measuments are in inches (not to confuse our metric friends)
*currently 2 in existence, 1 other including mine in kzoo, its a jimmy that has them on too
drill
drill bits
self tapping screws
screwdriver
torx
tape measure
clearance lights (avalible at advance auto) if you do go with these they come with an ugly silver base, i painted mine black with a sharpie marker, talk about cheap touch up paint
add a circuit fuse (also availible at advance auto)
a friend
and about 2hrs of time
Prep work
the headliner has to be partially removed to do this. first remove your overhead console if you have one. remove the 1 screw in the front and the 2 in the back after you remove the plastic lens cover
gently lower the overhead console. there is a few harnesses that need to be unplugged. set it aside in a safe place. next the visors need to be removed. this is where the torx come into play. there is 3 torx for each visor.
gently lower the visor and gently pull on the wire to where you can unclip the harness that is hidden above the headliner. the clips also have a torx but might need some persuasion with a flat bladed screwdriver to remove. be careful and do not gouge your headliner.
now gently pull down on your headliner until you have enough room to get your hands in to make a few splices.
math time
now you have to make a decision. do you want the equally spaced out look or the ford superduty look. i chose the ford look because that is what my measurements are based on and scaled down. if you want to do equally spaced take a look at the trim pieces underneath the roof rack. they make a good reference
now here are my measuerments for the superduty look
from left to right: 5.5", 8.5", 5.5",5.5", 8.5", 5.5"
just to clarify where i measured from. the metal piece where the arrow is pointing.
also the lights have to sit back a little. that measurement is 1.75" and is measured from the back piece of the black trim to the front of the light shown below.
now here is where your friend comes into place. have them adjust the lights side to side and you stand in front to verify they are in fact straight. triple check your measurements and that you like the placement before you continue. then mark with a pencil where your will be drilling. then remove your lights and mark the spot halfway between the two holes. this third hole will be where your power wire enters your cab. the power wire hole only has to be big enough to fit the wire through.(so make it the smallest of your holes)
the scary part
now its time to drill. like i said triple check your measurements. make sure your drill bit is slighty smaller then your self tapping screw. then drill your 15 holes. yes thats right 15 holes. before putting your lights on. apply a small dab of silicone to the power wire hole and the NON GROUND self tapping screw. if you put silicone on the ground your lights will not work because silicone is an insulator. silicone is a really cheap insurance for leaks too. the light company claims you do not need silicone but i highly recommend putting it on. the self tapping screw on the right is the non ground screw.
sparky time
the best way to wire these lights up is in parallel. if you purchase the advance auto kit it will include the correct splices. best way i know how to describe the splice is a trailer splice where 1 wire becomes 2. here is a very crude drawing i drew to illustrate the basic hook up of the lights.
after that run the power wire down and along the drivers a-pillar. in the pic my wire is yellow
run this down to where the windshield meets the dash. here there is a small space to feed the power wire down behind the dash and essentially hiding it from plain site. now remember that kick panel you removed. this is where you can get access to reach the wire then feed it to the fuse block. here crimp the power wire into the add-a circuit. dont pay any attention to those black vac lines.
make sure to read the instrucctions included with the add-a-circuit to properly hook up your existing factory parkling lights. the correct fuse can be found in your owners manual.
the nice thing about the add-a-circuit: you run the clearance lights off the factory switch, the lights can be flashed with keyless entry,
finishing touches
remember all that stuff you tore apart to get these lights in. thats all got to go back together, oh man is right.lol
alright heres the final product.
video:
http://www.youtube.com/watch?v=MQi7j...eature=channel
http://www.youtube.com/watch?v=9vXb0...eature=channel
keyless entry flash in 2nd video
any questions or comments, just post below.
all measuments are in inches (not to confuse our metric friends)
*currently 2 in existence, 1 other including mine in kzoo, its a jimmy that has them on too
Last edited by swartlkk; Mar 29, 2010 at 10:47 AM. Reason: *OP Deleted Images - Restoring to BF.com


Thread
Thread Starter
Forum
Replies
Last Post
Dunkshouse
1st Generation S-series (1983-1994) Tech
1
Apr 25, 2013 07:32 PM
93 s10 justin
1st Generation S-series (1983-1994) Tech
6
Mar 5, 2010 04:09 PM
Spectreblazer
Off Roading
17
Jan 14, 2010 08:10 PM