
How to: Handmade heat shield and intake - DISCUSSION THREAD

Thread Starter
|
BF Veteran
Joined: Feb 2007
Posts: 3,335


Want the benefits of a Cold-Air Intake (CAI) such as K&N`s, AEM`s, Air Raid`s, et cetera, but don`t have the cash to blow? Not too sure about a "kit" off eBay? Want the satisfaction of using your hands (and tools) to create one of your own? These instructions will work for 1996 through end of production for Chevrolet Blazers, GMC Jimmys, and Oldsmobile Bravadas equipped with the 4.3 Vortec.
The following will show you how to make your own CAI, all for under $100; all with pretty common tools (and with a little help from a friend). There is no drilling required and you can return your vehicle to stock if you so wish with no signs of any modifications made! I will attempt to be as informative as possible, please feel free to reply or PM with any questions. I am by no means a professional mechanic, but that`s the beauty of this modification-you don`t need to be! Please read entire how-to if you intend on building one of your own as there are some different options you may choose that will affect appearance and/or price.
TOOLS NECESSARY:
Phillips head screwdriver
Flathead screwdriver
10mm wrench or 10mm deep-well socket and ratchet
Hammer
Sheet metal snips (I used 7" straight snips, you may have better luck with smaller but I did not want to cut FEET of sheet metal with anything smaller)
Needle nose pliers
Scissors
Utility knife
Work gloves (if you intend on cutting the sheet metal yourself)
Sharpie marker
TOOLS NICE TO HAVE IF YOU HAVE ACCESS:
Center punch
Drill with 1/4" metal bit
Sheet metal shear
Sheet metal bender
Band saw/pipe cutter/Sawzall
3.5" metal hole saw
SUPPLIES NEEDED:
The following supplies were purchased at my local hardware store:
Minimum 24" wide by 24" long sheet metal (I used 24" wide by 30" long just to be safe)
3/4" by 1/2" corner braces (or similar hardware)
3" High-heat capable rubber coupling (usually comes with hose clamps but just in case...)
Two 3" hose clamps
Two (or more if you prefer) each of machine screws, washers, and nuts (all in same or smaller diameter as holes punched)
One sheet metal screw (see Step 2 under "Installation of Heat Shield..." for size)
4-5 feet of 3/8" fuel line (or similar high-heat capable material, i.e. hood weather-stripping)
7-8 inches of 1/4" fuel line or washer fluid hose
1 can of high heat paint (your choice of color, there are links under "Conclusion" that show the difference between flat black and aluminum)
1 tube of RTV sealant (not necessary)
3" Mandrel-bent, 45 degree pipe (I got mine from a local performance garage)
Spare cardboard lying around (a case of beer box is large and rigid enough)
This how-to got cut off as a result of a forum hack.
Here is a link to a slideshow with descriptions and pictures:
http://s702.photobucket.com/albums/w...view=slideshow
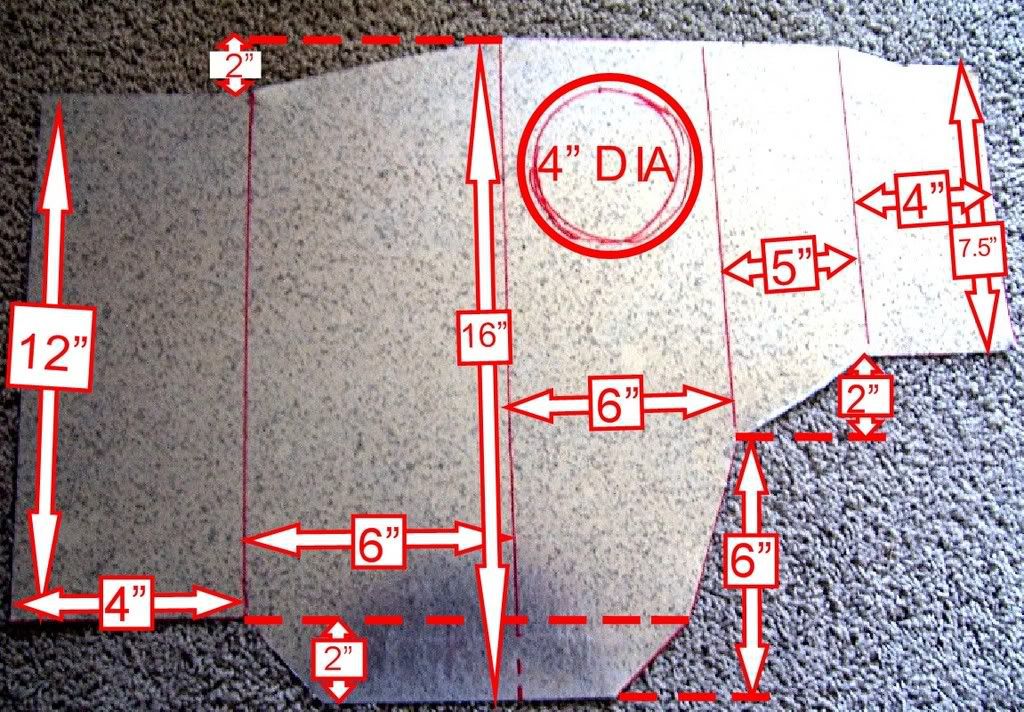
Here is the template:
The following will show you how to make your own CAI, all for under $100; all with pretty common tools (and with a little help from a friend). There is no drilling required and you can return your vehicle to stock if you so wish with no signs of any modifications made! I will attempt to be as informative as possible, please feel free to reply or PM with any questions. I am by no means a professional mechanic, but that`s the beauty of this modification-you don`t need to be! Please read entire how-to if you intend on building one of your own as there are some different options you may choose that will affect appearance and/or price.
TOOLS NECESSARY:
Phillips head screwdriver
Flathead screwdriver
10mm wrench or 10mm deep-well socket and ratchet
Hammer
Sheet metal snips (I used 7" straight snips, you may have better luck with smaller but I did not want to cut FEET of sheet metal with anything smaller)
Needle nose pliers
Scissors
Utility knife
Work gloves (if you intend on cutting the sheet metal yourself)
Sharpie marker
TOOLS NICE TO HAVE IF YOU HAVE ACCESS:
Center punch
Drill with 1/4" metal bit
Sheet metal shear
Sheet metal bender
Band saw/pipe cutter/Sawzall
3.5" metal hole saw
SUPPLIES NEEDED:
The following supplies were purchased at my local hardware store:
Minimum 24" wide by 24" long sheet metal (I used 24" wide by 30" long just to be safe)
3/4" by 1/2" corner braces (or similar hardware)
3" High-heat capable rubber coupling (usually comes with hose clamps but just in case...)
Two 3" hose clamps
Two (or more if you prefer) each of machine screws, washers, and nuts (all in same or smaller diameter as holes punched)
One sheet metal screw (see Step 2 under "Installation of Heat Shield..." for size)
4-5 feet of 3/8" fuel line (or similar high-heat capable material, i.e. hood weather-stripping)
7-8 inches of 1/4" fuel line or washer fluid hose
1 can of high heat paint (your choice of color, there are links under "Conclusion" that show the difference between flat black and aluminum)
1 tube of RTV sealant (not necessary)
3" Mandrel-bent, 45 degree pipe (I got mine from a local performance garage)
Spare cardboard lying around (a case of beer box is large and rigid enough)
This how-to got cut off as a result of a forum hack.
Here is a link to a slideshow with descriptions and pictures:
http://s702.photobucket.com/albums/w...view=slideshow
Here is the template:
BF Veteran
Joined: Feb 2007
Posts: 3,128
From: Princeton, NC, USA
Ithink I'll make me one tomorrow... with company sheet metal...
I think I'll go further and insulate the box with duct liner... I'll try it and if it is good I'll post it.

No problem at all Gary! Something just seems messed up in our current forum software. I never used to have a problem, but then, the old post format was plain text with tags. The new format converts the tags making things a pain... Then it doesn't like to remember everything you copy and paste, LOL! It all worked out in the end, just took a bit more time to get sorted out.


Thread Starter
|
BF Veteran
Joined: Feb 2007
Posts: 3,335
Pfffft, garage! Didn't you see the carpet in the background of the sheet metal template? I did this in my living room, LOL! Nah, I live in a two bedroom townhouse, and the landlord gets all heeby-jeeby if you even change a tire in your parking spot. Just had to make do! Thanks for the compliments!
BF Veteran
Joined: Feb 2007
Posts: 3,128
From: Princeton, NC, USA
I just finished making mine, except, for me... it didn't cost anything... thats what is nice about having an Heating &A/C shop in your backyard...
Instead of using fuel line to outline everything, I used door edge molding. In the end it turned out great except my 11.5in filter is way too big. I'll have to downsize to fit it correctly. When I get a new filter, I'll take out everything ans soak it with white vinegar (to removeoil- sheet metalhas apre-oiled surface) and paint it black or aluminum silver.
I may go back (now that I know how) and make a new sheildandchange some thingsit to better seal it.
