
How-to: Installing AC plugs and power inverter. -- DISCUSSION

Thread Starter
|
BF Veteran
Joined: Feb 2007
Posts: 3,128
From: Princeton, NC, USA

HOW-TO INSTALLING 110-120 VAC PLUGS AND POWER INVERTER
"house plugs"
Here's my step-by-step guide to installing a power inverter and externalizing the plugs and switch.
NEEDS LIST:
Power inverter
small phillips screwdriver
small slotted screwdriver
350-450�F Soldering Iron (for plastic welding and wire soldering)
1/4" drive socket and ratchet set
Long post OEM battery terminal
2x-- 5-10' of 3-wire electrical wire or drop cord
6-gauge red power cable 40" long (4gauge and a splitter can be used in case you want to hook up another inverter or an amp.)
4 ft of 16 gauge wire to externalize inverter switch
three prong receptacle
washer style electrical connector
Sharpie marker
digital multimeter
tylenol (optional, to get rid of a possible PITA)
1st step:
Getting an inverter
You need to choose a power inverter, AutoZone has a Schumacher power inverter for $50-60us, $65-75ca. You'll need to have the battery connectors with the power inverter.
2nd step:
Preparing inverter for installation
Test the inverter by clamping it to the battery. If it works, continue.
Take out the four screws that hold in the switch and the outlets. Using your slotted screwdriver, pry out the I/O switch. Use your soldering iron to remove the wires from the switch. Splice the 16 gauge wires with the wires that you just disconnected from the switch, then solder the other ends of the 16 to the switch.
3rd step.
Mount the inverter.
Lay the inverter in the glove compartment as shown below. You may tie down the inverter if you like with zip ties, but once you close up the glove compartment, it ain't gonna go anywhere.

4th step.
Run the battery cable
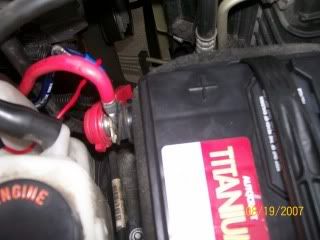
Find the grommet in the passenger side floorboard. Its just under the carpet at the firewall. Run your red cable through the hole a pick it up through the engine bay making sure you avoid the manifold. Disconnect the positive battery post and replace it with the new long battery post. You may use a bushing or washers to make sure that the post is tight.
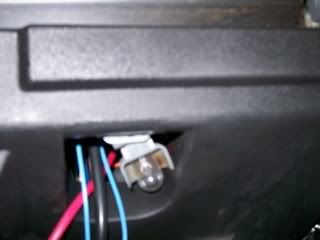
All cables going into glove compartment will go in through the gab around the interior light bulb.
Cut off the clamp ends of cable that came with the unit. Splice the red cable with the oneyou just ran to the battery. Making sure your switch is off, connect it to the inverter.
Running the ground is simple. Cut the clamp off the black cable. Crimp on the washer style connectors. Connect that end of the cable to one of the bolts in the glove compartment. Do not connect ground to the inverter until you are done. Its possible that you may blow a fuse.
5th Step
Running the drop cords.
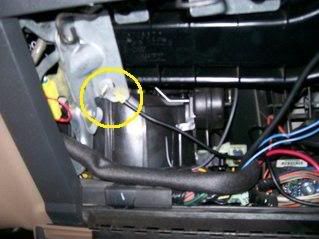
Take out the console lay-in. Take out the peice in the back of the console. Cut the female end off of the drop cords. Attach the male ends to the inverter and run them down through the light gap. Go back toward the firewall with them and tuck them under the carpet. Make a left turn and go toward the console. Make another left turn and take the cords alongside the console. Poke the ends under the console compartment. And reach down into the console and pull the cords up. Run the cords through the hole in the back of the aluminum brace in the back of the console. Pull the cord out of the back of the console. Poke the cords inside the console to hide them.
6th step
Prepping the panel.
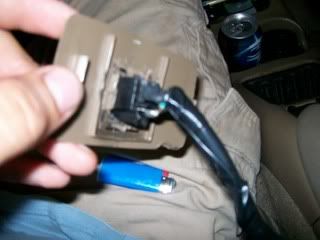
Use your sharpie marker and your plug to mark a cutout. Use the Plastic welding tip for your soldering iron to melt a hole for the plug. Slide the plug into the hole. Turn over the panel and use the chisel tip the melt the plastic of the plug and the panel together.
7th step
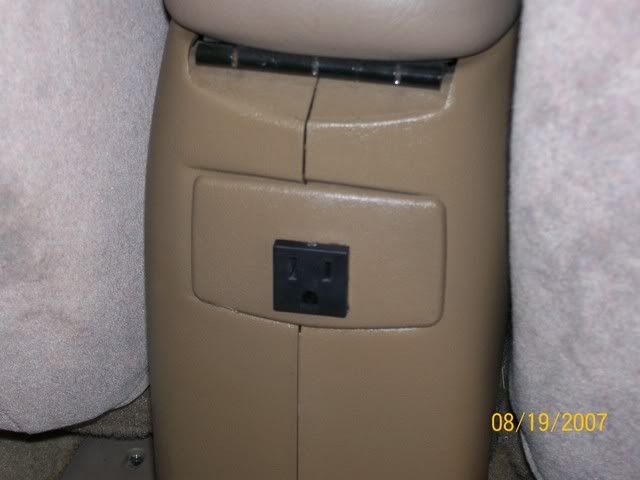
Connect the plugs and stick the panel back in.
Solder the wires to the plug and heat shrink them. Black should go to the wider slot of the plug, white the the smaller slot, green to the third prong.
Stick the panel back in, you may hot glue it in if it will not stay in.
8th step
Mounting the switch
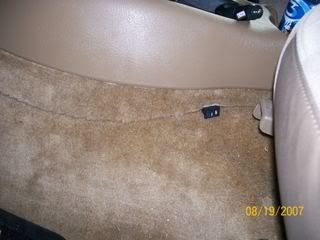
Run the switch to where ever you want, for me, I put it in an inconspicuous place.
9th step
Connect the ground cable to the inverter and you're ready to go!
Enjoy your DVD players, your guitar amp, your...lava lamp..., or a blender for parties!!
Finished product:
http://s159.photobucket.com/albums/t...goldls/How-to/
"house plugs"
Here's my step-by-step guide to installing a power inverter and externalizing the plugs and switch.
NEEDS LIST:
Power inverter
small phillips screwdriver
small slotted screwdriver
350-450�F Soldering Iron (for plastic welding and wire soldering)
1/4" drive socket and ratchet set
Long post OEM battery terminal
2x-- 5-10' of 3-wire electrical wire or drop cord
6-gauge red power cable 40" long (4gauge and a splitter can be used in case you want to hook up another inverter or an amp.)
4 ft of 16 gauge wire to externalize inverter switch
three prong receptacle
washer style electrical connector
Sharpie marker
digital multimeter
tylenol (optional, to get rid of a possible PITA)
1st step:
Getting an inverter
You need to choose a power inverter, AutoZone has a Schumacher power inverter for $50-60us, $65-75ca. You'll need to have the battery connectors with the power inverter.
2nd step:
Preparing inverter for installation
Test the inverter by clamping it to the battery. If it works, continue.
Take out the four screws that hold in the switch and the outlets. Using your slotted screwdriver, pry out the I/O switch. Use your soldering iron to remove the wires from the switch. Splice the 16 gauge wires with the wires that you just disconnected from the switch, then solder the other ends of the 16 to the switch.
3rd step.
Mount the inverter.
Lay the inverter in the glove compartment as shown below. You may tie down the inverter if you like with zip ties, but once you close up the glove compartment, it ain't gonna go anywhere.
4th step.
Run the battery cable
Find the grommet in the passenger side floorboard. Its just under the carpet at the firewall. Run your red cable through the hole a pick it up through the engine bay making sure you avoid the manifold. Disconnect the positive battery post and replace it with the new long battery post. You may use a bushing or washers to make sure that the post is tight.
All cables going into glove compartment will go in through the gab around the interior light bulb.
Cut off the clamp ends of cable that came with the unit. Splice the red cable with the oneyou just ran to the battery. Making sure your switch is off, connect it to the inverter.
Running the ground is simple. Cut the clamp off the black cable. Crimp on the washer style connectors. Connect that end of the cable to one of the bolts in the glove compartment. Do not connect ground to the inverter until you are done. Its possible that you may blow a fuse.
5th Step
Running the drop cords.
Take out the console lay-in. Take out the peice in the back of the console. Cut the female end off of the drop cords. Attach the male ends to the inverter and run them down through the light gap. Go back toward the firewall with them and tuck them under the carpet. Make a left turn and go toward the console. Make another left turn and take the cords alongside the console. Poke the ends under the console compartment. And reach down into the console and pull the cords up. Run the cords through the hole in the back of the aluminum brace in the back of the console. Pull the cord out of the back of the console. Poke the cords inside the console to hide them.
6th step
Prepping the panel.
Use your sharpie marker and your plug to mark a cutout. Use the Plastic welding tip for your soldering iron to melt a hole for the plug. Slide the plug into the hole. Turn over the panel and use the chisel tip the melt the plastic of the plug and the panel together.
7th step
Connect the plugs and stick the panel back in.
Solder the wires to the plug and heat shrink them. Black should go to the wider slot of the plug, white the the smaller slot, green to the third prong.
Stick the panel back in, you may hot glue it in if it will not stay in.
8th step
Mounting the switch
Run the switch to where ever you want, for me, I put it in an inconspicuous place.
9th step
Connect the ground cable to the inverter and you're ready to go!
Enjoy your DVD players, your guitar amp, your...lava lamp..., or a blender for parties!!
Finished product:
http://s159.photobucket.com/albums/t...goldls/How-to/
Thread Starter
|
BF Veteran
Joined: Feb 2007
Posts: 3,128
From: Princeton, NC, USA
Thanks guys. I gotta tear it back down and re-solder one of the prongs on the plugs, But it works better than I though it would. Believe me, it packs a shocking punch. Thats why I put in there to leave the ground as the last thing you connect! I'm gonna go back and complete it byadding the second receptacle. I'm thinking about where to put it. I think I maytake out the ashtray and modifythe space intoaflat panel, and mount the receptacle there.
Thread Starter
|
BF Veteran
Joined: Feb 2007
Posts: 3,128
From: Princeton, NC, USA
Yeah you're right. A receptacle in the rear would be a lot more useful for my guitar amp and stuff. And if I go with regular residential three-wire, It will be flat enough to put under the floor trim and get it to the back.
I'm just tossing around my ideas right now, so I don't know yet what I'll do.
I'm just tossing around my ideas right now, so I don't know yet what I'll do.

Thread Starter
|
BF Veteran
Joined: Feb 2007
Posts: 3,128
From: Princeton, NC, USA
Yeah man you need to do it. The total cost is around $75 the way I did it. If I add another receptacle, I'm looking at 5-10 more dollars. I have some electrical wire left and I also still have a few feet of that drop cord left.
BF Veteran
Joined: May 2007
Posts: 2,713
From: Chicago, IL

i know this is an old post but will a power inverter heat up very much? i saw one at pepboys the other day (maybe like a week or two ago so it probably isnt on sale anymore) and it was $25 after a mail-in-rebate. it was a 400watt which IMO is a great deal... i really wish i had bought it

BF Veteran
Joined: Jan 2007
Posts: 3,946
From: GP AB CA
It depends... usually the smaller ones won't heat up too much... I've got a 400 or so watt one, that's got a built in fan to help keep it cool...
If you run it near maximum capacity a long time it'll definitely get somewhat toasty...
If you run it near maximum capacity a long time it'll definitely get somewhat toasty...