1999 Sandblazer Build

Thread Starter
|
Starting Member
Joined: Jun 2016
Posts: 206
From: LAS VEGAS, NV

Umm Sandblazer is the truck name, not sure I will be
doing sand dunes, but I live in the desert and thought
it sounded better then xxxxxxxxxxx..Lol
So I wanted to replace all parts that show wear or are worn already.
Then the fun stuff like light bars, lift kit etc...I will start soon.
Only a few pics so far since most work done under truck.
I put the Sandblazer badge on rear window
and the windshield logo will go on when the window
tint is done in a few weeks.
So far just under $ 2,000 between June 10 & June 15
-----Items DONE--------
Axel - Left Front
Brake fluid flush service
Brake Master Cylinder
Differential Flush
Fuel Injector service
Idler Arm
Inner Tie rods
Outer Tie rods
Pitman arm
Rear Pinion seal
Steam clean Suspension / Engine/ Trans ** Shop did Free **
Sway Bar Links ** Shop did Free **
Trans flush service
Trans Pan Gasket
Wheel alignment
Thread Starter
|
Starting Member
Joined: Jun 2016
Posts: 206
From: LAS VEGAS, NV
Started on the fun stuff, scheduled install of my Kenwood receiver, 4 Alpine speakers in the doors and my Pyle amp to be installed on Thursday.
I did manage to get the original untouched factory trailer wiring hooked into my LED Bow tie hitch cover today.
I did manage to get the original untouched factory trailer wiring hooked into my LED Bow tie hitch cover today.


Thread Starter
|
Starting Member
Joined: Jun 2016
Posts: 206
From: LAS VEGAS, NV
Thread Starter
|
Starting Member
Joined: Jun 2016
Posts: 206
From: LAS VEGAS, NV
Got the two front windows tinted to match rear ones,
and the front windshield limo dark strip done...also got my graphics installed...I have to re-take pics...sun was just too bright made the bright yellow come out darker on front and rear windows.
..

and the front windshield limo dark strip done...also got my graphics installed...I have to re-take pics...sun was just too bright made the bright yellow come out darker on front and rear windows.
..
Last edited by cdtek101; Jun 24, 2016 at 08:13 PM.


Thread Starter
|
Starting Member
Joined: Jun 2016
Posts: 206
From: LAS VEGAS, NV
Got the LED light bar mounted to the bull bar.
Figured out where to run the harness into the cab.
I am going through the antenna grommet, on passenger
side floor/firewall section inside the cab....just took
a very bright led light and a screw driver to figure
out where it came out on engine side fire wall...but I see
where now...Lol
It is close to exhaust pipe, so I am going to pick up
some type of insulation to wrap around harness for
that small section.
Thread Starter
|
Starting Member
Joined: Jun 2016
Posts: 206
From: LAS VEGAS, NV
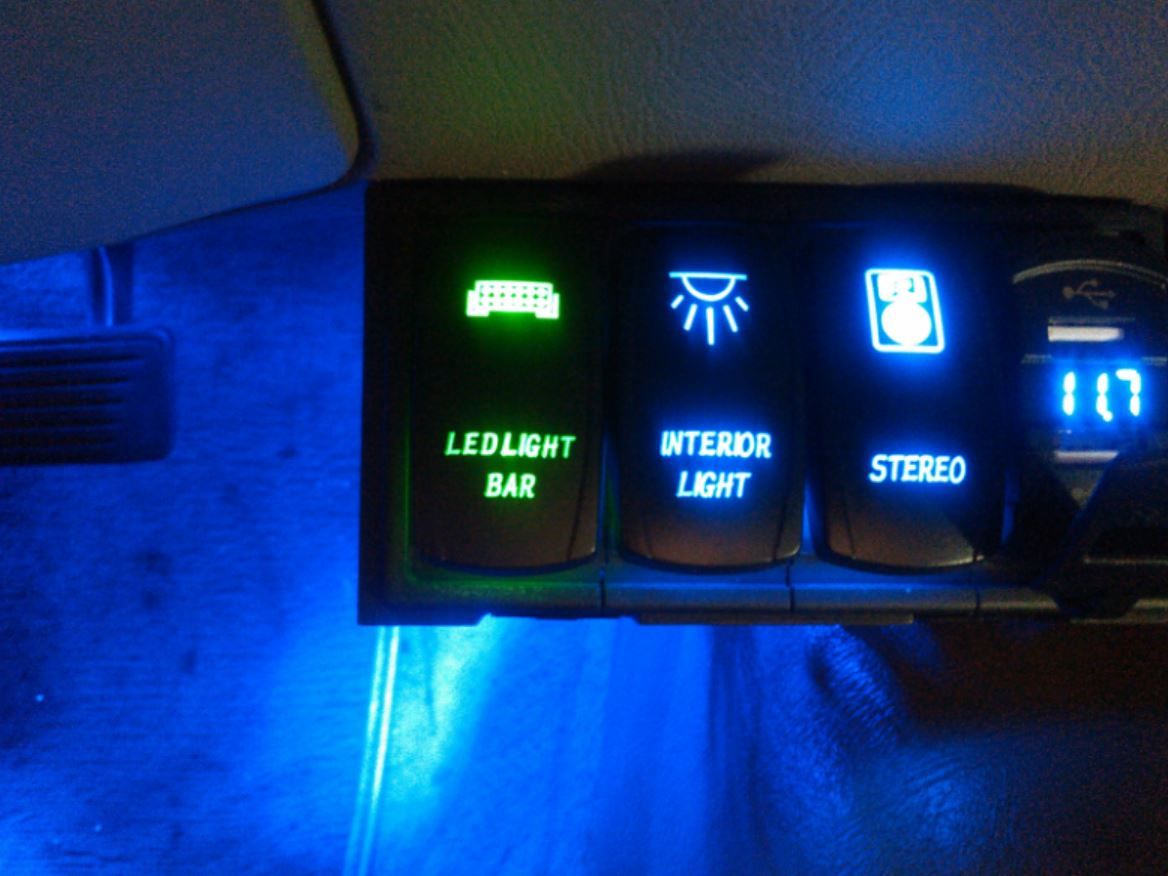
Got my Led Light Bar harness run from Battery to inside cab.
I ran it down along and under a/c housing to the antenna
access hole into the cab.
Installed my custom made rocker panel housing.
Got my rocker switches pre-wired and run taps off the Positive
and Negative new harness for rocker panel power, ..USB dual charge / Volt Meter LED rocker ..and the amp power off wire ready for it's rocker switch.
Last edited by cdtek101; Jul 9, 2016 at 10:01 AM.