
Exterior Lights & Flush Mount Connectors

Thread Starter
|
Beginning Member
Joined: Aug 2013
Posts: 20

I would like to start off by saying if this is old news, sorry about that. I just want to share what I am doing just in case it could be of help for someone.
I started buying parts here and there for the build I am doing, and the question of how to run the wires for the spot lights and light bar came up. I was looking at different ways people have done it, but then also thought of different vehicles we use at work. So, this is the choice I went with:
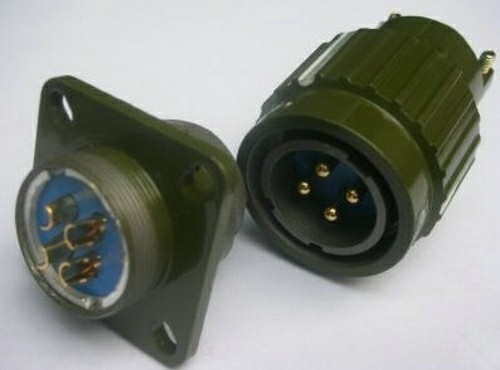
These are military style 4 post, weatherproof, twist lock connectors (easily found on ebay )
The female part will be flush mounted on the roof (one on each end) with a waterproof seal. The male part of it will have the wires for 2 different pairs of lights. I am using 2 posts per light pair, having one post for negative and one for positive. What makes this easy to use is there is only one way the male can attach to the female, thus, having the correct pins matching every time. The only thing you have to keep in mind is that on both sides the wires will need to be soldered on to each pin.
The reason I went with this was 1) I did not want to have the wires running through the door area; 2) for any reason I need to remove anything, it is just a quick twist and the lights are now removable from the body.
If there is any interest in this, I will do a step by step when I start the install.
I started buying parts here and there for the build I am doing, and the question of how to run the wires for the spot lights and light bar came up. I was looking at different ways people have done it, but then also thought of different vehicles we use at work. So, this is the choice I went with:
These are military style 4 post, weatherproof, twist lock connectors (easily found on ebay )
The female part will be flush mounted on the roof (one on each end) with a waterproof seal. The male part of it will have the wires for 2 different pairs of lights. I am using 2 posts per light pair, having one post for negative and one for positive. What makes this easy to use is there is only one way the male can attach to the female, thus, having the correct pins matching every time. The only thing you have to keep in mind is that on both sides the wires will need to be soldered on to each pin.
The reason I went with this was 1) I did not want to have the wires running through the door area; 2) for any reason I need to remove anything, it is just a quick twist and the lights are now removable from the body.
If there is any interest in this, I will do a step by step when I start the install.

Thread
Thread Starter
Forum
Replies
Last Post
hroofblaze96
2nd Generation S-series (1995-2005) Tech
7
Jan 15, 2020 04:39 PM
96jimmyslt4x4
Audio/Video Electronics
1
May 19, 2011 08:16 PM
pfsantos
1st Generation S-series (1983-1994) Tech
3
Sep 23, 2010 03:58 PM
portcqb
2nd Generation S-series (1995-2005) Tech
2
Apr 29, 2008 09:56 AM
ZR 2
2nd Generation S-series (1995-2005) Tech
2
Dec 4, 2007 03:53 AM