
First gen AD244 alternator install "how to" with pics.

Thread Starter
|
Senior Member
Joined: Feb 2009
Posts: 847
From: Charleston, WV

Alright, this is something I have seen alot of people asking about and not many people show the actual step by step install and problems that may be incountered. I have a 1992 S-10 Blazer with the TBI 4.3L V6. When I bought the vehicle the factory CS130 alt was going bad from age. I replaced it with a Powermaster 140amp CS130 style alternator. Which worked great untill I installed my amp and subs. I had some drops but nothing horrible. Untill I bought a 2000 watt amp and was actually dropping so bad at idle that the engine rpm's would fluctuate with the bass hits. I knew I had to do something, plus I was tired of replacing headlights and other bulbs every 6-7 monthes! 
So, I read up on the AD244 alternator. There is a vast amount of general knowledge out there about the years, makes and models this alt. came factory on. And how good of an idea it is to retrofit into smaller vehicles cause the AD244 will put out 100amps at idle when warm. Unlike the factory CS130 and CS130D's in the blazers that are lucky to do 40-50 amps at idle. So you can find alot of info from searching the web. But no one ever did a how to persay on the subject... untill now.
First off, remove the negative battery post from the battery so you don't arch any when removing the power wires from the old alt, plus it's just safer and easier this way. Then you will want to remove the two bolts that hold the alternator to the mounting bracket. There is a long black grade 8 bolt on the drivers side that must be removed.
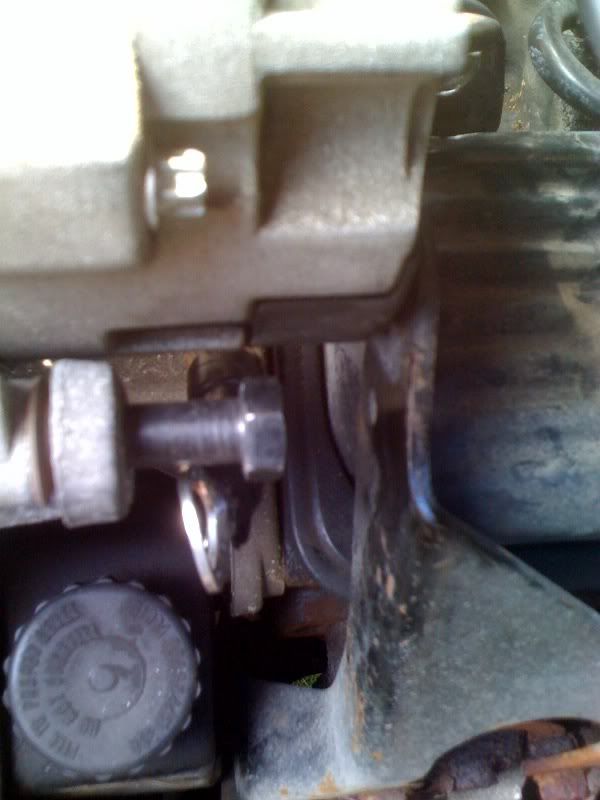
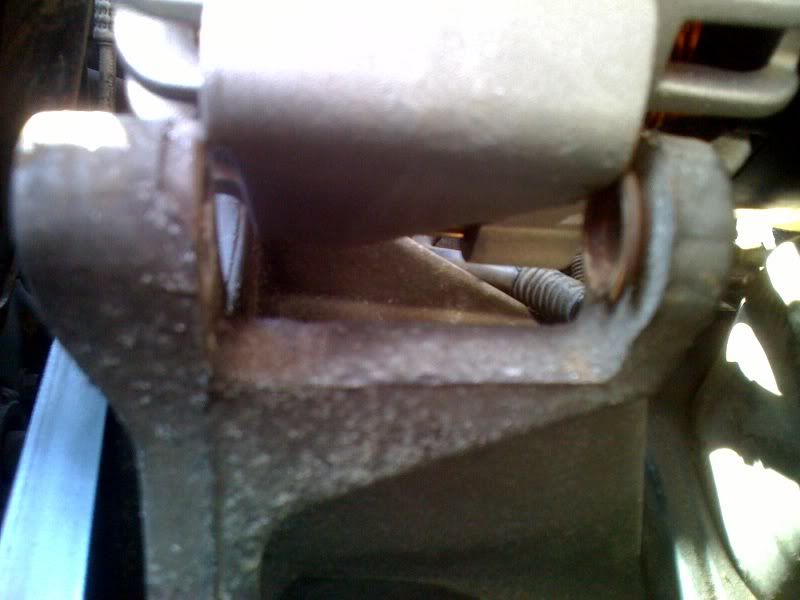
Also on the opposite side of the alt is a smaller lenth silver bolt that must also be removed. In this picture, the bolt is partialy removed to show it's location.
Now you have the alt free of the bracket, you now remove the clip from the top/side of the alt. This clip has a rubber cover on it, and a black wire loom covering the wires. Most all clips have a prong on one side that you pry up and then slide back to remove. Also you must remove the positive wire going from the alt to the battery from the post of the back of the alt. Once these are removed you should be able to shimmy the alt out of the bracket.
Now my vehicle is a 92 model, which is a 1st gen set-up. It's alternator is diffrent then what is on the 95+ 2nd gen blazers. My factory alt harness looked like this.

Commonly refered to as a "dog leg" connector, it has 3 small prongs and one large prong. Where as the later model connectors, and the one I had to go to a salvage yard to pull off a 2nd gen blazer, has 4 small prongs which is the same as the AD244. Here is a pic.
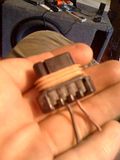
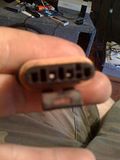
If your alt connector looks like the second more round one, you should be fine and the AD244 alt should be plug and play. If your plug looks like the first one, you will have to obtain a newer style plug and solder/crimp it onto your factory wiring.
So, I read up on the AD244 alternator. There is a vast amount of general knowledge out there about the years, makes and models this alt. came factory on. And how good of an idea it is to retrofit into smaller vehicles cause the AD244 will put out 100amps at idle when warm. Unlike the factory CS130 and CS130D's in the blazers that are lucky to do 40-50 amps at idle. So you can find alot of info from searching the web. But no one ever did a how to persay on the subject... untill now.
First off, remove the negative battery post from the battery so you don't arch any when removing the power wires from the old alt, plus it's just safer and easier this way. Then you will want to remove the two bolts that hold the alternator to the mounting bracket. There is a long black grade 8 bolt on the drivers side that must be removed.
Also on the opposite side of the alt is a smaller lenth silver bolt that must also be removed. In this picture, the bolt is partialy removed to show it's location.
Now you have the alt free of the bracket, you now remove the clip from the top/side of the alt. This clip has a rubber cover on it, and a black wire loom covering the wires. Most all clips have a prong on one side that you pry up and then slide back to remove. Also you must remove the positive wire going from the alt to the battery from the post of the back of the alt. Once these are removed you should be able to shimmy the alt out of the bracket.
Now my vehicle is a 92 model, which is a 1st gen set-up. It's alternator is diffrent then what is on the 95+ 2nd gen blazers. My factory alt harness looked like this.
Commonly refered to as a "dog leg" connector, it has 3 small prongs and one large prong. Where as the later model connectors, and the one I had to go to a salvage yard to pull off a 2nd gen blazer, has 4 small prongs which is the same as the AD244. Here is a pic.


If your alt connector looks like the second more round one, you should be fine and the AD244 alt should be plug and play. If your plug looks like the first one, you will have to obtain a newer style plug and solder/crimp it onto your factory wiring.
Last edited by ImScrewed92; Jun 19, 2010 at 10:36 PM.
Thread Starter
|
Senior Member
Joined: Feb 2009
Posts: 847
From: Charleston, WV
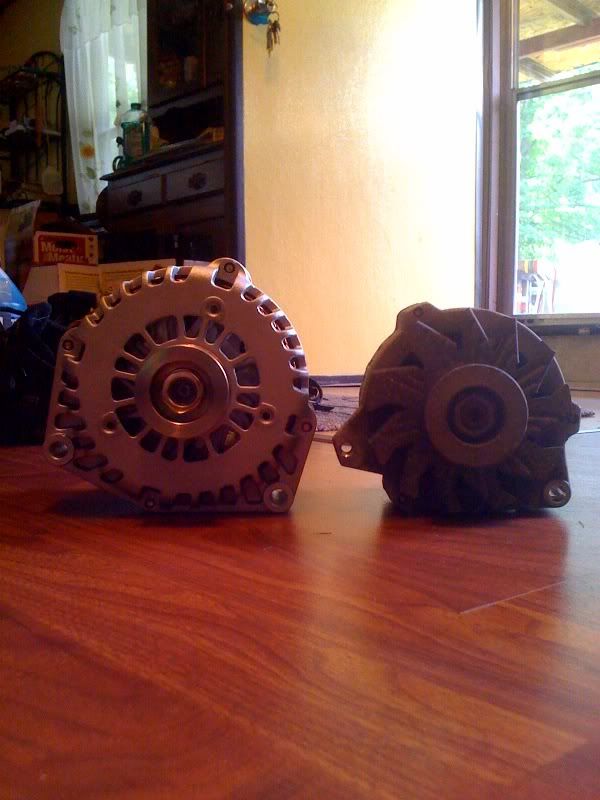
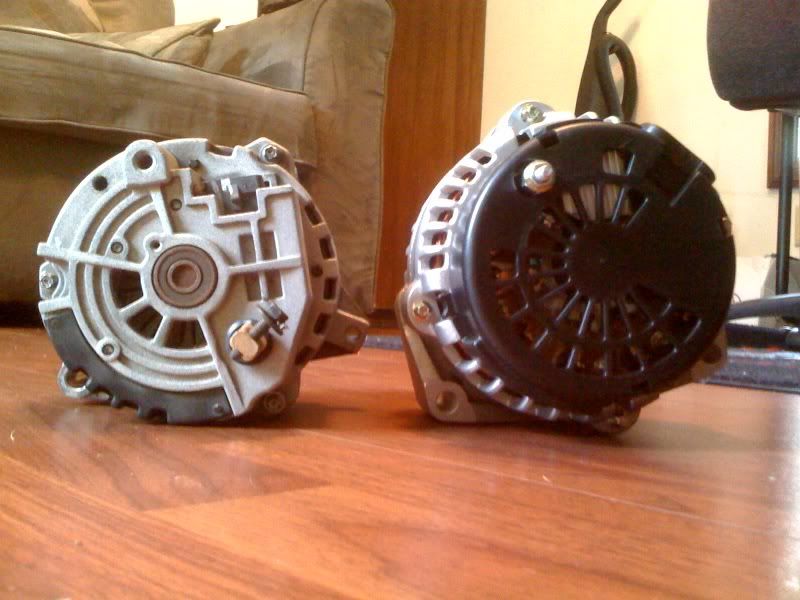
Here are some side by side shots just to show the diffrence in size of the two alts.


But back to the install...
Now that you have the alt removed we start on the install of the new unit. Well on my 92, the brackets were too small for the alt to just drop into like the picture below shows.
What I did was get a file, and file down the mounting holes on the new alt and the alternater mounts in the engine bay.
After a good while of filing, It fit. The long black bolt that was on the drivers side I reused to secure it on that side. But the hole on the alt on the passenger side was off by just a hair from the mounting bracket in the engine bay. So I filed some more to get it to sit in. I found out that the holes just won't mate up perfect, so what I did was get a 1/4 inch grade 8 bolt and run it through the off center holes and a washer and nut to tighten it down. This worked fine and I can't make the alt budge at all in the bracket. (And I had all 285 lbs of myself rocking the truck trying to move it .
.
Here's some pics of the factory bolt on the drivers side, (which is also the location I use for the big 3 engine block to frame ground wire.)
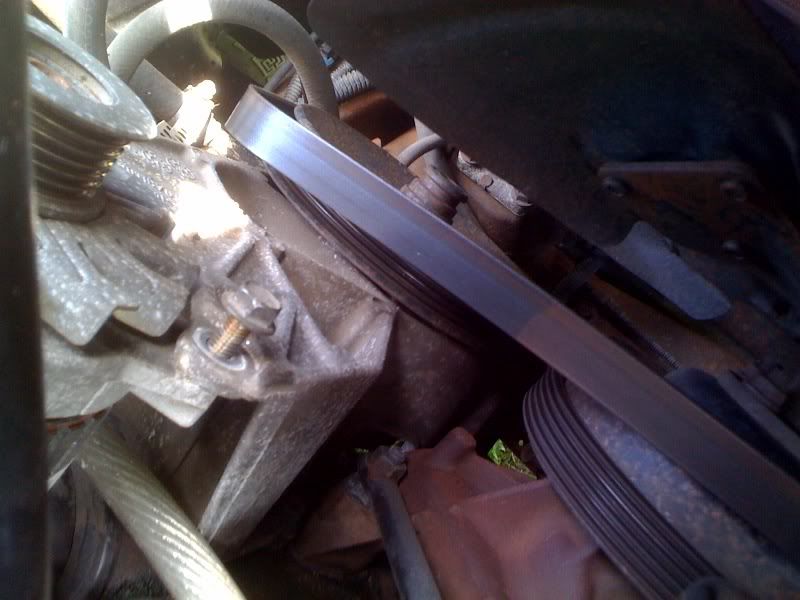
And the new 1/4 inch grade 8 bolt on the passenger side.
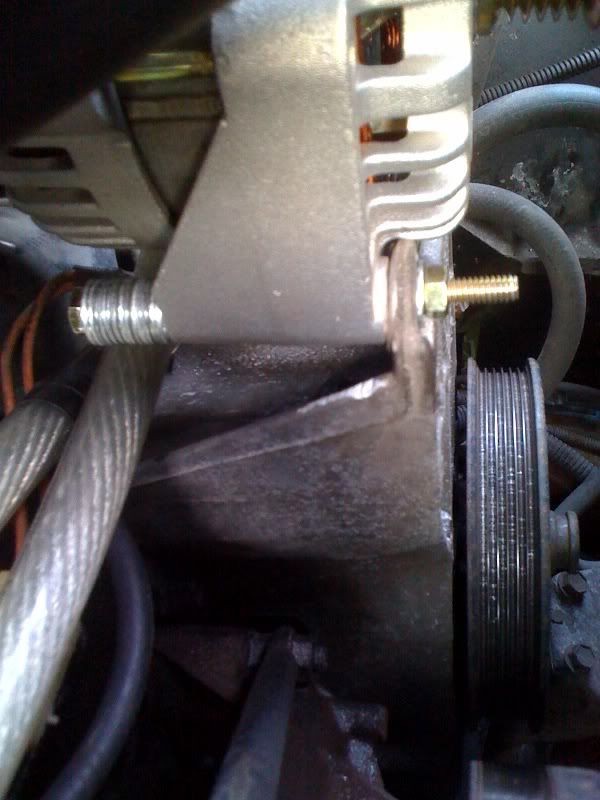
The bolt I got for the passenger side as you can see is too long for the application to look good and sit flush. So for now I added quite a few washers to fill the space. It protrudes foreward towards the serp. belt but doesn't look like it will contact the belt at all. I do plan on getting a shorter belt very soon.
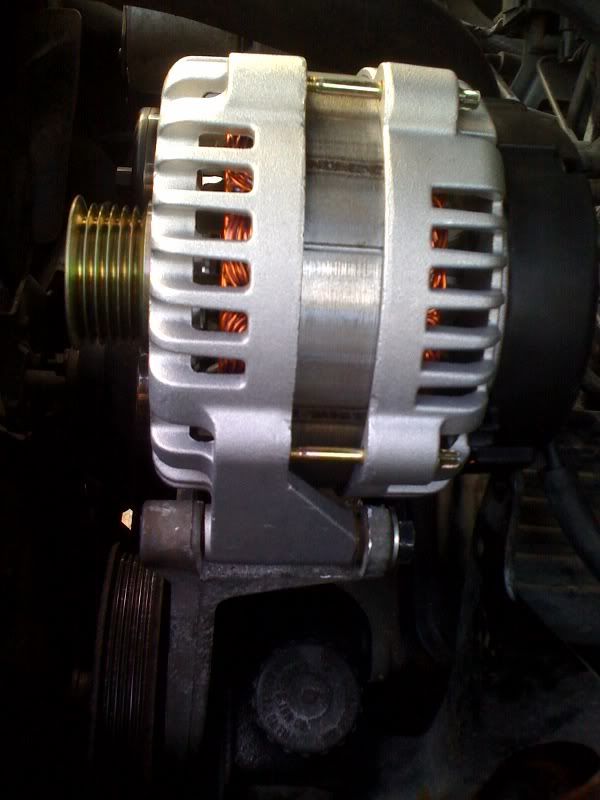
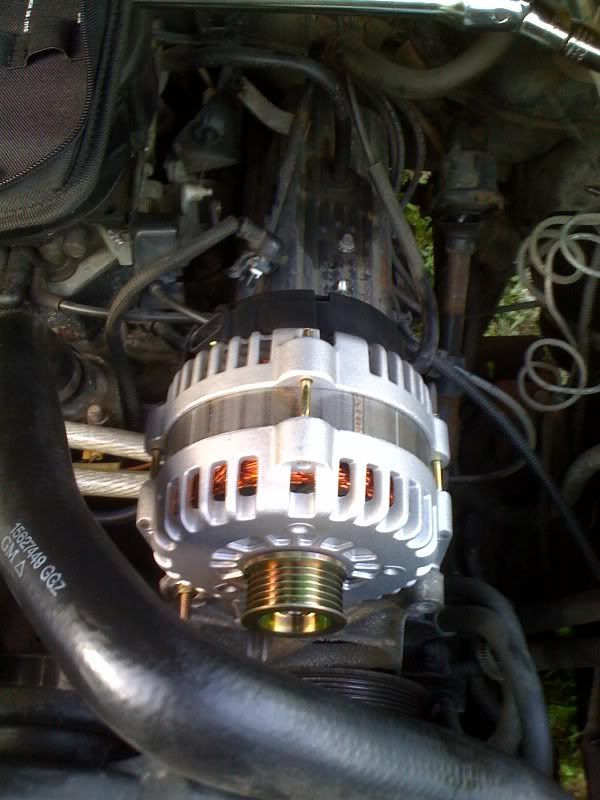
Here is a pic of the alt installed in the mounting brackets in it's final location.
This is all I got done today. The filing on the alternator and the brackets took most of my time away, plus the run to Lowes for the thinner grade 8 bolt. I went ahead and cut my old connector off and crimped my new harness on. Tomarrow I will add the serp. belt and plug the neg. battery post back in and test it all out.
One main thing to keep in mind is your old serp. belt WILL be to small with the larger case alternator and you will need a new longer belt. The new lenth however varies from year to year. A 91 might be a diffrent lenth than a 92 and a 96 might be diffrent than a 97. Just find out your factory belt's lenth and get one that is roughly one inch longer. I tried to do that and went to install it tonite and the guy gave me another factory lenth one. So now I have to return it and try agian tomarrow. I will also pick up a meter of some sort to show the volts at the alt under diffrent loads. And try to get a readout of the power at the Amplifier for my subs at the request of another forum member. More tomarrow!!!
But back to the install...
Now that you have the alt removed we start on the install of the new unit. Well on my 92, the brackets were too small for the alt to just drop into like the picture below shows.
What I did was get a file, and file down the mounting holes on the new alt and the alternater mounts in the engine bay.
After a good while of filing, It fit. The long black bolt that was on the drivers side I reused to secure it on that side. But the hole on the alt on the passenger side was off by just a hair from the mounting bracket in the engine bay. So I filed some more to get it to sit in. I found out that the holes just won't mate up perfect, so what I did was get a 1/4 inch grade 8 bolt and run it through the off center holes and a washer and nut to tighten it down. This worked fine and I can't make the alt budge at all in the bracket. (And I had all 285 lbs of myself rocking the truck trying to move it
. Here's some pics of the factory bolt on the drivers side, (which is also the location I use for the big 3 engine block to frame ground wire.)
And the new 1/4 inch grade 8 bolt on the passenger side.
The bolt I got for the passenger side as you can see is too long for the application to look good and sit flush. So for now I added quite a few washers to fill the space. It protrudes foreward towards the serp. belt but doesn't look like it will contact the belt at all. I do plan on getting a shorter belt very soon.
Here is a pic of the alt installed in the mounting brackets in it's final location.
This is all I got done today. The filing on the alternator and the brackets took most of my time away, plus the run to Lowes for the thinner grade 8 bolt. I went ahead and cut my old connector off and crimped my new harness on. Tomarrow I will add the serp. belt and plug the neg. battery post back in and test it all out.
One main thing to keep in mind is your old serp. belt WILL be to small with the larger case alternator and you will need a new longer belt. The new lenth however varies from year to year. A 91 might be a diffrent lenth than a 92 and a 96 might be diffrent than a 97. Just find out your factory belt's lenth and get one that is roughly one inch longer. I tried to do that and went to install it tonite and the guy gave me another factory lenth one. So now I have to return it and try agian tomarrow. I will also pick up a meter of some sort to show the volts at the alt under diffrent loads. And try to get a readout of the power at the Amplifier for my subs at the request of another forum member. More tomarrow!!!
Thread Starter
|
Senior Member
Joined: Feb 2009
Posts: 847
From: Charleston, WV
If your still with me, your almost done! I went back to Advance and got another guy that gave me just what I needed. The new belt went on flawlessly. Now we just make sure the belt is seated good. Now connect your wires to the back of the alternator on the post.
(Hopefully you have done the Big 3 wire upgrade by now, but if not run AT LEAST a 4 gauge cable from your alt post to the pos+ batt terminal. And possibly a cable from battery neg- post to frame for a ground. But doing the other wire the engine block to ground would complete the big 3 so just go ahead and do that.)
Then just make sure all your cables are tight and secure, not touching headers or anything that will get hot or move. Then bolt the neg- batt cable back to the battery and see that you have power. For some reason at first my underhood light didn't come on, but all my other lights worked. And when I came back from inside the truck it was on.
Now simply start the vehicle and watch the serp belt system. make sure it is tight and uniform all through the pulley system. Give the engine a few revs to make sure the belt isn't slipping and everything looks good. Now comes the good part. Grab a cd or mp3 player and see what we've got. I'll post up some volt readouts tonite.
For now I'll say that my drops at idle are no where near as bad as they were. Subs seem to have a stronger, more solid hit to them. And with a volt meter that plugs into the cigg lighter. I was reading about 14.06 at idle with the engine at operating temerature. With the lights on and stereo at full tilt, I was dropping to around 13.53 volts. Which is better then the 10.5-11 volts I was hitting before! Even driving down the highway my red light on the volt meter would come on. Sitting at idle that light only came on once. And that was at full tilt with the stereo cranked loud as sin with the lights on. So deffinantly a improvement. I'm happy with the install.
All you need for the install is;
The alternator,
a new regulator clip (if your blazer is 95 and older, if yours is 96+ and up, you should already have a clip that works with the AD244.)
A 1/4 inch grade 8 bolt with nut, (only on first gen, second gen should drop right in)
A longer serpetine belt. (Normally around one inch longer, every year was a diffrent lenth pretty much, but just ask your parts store for a one inch longer belt than factory and they will help you out.)
AT LEAST a 4 gauge cable from the post on the back of the alt going to the +batt terminal. (Even better just do the Big 3 wiring upgrade. I went with 1/0 gauge wire, but I like to be safe and I already bought a 32 foot roll for my amp wiring.)
I had to extend some wires to reach the post on the new alternator since it is on the top of the unit and the old alt's post was on the back. Everyone's experince will vary and just be careful. I DO NOT guarentee that this will work for you and do not accept any blame for messing up your ride. If you don't feel comfortable, really study on it and maybe have somebody else help you out.
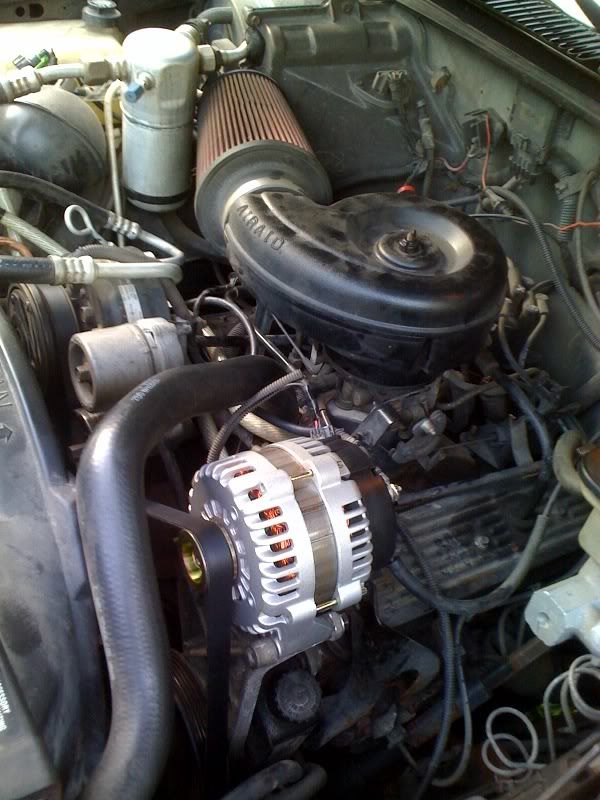
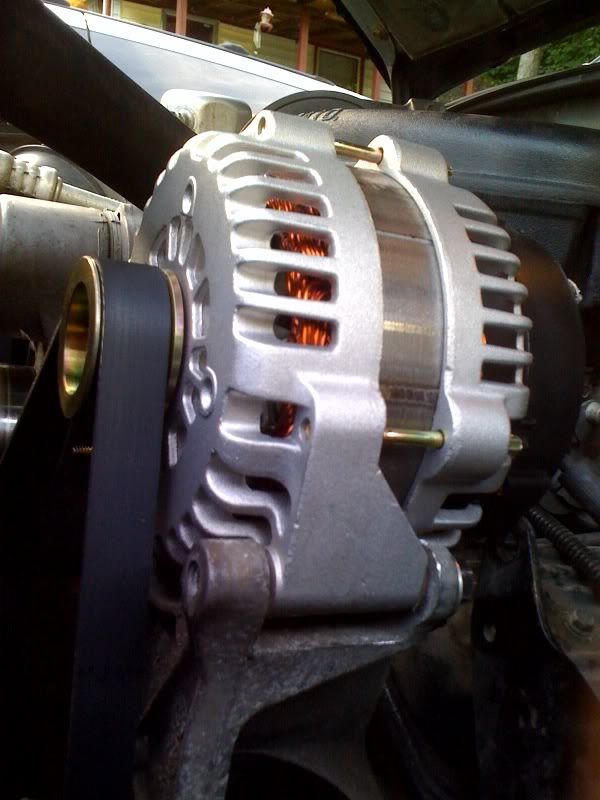
Some pics of the final product.
And a little video, I hope ya'll like country. Wanted to do something besides rap like everyone else does. Enjoy
http://www.youtube.com/watch?v=gOduBWcSyhs
(Hopefully you have done the Big 3 wire upgrade by now, but if not run AT LEAST a 4 gauge cable from your alt post to the pos+ batt terminal. And possibly a cable from battery neg- post to frame for a ground. But doing the other wire the engine block to ground would complete the big 3 so just go ahead and do that.)
Then just make sure all your cables are tight and secure, not touching headers or anything that will get hot or move. Then bolt the neg- batt cable back to the battery and see that you have power. For some reason at first my underhood light didn't come on, but all my other lights worked. And when I came back from inside the truck it was on.
Now simply start the vehicle and watch the serp belt system. make sure it is tight and uniform all through the pulley system. Give the engine a few revs to make sure the belt isn't slipping and everything looks good. Now comes the good part. Grab a cd or mp3 player and see what we've got. I'll post up some volt readouts tonite.
For now I'll say that my drops at idle are no where near as bad as they were. Subs seem to have a stronger, more solid hit to them. And with a volt meter that plugs into the cigg lighter. I was reading about 14.06 at idle with the engine at operating temerature. With the lights on and stereo at full tilt, I was dropping to around 13.53 volts. Which is better then the 10.5-11 volts I was hitting before! Even driving down the highway my red light on the volt meter would come on. Sitting at idle that light only came on once. And that was at full tilt with the stereo cranked loud as sin with the lights on. So deffinantly a improvement. I'm happy with the install.
All you need for the install is;
The alternator,
a new regulator clip (if your blazer is 95 and older, if yours is 96+ and up, you should already have a clip that works with the AD244.)
A 1/4 inch grade 8 bolt with nut, (only on first gen, second gen should drop right in)
A longer serpetine belt. (Normally around one inch longer, every year was a diffrent lenth pretty much, but just ask your parts store for a one inch longer belt than factory and they will help you out.)
AT LEAST a 4 gauge cable from the post on the back of the alt going to the +batt terminal. (Even better just do the Big 3 wiring upgrade. I went with 1/0 gauge wire, but I like to be safe and I already bought a 32 foot roll for my amp wiring.)
I had to extend some wires to reach the post on the new alternator since it is on the top of the unit and the old alt's post was on the back. Everyone's experince will vary and just be careful. I DO NOT guarentee that this will work for you and do not accept any blame for messing up your ride. If you don't feel comfortable, really study on it and maybe have somebody else help you out.
Some pics of the final product.
And a little video, I hope ya'll like country.
Wanted to do something besides rap like everyone else does. Enjoyhttp://www.youtube.com/watch?v=gOduBWcSyhs


Thread Starter
|
Senior Member
Joined: Feb 2009
Posts: 847
From: Charleston, WV
Thanks guys! Seems like alot of people have done this swap on 2nd gen blazers and not many on the 1st gen models. And 99.9% of them didn't do a how to on it. So I figured since the only other real write up on it I found was a 2nd gen, I'd do one for the 1st gens. Represent! ha ha
When/if you do the swap just post up if you need any help, I'll do what I can. I've never done a alt swap or replacement by myself before and with all the problems I hit including driving to advance auto parts three times and lowes once, I still got it done in a very slow lazy weekend. With all the parts in hand it could easily be done a a few hours.
BTW the serp. belts vary with each year. For some odd reason, everything I have read about this alt says you need a inch longer serpentine belt. But I tried a 97 inch and 96.6 inch and they all were too big and my belt tensioner wouldn't line up right. I put my factory lenth 96 inch back on and it lined up like normal. So I didn't need a new belt. But pick up a new belt just incase, if you don't need it you can always take it back. Last thing you want is too tight a belt wearing out all your pulleys!
Man, that's $30 a minute... I should get a commision of that one, lol.
Last edited by ImScrewed92; Jul 11, 2010 at 05:38 PM.
Thread Starter
|
Senior Member
Joined: Feb 2009
Posts: 847
From: Charleston, WV
Well the alt I got was from db electrical. It is a high output unit, and ran me about $300 with shipping. I already had all my wrenches and sockets for the job. Also a socket on a 1/2 inch drive 20 inch breaker bar works great for removing and installing the serpent belt. Had to buy the 1/4 inch bolt, and the new alt harness plug from a salvage yard. The bolt was about 70 cents and the alt harness was about $5. Cost me under $350. New serpetine belt was about $33.
But unless your running a fairly big stereo you won't need a high output unit like I got. You could get a 145 amp mod off a vehicle in a salvage yard for under $75 in most places. Then just have it tested to make sure it works at a parts store. So that would make it under $150 honestly.
But unless your running a fairly big stereo you won't need a high output unit like I got. You could get a 145 amp mod off a vehicle in a salvage yard for under $75 in most places. Then just have it tested to make sure it works at a parts store. So that would make it under $150 honestly.
Thread Starter
|
Senior Member
Joined: Feb 2009
Posts: 847
From: Charleston, WV
And btw 84s10blazer. The 140 amp model that came factory on the fullsize trucks will do a solid 100 amps at idle when hot. Versus the 40-50 amps at idle hot with the 105amp cs-130 that came factory on the first gens.