Blazer Forum - Chevy Blazer Forums
  • LOG IN
  • REGISTER
  • Forums
    • Announcements
      • Forum Notice
      • New Member Area
    • General
      • General Chat
      • The Lounge
      • Builds
      • Off Roading
      • Sights N Sounds
      • Street N Strip
      • The Chop Shop
      • Shows & Clubs
    • Mechanical & Maintenance
      • General Tech Help
      • Engine & Transmission
      • Lighting & Electrical
      • Steering, Suspension & Drivetrain
    • Modifications
      • Performance & Brainstorming
      • Tires and Wheels
      • Audio/Video Electronics
      • Paint, Body, & Interior
      • Suspension Tech
      • Detailing
    • Chevy Blazer Classifieds
      • Member Group And Special Buys
      • Absolutely Free!!!
      • PRIVATE For Sale / Trade Classifieds
      • Private 'Wanted' Classifieds
      • Online Auctions & Listings
    • The Site
      • Website Problems and Suggestions
  • Marketplace
    • Vendor Directory
    • Become a Vendor
  • New Posts
  • Tools
    • Car Payment Calculator
    • Tire Rim Calculator
    • Recalls
    • Technical Service Bulletins (TSBs)
    • Members List
    • Live Feed
  • Gallery
  • View Dark Mode
    • Please register or login to enable Dark Mode.
  • Log In
  • Register
Blazer Forum - Chevy Blazer Forums
    • Threads
      • Advanced
Dark Mode

Please register or login to enable Dark Mode.

Log In

Forgot your Password?

By logging into your account, you agree to our Terms of Use and Privacy Policy, and to the use of cookies as described therein.
  • Recent
  • Commented
  • Albums
  • My Pictures

BLAZINSTEIN's Photos

View Profile
Sort:
Commented
  • Most Recent
  • Most Comments
  • Albums
  • Photos
The final product! Yay! Finally finished. Good luck .Hope these albums and pics make things go easier for ya.
0 2016/09/25 18:05:37 BLAZINSTEI
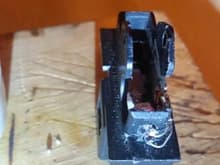
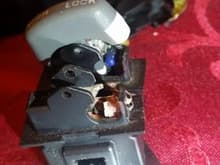
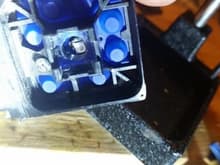
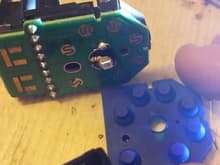
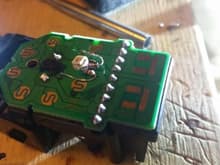
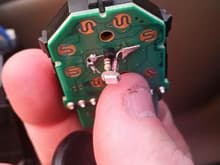
On this led, the leg with the brown resistor was negative? ( Before soldering it would be wise to test it in the door first to make sure of correct polarity for your led to light up on this one)and went to the closest metal contact. Then the other leg ran to the opposite metal contact. Made sure the legs would never make contact with each (avoiding a ground out) by first using a screwdriver to keep them as close and flush to the body and base as possible then after soldering them permanently into position ; I hot glued all around the metal legs so they wouldn't bump into each other,ever.
0 2016/09/25 17:54:01 BLAZINSTEI
Here you can see the led sticking out a bit through the drilled out plastic . I tested the led first to determine positive and negative leg then wired accordingly.
0 2016/09/25 17:51:05 BLAZINSTEI
Taking apart the switche shows how there is a metal contact that rocks back and forth depending on the switch's position. Again, I opted to take the time and clean the contacts.
0 2016/09/25 17:44:27 BLAZINSTEI
Using some alcohol on "q-tips", I cleaned 16 years of dirt out first then took my dremmel with a special flat sanding bit to clean this contact (which sits deep in the switch) until it shined.
0 2016/09/25 17:44:27 BLAZINSTEI
A quick side by side comparison shows the space problem with an led. A plug and play led will extend to far in and not be able to shine up into the transparent light-carrying plastic piece that allows the white portion to glow at night. Since there is such little space when the switch is clicked back to allow all door controls to function for passengers I opted to mount the led through the side to get  enough space to angle the led nicely .
A quick side by side comparison shows the space problem with an led. A plug and play led will extend to far in and not be able to shine up into the transparent light-carrying plastic piece that allows the white portion to glow at night. Since there is such little space when the switch is clicked back to allow all door controls to function for passengers I opted to mount the led through the side to get enough space to angle the led nicely .
0 2016/09/25 17:32:49 BLAZINSTEI
The missing switch is the " lockout switch" and is the last one of these controls and probably the biggest pain to get it to look good. I decided to put a red led in it like the doors lock switch so I can tell whats what a little easier at night . Other than that most lights are going blue.
0 2016/09/25 17:32:49 BLAZINSTEI
Driver's master "Lockout Switch" for passenger windows and doors.
0 2016/09/25 17:32:49 BLAZINSTEI
Originally the not all the controls in the door worked or even illuminated. No worries, I will steal the ones out of my 98 Blazer ( basically the same interior and color) and work on updating the switches to LEDs anyway. ( See the led conversion albums if interested)
0 2016/09/25 17:17:14 BLAZINSTEI
Rear seat. Looks to me like someone used leather dye spray to regenerate all the seats original look. They did pretty good too,just a few spots where it didn't set proper and didn't take good hold came free. Totally exceptable to me for what it is.
0 2016/09/25 17:17:14 BLAZINSTEI
Here you can see the assembly coming together with the led light sitting in the middle at the base of the transparent light-carrying plastic piece
0 2016/09/25 15:29:35 BLAZINSTEI
OK, so cut the middle nub of blue silicone rubber( where the led light will sit) flush with the base of said silicone rubber piece. That way it will not block any of the Lee's light transmission.
0 2016/09/25 15:29:35 BLAZINSTEI
The transparent light-carrying plastic takes the light source from one spot to another.But, I notice that a led light needs to be placed just so in order to get the full light effect through it.
0 2016/09/25 15:29:35 BLAZINSTEI
Here, I have used my soldering iron to melt and flatten the black plastic that protrudes through the middle so I can bend and place my led right in that very same middle spot at a better height for shining led light up and into the transparent plastic light carrier.( Might want to use some caution melting that plastic, I believe it holds the board down?)
0 2016/09/25 15:19:15 BLAZINSTEI
Using a standard Neo3-bhp led taken out of its base still has the resistors that will make the led miss the mark when put back into the switch. So we need to get this thing lower.( See the other pic  of this piece in this album)
Using a standard Neo3-bhp led taken out of its base still has the resistors that will make the led miss the mark when put back into the switch. So we need to get this thing lower.( See the other pic of this piece in this album)
0 2016/09/25 15:19:15 BLAZINSTEI
Driver's side master controls. Side mirrors' switch. Completely illuminated.
0 2016/09/25 15:19:15 BLAZINSTEI
Dash almost finished.
0 2016/09/25 12:36:25 BLAZINSTEI
Blue LEDs on beige interior.
0 2016/09/25 12:32:54 BLAZINSTEI
Driver's master control switches for doors,windows and mirrors.
0 2016/09/25 12:32:54 BLAZINSTEI
Dash, not quite 100%  finished but real close.
Dash, not quite 100% finished but real close.
0 2016/09/25 12:32:54 BLAZINSTEI
Named it
Named it
0 2016/09/25 12:18:12 BLAZINSTEI
Front view
Front view
0 2016/09/25 12:18:12 BLAZINSTEI
Nice Stichwork in the headrest
0 2016/09/25 12:14:08 BLAZINSTEI
Angled view
Angled view
0 2016/09/25 12:14:08 BLAZINSTEI
Two tone leather power seating
0 2016/09/25 12:14:08 BLAZINSTEI


Top
Blazer Forum - Chevy Blazer Forums
  • Contact Us
  • FAQ
  • Archive
  • Advertising
  • Cookie Policy
  • Privacy Statement
  • Terms of Service
  • Your Privacy Choices
  • Manage Preferences

© 2026 MH Sub I, LLC dba Internet Brands


When you click on links to various merchants on this site and make a purchase, this can result in this site earning a commission. Affiliate programs and affiliations include, but are not limited to, the eBay Partner Network.