LOG IN
REGISTER
Forums
Announcements
Forum Notice
New Member Area
General
General Chat
The Lounge
Builds
Off Roading
Sights N Sounds
Street N Strip
The Chop Shop
Shows & Clubs
Mechanical & Maintenance
General Tech Help
Engine & Transmission
Lighting & Electrical
Steering, Suspension & Drivetrain
Modifications
Performance & Brainstorming
Tires and Wheels
Audio/Video Electronics
Paint, Body, & Interior
Suspension Tech
Detailing
Chevy Blazer Classifieds
Member Group And Special Buys
Absolutely Free!!!
PRIVATE For Sale / Trade Classifieds
Private 'Wanted' Classifieds
Online Auctions & Listings
The Site
Website Problems and Suggestions
Marketplace
Vendor Directory
Become a Vendor
New Posts
Tools
Car Payment Calculator
Tire Rim Calculator
Recalls
Technical Service Bulletins (TSBs)
Members List
Live Feed
Gallery
View Dark Mode
Please register or login to enable Dark Mode.
Log In
Register
Threads
Google
Threads
Posts
Advanced
Dark Mode
Please register or login to enable Dark Mode.
Log In
Forgot your Password?
By logging into your account, you agree to our
Terms of Use
and
Privacy Policy
, and to the use of cookies as described therein.
Recent
Commented
Albums
My Pictures
christine_208's Photos
View Profile
Sort:
Commented
Most Recent
Most Comments
Albums
Photos
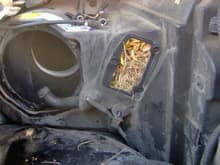
Blower motor out and the temperature control module removed
2
2018/04/16 09:58:41
christine_
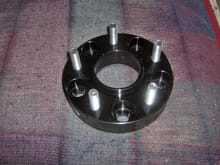
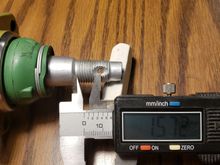
The spacer before install
1
2018/12/19 12:59:14
christine_
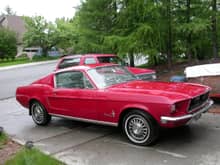
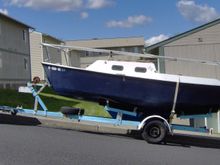
My 1968 Mustang. 289, AT. One family car. The paint looks better than it is because of the rain. My old '92 B Blazer is behind it.
1
2018/01/04 08:39:09
christine_
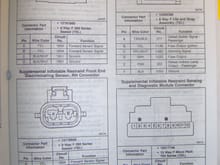
1999 Blazer SIR comp connectors 1_2 pg 9_27
1
2017/10/13 19:26:02
christine_
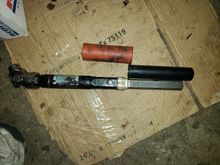
Lower intermediate shaft with the orange rubber sleeve and the upper black plastic sleeve.
0
2026/05/24 12:01:17
christine_
0
2026/05/24 11:55:39
christine_
0
2026/05/20 19:58:16
christine_
Spent .22 LR cartridge casings used as knobs.
0
2026/04/20 15:37:45
christine_
0
2026/04/12 21:13:34
christine_
This view is looking to the outward direction on the driver's side of the rear of the engine compartment. Reservoir has the yellow diagonal stripes and the vacuum hose to it has the blue stripe on it.
0
2026/02/06 17:42:54
christine_
0
2026/01/17 11:49:19
christine_
0
2026/01/04 17:03:13
christine_
0
2025/10/25 08:26:14
christine_
0
2025/10/25 08:23:47
christine_
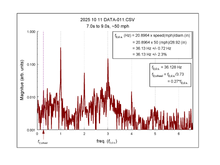
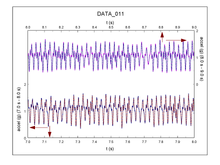
The frequency of the vibrations. The frequencies are in terms of the expected frequency of vibration of the driveshaft. The main peaks line up with these indicating that the vibrations are not with the wheels.
0
2025/10/12 00:24:16
christine_
The raw data from the accelerometer showing the vibrations.
0
2025/10/12 00:24:07
christine_
0
2025/09/09 20:49:50
christine_
0
2025/09/09 20:48:47
christine_
Side view of the inner race.
0
2025/08/05 23:36:35
christine_
The outer race for the cv joint that is integral with the outer axle shaft.
0
2025/08/05 23:35:54
christine_
0
2025/08/05 23:34:22
christine_
The height above the top of the taper to the hole on the Mevotech ball joint.
0
2025/07/30 11:36:36
christine_
The Mevotech and Moog ball joints side-by-side.
0
2025/07/30 11:36:09
christine_
The installed new Mevotech ball joint with the cotter pin hole too high to engage the nut castellations.
0
2025/07/30 11:35:35
christine_
The height above the top of the taper to the hole on the old Moog ball joint.
0
2025/07/30 11:35:22
christine_
View looking up and towards the front.
0
2025/07/27 22:47:43
christine_
View looking towards back towards propeller shaft.
0
2025/07/27 22:47:02
christine_
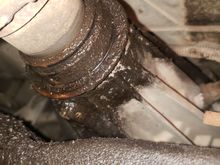
Fluid that has leaked onto the cross-member.
0
2025/07/27 22:46:37
christine_
0
2025/07/26 23:33:16
christine_
0
2025/07/26 23:24:13
christine_
View looking down showing a view of the long extension used to get at the block plug. The trouble-light is resting on the upper control arm.
0
2025/07/26 23:23:53
christine_
The view from low behind the front brake caliper. The open hole where the plug goes in the block can be seen in the lighted area. The front end of the left-side torsion bar is in the foreground.
0
2025/07/26 23:23:31
christine_
The view from low behind the front brake caliper. The open hole where the plug goes in the block can be seen in the lighted area.
0
2025/07/26 23:23:06
christine_
View looking up along the long extension as I was reinstalling the block plug.
0
2025/07/26 23:22:50
christine_
Front, grille-facing side, of the radiator.
0
2025/07/26 23:00:59
christine_
Picture of the engine side of the radiator as soon as I unpacked it. It only came with the connectors for the oil-cooler. I was able to swap the old ones for the transmission cooler.
0
2025/07/26 23:00:32
christine_
0
2025/07/26 22:49:03
christine_
View looking up and a bit forward showing how to access the petcock from the front end of the front right wheel well.
0
2025/07/26 22:48:41
christine_
Another view of the extra transmission cooling lines. The slivery metal strap is what I had used to secure the lower fan shroud with the earlier ECP radiator. I likely didn't need it but it was easier to reuse than remove.
0
2025/07/26 22:48:15
christine_
This view is looking up and to the rear on the driver side. The front of the steering gear is in the lower half. A the bottom of the radiator is the zip tie that secures the lower fan shroud to the radiator.
0
2025/07/26 22:47:48
christine_
First
Page
1 of 20
Last
Go To
Page
1
2
3
4
5
6
7
...
20
1 of 20
Go To
GO
Go to page
of 20
pages
1
2
3
4
5
6
7
...
20