Project: Broken Driveline begins
#1
 05-01-2015, 08:11 PM


PREFACE This build log covers the first 10 weeks of drama that lead up to me having WOT capabilities with my L31 V8 and is by no means completed at this point. I will be copying my v8s10.org build thread over here for redundancy and this one can be shared publicly whereas v8s10.org build threads are members only.
INTRODUCTION
Hey guys, I've been reading about and researching v8 swaps for about as long as I've owned my 94 T15 Jimmy. I made it a personal goal to keep the 4.3 in tip top shape and when the engine dies, the truck gets a v8 heart transplant.
Well on Novenmber the 8th 2014 driving back from a 1600 mile trip (536 miles from home) with a trailer and my new 31" tires pulling a hill at 5300RPM WOT my engine failed 273K: VIDEO:
Shes been parked in the backyard ever since. I can't turn the crank over in either direction prying on the flywheel with a flathead. Oil has very slight metallic flakes floating around. Have yet to open up the filter.
This swap's primary focus is to be a daily driver. We camp in our car with our dogs, we sleep in our car, offroad in it, watch movies, its a poor mans RV I have no interest in performance mods beyond holding lockup in 4th towing my empty 16 foot 1500lb trailer just like my wifes tahoe does. The 4.3's anemic with my 4800lb curb weight pulling mountains.
PLANS
I've been really working hard to make an lsx swap happen they ultimately just cost too damned much compared to a 96-99 vortec l31 which is where I'm headed.
I'm considering the cheap oil pan route, welding the front half of the v8 pan the rear of the v6 pan or going with the canton 7quart pan $100-300 estimated
Going with JTR motor mounts and 2.8 clamshells. $100 bucks estimated
Now for exhaust! I've read a post on s10forum of a guy taking the stock l31 manifolds and having them milled down to clear. Hes the only guy I've seen try this but I'm very excited about the prospect. I'd love to bolt straight up to my y-pipe and be trucking for minimal $$.
link:
Tahoe 5.7 Vortec exhaust in a 97 Blazer AWD - S-10 Forum
5.7 powered 96-99 tahoes and burbs are around here running for 1000-1500 regularly on craigslist. I'm going to buy the whole vehicle that way I can test drive everything before swapping over. I'm going to get it running good in the donor truck then move everything over from there and part out what I can.
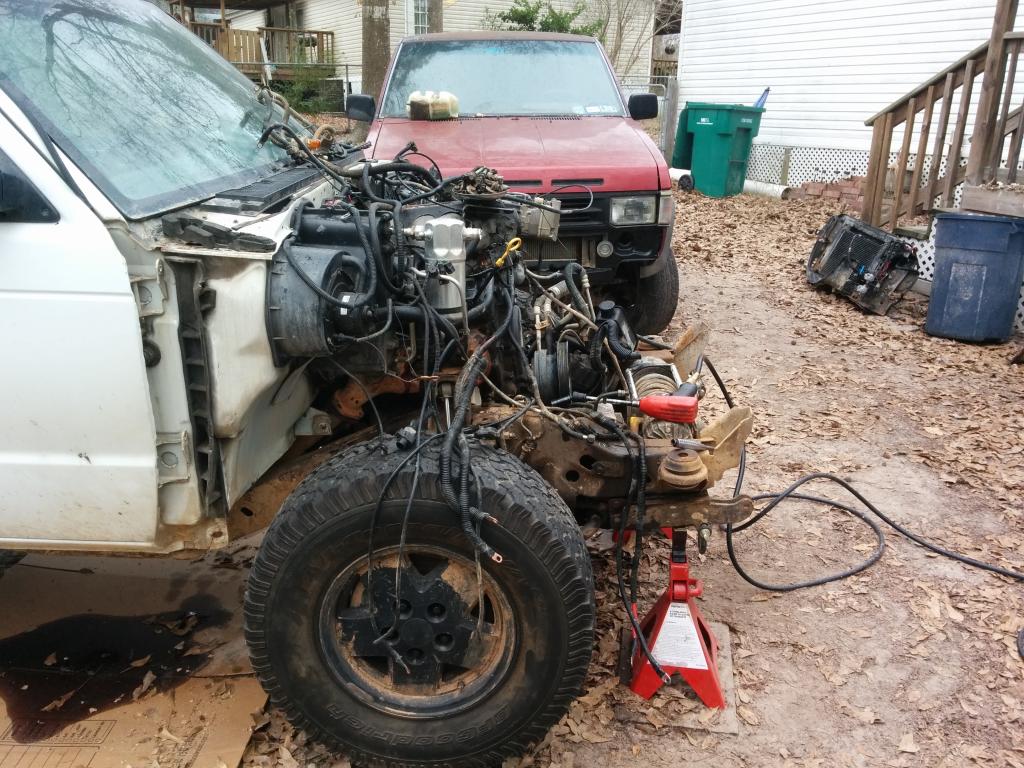
Progress: Tearing the front clip off and pulling the powertrain. The front diff failed about 5k ago. Pretty sure I broke the engagement gear so I'll have to drop the 100 bucks at the dealership before the engine goes back in.
CONCERNS
Oil cooler line. Hoping I can just bolt the 4.3 adapter to the 5.7 block and use it exactly how the v6 was.
Fuel lines to intake: They look like damn near perfect however I'm sure I'll have to persuade them a little further than bolt-on.
Exhaust: Is my 4.3 y pipe to the cat going to be an issue? I have a 2.5 dynomax catback installed if that matters.
Cooling: I'm reading that unless I do the 0411 PCM swap I can only control 1 efan, I have pushed the original tube-fin condenser forward to work as my transmission cooler, just behind that is a parallel flow condenser for my ac, finally the 4.3 radiator in the stock position. with 2 derale 12" pushers just behind the grille.
Throttle cable fitment.
ac hoses appear to work 3.5 inches forward
power steering hoses appear to need a few bends to work
Looking at making a 2nd gen 96+ stock air cleaner/intake fit.
PICS:
https://plus.google.com/101704830626...ts/5Tgp7cFXUgq
T15 Jimmy V8 Swap Slideshow by uhlhazard | Photobucket
https://plus.google.com/101704830626...ts/9RKmtaBHWPf
UPDATES:
Neighbors just bought a 99 suburban for a grand out the door. I saw them pull it in the driveway as I felt a surge of envy. God if only they would leave me alone with that truck for a few days the things I would do to her...
I'm still tearing my truck down. I thought that I'd get lucky and the timing chain snapped causing the ruckus in the video. Nope! But I did notice huge chunks of metal in the pan right at the front. Also bearing material coming out of the front main. The ARP main bolts I upgraded to appear to have done their job keeping themselves and nearby metal attached. I pulled the passenger head and didn't notice anything obvious until I got into the shop. All of the exhaust valves are bent almost 1/8 of an inch where they made contact with the piston.
I went out sad thinking I could yank off the drivers head and noticed a bent pushrod (shiny spot amongst the carbon) Checked the other pushrods and half of them were bent. I've never had the heads off before and the piston surfaces look damn good I must say. I've run a 6psi wynjammer for about 2 years and ran it at 10psi for another year absolutely abused on this engine. Never got to drive in high elevation though, someday.
A friend of mine has a 96 3/4 ton truck 2wd for $1000 that has a 5.7 4 bolt main 4l80. I'm looking at doing the 4l80 swap but I think I'll be better off with the 60 for fuel economy and performance.
I figure my base budget will be:
$800 Donor truck
$250 canton oil pan
$100 motor mount adapters
$100 milled manifolds
So we are at $1250 to start with. I'm sure the limg on the donor will be leaking and already have a set of felpro ms98000 ready to install I'll throw on an oil pan gasket/front main/rear main and gm performance parts single roller timing set. So thats another $100 bucks and hopefully the donor spider/regulator isn't leaking!
I'll do my own wiring. I'm looking forward to cleaning up everything and having access to a new firewall electrical bulkhead to feed mods through:
5 wires Interior lockout winch controls
1 wire per efan for feedback light indicating status
2 wires per efan for controls override on/off/auto
3 wires fuel pressure sender
1 wire oil temp
1 wire ambient air temp for dic
1 wire class 2 serial data for dic
X wires obd2 port
My goal is to keep the budget as low as possible for this build. I want the maximum bang for the buck I can get.
Donor truck will have an available front and rear differential, doors, body panels, transfer case etc.
INTRODUCTION
Hey guys, I've been reading about and researching v8 swaps for about as long as I've owned my 94 T15 Jimmy. I made it a personal goal to keep the 4.3 in tip top shape and when the engine dies, the truck gets a v8 heart transplant.
Well on Novenmber the 8th 2014 driving back from a 1600 mile trip (536 miles from home) with a trailer and my new 31" tires pulling a hill at 5300RPM WOT my engine failed 273K: VIDEO:
This swap's primary focus is to be a daily driver. We camp in our car with our dogs, we sleep in our car, offroad in it, watch movies, its a poor mans RV I have no interest in performance mods beyond holding lockup in 4th towing my empty 16 foot 1500lb trailer just like my wifes tahoe does. The 4.3's anemic with my 4800lb curb weight pulling mountains.
PLANS
I've been really working hard to make an lsx swap happen they ultimately just cost too damned much compared to a 96-99 vortec l31 which is where I'm headed.
I'm considering the cheap oil pan route, welding the front half of the v8 pan the rear of the v6 pan or going with the canton 7quart pan $100-300 estimated
Going with JTR motor mounts and 2.8 clamshells. $100 bucks estimated
Now for exhaust! I've read a post on s10forum of a guy taking the stock l31 manifolds and having them milled down to clear. Hes the only guy I've seen try this but I'm very excited about the prospect. I'd love to bolt straight up to my y-pipe and be trucking for minimal $$.
link:
Tahoe 5.7 Vortec exhaust in a 97 Blazer AWD - S-10 Forum
5.7 powered 96-99 tahoes and burbs are around here running for 1000-1500 regularly on craigslist. I'm going to buy the whole vehicle that way I can test drive everything before swapping over. I'm going to get it running good in the donor truck then move everything over from there and part out what I can.
Progress: Tearing the front clip off and pulling the powertrain. The front diff failed about 5k ago. Pretty sure I broke the engagement gear so I'll have to drop the 100 bucks at the dealership before the engine goes back in.
CONCERNS
Oil cooler line. Hoping I can just bolt the 4.3 adapter to the 5.7 block and use it exactly how the v6 was.
Fuel lines to intake: They look like damn near perfect however I'm sure I'll have to persuade them a little further than bolt-on.
Exhaust: Is my 4.3 y pipe to the cat going to be an issue? I have a 2.5 dynomax catback installed if that matters.
Cooling: I'm reading that unless I do the 0411 PCM swap I can only control 1 efan, I have pushed the original tube-fin condenser forward to work as my transmission cooler, just behind that is a parallel flow condenser for my ac, finally the 4.3 radiator in the stock position. with 2 derale 12" pushers just behind the grille.
Throttle cable fitment.
ac hoses appear to work 3.5 inches forward
power steering hoses appear to need a few bends to work
Looking at making a 2nd gen 96+ stock air cleaner/intake fit.
PICS:
https://plus.google.com/101704830626...ts/5Tgp7cFXUgq
T15 Jimmy V8 Swap Slideshow by uhlhazard | Photobucket
https://plus.google.com/101704830626...ts/9RKmtaBHWPf
UPDATES:
Neighbors just bought a 99 suburban for a grand out the door. I saw them pull it in the driveway as I felt a surge of envy. God if only they would leave me alone with that truck for a few days the things I would do to her...
I'm still tearing my truck down. I thought that I'd get lucky and the timing chain snapped causing the ruckus in the video. Nope! But I did notice huge chunks of metal in the pan right at the front. Also bearing material coming out of the front main. The ARP main bolts I upgraded to appear to have done their job keeping themselves and nearby metal attached. I pulled the passenger head and didn't notice anything obvious until I got into the shop. All of the exhaust valves are bent almost 1/8 of an inch where they made contact with the piston.
I went out sad thinking I could yank off the drivers head and noticed a bent pushrod (shiny spot amongst the carbon) Checked the other pushrods and half of them were bent. I've never had the heads off before and the piston surfaces look damn good I must say. I've run a 6psi wynjammer for about 2 years and ran it at 10psi for another year absolutely abused on this engine. Never got to drive in high elevation though, someday.
A friend of mine has a 96 3/4 ton truck 2wd for $1000 that has a 5.7 4 bolt main 4l80. I'm looking at doing the 4l80 swap but I think I'll be better off with the 60 for fuel economy and performance.
I figure my base budget will be:
$800 Donor truck
$250 canton oil pan
$100 motor mount adapters
$100 milled manifolds
So we are at $1250 to start with. I'm sure the limg on the donor will be leaking and already have a set of felpro ms98000 ready to install I'll throw on an oil pan gasket/front main/rear main and gm performance parts single roller timing set. So thats another $100 bucks and hopefully the donor spider/regulator isn't leaking!
I'll do my own wiring. I'm looking forward to cleaning up everything and having access to a new firewall electrical bulkhead to feed mods through:
5 wires Interior lockout winch controls
1 wire per efan for feedback light indicating status
2 wires per efan for controls override on/off/auto
3 wires fuel pressure sender
1 wire oil temp
1 wire ambient air temp for dic
1 wire class 2 serial data for dic
X wires obd2 port
My goal is to keep the budget as low as possible for this build. I want the maximum bang for the buck I can get.
Donor truck will have an available front and rear differential, doors, body panels, transfer case etc.
#2
05-01-2015, 08:14 PM
I got my donor truck!
Picked up a 99 GMC Suburban 2wd from Dallas yesterday. Had to hammer on the starter to hear it crank but the fuel pump is out of comission. Price paid was low enough that unless the engines perfect Im going to rebuild her out of the gate. Trans is going to be my next problem. I believe all I need to do is swap output shafts and change to a 4wd bellhousing.
My trans concern is will I need to measure the selective washer behind the input shaft after the replacement output shaft? I dont have the necessary tools and Im worried the output shaft will change things. I have a spare 4x output shaft from a 96.
Going to troubleshoot the fuel pump on the otherwise drivable donor. I want to hear everything moving before I tear into it. Engine has no visible oil/coolant leaks besides the cooler lines. Oil looks old but not contaminated and evrrything in the engine bay is giving me hope for a good running engine!
Going to part out valuables on the burb to help pay for the swap mounts and oil pan. Then i need to find a shop that can mill my manifolds down to tuck the stock l31 manifolds inside my frame rails like the stock 4.3.
#3
05-01-2015, 08:16 PM
Alright, got a fuel pump tossed into the donor, SHE RUNS!!!!
https://plus.google.com/101704830626...ts/QqtUntxTsmL
2nd video:
https://plus.google.com/101704830626...ts/FxuAjiY4aUh
I kept moving the dizzy a hair resetting the p1345 code starting the truck, repeat. The light is now off, truck still has a poor idle responds well on WOT but I'm thinking the old fuel in the tank isn't helping troubleshooting. Hopefully the computer can tell me what's going on via codes until then I'm gonna idle her in the backyard until the fuel runs out then check the plug condition/probably new plugs and refuel her with some fresh 87 octanes.
Cap/rotor is new and wires are look good but I'll replace em after the plugs/fuel if it's still running funky.
Challenges:
PASSLOCK 2 SECURITY:
The 99 has a chip/key anti theft system that I need to disable: How To Permanently Disable GM PassLock System | KingBain
Alternatively I can tune it out of a lot of money falls out of my *** for a tuner.
TANK PRESSURE SENSOR:
Probably can rig this up but I'd rather tune it out if possible
BELLHOUSING:
Is there a difference between the 4x4 and 2x4 bellhousing in 1999?
Notes:
There IS on our blazers 93/94. The 4x4 1 piece case has the lower half unbolted with brackets from the engine to the transmission. The 2wd trans has a full bellhousing that bolts to the aluminum pan on 4.3 but I think there is just a steel plate on 2x4's in the v8 application, or nothing.
2ND GEN AIR ASSY SWAP THEORY:
I'm looking at using the stock 4.3 air cleaner assy from the 96+ v6 from the air box to the throttle body. There MAY be differences in the v8 maf vs the v6 and also diameter of the ducting. I'd also like to try and use the 4.3 cpi air cleaner if possible however I feel it is unlikely to work due to the bends required.
MOTOR MOUNT ADAPTERS:
The v8 has a knock sensor that interferes with SOME motor mount adapters. The solution is to cut into the adapter where the knock sensor goes and install a 45* npt fitting to angle the sensor away from the mount. I'd like to avoid this hack job **** if possible.
The next related motor mount issue is available options: our 1st gens have mount pads that bolt to the frame. This makes it easy to just unbolt those pads and bolt the adapter plates to that (please note that most adapter plates are adjustable both forward/rear engine movement, and some are adjustable up/down.) EVEN STILL some mounts let you adjust engine position left/right in the bay. I'd like to match my original engine position.
You can get our **** 4.3 mount adapters, 2.8 clam shell adapters (smaller profile) and standard v8 mount adapters. I'm leaning towards v8 adapters. They should grant more cushion for the pushin vs the 2.8 and I already own half of the kit via my donor.
#4
05-01-2015, 08:19 PM
2015/03/05 Mounted the engine to the engine stand, pulled the flexplate and noticed very clean recently replaced cam freeze plug and those 3 pipe plugs above it. Also the other freeze plugs appear to have been replaced which reinforces my theory of this engine having been recently overhauled (I'm guessing within the last 100k or less) The flexplate is in excellent shape and has minimal tooth wear. The rear main seal has surface rust so it's obviously not leaking the pan gasket however is a different story. I'm probably going to replace it if I'm feeling frisky and the wallet can take more abuse.
I pulled the harness completely off of the engine and tossed it into the now storage building suburban. I then pulled the engine oil cooler/filter adapter and got sad. It's totally different from the 4.3 oil cooler adapter. I'm now searching out trying to find which adapter I can use. I'm trying dearly to retain my remote oil filter and oil cooler setup as I've seen the 4.3 hit 260* oil temp many of times. For some good news, I dropped the manifolds off at the machine shop, Custom Machine and Fab about 20 minutes northeast of me. Going to pull 0 off of the top of the manifold and 3/16 of an inch off of the bottom of the ports. The machinist knows exactly what I need done, I brought my old 4.3 block/head and old 4.3 manifolds to help convey my plans better to them. We noted that when he brings the manifolds into the block that they will interfere with the v8 mount shell so I'm going to go with the JTR 2.8 adapters. What I'm wondering is if I can get away with using the 2wd mount adapters AND the 7 quart canton pan. I'm going to buy them first and see. If not I'll just order the damn 4x4 mounts.
I also removed the exhaust off of the suburban back to the muffler. The exhaust shop "It's Muffler Time" in Conroe told me to bring them my stock cats so they can just weld them up so I don't have to buy all new stuff. Totally kickass guys over there. They already did my catback designed to work with my future v8 swap about a year ago while I was rocking the 4.3 so they will fill in the gaps from the manifolds to the cats then from the cats to the muffler keeping all of the stock o2 sensors intact.
I'm still not sure where to install my wideband, thinking about just monitoring 1 bank.
Then I'm wondering if I will benefit from an H or an X design exhaust system since I'm going to be dual to the muffler. Hell I suppose I can replace/add a muffler per bank I just haven't really thought that part out yet. My goals are not performance for the sake of noise/drivability.
Stumbled on a build log where a guy says " I had to notch the AC bracket to clear the water pump inlet; hopefully it will be strong enough. I�ve seen other guys on here do the same thing so I should be alright." I ran outside like WTF notch the bracket. Well I discovered that I didn't have to notch the bracket for the water neck like he did, my intake/thermostat housing/egr/water pump heater hoses all interfere with either 4.3 accessory bracket. I'm forced to not only have 1 alternator but pay actual money for ac lines since I'll be doing the sanden conversion afterall. Sandens do own so I suppose theres that.


#6
05-01-2015, 08:21 PM
I just scored a new parts truck!:
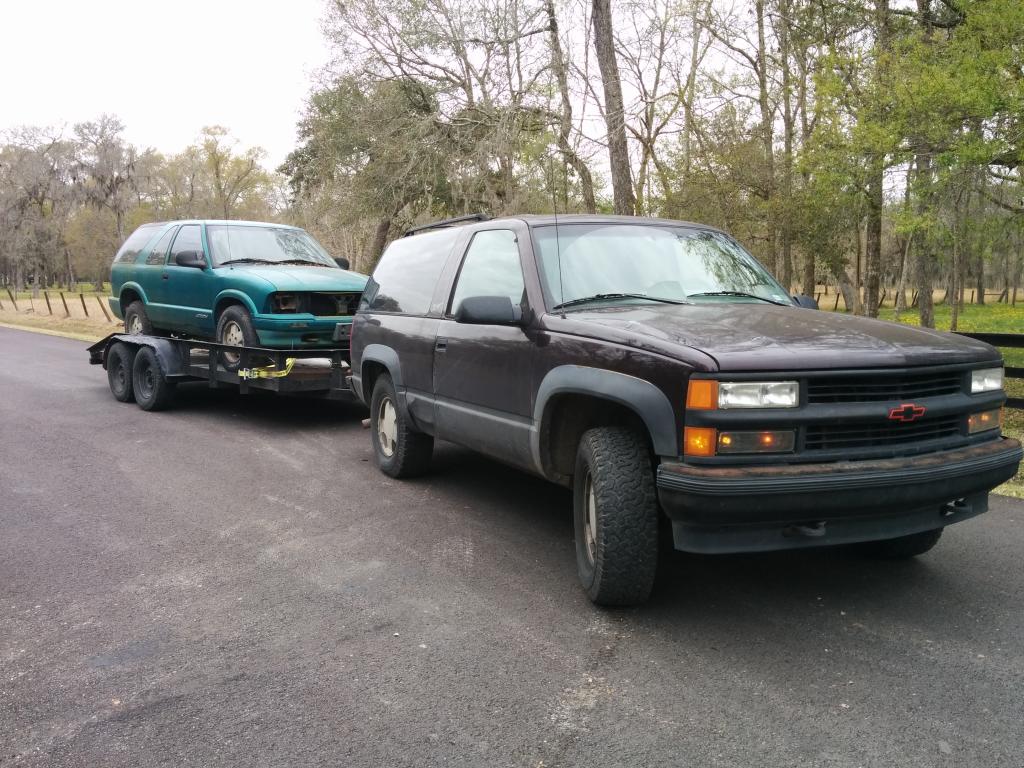
She has the cast iron front diff and 8.5 inch rear diff. I'm gonna sell the rear diff but I'm gonna keep the cast iron front diff. This should help me graft over all of the differences I have between 1st gen/2nd gen/powertrains as well.
I've never seen a cast iron front diff in person until today. Freaking awesome. I already have a no-slip in my disk 7 5/8 rear with arp studs and a nice beefy diff cover so I'm not worried about the 8.5 diff so much. Listed that guy on clist hopefully someone will buy it!
Ooh and to top it off, got a blue texas title in hand, signed by the previous owner and he clearly forgot to date it. 100K original miles. (engines knocking)
#7
05-01-2015, 08:22 PM
Well it's been raining for basically 3 days straight. I have a dirt backyard and no $$ for a cover/concrete YET! Plans call for a shop AFTER the v8 swap. Ooh well.
I have been stuck indoors working/researching. Came up with an acdelco P/N for the badass power steering pulley: 12605677 1988 13 Escalade Tahoe Suburban 6 2L 6 6L GM Power Steering Pump Pulley 12605677 | eBay
After talking with wildbill83 I'm going forward with the Hayden 291 oil cooler adapter. Hayden 291 Oil Filter Relocation Aluminm Natural Kit | eBay
I'm wanting to be 1000% confident in the oil cooler kit so I'm researching running quality lines/fittings from the oil filter adapter to the oil filter. Then running the stock 4.3 oil cooler lines to the rad and upgrading them when $$ becomes available. (I have a set with 10k on them) I'm thinking I'll do hardlines with fittings from the hayden adapter to the front of the block under the power steering pump mimicking the OE setup then curve 90 and thread on some hose from there to the oil filter. Probably be 200 bucks in fittings/labor but no worries about blowing a hose.
I'm still awaiting my milled manifolds from the machineshop. I haven't purchased motor mount adapters or the oil pan yet. Trying to sell some parts off of my 2 donor vehicles to finance that.
HA I found out that in a 4l60e rebuild kit theres a plug that comes in it. It's for the servo bore to eliminate the check valve for a better 2/3 shift. Customer didn't want it modified so I left it alone. Well that plug fit PERFECTLY into my dipstick tube of my old 4.3 cpi and Im pretty sure the dipstick tube diameter is the same in both. This saves me from having to do any tapping on the engine block. Just a simple plug and tapping on a socket. Probably fill the cavity with RTV for sport.
#8
05-01-2015, 08:23 PM
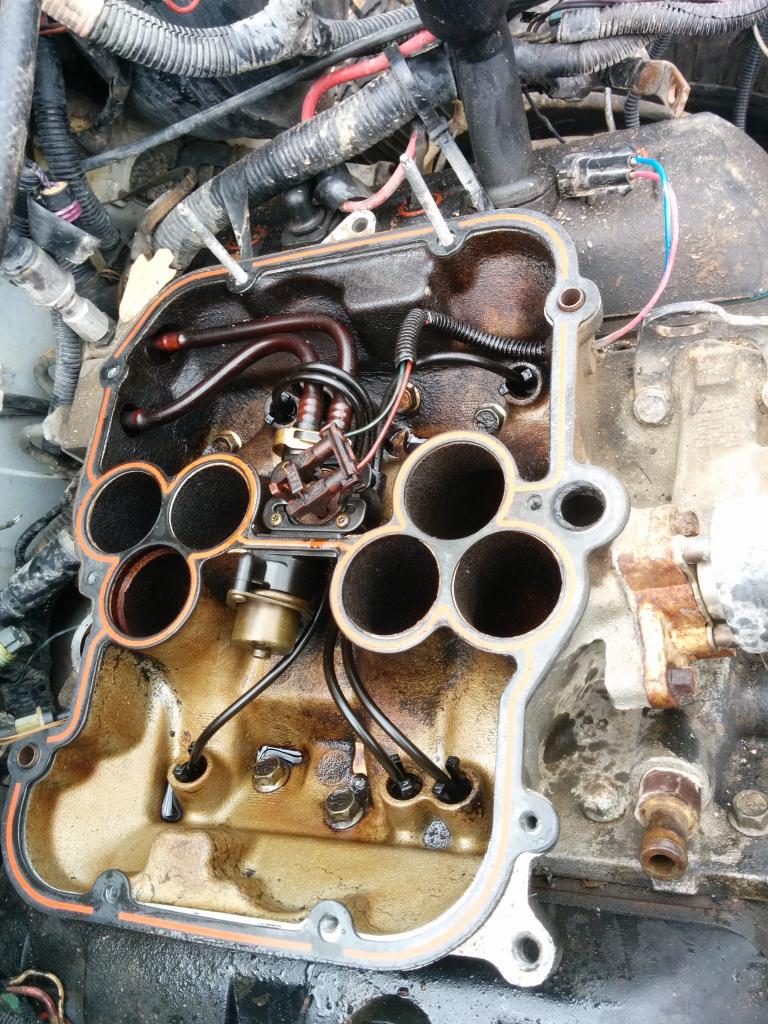
I'm trying to find a few pictures of my core support but heres a breakdown of the layers: fan shroud/radiator/AC Condenser/transcooler (old tube/fin ac condenser)/derale 12" pusher fans/grille
Alright, got some progress done and new issues cropped up. (shocker I know)
The entire air intake assembly from the v8 is not usable. I bought this 96 Jimmy and swapped it's intake cleaner assy over and the hose was hitting the oil fill tube coming from the valve cover. The 4.3 oil fill tube has a different thread design than the standard 5.7 filler neck so the swap idea was out. I then unscrewed the cap from the filler tube on the 4.3 and noticed that both ends were basically the same and the tube was just an extension of the cap. I pulled the 5.7 cap from the tube, unscrewed the tube from the valve cover and tossed the 5.7 cap directly into the valve cover then bolted up the air cleaner assy!
The next issue: maf compatibility. Is the 4.3 maf going to work with the 5.7 computer? The two maf's are different in size enough that a heat gun and persuasion couldn't fit the 5.7 maf into the 4.3 duct. I'm assuming the 4.3 is just a more restrictive version of the 5.7 and should work fine based on what I glean from reading all of these 2nd gen swaps. I've not seen any mention of people talking about making the 5.7 maf work or programming the new ecu to read it properly. So unless someone specifically knows I'm just going to find out when I first start her up.
The 96 air cleaner assy is a HUGE space hog and won't fit well/at all on my Jimmy so I'm going to see if I can cut some of the stock 4.3 cpi air cleaner to mate up to the maf rubber joint. It looks like it will be a pretty clean connection but I won't be able to really mock it up and verify until the engine is in position and the core support is back in.
I scored the 2nd gen coolant bottle/ecu mount. The 99 burb ecu slid and latched right in as expected. I'm thinking I can swap the inner fender so everything bolts right up as theres fancy fasteners preinstalled.
I also went out and stuck a magnet to my new cast iron front diff and wasn't disappointed.
Sold my 8.5 rear end. Sad to see her go but I'm looking at getting one in the distant future. I MUST focus on getting the damned v8 installed before I start jacking around with things that already work. Gonna start pulling parts off of my donor suburban and listing them on fleabay/clist. Same on the 96 4x4 Jimmy. My wifes not exactly thrilled at my 5 derelict vehicles in the backyard but I'm having a blast finally getting to do the swap.


I realized I couldn't run my original 4.3 cpi accessory brackets so I'm using all vortec brackets from the v8. Looks like I'm getting a sanden! I pulled the lines from the 96 compressor and the threads are identical to my Jimmy condenser and filter dryer. 1 issue I ran into when I removed these lines they are not attached. Is mine broken or they all like this? I'd really like to reuse the hoses if I can. Any thoughts?

Got the 4.3 air cleaner assy mocked up where she will be once the v8 is installed and i should only need a very small piece of ducting to connect it to my stock 94 air cleaner.

Maf size differences:


I ordered the 2WD conversion mounts from car shop inc with the rubber 2.8 mounts. I can't do the v8 mounts because the shell on the block will interfere with my manifolds and the 4.3 mounts are an abortion and that design should be banned.
I also ordered the 2013 escalade power steering pump pulley for 28 bucks shipped.
I'm kind of stuck waiting on the manifolds back from the machine shop to test fit clearances. That determines how I proceed with oil pan/dipstick tube. Once all those things are there I have to figure out my oil cooler line plans. Electrical harness is on standby until I have the engine in the bay with the front clip mostly in place.
The next job on the project is swapping front diffs which will be a project in and of itself. My 94 is broken, the 96 appears to work, and I have a diff off of an 01 thats mostly borked. That freaking gear that shears off is 70 bucks! Anyways my new iron diff has a DRAIN PLUG!!! and will bolt right up to my flanged cv shafts. Hopefully shes perfect so I can push forward and complain about the next phase of issues.
Alright, got some progress done and new issues cropped up. (shocker I know)
The entire air intake assembly from the v8 is not usable. I bought this 96 Jimmy and swapped it's intake cleaner assy over and the hose was hitting the oil fill tube coming from the valve cover. The 4.3 oil fill tube has a different thread design than the standard 5.7 filler neck so the swap idea was out. I then unscrewed the cap from the filler tube on the 4.3 and noticed that both ends were basically the same and the tube was just an extension of the cap. I pulled the 5.7 cap from the tube, unscrewed the tube from the valve cover and tossed the 5.7 cap directly into the valve cover then bolted up the air cleaner assy!
The next issue: maf compatibility. Is the 4.3 maf going to work with the 5.7 computer? The two maf's are different in size enough that a heat gun and persuasion couldn't fit the 5.7 maf into the 4.3 duct. I'm assuming the 4.3 is just a more restrictive version of the 5.7 and should work fine based on what I glean from reading all of these 2nd gen swaps. I've not seen any mention of people talking about making the 5.7 maf work or programming the new ecu to read it properly. So unless someone specifically knows I'm just going to find out when I first start her up.
The 96 air cleaner assy is a HUGE space hog and won't fit well/at all on my Jimmy so I'm going to see if I can cut some of the stock 4.3 cpi air cleaner to mate up to the maf rubber joint. It looks like it will be a pretty clean connection but I won't be able to really mock it up and verify until the engine is in position and the core support is back in.
I scored the 2nd gen coolant bottle/ecu mount. The 99 burb ecu slid and latched right in as expected. I'm thinking I can swap the inner fender so everything bolts right up as theres fancy fasteners preinstalled.
I also went out and stuck a magnet to my new cast iron front diff and wasn't disappointed.
Sold my 8.5 rear end. Sad to see her go but I'm looking at getting one in the distant future. I MUST focus on getting the damned v8 installed before I start jacking around with things that already work. Gonna start pulling parts off of my donor suburban and listing them on fleabay/clist. Same on the 96 4x4 Jimmy. My wifes not exactly thrilled at my 5 derelict vehicles in the backyard but I'm having a blast finally getting to do the swap.
I realized I couldn't run my original 4.3 cpi accessory brackets so I'm using all vortec brackets from the v8. Looks like I'm getting a sanden! I pulled the lines from the 96 compressor and the threads are identical to my Jimmy condenser and filter dryer. 1 issue I ran into when I removed these lines they are not attached. Is mine broken or they all like this? I'd really like to reuse the hoses if I can. Any thoughts?
Got the 4.3 air cleaner assy mocked up where she will be once the v8 is installed and i should only need a very small piece of ducting to connect it to my stock 94 air cleaner.
Maf size differences:
I ordered the 2WD conversion mounts from car shop inc with the rubber 2.8 mounts. I can't do the v8 mounts because the shell on the block will interfere with my manifolds and the 4.3 mounts are an abortion and that design should be banned.
I also ordered the 2013 escalade power steering pump pulley for 28 bucks shipped.
I'm kind of stuck waiting on the manifolds back from the machine shop to test fit clearances. That determines how I proceed with oil pan/dipstick tube. Once all those things are there I have to figure out my oil cooler line plans. Electrical harness is on standby until I have the engine in the bay with the front clip mostly in place.
The next job on the project is swapping front diffs which will be a project in and of itself. My 94 is broken, the 96 appears to work, and I have a diff off of an 01 thats mostly borked. That freaking gear that shears off is 70 bucks! Anyways my new iron diff has a DRAIN PLUG!!! and will bolt right up to my flanged cv shafts. Hopefully shes perfect so I can push forward and complain about the next phase of issues.
#9
05-01-2015, 08:24 PM
Thanks, I found the ac delco p/n 1532460
I've been doing a ton of trials for cooling off this truck with various options. These are derale 2210 cfm 12" pushers. They will absolutely cool off my v6 with 10psi pulling a 1500lb trailer containing a bravada at 75mph when it's 107* outside and in traffic. What I did have to do to keep the fans working:
1: throw the fan harness that comes with them in the trash
2: buy a 60a megafuse holder
3: buy continuous duty solenoid
4: profit.
With this setup I have run the truck non-stop for 4 days driving to west texas and back and sleeping in the truck ac the entire time. My curb weight is around 5000lbs when I'm packed up for trips. Hell of a test I'd say!
#10
05-01-2015, 08:24 PM
I'm excited to see your solution. I forgot to order my oil cooler adapter, just did it now.
Ran into some fun today. Working on removing the front cast iron front unicorn and the torsion bolt is broken off inside of the key on the drivers side.
I got really excited when I saw the inner fender mud flap. Hopefully it will work on my 1st gen:

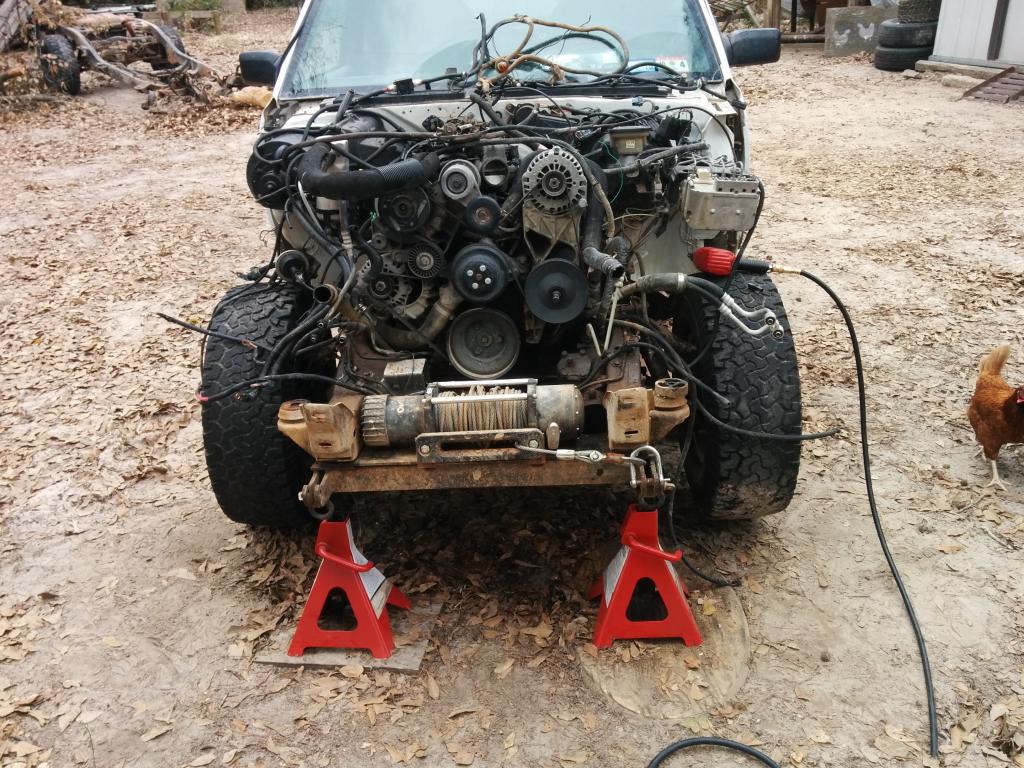
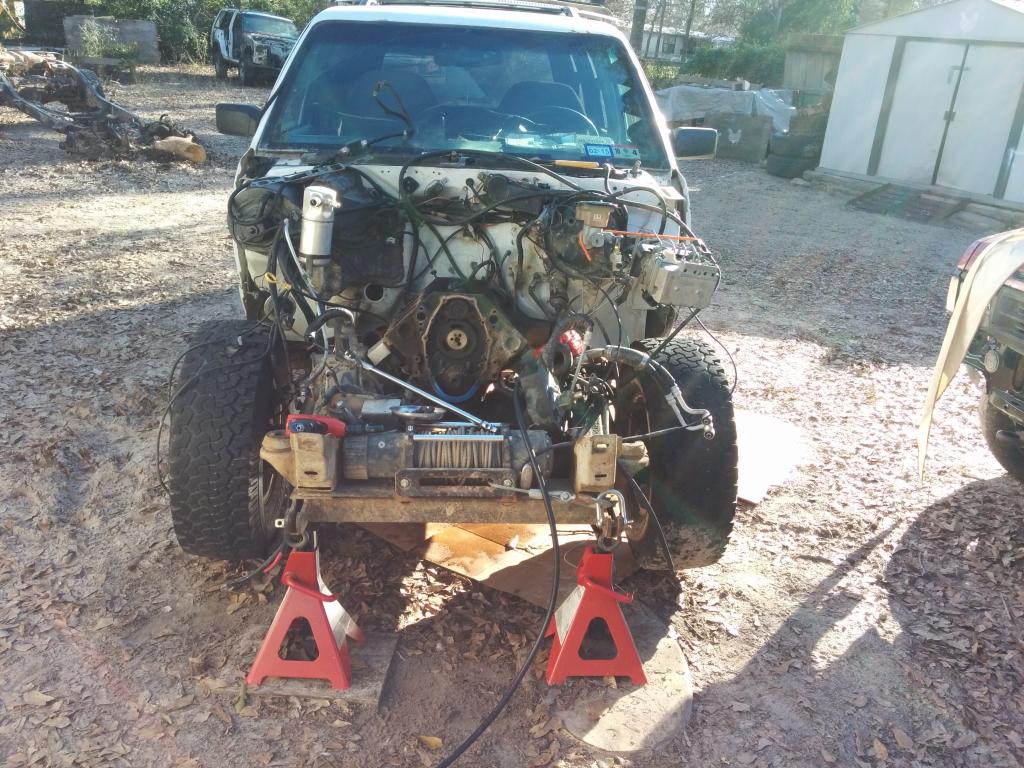
Here she sits on jackstands for the duration:

I'm wondering if I need to swap into this 2nd gen sway bar. I'm going to research if theres a way I can fab up a quick disconnect for it. Might be awesome.
The brakes look great, just everything has this evil non-customary rust coating. The pads are looking like new, the rotors look new, and the cv's appear leak-free. I'm dual piston brakes so I'll toss these spindles/rotors/calipers/pads/hubs on the classifieds for cheap. Hoping to have the diff out tomorrow but it's supposed to rain.
Ran into some fun today. Working on removing the front cast iron front unicorn and the torsion bolt is broken off inside of the key on the drivers side.
I got really excited when I saw the inner fender mud flap. Hopefully it will work on my 1st gen:
Here she sits on jackstands for the duration:
I'm wondering if I need to swap into this 2nd gen sway bar. I'm going to research if theres a way I can fab up a quick disconnect for it. Might be awesome.
The brakes look great, just everything has this evil non-customary rust coating. The pads are looking like new, the rotors look new, and the cv's appear leak-free. I'm dual piston brakes so I'll toss these spindles/rotors/calipers/pads/hubs on the classifieds for cheap. Hoping to have the diff out tomorrow but it's supposed to rain.