
2000 LT Fuel Rail Troubleshooting Help


Thread Starter
|
Beginning Member
Joined: Aug 2015
Posts: 13

Hi Guys
I’m a noob here from Colorado and have a question. I got a project Blazer LT (2000) 4-door with a no start as a little thing to work on. I guess I want to fix it up and take it on some trails and have some fun with it. I got this from someone for dirt cheep with the assumption that there was possibly a mechanical problem with the engine, and the PO also stated that they replaced the fuel pump recently. I say mechanical issue because the PO also thought that there might be no compression due to an overheat on it. But after seeing the fuel pump I’m not quite convinced that it did overheat. So I figured that I could pick up a new engine and do a swap if necessary, but first I would troubleshoot fuel and ignition on this one, run a compression test if necessary and go from there. However crank over sounds pretty good so I started with the fuel system. Also when I picked it up I noticed that during towing, some fuel came out of the tank :O. I took it to a garage to work on it, and sure enough when I dropped the tank the fuel pump gasket was literally on the top of the pump being held on with the fuel lines and the pump DC plug instead of actually on the tank. (Did I mention that it was full, and I had to pump all 19 gallons out? Of course :P The Retaining clip was also loose, so as soon as I dropped the tank, the fuel pump sprang out of there, yes really. Well I tried just sticking the pump back in with the gasket put in to help seal it. I noticed three things. One was that the vent to the filler tube (the smaller one next to the fill port) seams cracked, also I noticed that some kind of tube in the front of the tank, that looks replicable was also cracked where it joins the hose to the port on the front. It looks like when the PO put in the fuel pump they dropped the tank and split theses, so I probably need a new tank. I have a Delphi pump coming since he used an Aertex and I don’t really have any good luck with that brand. I say new tank because the vent hose on the tank is set in with the rest of the plastic tank so my first question…
For the 4 door LT the tank is a long tank that’s mounted driver side with the pump towards the rear of the vehicle, however when looking up parts for it there seems to be a second tank assembly that is shorter with the pump mounted more towards the center. Where can I find the correct tank for this? Is there a marking for the part number on the tank itself? Are there different tanks for 4-door vs 2-door? I can’t seem to get a straight answer on this. What is the deal?
Also what is that little vent tube in the front of the tank called? It is also damaged, its circled here. Also my tank looks like this instead of the other smaller version, which keeps popping up to buy instead.

So everything outside of the engine fuel system wise looks good, no leaks on the lines anywhere, none of the other fittings are leaking, the filter was just swapped and no longer leaking from the pump assembly. I am still getting some bleed off. If I understand correctly this model needs 62 PSI to run or fire injectors. I get 60 PSI during pump initialization, and then it drops down pretty far sometimes 10 – 15 PSI right after the pump shuts off still on the original pump so I think I will swap that out.
Here is a video of my initial Fuel Pressure Test. You will notice the initial pressure at 60PSI the drop, some bleed off, and then during cranking going from 60 PSI and kind of fluttering around at that PSI then the pump shuts off off, and strangely the pressure will return to the same pressure that it bled down to previously.
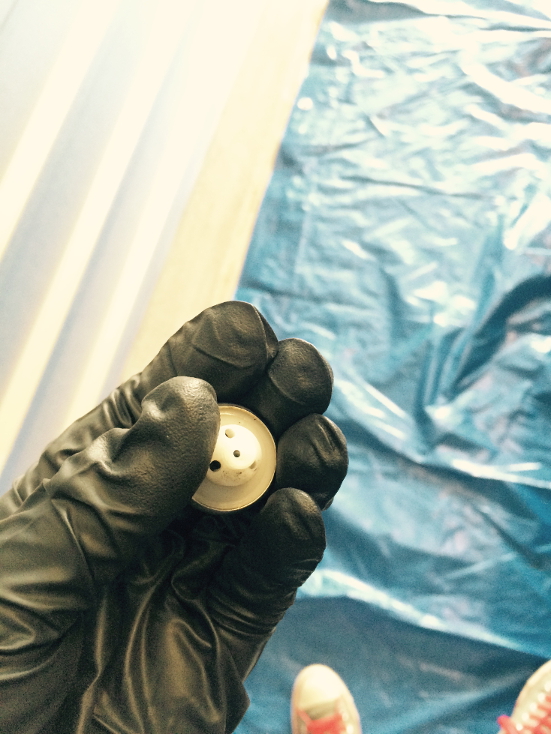
Next question. I found this on the bottom of the tank, not sure what it is or where it goes. I don’t’ see this on the diagrams anywhere, and it looks like a valve of some sort. I poked around and didn’t find where it went. Any ideas? Part of the pump does it go somewhere else?

I also poked around ODBII there are no stored codes, I didn’t’ see anything too suspicious, I would like to see Manifold pressure during crank but couldn’t get a reading on that, and I didn’t seam to be able to probe for fuel tank pressure sensor either. But all the basics throttle, RPM, Coolant Temp, and all that good stuff seamed pretty reasonable. O2 and MAP were not like off the charts crazy either so they seam to be OK. There are no stored coded that were there nor popped up during my fuel pressure test.
I also poked inside of the throttle body to see what going on down in there and I noticed some fuel pooling inside there on the bottom towards the front of the engine. I think on this one there are some fuel components like a regulator and such inside the intake manifold? Should I open this up and test some of the stuff in there?
What is a good way to kind of start narrowing this down so that were not just buying stuff for the sake of buying new stuff? How would we isolate that the tank is still leaky vs the intake or perhaps both areas need attention first?
Sorry for the long post I usually don’t work on GM vehicles, this is my first so I am kind of trying to learn and I’m not at all familiar with GM stuff and I decided lets have some fun with this project :P
Anyway thanks, sorry for the long post. I usually have like an obvious fuel pump failure, where there is 0 – not enough pressure, then swap it, but since a monkey worked on it first I have not had to trouble shoot a rail drop quite like this one.
Thanks Guys!
I’m a noob here from Colorado and have a question. I got a project Blazer LT (2000) 4-door with a no start as a little thing to work on. I guess I want to fix it up and take it on some trails and have some fun with it. I got this from someone for dirt cheep with the assumption that there was possibly a mechanical problem with the engine, and the PO also stated that they replaced the fuel pump recently. I say mechanical issue because the PO also thought that there might be no compression due to an overheat on it. But after seeing the fuel pump I’m not quite convinced that it did overheat. So I figured that I could pick up a new engine and do a swap if necessary, but first I would troubleshoot fuel and ignition on this one, run a compression test if necessary and go from there. However crank over sounds pretty good so I started with the fuel system. Also when I picked it up I noticed that during towing, some fuel came out of the tank :O. I took it to a garage to work on it, and sure enough when I dropped the tank the fuel pump gasket was literally on the top of the pump being held on with the fuel lines and the pump DC plug instead of actually on the tank. (Did I mention that it was full, and I had to pump all 19 gallons out? Of course :P The Retaining clip was also loose, so as soon as I dropped the tank, the fuel pump sprang out of there, yes really. Well I tried just sticking the pump back in with the gasket put in to help seal it. I noticed three things. One was that the vent to the filler tube (the smaller one next to the fill port) seams cracked, also I noticed that some kind of tube in the front of the tank, that looks replicable was also cracked where it joins the hose to the port on the front. It looks like when the PO put in the fuel pump they dropped the tank and split theses, so I probably need a new tank. I have a Delphi pump coming since he used an Aertex and I don’t really have any good luck with that brand. I say new tank because the vent hose on the tank is set in with the rest of the plastic tank so my first question…
For the 4 door LT the tank is a long tank that’s mounted driver side with the pump towards the rear of the vehicle, however when looking up parts for it there seems to be a second tank assembly that is shorter with the pump mounted more towards the center. Where can I find the correct tank for this? Is there a marking for the part number on the tank itself? Are there different tanks for 4-door vs 2-door? I can’t seem to get a straight answer on this. What is the deal?
Also what is that little vent tube in the front of the tank called? It is also damaged, its circled here. Also my tank looks like this instead of the other smaller version, which keeps popping up to buy instead.
So everything outside of the engine fuel system wise looks good, no leaks on the lines anywhere, none of the other fittings are leaking, the filter was just swapped and no longer leaking from the pump assembly. I am still getting some bleed off. If I understand correctly this model needs 62 PSI to run or fire injectors. I get 60 PSI during pump initialization, and then it drops down pretty far sometimes 10 – 15 PSI right after the pump shuts off still on the original pump so I think I will swap that out.
Here is a video of my initial Fuel Pressure Test. You will notice the initial pressure at 60PSI the drop, some bleed off, and then during cranking going from 60 PSI and kind of fluttering around at that PSI then the pump shuts off off, and strangely the pressure will return to the same pressure that it bled down to previously.
Next question. I found this on the bottom of the tank, not sure what it is or where it goes. I don’t’ see this on the diagrams anywhere, and it looks like a valve of some sort. I poked around and didn’t find where it went. Any ideas? Part of the pump does it go somewhere else?
I also poked around ODBII there are no stored codes, I didn’t’ see anything too suspicious, I would like to see Manifold pressure during crank but couldn’t get a reading on that, and I didn’t seam to be able to probe for fuel tank pressure sensor either. But all the basics throttle, RPM, Coolant Temp, and all that good stuff seamed pretty reasonable. O2 and MAP were not like off the charts crazy either so they seam to be OK. There are no stored coded that were there nor popped up during my fuel pressure test.
I also poked inside of the throttle body to see what going on down in there and I noticed some fuel pooling inside there on the bottom towards the front of the engine. I think on this one there are some fuel components like a regulator and such inside the intake manifold? Should I open this up and test some of the stuff in there?
What is a good way to kind of start narrowing this down so that were not just buying stuff for the sake of buying new stuff? How would we isolate that the tank is still leaky vs the intake or perhaps both areas need attention first?
Sorry for the long post I usually don’t work on GM vehicles, this is my first so I am kind of trying to learn and I’m not at all familiar with GM stuff and I decided lets have some fun with this project :P
Anyway thanks, sorry for the long post. I usually have like an obvious fuel pump failure, where there is 0 – not enough pressure, then swap it, but since a monkey worked on it first I have not had to trouble shoot a rail drop quite like this one.
Thanks Guys!
Last edited by mothra; Aug 17, 2015 at 03:26 PM.

Moderator
Joined: Oct 2014
Posts: 4,345
From: North Central Indiana
In case you are wondering why no one seems to be interested in helping..... see above. Do you realize how immature and offensive that sounds to those of us who like our Blazers and actually know how to work on them?
Last edited by LesMyer; Aug 17, 2015 at 02:55 PM.
Thread Starter
|
Beginning Member
Joined: Aug 2015
Posts: 13
Oh well I didn't proof read that last night well enough. No I mean like keep it around till it drops, not go rally it. Who said I didn't like the Blazer? Did you not see all the work I just did troubleshooting it? I am a GM noob, just have not been around them. The ignition system is totally different, the fuel system specs are totally different, there is nothing about this vehicle that I am familiar with besides the basics and what I have taken from the Ranger and Jeep I worked on last. That's why I picked it up, to learn something, have some fun and enjoy it. I have a car right now so an SUV would be fun, I could take it up here on the trail and go hiking and not scrap up the bottom. Park in the lot up the hill a little ways and go camping kind of a thing. I would not have bitten the bullet on something I didn't like to work on whats the fun in that? So sorry that it came off the wrong way that was not the way to phrase that. I'm just trying g something different and I'm completely unfamiliar with it.
Last edited by mothra; Aug 17, 2015 at 05:47 PM.
Moderator
Joined: Oct 2014
Posts: 4,345
From: North Central Indiana
For the 4 door LT the tank is a long tank that’s mounted driver side with the pump towards the rear of the vehicle, however when looking up parts for it there seems to be a second tank assembly that is shorter with the pump mounted more towards the center. Where can I find the correct tank for this? Is there a marking for the part number on the tank itself? Are there different tanks for 4-door vs 2-door? I can’t seem to get a straight answer on this. What is the deal? Also what is that little vent tube in the front of the tank called?
So everything outside of the engine fuel system wise looks good, no leaks on the lines anywhere, none of the other fittings are leaking, the filter was just swapped and no longer leaking from the pump assembly. I am still getting some bleed off. If I understand correctly this model needs 62 PSI to run or fire injectors. I get 60 PSI during pump initialization, and then it drops down pretty far sometimes 10 – 15 PSI right after the pump shuts off still on the original pump so I think I will swap that out.
Here is a video of my initial Fuel Pressure Test. You will notice the initial pressure at 60PSI the drop, some bleed off, and then during cranking going from 60 PSI and kind of fluttering around at that PSI then the pump shuts off off, and strangely the pressure will return to the same pressure that it bled down to previously.
Here is a video of my initial Fuel Pressure Test. You will notice the initial pressure at 60PSI the drop, some bleed off, and then during cranking going from 60 PSI and kind of fluttering around at that PSI then the pump shuts off off, and strangely the pressure will return to the same pressure that it bled down to previously.
If it has been upgraded, based on your pressure readings I doubt if the fuel pump is causing a no-start (as it will deliver fuel past the injectors even at the slightly lower pressure). For comparison the regulator attached to my GM MPFI conversion fuel injectors goes to 58psi with the key first on. The real tests for the fuel pump are decribed in the sticky at the top of this forum and requires (in part) dead-ending of the fuel pump to build 73-108psi of pressure and holding it for a certain time. This checks max output and the check valve in the pump. Only then can you definitively say your fuel pump is good or bad.
Next question. I found this on the bottom of the tank, not sure what it is or where it goes. I don’t’ see this on the diagrams anywhere, and it looks like a valve of some sort. I poked around and didn’t find where it went. Any ideas? Part of the pump does it go somewhere else?
I also poked inside of the throttle body to see what going on down in there and I noticed some fuel pooling inside there on the bottom towards the front of the engine. I think on this one there are some fuel components like a regulator and such inside the intake manifold? Should I open this up and test some of the stuff in there?
What is a good way to kind of start narrowing this down so that were not just buying stuff for the sake of buying new stuff? How would we isolate that the tank is still leaky vs the intake or perhaps both areas need attention first?
What is a good way to kind of start narrowing this down so that were not just buying stuff for the sake of buying new stuff? How would we isolate that the tank is still leaky vs the intake or perhaps both areas need attention first?
Check compression on at least one cylinder to verify camshaft is turning and valve timing is OK. Check for spark coming out of the secondary terminal of the coil while cranking. This will check the function of the crank sensor, PCM (as far as spark control), and the coil itself. Pull the cap and rotor and inspect for corrosion, carbon tracking, etc. These are notoriously troublesome. (Replace cap/rotor with Delco only). Put engine on TDC#1 (note there are two marks on the balancer) and make sure the rotor points to the #6 stamped in the distributor housing. This will check to make sure the PO didn't pull the distributor out and get it back in the wrong position (very common). Check spark plug wires with an ohm meter and look at the terminal inside each boot (both ends) for corrosion. If you want you can pull the plugs out for inspection as well and do a complete compression check. #3 is a bearcat (pop the plastic over off and take the steerng column loose at the steering box - then go through the wheel wells for almost all of the spark plugs).
Fix up your fuel tank/fittings with epoxy or replace it and/or the fuel pump if you wish.
Verify dead-ended FP pressure and holding of pressure per the sticky. If not OK fix it.
Pull plastic plenum on intake and note which kind of injector system you have. If early system and fuel pump pressure is OK, but not min pressure or leaks down you will want to upgrade. Shouldn't be any leaks under this plenum as all gas should be delivered through the injectors. If it is upgraded injectors with no external leaks, then pressure test you already did implies this is not the problem. You will want new plenum seals when going back together.
Well, that should keep you busy for a while and if you do in this order needless costs should be minimal. Let us know if you run across any more questions during the diagnosis and certainly let us know when you get it fixed and what you found. Good luck and best wishes!
Last edited by LesMyer; Aug 18, 2015 at 11:00 AM.
Thread Starter
|
Beginning Member
Joined: Aug 2015
Posts: 13
Thanks Lesmyer I really appreciate your help!
Yep this will keep me busy for quite some time!
I didn't think about epoxy, that's a great idea. I was about to just order a tank or look for one to pull from a yard, I totally spaced out on the epoxy route. I think they make some epoxy that specifically for repairing tanks like this too. I will go pick some up. I'd rather not have any leaks so I'll go fix it up with some epoxy and feel better about it.
Based on a quick visual inspection, looks like the spark plug wires were replaced, but the distributor cap is original? I'm not sure why you would do this, but the cap also has some damage IE a crack on it, which of course is not going to be helping things. So a Delco Cap and Rotor are shipping. On the plus side since he probably didn't touch the rotor it will be easy to verify its all lined up.
When I was poking around inside the intake manifold using a mirror I noticed that it looks original (little black plugs, vs having an electric connection on there to actuate the injectors) so its probably not upgraded. (Like the last picture here instead of the first pictures) Vortec CSFI to MPFI conversion. I can't be 100% sure since I was looking for leaks rather than at the type of connectors but I can check again and that may be a really great idea to upgrade these anyway, especially if they will fire more reliably with lower fuel rail pressures. I am glad that you pointed this out to me. That's really actually kind of cool. I'll be on the lookout for this part. Its a little wet in there but I did spray some stuff in there too so I'm going to let it air out and dry and will re-check it after my testing.
So based on that I would say that the lower fuel pressure is a contributing factor to the no start, since the spider assembly looks factory stock, but also that since the distributor housing is damaged, that also needs to be addressed because having misses won't help either.
The little plastic/metal piece that I found in my picture above was identified as a part of the fuel pump assembly for this vehicle. Looks like it goes to the OEM fuel pump assembly.
Alright well this weekend some parts are coming in, and I will start with the list you gave me and let you know how it goes.
Thank you thank you tank you!
Yep this will keep me busy for quite some time!
I personally would attempt epoxy, as it is a $300 tank.
Based on a quick visual inspection, looks like the spark plug wires were replaced, but the distributor cap is original? I'm not sure why you would do this, but the cap also has some damage IE a crack on it, which of course is not going to be helping things. So a Delco Cap and Rotor are shipping. On the plus side since he probably didn't touch the rotor it will be easy to verify its all lined up.
When I was poking around inside the intake manifold using a mirror I noticed that it looks original (little black plugs, vs having an electric connection on there to actuate the injectors) so its probably not upgraded. (Like the last picture here instead of the first pictures) Vortec CSFI to MPFI conversion. I can't be 100% sure since I was looking for leaks rather than at the type of connectors but I can check again and that may be a really great idea to upgrade these anyway, especially if they will fire more reliably with lower fuel rail pressures. I am glad that you pointed this out to me. That's really actually kind of cool. I'll be on the lookout for this part. Its a little wet in there but I did spray some stuff in there too so I'm going to let it air out and dry and will re-check it after my testing.
So based on that I would say that the lower fuel pressure is a contributing factor to the no start, since the spider assembly looks factory stock, but also that since the distributor housing is damaged, that also needs to be addressed because having misses won't help either.
The little plastic/metal piece that I found in my picture above was identified as a part of the fuel pump assembly for this vehicle. Looks like it goes to the OEM fuel pump assembly.
Alright well this weekend some parts are coming in, and I will start with the list you gave me and let you know how it goes.
Thank you thank you tank you!
Thread Starter
|
Beginning Member
Joined: Aug 2015
Posts: 13
That part that I found was part of the fuel pump, its the check valve for backflow. Replaced the pump after verifying it was snapped off. Still have a regulator leak, verified that with a borescope.
So I goofed on the fitting sizes for my compression tester. I saw one that I almost picked up that required a compressor (leak down cylinder test) type but since the engine wont warm up I figured that was probably worthless. So since mine only has fittings for my bike I will need to go rent one this weekend.
I verified that originally only 4 cylinders showed spark #6 and #4 didn’t. New rotor and cap came in, and I replaced the originals with AC Delco brand. 156 miles on a cap and rotors aren’t too bad :P Verified timing, no one opened it up since it left the factory, lined up nicely at TDC. Verified spark at all 6 cylinders now. Wasn’t able to get a hold of a spark gap, so I could not verify coil strength yet. Plugs wires were all OK though no resistance on them they were brand new. I do have a scope so I may poke at some sensors and verify those. Now I have spark on all cylinders. Original cap was well worn out, and 2 posts didn't even make contact.
I was able to borrow a borescope, pretty nifty!! xD I saw that the original injectors were on there and that the fuel pressure regulator diaphragm was leaking out the little hole. Not as bad as I though but still leaking. It is not an MPFI upgraded system. There was some pooled fuel in there too, looks like the drain port is a little clogged up as well. Front half of the intake is clean the other is grungy black. Looks like a good candidate for the MPFI conversion if the compression test checks out.
Since I didn’t have a compression tester, I used the borescopescope to take a look at the #5 cylinder, so there are no leaks, IE no antifreeze and it didn’t get steam cleaned or anything. The head looks good, and the valves are opening and closing with the cylinder movement, they are not bent. Gasket on there looks well sealed, no visible leaks around the edge there. Timing looks OK on that cylinder the valves open and close at the right spots spinning it over manually. I did however find some cylinder wall scuffing occurring on that cylinder. Nothing to deep but it could affect compression in theory, that’s too bad really because if compression comes back low that will mean that the block will need to be re-honed or replaced. That’s exactly what I didn’t want to see in there. So now I know if the compression-wet test fails that a new block will be required. Its one single scuff on that wall, its not very deep but it does indicate that at some point some on abused it a little. Timing is Ok on that side of the block though. I will go inspect the other cylinders and see if I see the same type of situation and run a complete compression test. There still is cross-hatching though on walls all through out, other than the scuff it looks OK. The borescope is pretty nifty though, I may have to pick one up :P Last time I spent hours tearing it down that far to see the same results after a compression test. I’ll have to see if I can get some images from it. Saved some teardown time.
So next step for sure is a compression test for me, if nothing else I can have the heads machined and get a new block to pop in there.
Last edited by mothra; Aug 22, 2015 at 12:28 AM.
Thread Starter
|
Beginning Member
Joined: Aug 2015
Posts: 13
Well I only got to one cylinder today #5 had only 32 PSI I don't think that was accurate though. re-reading the instructions I probably could have cranked it longer. I didn't get the other plugs off they were kind of tucked under the steering column and I was hungry :-P I guess I need to figure out how to move the stering colum for a better reach. Thanks for you help!! XD
Last edited by mothra; Aug 23, 2015 at 09:01 PM. Reason: Phone typing
Moderator
Joined: Oct 2014
Posts: 4,345
From: North Central Indiana
Well I only got to one cylinder today #5 had only 32 PSI I don't think that was accurate though. re-reading the instructions I probably could have cranked it longer. I didn't get the other plugs off they were kind of tucked under the steering column and I was hungry :-P I guess I need to figure out how to move the stering colum for a better reach. Thanks for you help!! XD
Good luck!
Last edited by LesMyer; Aug 24, 2015 at 07:31 AM.
Thread Starter
|
Beginning Member
Joined: Aug 2015
Posts: 13
Humm well that is very low compression the thing is is that with the fuel rail fix up the Blazer will crank and then catch a little. When it does catch it will sound almost like a start and then not quite catch. Then it return to a more hollow crank sound. The crank isn't uneven and had a little more to it now than it did have. It also catches differently if the throttle is heald open the throttle a little during crank it will act different. It will catch more but sound like catch then not then catch then not very uneven with it open. I would describe is at just not getting fuel or not firing evenly. The exhaust has a unburned smell to it. Oil was drained and it looked good. It almost sound like a start but as soon as you let off the starter it dies. That cylinder looks pretty good in comparison and the valves are not cracked looking at the cylinder top. They are both opening and closing with a seal. I will pull all the plugs and retry the compression test on all of them both wet and dry. Interesting that you should bring up crank speed. A friend commented that it sounds like a slow crank speed on a GM for that but the battery is fresh and the connections are good, so maybe the starter is not cranking over fast enough. He also said that it didn't sound like it had anything too bad and it sounded pretty healthy otherwise, so there wasn't anything to indicate a huge internal problem. That is a rented compression gauge as well, so I may go try it out on a good vehicle and see, its a really tight fit down there by the plugs in the Blazer :P
Last edited by mothra; Aug 24, 2015 at 10:13 AM.
Thread Starter
|
Beginning Member
Joined: Aug 2015
Posts: 13
Alright compression was low across the board, started to teardown. Dry Vs Wet made no difference it was the same reading. Compression tester was OK. So I tore into it tonight and looked inside the intake, there is some coolant in the very front intake port and some inside the pockets of the upper throttle body / intake manifold where the spider injector resides. Decided to take off the upper intake manifold and continue my inspection.
So question, should I take the heads off or just the intake manifold? Think at this point heads need to come off too?

So question, should I take the heads off or just the intake manifold? Think at this point heads need to come off too?
Last edited by mothra; Aug 26, 2015 at 11:13 PM.