
Fuel System Delivery Issue
#1
 02-09-2014, 01:04 PM


2001 Blazer 4x4 2 door
I'm pretty new to the forum and this is my first thread post. I love this forum and have used it many times before for other problems and thank everyone on here for all of their knowledge.
Ok here goes… I'm experiencing a NO START problem. When I crank it, I hear it fire a little bit here and there but won't start. I suspected a fuel problem so I hooked up a fuel pressure gauge to the fuel rail to perform a fuel pressure leak down test. Key on engine off I get a reading of 58psi/400kPa when it should be within 60psi-66psi if I'm not mistaken. Within a matter of a few seconds it drops to 0!!! I followed the fuel feed line and found no visible leaks. I have replaced the fuel spider assembly with the updated MFI before I experienced this no start issue so I believe its safe to say the leak is not inside the plenum. I'm about to test at the fuel filter to isolate the pump anyways, I just haven't made it to the hardware store yet to get the adapters. I suspect the fuel pump is weak from the low reading at the fuel rail. I bought this Blazer a couple years ago and I'm not sure what pump is in it. (Probably some cheap aftermarket BS!!) I'm about to purchase the Delphi pump from RockAuto and would appreciate a little input before I make the buy.
Sorry for the long post and thank you for your replies!!!
#2
02-09-2014, 01:30 PM
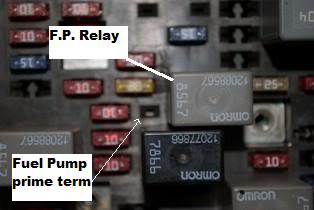
On 1998 and newer S&T series vehicles, in the underhood fuse panel there is a vacant terminal next to the fuel pump relay. The circuit goes directly to the fuel pump.
Connect the tester directly to the fuel filter outlet. (it will require some creative plumbing). All pressure and flow must end at the tester, with no leaks
Connect one end of a 20amp fused jumper wire to battery positive.
Connect the other end to the fuel pump prime terminal.
When the fuel pressure stabilizes on the tester, write it down.
Disconnect the jumper wire.
Wait 10 minutes and write down the pressure.
Post the results.
#3
02-09-2014, 09:09 PM
Thank you Captain Hook for your quick response.
I completed the test 2 times at the filter and got some interesting results.
Test 1
Pump Primed to 65 then after about a few seconds went down to 0 when i removed the jumper wire.
Test 2
Pump only primed to 15 then just about immediately went down to 0 when i removed the jumper wire.
I'm thinking new Delphi fuel pump?
#6
02-12-2014, 05:18 PM
Thanks CaptainHook.
My Delphi pump should be here any day now and I was hoping that its possible to replace while the car is on the ground. I have a jack and stands so I can lift it up some. I was also wondering if there is a how-to on this for my 2 door. Thanks.
My Delphi pump should be here any day now and I was hoping that its possible to replace while the car is on the ground. I have a jack and stands so I can lift it up some. I was also wondering if there is a how-to on this for my 2 door. Thanks.
#7
02-12-2014, 07:11 PM
Jack it up and put the stands under the frame. This will allow the rear axle drop down and give you more room to work. Remove the plastic tank shield, (if equipped). Drain the tank. At 8 pounds per gallon, the lighter the tank is, the easier it is to control. You can either use the fuel pump, (if it works) or remove the rubber fill tube from the tank and siphon it out, (fill tube has to come off to remove the tank anyway). Remove the rubber vent tube, (next to the fill tube) from the tank. Support the tank with a jack, and remove the strap bolts at the front of the tank. Lower the tank enough to reach up and unplug the sending unit and tank pressure sensor connectors. The fuel pressure and return lines require a special tool to release the clips. The vapor line connector just squeezes together and pulls off. Pay attention to where each line goes, 3 different sizes and it is possible to screw it up Let the tank down and clean the rust gravel, sand, dirt, etc, off the top of it, compressed air works well. Unscrew the lock ring, counter clockwise, using the special tool or by carefully using a hammer and hefty flat blade screwdriver. Might want to have a new lock ring handy, they like to rust out. Before installing the new pump, coat the new O ring, and all three line connection nipples on the module, with clean motor oil. The oil helps to keep the O ring in place when installing the lock ring, and it helps the lines slide on and seal easier.
If the new module has the new style electrical connector, it will come in the box.
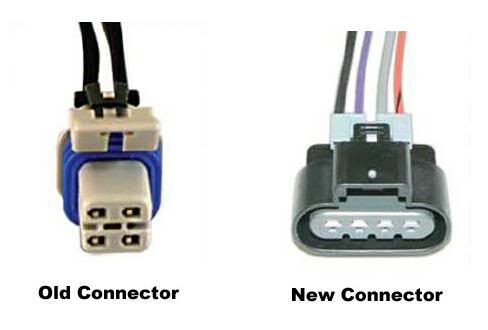
The grey and purple wires need to be soldered to the vehicle harness, do not use crimp connectors. Use heat shrink tube to insulate them. Now would be a good time to upgrade the ground for the level sensor and fuel pump. Solder the black wire and the orange with black stripe wire in the new connector together. Solder a piece of 14 gauge wire to them, and attach the other end to a good clean chassis ground near the tank. Use heat shrink tube or tape to insulate the connection. Put some tape on the two black wires in the vehicle harness, they are not used. The new ground is less likely to cause a problem with the fuel pump in the future.
Let the tank down and clean the rust gravel, sand, dirt, etc, off the top of it, compressed air works well. Unscrew the lock ring, counter clockwise, using the special tool or by carefully using a hammer and hefty flat blade screwdriver. Might want to have a new lock ring handy, they like to rust out. Before installing the new pump, coat the new O ring, and all three line connection nipples on the module, with clean motor oil. The oil helps to keep the O ring in place when installing the lock ring, and it helps the lines slide on and seal easier. If the new module has the new style electrical connector, it will come in the box.
The grey and purple wires need to be soldered to the vehicle harness, do not use crimp connectors. Use heat shrink tube to insulate them. Now would be a good time to upgrade the ground for the level sensor and fuel pump. Solder the black wire and the orange with black stripe wire in the new connector together. Solder a piece of 14 gauge wire to them, and attach the other end to a good clean chassis ground near the tank. Use heat shrink tube or tape to insulate the connection. Put some tape on the two black wires in the vehicle harness, they are not used. The new ground is less likely to cause a problem with the fuel pump in the future.
#8
04-14-2014, 09:56 AM
Sorry for being such a late update, I haven't had the time to get under the truck and weather here in Chicago has been pretty crappy until recently, sooo I finally got the pump in and I actually went ahead and got the Ac Delco off rockauto (it was only like 20 bucks more than the delphi). The pump came with instructions as to rewiring the new connector which I followed. I ran the new ground wire as Captain recommended and insulated with shrink wrap and electrical tape. While I was at it I replaced the lock ring as well as the fuel filter with a wix filter. I primed the system and tested at the fuel service port and what do ya know? KOEO 60psi!! and bled to 55 after 10 minutes!! So fuel system appears to be in check (new MFI assembly as well).
So get this, she starts up instantly with barely any crank but I still notice what to me seems a random miss because she'll only miss once every 20-30 seconds at idle but really starts to miss under load. So, I decided to rule out compression. Did a compression test and heres what I got with minimal to no leak down.
Cyl. 1 - 155 psi.
Cyl. 2 - 152 psi.
Cyl. 3 - 170 psi. woah
Cyl. 4 - 160 psi.
Cyl. 5 - 160 psi.
Cyl. 6 - 150 psi.
According to other posts these results appear to be good. Made a thread with no response but instead did a whole bunch of research. (Absolutely love this site).
Now I'm thinking spark. Replaced all plugs with Ac Delco double plats. Gapped to .060. Put dialectic grease on the plug boots at cap and plug on all wires. Made little to no change in the random miss. I did replace my lower intake manifold gaskets and haven't got the cam retard set properly but I had this same problem before that job and wouldn't it set a timing code if it was +/- 5 degrees? I have no CEL. So my next step is wires, cap, rotor and maybe distributor? Not sure how to check a distributor itself. If I do decide to start replacing these parts which order should I go in?
Thank you very much to Captain and everyone else you've been such a great help to me as well as many others.
#9
04-14-2014, 02:02 PM
If the distributor is not meshed correctly with the camshaft, P1345 will set and the light will come on. No light, distributor is meshed correct.
Camshaft retard spec is zero degrees plus or minus 2 degrees. It can be off as much as ~25 degrees and NOT turn the check engine light on. If it's off more than 2 degrees, in either direction, crossfire will occur inside the distributor cap, and it may or may not set a misfire code or turn the light on.
I'd suggest having camshaft retard checked/adjusted first. Next would be a good quality, (not a store brand) set of plug wires, then an AC Delco cap & rotor.
