tricks or warnings intake gasket 4.3l
#1
 08-20-2015, 10:03 AM


Hello, first post here, but I must say, you guys are a wealth of information. I have located my leak, will replace the intake gaskets this weekend. I am very mechanically inclined, Its what I did in the army and have continued to do on my own vehicles ever since. With that said, I was wondering if any of you have some wisdom to pass along in regards to changing these gaskets, something I may not know perhaps? any responses would be greatly appreciated. thanks for your time.
#3
08-20-2015, 10:36 AM


Sure, either here or in the engine section works fine.
You will have to loosen the A/C compressor mount to engine fasteners and pull the mount forward to get to the front driver's side intake bolt. You don't have to fully remove the mount and the studs. Look for five fasteners - three studs/nuts through the main part. One at the bottom, and one on the side.
Use only the Felpro rubber coated metal gaskets. No sealers except supplied RTV for ends of manifold.
Run a tap into each in each bolt hole in the heads to clean out threads. Especially take care for the blind holes as they tend to fill up with crud.
Use new bolts with sealer factory applied, or wire brush crud off threads of old bolts and apply white bolt sealer.
Obtain an inch pound click torque wrench and tighten in the recommended sequence to the recommended torque. Go over then several times until they are all the same torque and don't turn any more. It is very important with the Vortec intakes.
Now's a good time to upgrade to MPFI if yours has never been done.
Make sure you don't pinch wiring under the passenger side rear of the manifold.
Pretty sure there is a sticky in the tech section on the intake. https://blazerforum.com/forum/tech-a...e-first-30093/
Last edited by LesMyer; 08-20-2015 at 10:59 AM.
#4
08-20-2015, 01:00 PM
Thank you,Les. I think I got it. 5 fasteners on ac bracket,fel-pro gaskets ( already ordered), chase/clean threads, white bolt sealer,inch-pound torque wrench/sequence, mpfi,observe wiring. Seems pretty straight forward from what I can tell so far. Appreciate it! One more thing, off the top of your head, any idea what size taps to use? I don't want to buy a set unless I absolutely have too. Thanks again.
Last edited by telecaster; 08-20-2015 at 01:03 PM.
#5
08-20-2015, 01:01 PM

Take pics specially when bolts are different sizes to make sure they go again on the right spot, or just label them. Just a hung I know many will disagree but personally I added just a really small amount of that same silicone on both sides of gasket so they didnt slide or move as I was lowering the intake manifold again. Just enough to hold it in place for a few seconds, I rather be safe than sorry
#6
08-20-2015, 01:07 PM
when I did mine I noticed that after I tighten and torked all bolts I still went a second time to confirm and since now gasket was flush and tight, I was able to give it a few more degrees of movement at the same torque specs, don't know if anyone else has done this, but just like to be safe than sorry
#7
08-20-2015, 01:33 PM
Thanks, Ricco, I will double check the torque on the bolts. I was planning on buying a couple of bolts to cut the heads off of to use as guides while installing the intake.
#8
08-20-2015, 02:23 PM
To be honestI love creating things and if I had free time world design and patent a kit if it isn't out there already, I herd about your idea days after I did my install. Good luck my friend
#9
08-20-2015, 02:50 PM
Thank you,Les. I think I got it. 5 fasteners on ac bracket,fel-pro gaskets ( already ordered), chase/clean threads, white bolt sealer,inch-pound torque wrench/sequence, mpfi,observe wiring. Seems pretty straight forward from what I can tell so far. Appreciate it! One more thing, off the top of your head, any idea what size taps to use? I don't want to buy a set unless I absolutely have too. Thanks again.
One more thing... On mine, even after the heads came back from the machine shop hot tanked, rebuilt, and surfaced I still had to run the tap into the blind holes on the front intake bolt holes several times before all the crud came out. Look in the holes going through the intake as well. Someone had previously not cleaned them out and packed the crud into a brick in the blind holes with the end of the bolts. Bet that did wonders for the bolt torque. Someone also had pinched a ground wire completely in two underneath the passenger rear of the intake. Was very surprised that it didn't leak coolant.
Good luck and best wishes for successful repair.
Les
Last edited by LesMyer; 08-20-2015 at 03:11 PM.
#10
08-20-2015, 05:00 PM
Pretty sure the intake bolts are 5/16 X 18. As mentioned, if you chase the threads on the bolts and in the heads, then apply thread sealer, you don't need to replace the bolts.
VERY IMPORTANT:
Good idea to repeat step 10.3 a few times.
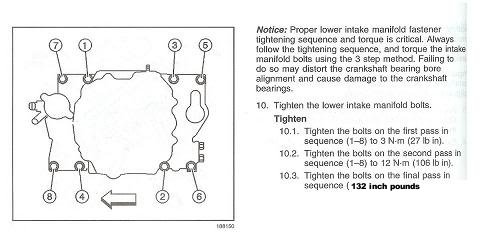
RTV on the block between the heads only. Let it skin over for a minute or so, then set the manifold straight down, DON'T slide it to line up the holes, make it a one shot deal. If you need to use bolts with the heads cut off for guides, so be it. The intake gaskets will stay in place on the heads via the locator pins on the gaskets, don't use RTV as it can affect torque, (see "Notice" in image above) and may cause a coolant leak.
VERY IMPORTANT:
Good idea to repeat step 10.3 a few times.
RTV on the block between the heads only. Let it skin over for a minute or so, then set the manifold straight down, DON'T slide it to line up the holes, make it a one shot deal. If you need to use bolts with the heads cut off for guides, so be it. The intake gaskets will stay in place on the heads via the locator pins on the gaskets, don't use RTV as it can affect torque, (see "Notice" in image above) and may cause a coolant leak.