When you click on links to various merchants on this site and make a purchase, this can result in this site earning a commission. Affiliate programs and affiliations include, but are not limited to, the eBay Partner Network.
Under-hood vacuum hose replacement: 1999 4-button transfer case
[updated continually]
Hi all,
For those of you interested in the lengths and sizes for the vacuum hoses that control your transfer case and HVAC that live under the hood of your rigs, here is the list of the sizes and length of each I used on my '99 Blazer LT with 4WD (4-button 4wd/Auto-4wd/NVG236 transfere case) (see below for 3-button transfer case)
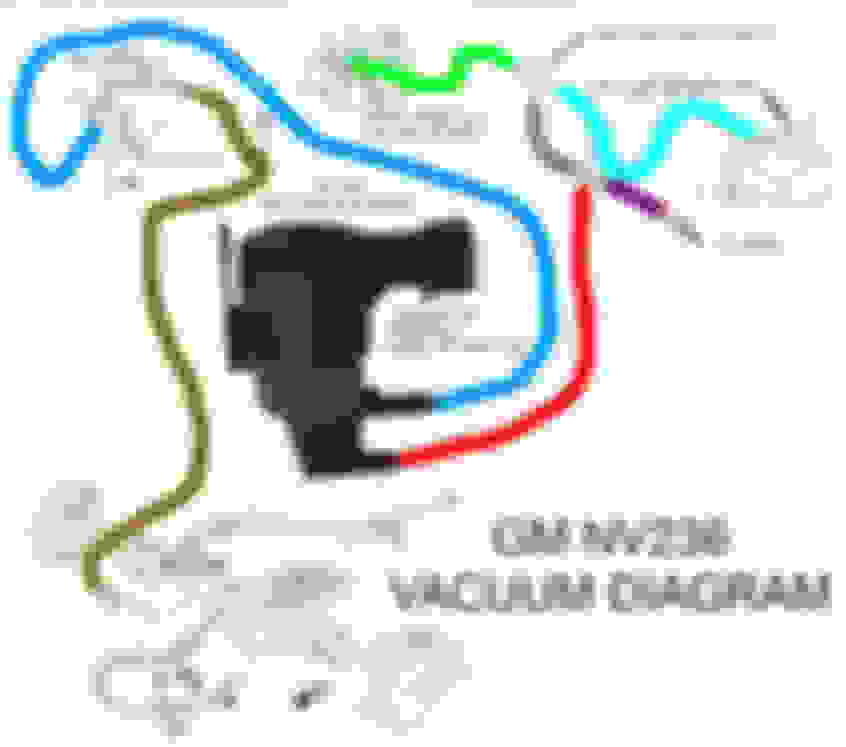
Intake supply line:..............................................7/32" ID, 7/16" OD, L = 20" [ light green line in schematic] lines to transfer case:.........................................5/32" ID, 5/16" OD, L = 7' (total of both lines) [ blue and red lines in schematic] to vacuum reservoir:...........................................3/16" ID, 5/16" OD, L = 8" [ light blue line in schematic] between Tee and one-way valve (vac supply):......7/64" ID, 1/4" OD, L = 3" [ grey line in schematic]
(The brown line in the schematic is a cable, not vacuum line.)
Regarding the hose connection to the vacuum diaphragm for the front axle located under the battery tray: The OD of the hose that goes to the vacuum actuator for the front axle is as important as the ID. This is because this hose connects to the actuator using a FEMALE fitting, not a male (i.e. a nipple) fitting. And as we all know, not all hoses with the same ID have the same OD. I lucked out with this one as I did not know that when I purchased my hoses.
Of course I purchased more hose than I needed. Except for the smallest diameter hose, I ended up with 16" to 22" extra and 9" extra for the smallest ID hose.
You'll likely want to do round up the lengths to the nearest foot so that you can have a little extra to allow yourself to reroute any of your lines if you desire.
Christine
Hint: If you want a bit of extra insurance, you might do what I did and use zip-ties as mini hose-clamps where each of the hoses attach to the nipples.
Here is a schematic of the hose connections posted by mike5511 (post #29) who found it elsewhere on BF.com.
This information is from Fitz (post 23):
To All: Replacing vac lines on transfer case, I just did it. Because 3 lines goes down to a plastic piece on the transfer case with 3 spots , and they all fell behind the engine, it was a question of which line went to which part of the plastic cap. You have to cut any zip ties on the dip stick tube to allow all of the lines to be pulled up with the plastic cap that pulls off the transfer case. A little patience and pulling slowly up trying to free it from hang ups is needed. lines are 5/32" vac lines and there is a tee that splits off above the transfer case and uses a slightly larger vac line. The
lines can be replaced now knowing their length and which one goes where. One line hooks up to the tee near the brake reservoir , one goes to the vac actuator located under the battery and one has a plugged end that ends near the top of the dip stick. tube. I'm thinking again this line is the larger vac line and at the tee one part of the tee is 5/32 that plugs into the plastic piece on the transfer case. That plastic piece on the transfer case has a pin position location for where it fits on the transfer case.
That plastic cap has to be wiggled slightly and pulls up on it to get it off. Hope this
helps anyone interested.
The blazer is a 2001 2dr , 4.3l , 3 button 4wd , type of trans automatic
The length of the vacuum lines I cannot say, that is why I pulled the whole
thing out . Once out you will not only know which line went where on the
plastic piece that fits on the transfer case , where each line connects under
the hood, and how each line is routed under the hood, and the length of each line.
P.S. I am continually updating this first post in this thread with additional details and ideas others have contributed.
Last edited by christine_208; Oct 25, 2018 at 07:04 PM.
Reason: make title more accurate, added note about zip-ties, mapping colors on schematic to hose sizes
Oh yes, in case anyone was wondering, replacing the hoses did help! The air delivery selector (auto heat option in my truck) was starting to act wonky with the vent-air being the only delivery method I could get unless I first turned it to defrost. Now I can select any of the options irrespective of the last one.
Also, I used a couple left-over, never used, old-school, fuel-line-to-fuel-filter spring clamps on the connector to the bellows that is used for the front axle engagement. The long vacuum line fits into a short section (1.5") of larger diameter hose that fits over the nipple on the bellows. It just seemed like a good idea to add a little insurance to the setup since it was only accessible with the battery tray out. :-)
Thanks for posting this helpful info on vacuum hoses. When the newest model Blazer here is a 2005, everyone on the forum needs to check those fragile hoses. Remember they are subjected to extreme heat and cold as well as under the hood gasoline and oil and engine heat. I have been reluctant to attempt that job, but now I have the sizes , so it's a big starter boost. As you know, vacuum leaks can cause all sorts of strange symptoms. Thanks!
A hint that helped me was to cut off an inch or so of the old line to as an example of what you need. But don't use the end that was stretched from being on a nipple fitting. I also used my drill bit set as gauges to determine the ID of the hoses.
An important point I should have shared in my initial post and is described in my second post on this thread:
The OD of the hose that goes to the vacuum actuator for the front axle (that is under the battery tray) is as important as the ID.
This is because this hose connects to the actuator using a FEMALE fitting, not a male (i.e. a nipple) fitting. And as we all know, not all hoses with the same ID have the same OD. I lucked out with this one as I did not know that when I purchased my hoses.
And here is something I felt clever for doing: For the hose that goes to the vacuum actuator, I used the old hose to help thread the new hose through the plastic protector tube by taping the ends together and pulling on the old one. :-)
I found that my new hose that goes to the vacuum reservoir in the left front fender was a bit loose on the nipple for the reservoir. I fixed it using a zip-tie as a hose-clamp.
I wasn't necessarily seeing any problems with the HVAC system or 4WD system not working correctly due to a vacuum leak but I thought I'd remove any doubt about it ever leaking.
This post oughta be a sticky by now. I am about to begin swapping these lines in an attempt to isolate my 4 wheel and HVAC mode door(or blend door, whichever causes air to blow on your face all the time) issues..
This post oughta be a sticky by now. I am about to begin swapping these lines in an attempt to isolate my 4 wheel and HVAC mode door(or blend door, whichever causes air to blow on your face all the time) issues..
Thanks Christine. real time saver..
I'm glad people are finding this useful. Report back if you have anything to add and if replacing the lines helped.
BTW, in addition to replacing the vacuum lines to fix the issue with to where the air was being delivered, I also had to replace the blend-door actuator (which is electronic and controls the temperature) as it was stuck in the Hot position.