When you click on links to various merchants on this site and make a purchase, this can result in this site earning a commission. Affiliate programs and affiliations include, but are not limited to, the eBay Partner Network.
For those of you interested in the lengths and sizes for the vacuum hoses that control your transfer case and HVAC that live under the hood of your rigs, here is the list of the sizes and length of each I used on my '99 Blazer LT with 4WD (4-button 4wd/Auto-4wd/NVG236 transfere case)
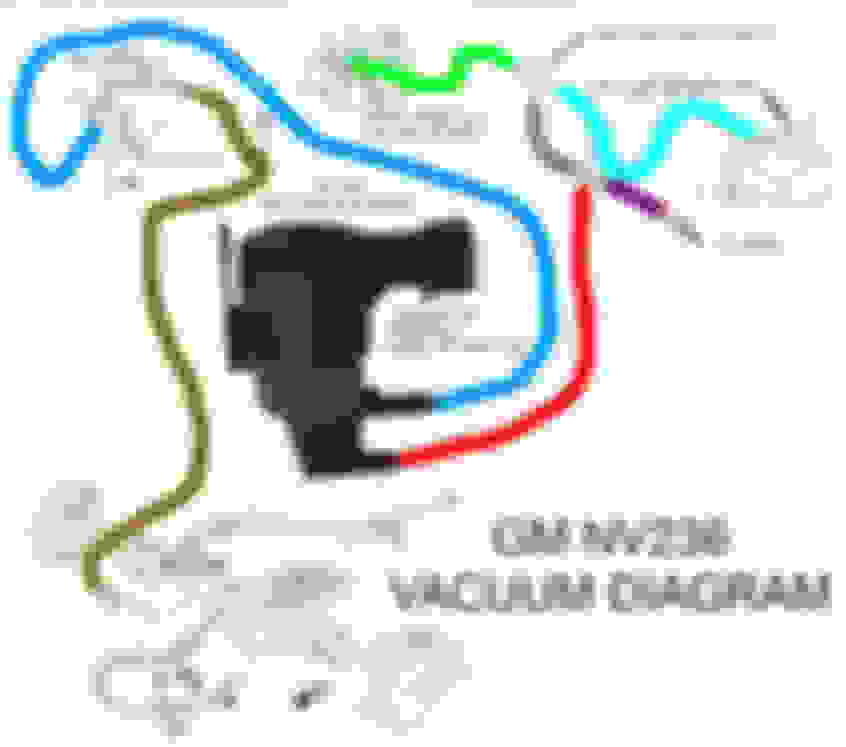
Intake supply line:............................................7/32" ID, 7/16" OD, L = 20" [light green line in schematic]
lines to transfer case:........................................5/32" ID, 5/16" OD, L = 7' (total of both lines) [blue and red lines in schematic]
to vacuum reservoir:........................................ 3/16" ID, 5/16" OD, L = 8" [light blue line in schematic]
between Tee and one-way valve (vac supply):......7/64" ID, 1/4" OD, L = 3" [grey line in schematic]
[The brown line in the schematic is a cable.]
Of course I purchased more than I needed. Except for the smallest diameter hose, I ended up with 16" to 22" extra and 9" extra for the smallest ID hose.
You'll likely want to do round up the lengths to the nearest foot so that you can have a little extra to allow yourself to reroute any of your lines if you desire.
Christine
Edit: If you want a bit of extra insurance, you might do what I did and use zip-ties as mini hose-clamps where each of the hoses attach to the nipples.
P.S. Here is a schematic of the hose connections posted by mike5511 (post #29) who found it elsewhere on BF.com.
quick question ....on a 4-button where does the light green line plumb into the T-case? I haven't had time to work on my Blazer, but on mine I'm pretty sure that line goes down the backside of the block, kinda towards the T-case, but into a section of protective loom . From there I can't really determine where it goes.
Also, where does the HVAC line end up going? Under the dash? The only HVAC issue I'm having is that I have lost floor heat, which I think is a mechanical issue, not vacuum.
Last edited by Puppytank; Oct 6, 2018 at 10:32 AM.
Reason: Addition
quick question ....on a 4-button where does the light green line plumb into the T-case? I haven't had time to work on my Blazer, but on mine I'm pretty sure that line goes down the backside of the block, kinda towards the T-case, but into a section of protective loom . From there I can't really determine where it goes.
Also, where does the HVAC line end up going? Under the dash? The only HVAC issue I'm having is that I have lost floor heat, which I think is a mechanical issue, not vacuum.
Actually, the light-green line is the one that supplies vacuum to everything else. It is connected to a port on the left side of the upper intake plenum.
My 1999 transfer case is only electronically controlled with no vacuum hoses attached to it.
As for the HVAC line, yes it goes through the firewall below and to the outside of the brake vacuum assist can. It goes to the HVAC controller
If you can direct the air flow of the HVAC system to the window and to the instrument panel but not down below for heat, yes, you might have a mechanical issue. Hopefully the fix will be something simple such as reattaching the actuator arm.
Last edited by christine_208; Oct 6, 2018 at 11:39 AM.
Actually, the light-green line is the one that supplies vacuum to everything else. It is connected to a port on the left side of the upper intake plenum.
My 1999 transfer case is only electronically controlled with no vacuum hoses attached to it.
As for the HVAC line, yes it goes through the firewall below and to the outside of the brake vacuum assist can. It goes to the HVAC controller
If you can direct the air flow of the HVAC system to the window and to the instrument panel but not down below for heat, yes, you might have a mechanical issue. Hopefully the fix will be something simple such as reattaching the actuator arm.
Thanks so much Christine! Your info is so invaluable. ...are you a GM tech or something? You are super knowledgeable and what a great asset and resource for us all here. Thank you for so willingly offering up your hard-earned information .
I dug into replacing the vacuum lines this evening. Got most of them replaced without too much trouble, along with the check valve that run inline. The last one I was going to do was the one going to the actuator under the battery.
As soon as I pulled the battery tray clear I saw my problem (I hope):
New 1 year ago!! 5 letter word in the middle says it all!
Yes I just replaced this little bugger about a year ago when I first started having trouble with the 4x4. I didn't suspect it for that reason.
Anybody know of a QUALITY replacement for this?
You are very welcome. I like to think that when I write up something like this, it is me paying it forward for those whose threads were very helpful to me in the past.
As for being a GM-Tech? Nope, just a nerd-girl who gets a bit meticulous at times. LOL
As for what you found, yeah there is a bit of a problem with that par.
To the OP and everyone else, please tell me if I'm hijacking Christine's thread....I don't want to wear out my welcome!
Ha, hijacking this thread? I would think that as long as the posts contribute to the topic so that others may benefit all is ok. If you suddenly ask about or provide advice other than related to replacing the vacuum hoses, then we will have an issue!
Thoughts on the Dorman replacement? Seems Dorman stuff is usually ok. Or should go the Posi-Lok route?
You mean for a replacement diaphragm? I don't have direct experience. Normally I try to go for GM parts since I expect to keep my Blazer for a while. The exception for parts are suspension components; e.g. Moog, Proforged, Wix (filters).