vacuum switch ok 4x4 not working
#61
 11-19-2012, 07:25 PM


Nice pix! You can clearly see the damage, and that's the noise you were hearing. Don't forget to replace the vacuum switch on the transfer case, that's the bad boy that caused all the damage. You can see the location of the switch here:
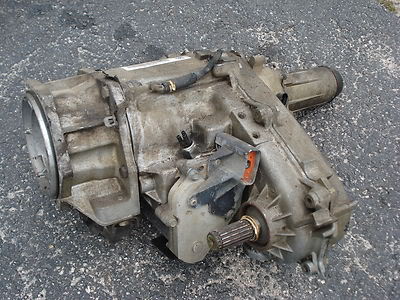
On a 2 Door it's kind of a trick to get to it, gotta reach over the crossmember from behind. 4 door is a piece of cake.
On a 2 Door it's kind of a trick to get to it, gotta reach over the crossmember from behind. 4 door is a piece of cake.
Last edited by Captain Hook; 11-19-2012 at 07:28 PM.
#62
11-19-2012, 08:41 PM

Nice pix! You can clearly see the damage, and that's the noise you were hearing. Don't forget to replace the vacuum switch on the transfer case, that's the bad boy that caused all the damage. You can see the location of the switch here:

On a 2 Door it's kind of a trick to get to it, gotta reach over the crossmember from behind. 4 door is a piece of cake.
On a 2 Door it's kind of a trick to get to it, gotta reach over the crossmember from behind. 4 door is a piece of cake.
never knew it was actually on the TC
i read people saying that a few times but i really thought they were talking the front diff and that it was electrically activated by the wires that went to the vacuum actuator on the front diff.
so is that just a sensor for something since it dont actually engage that ball on the vacuum switch?
btw got a 4door so at least thats a plus for changing that switch
#63
11-19-2012, 09:25 PM
The vacuum switch on the transfer case applies vacuum to the actuator under the battery tray to lock the axle. Dorman Help! 49315 - TRANSFER CASE SWITCH | O'Reilly Auto Parts 7/8" deep socket and a 3/8" drive ratchet gets right on it.
The switch on the axle housing is a "confirmation" switch that tells the TCCM, (Transfer Case Control Module) if the axle is locked in. It's just a spring loaded push button ON/OFF switch, that's all it is:
Dorman OE Solutions 600-504 - 4WD Switch | O'Reilly Auto Parts
When the fork in the axle housing pulls back, it trips the switch.
#64
11-20-2012, 04:57 AM
when i go to put the axle housing flange back together do i need to get a new seal that goes around that protruded hole that is about 4" where the axle slides into?
do i use rtv sealant or anything?
i think im supposed to get a new seal where the cv joint slips over the 1/2 shaft
and get a seal for the vacuum actuator too or can i just use rtv in it too?
i think im gonna re-use that worn gear or at least try it for a bit
after i filed it the sleeve slides over it pretty good and depending how far the vacuum cable pulls the fork over the drive gear then i think it still has pretty good grip over both gears
not sure but im hoping i dont have to get.
would be nice to only get vacuum switch and vacuum actuator under batter and seals and oil for the diff
80-90 weight i believe
#65
11-20-2012, 04:23 PM
 Replacing the inner axle seal is not mandatory, as long as it's not damaged, or was leaking, BUT, for $6, it's crazy not to replace it, considering the amount of work involved to get to it when it's all back together.
Definitely need the vacuum switch on the transfer case, the axle seal, and the seal between the clutch mechanism housing and the axle housing, and some 80w90 oil. From what you found earlier, the actuator under the battery might be OK.
#66
11-21-2012, 07:20 AM
Captain Hook
on page 02 on inner axle housing shaft and housing replacement (step 10) it says to use GM 123456739 sealant or equivalent.
so i buy a seal that goes on the inner axle flange and also buy a seal for the vacuum actuator also on that flange and then use "Black RTV" ( the equivalent) and smear it all over the flange area?
and also get a seal for the out end of the axle housing where the cv joint plugs into?
one more thing
there are 2 thrust washers
they each have like 3 little slots
do the slots face away from each gear
i mean which way are the slots supposed to face or does it matter
#67
11-21-2012, 02:54 PM
Sorry, didn't understand what you meant in your last post.
Refer to post #35 for the following:
Apply a light coat of RTV between the axle tube (#5) and the differential surface (#31). Same with the shift housing (#16).
Parts #8 & #10 are thrust washers, the slots face inboard, (toward the differential).
You'll also need 3 seals: parts #3, #20, & #76. If you print the exploded view images and bring them with you to a GM dealer, it will help them get you the correct parts, (aftermarket stores probably will not have the parts). Might not be a bad idea to bring your VIN and the image of the RPO codes too.
#68
11-21-2012, 04:17 PM
Sorry, didn't understand what you meant in your last post.
Refer to post #35 for the following:
Apply a light coat of RTV between the axle tube (#5) and the differential surface (#31). Same with the shift housing (#16).
Parts #8 & #10 are thrust washers, the slots face inboard, (toward the differential).
You'll also need 3 seals: parts #3, #20, & #76. If you print the exploded view images and bring them with you to a GM dealer, it will help them get you the correct parts, (aftermarket stores probably will not have the parts). Might not be a bad idea to bring your VIN and the image of the RPO codes too.
Refer to post #35 for the following:
Apply a light coat of RTV between the axle tube (#5) and the differential surface (#31). Same with the shift housing (#16).
Parts #8 & #10 are thrust washers, the slots face inboard, (toward the differential).
You'll also need 3 seals: parts #3, #20, & #76. If you print the exploded view images and bring them with you to a GM dealer, it will help them get you the correct parts, (aftermarket stores probably will not have the parts). Might not be a bad idea to bring your VIN and the image of the RPO codes too.
omg! (i looked at the wear pattern on washer and its mating surfaces and it looked like i put them the correct way but i think i did opposite of what you said
is there any way i can tell?
everything is put back together
i didnt put any rtv black on the actuator surface either
lol
#69
11-21-2012, 04:28 PM
Matching up witness marks, (wear pattern) is fine assuming whoever put it together did it right It's been a couple of years since I had one apart and honestly can't remember which way they go. I was going by the exploded view and it appears they both face inboard. Maybe someone will chime in that has a better rememberer than I do
It's been a couple of years since I had one apart and honestly can't remember which way they go. I was going by the exploded view and it appears they both face inboard. Maybe someone will chime in that has a better rememberer than I do
#70
11-21-2012, 05:56 PM
Matching up witness marks, (wear pattern) is fine assuming whoever put it together did it right It's been a couple of years since I had one apart and honestly can't remember which way they go. I was going by the exploded view and it appears they both face inboard. Maybe someone will chime in that has a better rememberer than I do
It's been a couple of years since I had one apart and honestly can't remember which way they go. I was going by the exploded view and it appears they both face inboard. Maybe someone will chime in that has a better rememberer than I do 