
2000 Heater Core Replacement Summary - DISCUSSION THREAD

New Member
Joined: Sep 2010
Posts: 4
From: Las Vegas, NV

I just went through and replaced the heater core in my 2000 Blazer ZR2 following the instructions AdamCrosier posted in post 19 of this thread. Total time was about 8.5 hours, but honestly it wasn't that bad of a job, just tedious. It took me longer last weekend to deal with rusted and frozen nuts and O2 sensors, and a snapped muffler flange stud, when I swapped my catalytic converter than it did to do the heater core!
In the course of doing the heater core, there were a couple things I noticed or did differently than what's mentioned on here.
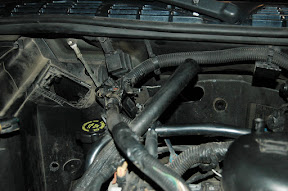
1. There are three connectors on the Body Control Module (box at the front of the console, step 24 in AdamCrosier's instructions), a blue, a brown, and a purple. In the 26-page Mitchell instructions that robertr728 posted above, it mentions removing the brown connector, then the purple connector from the BCM. It makes no mention of the blue in the ordering. I don't know why the order of removal would matter if the battery is already disconnected (which it better be!), but food for thought. I did the brown, then purple, then blue.
2. When removing the BCM connectors, check to see if they are taped to the dash. I had one set of them taped to a support right by the BCM, which hung up removal of the dash.
3. To get the dash out over the steering wheel, I removed the instrument cluster. It made for a lot more wiggle room to get the dash contorted out of the truck. Four 7mm screws and one connector.
4. Don't forget to disconnect the "six-pack" of vacuum connectors coming from the HVAC controls to the air blend/heater unit before taking the dash out. They are by the large power connector and airbag connector in step 15.
5. Also in step 15, make sure to get the yellow airbag connector immediately to the left of the main power connector. I got a bit ahead of myself and disconnected the one to the left of the glovebox, only to re-connect it and undo the proper one next to the large connector. My bad...
6. Make sure to route the antenna cable from the stereo out of the radio cavity. Mine was clipped onto the dash and kind of wrapped around in the radio cavity, and hung up the dash when we tried to remove it.
7. Near steps 8 and 9 in these directions, there is a four pin flat connector with thick (12-ish gauge) wires that runs to the fuse box from a place unknown. That also hung me up on dash removal. Look for it near the parking brake release handle cavity after you take that panel off. I don't know exactly where it belongs, but I know it's there.
8. For the "worst bolt" in step 29, I cheated a LOT here. The way I figure it, if I already have to break out the sealant to close up the area around the resistor pack on top, why not make another hole to patch?
8a. I (carefully) drilled a 1/2" hole at about the same level as the the bolthead, and another 1-1.5" or so towards the engine, further away from the AC evaporator. When drilling, do NOT drill anywhere except towards the firewall/back of the truck! If you aim the drill toward the passenger side, you may very well end up drilling your AC evaporator and causing a damn expensive mess, and killing your air conditioning. BE CAREFUL!
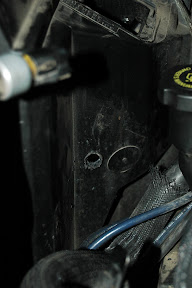
8b. I used a 12" long, 3/8" drive extension and a 10mm socket. I put the extension through the hole, then angled it up and attached the 10mm socket to it.
8c. When I felt the bolt getting loose, I used a magnet on an extendable handle and grabbed it with the magnet before it came fully loose. Once it was all the way backed out, I pulled the extension and socket back a bit, let the magnet hold the bolt, and pulled the bolt out with the magnet.
8d. When reinstalling that bolt, I put the magnet on the socket to magnetize it, and then put the bolt into the end of the socket. I had to use my fingers to guide the bolt into the hole, but it was pretty smooth sailing.
8e. To patch the hole, I'm going to use some weatherstrip glue or rubber/contact cement and a piece of thin black rubber to patch over the hole. I was going to use some thin sheet styrene I have at work, but I've decided I want something more flexible/pliable to deal with the temp shifts and differential between the hot engine bay and (potentially) cold evaporator housing. So, an update is forthcoming on this, but I don't anticipate a problem.
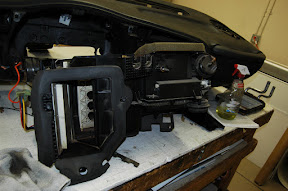
What to expect your truck to look like:
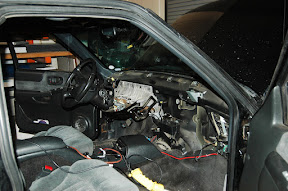
Pile o' parts removed:
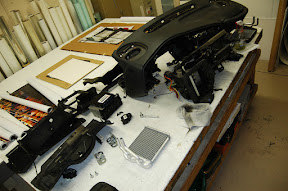
The HVAC unit with the heater core removed:
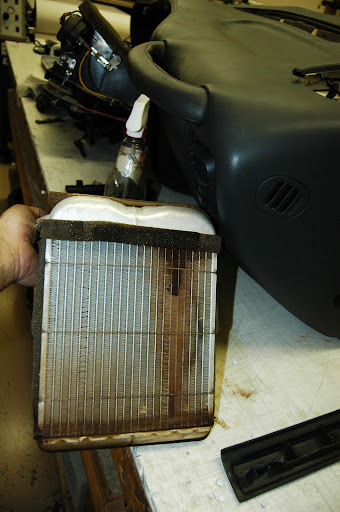
The culprit:
Hope this helps someone who's going to tackle this job. And, thanks to everyone on here for all the helpful information, and especially AdamCrosier, whose step-by-step directions were irreplaceable for me on this!
Matt
In the course of doing the heater core, there were a couple things I noticed or did differently than what's mentioned on here.
1. There are three connectors on the Body Control Module (box at the front of the console, step 24 in AdamCrosier's instructions), a blue, a brown, and a purple. In the 26-page Mitchell instructions that robertr728 posted above, it mentions removing the brown connector, then the purple connector from the BCM. It makes no mention of the blue in the ordering. I don't know why the order of removal would matter if the battery is already disconnected (which it better be!), but food for thought. I did the brown, then purple, then blue.
2. When removing the BCM connectors, check to see if they are taped to the dash. I had one set of them taped to a support right by the BCM, which hung up removal of the dash.
3. To get the dash out over the steering wheel, I removed the instrument cluster. It made for a lot more wiggle room to get the dash contorted out of the truck. Four 7mm screws and one connector.
4. Don't forget to disconnect the "six-pack" of vacuum connectors coming from the HVAC controls to the air blend/heater unit before taking the dash out. They are by the large power connector and airbag connector in step 15.
5. Also in step 15, make sure to get the yellow airbag connector immediately to the left of the main power connector. I got a bit ahead of myself and disconnected the one to the left of the glovebox, only to re-connect it and undo the proper one next to the large connector. My bad...
6. Make sure to route the antenna cable from the stereo out of the radio cavity. Mine was clipped onto the dash and kind of wrapped around in the radio cavity, and hung up the dash when we tried to remove it.
7. Near steps 8 and 9 in these directions, there is a four pin flat connector with thick (12-ish gauge) wires that runs to the fuse box from a place unknown. That also hung me up on dash removal. Look for it near the parking brake release handle cavity after you take that panel off. I don't know exactly where it belongs, but I know it's there.
8. For the "worst bolt" in step 29, I cheated a LOT here. The way I figure it, if I already have to break out the sealant to close up the area around the resistor pack on top, why not make another hole to patch?
8a. I (carefully) drilled a 1/2" hole at about the same level as the the bolthead, and another 1-1.5" or so towards the engine, further away from the AC evaporator. When drilling, do NOT drill anywhere except towards the firewall/back of the truck! If you aim the drill toward the passenger side, you may very well end up drilling your AC evaporator and causing a damn expensive mess, and killing your air conditioning. BE CAREFUL!
8b. I used a 12" long, 3/8" drive extension and a 10mm socket. I put the extension through the hole, then angled it up and attached the 10mm socket to it.
8c. When I felt the bolt getting loose, I used a magnet on an extendable handle and grabbed it with the magnet before it came fully loose. Once it was all the way backed out, I pulled the extension and socket back a bit, let the magnet hold the bolt, and pulled the bolt out with the magnet.
8d. When reinstalling that bolt, I put the magnet on the socket to magnetize it, and then put the bolt into the end of the socket. I had to use my fingers to guide the bolt into the hole, but it was pretty smooth sailing.
8e. To patch the hole, I'm going to use some weatherstrip glue or rubber/contact cement and a piece of thin black rubber to patch over the hole. I was going to use some thin sheet styrene I have at work, but I've decided I want something more flexible/pliable to deal with the temp shifts and differential between the hot engine bay and (potentially) cold evaporator housing. So, an update is forthcoming on this, but I don't anticipate a problem.
What to expect your truck to look like:
Pile o' parts removed:
The HVAC unit with the heater core removed:
The culprit:
Hope this helps someone who's going to tackle this job. And, thanks to everyone on here for all the helpful information, and especially AdamCrosier, whose step-by-step directions were irreplaceable for me on this!
Matt
Last edited by VegasMatt; Nov 22, 2010 at 06:23 PM. Reason: Added photos to the post

New Member
Joined: Dec 2010
Posts: 9
my heater core also just took a dump. looks like this is what my next couple of days will consist of. if anyone has any additional advice or tips they are greatly welcomed. i have a 2001 blazer 4dr 4x4. it has 170k and it is falling apart. ive always been a blazer fan but i must admit this one (being my 3rd blazer) is really breaking me down. ive wrenched on this vehicle more than anything ive ever had and ive only had it for 2 years. heres a short list--- ball joints about every 6 months. 2 fuel pumps this year. i think im on my 4th pitman arm. 2nd idler arm and tie rods. it needs a steering box i think (theres a lot of play in the steering wheel. reminds me a of ridding lawn mower) and some other piddly ****. but anyway im new to the forum and i suppose this is my introduction. my name is jesse, i just graduated college and am looking for in the hvac world. i live in kentucky (45 min south of louisville) and thats about it. ive never replaced a heater core and i must admit im quite nervous. i have a feeling this will be me and the heater core  hahaha. id like to thank everyone that took time out of their day to take pictures and do a write up. youve given me some hope. hats off to you
New Member
Joined: Dec 2010
Posts: 9
ok so i just got everything back together and i have a couple of problems...
when i turn on the defroster or the a/c it bogs the motor down and dies
when the floor setting is selected, air blows out at the defrost vents as well.
4x4 high will not engage but 4x4 low will.
it drives fine. thats all ive come across so far. anyone have any ideas as to what this could be?
when i turn on the defroster or the a/c it bogs the motor down and dies
when the floor setting is selected, air blows out at the defrost vents as well.
4x4 high will not engage but 4x4 low will.
it drives fine. thats all ive come across so far. anyone have any ideas as to what this could be?

New Member
Joined: Dec 2010
Posts: 9
From one of the stickies at the top of this section:
DIY SUBMISSIONS ONLY - NO REQUESTS FOR HELP
DIY SUBMISSIONS ONLY - NO REQUESTS FOR HELP

New Member
Joined: Dec 2010
Posts: 2
From: Vancouver BC
First off thanks to Adam Croizer, Vegas matt & Dream Steve for their input and advice.
Here's a link to a series of pictures and comments for when I did mine. As I had a ton of extra wiring that I redid too while everything was open. Alarm, autostarter, DVD player, paging unit, etc. etc. It took close to 32 hours, 35 hrs once all the tools were put away and vehicle / work area was cleaned up. Did it in one shot as I had to do it in a shared condo common parkade and it is in a high theft risk area. Good Luck all !
http://www.facebook.com/album.php?ai...5&l=be6f90205d
Good Luck all !

After seeing those pictures, I DEFINATELY don't want to embark on this kind of project. It looks complicated and sounds even more confusing!1 Was you afraid of screwing stuff up while doing this?
Last edited by Senshi09; Mar 29, 2011 at 09:31 PM.

Heater Core went bad on my way from Springfield to St. Louis today....smell gave me a head ache and instantly got the greasy film (fog) on my windshield and windows. Ended up getting it towed about 90 miles.
Debating on tackling this myself or taking it into the shop. Any one ever taken it in?
How long and how much did it set ya back? worth it?
Debating on tackling this myself or taking it into the shop. Any one ever taken it in?
How long and how much did it set ya back? worth it?
Beginning Member
Joined: Jan 2010
Posts: 37
From: Westland, MI
When mine went bad I took it in just to get a quote and they said it'd set me back about $900 and about a days time. I did it myself for $65 in about 8 hours. If you have any mechanical aptitude I would go for it and save yourself all that money 