
EGR Valve Cleaning


Thread Starter
|
Starting Member
Joined: Feb 2007
Posts: 141
From: Huntsville, AL

This will guide you through removing, cleaning, and reinstalling your Exhaust Gas Recirculation (EGR) valve. It�€™s an easy job that takes less than an hour.
Tools needed:
- 10mm socket
- 10�€�-ish socket extension.
- Torque Wrench
- Gasket Scraper
- small flexible brush. The bristles should be 1 to 1.5 inches long.
- rubber stopper or anything to plug the intake port (I used a large vacuum cap turned upside down and then added electrical tape to get it to the right diameter) This is for optional step 4.
Materials needed:
- A spray can of carbon cleaner. I used STP carburetor cleaner and it seemed to work fine.
- New EGR gasket (get the one with the screen�€�see the picture below in step 6)
Approximate time: 30 �€“ 45 minutes.
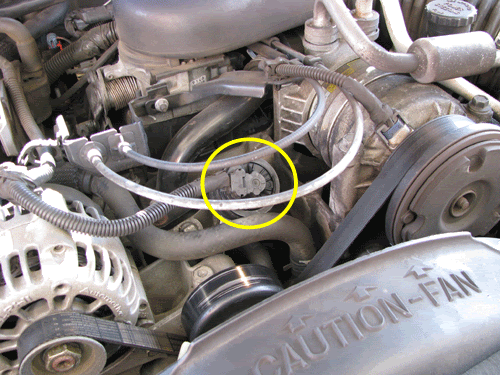
Your EGR valve is towards the front of your intake manifold.
Step 1:
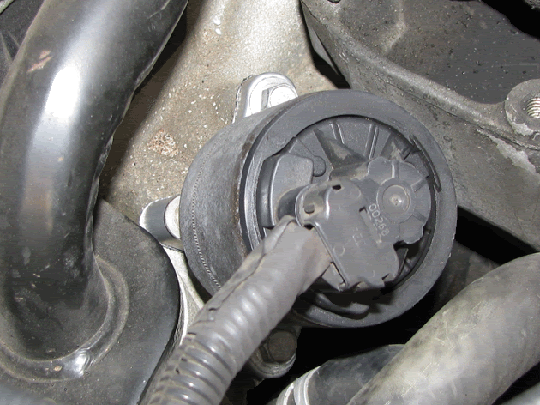
Disconnect positive battery cable and then remove the electrical connector from the top of the EGR valve.
Step 2:
Remove the 2 bolts holding the EGR valve to the intake manifold and pull the EGR valve off of the engine. The cavity in the bottom of the EGR valve is what you�€™re going to clean out.
Step 3:
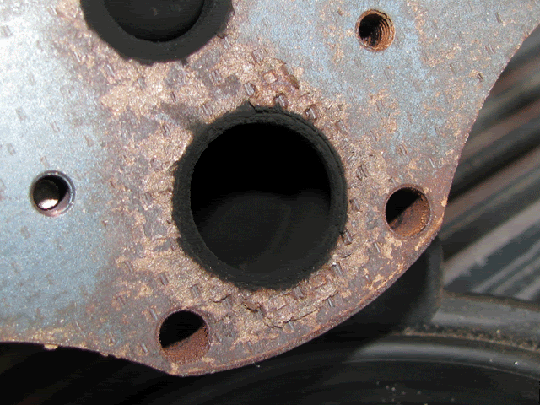
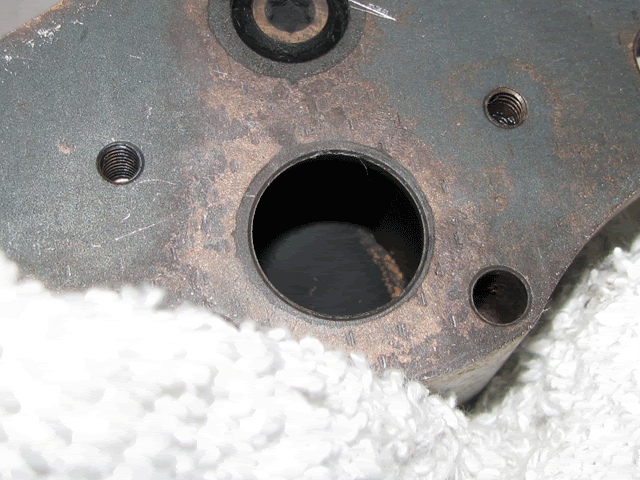
Spray a healthy amount of carbon cleaner into the cavity and then use your brush to scrub as much of the cavity as you can get to. Rinse the cavity out with more carbon cleaner. Repeat until you�€™re not getting any more carbon in your rinse. It�€™s hard to tell in the pictures because the carbon absorbs light and makes the cavity look like a black hole, but if you look carefully at the before and after pictures, you�€™ll see the difference.
This is what it looked like before I started:
This is what it should look like when you�€™re done.
Step 4 (Optional, but recommended):
While the EGR valve is still off, start the engine for a few seconds to let the pressure from the exhaust blow out through the exhaust side opening for the EGR valve. This step is a good idea because it cleans out any loose chunks of carbon in the exhaust-side plumbing of your EGR circuit. You have to be aware, however, that there will be a huge vacuum leak because the intake manifold port is open and this can cause the engine to race. What I did to prevent the engine from racing (and to prevent the intake vacuum from sucking any of that debris into the intake side of the circuit) was to plug the intake side port. It worked well and gave me the piece of mind to let the engine run for a few more seconds than I would have if the engine was racing.
Step 5:
Using the gasket scraper, clean off any of the old gasket from the intake manifold and bottom of the EGR valve. Then use some of the cleaner on a rag and wipe both surfaces so you have a clean surface for your new gasket.
Step 6:
Install your new gasket (the bolts in the picture are only there to hold the gasket in place for the picture), place the EGR valve over the gasket, and then install the bolts. Torque to 20-25 ft/lbs.
Step 7:
Plug the electrical connector in and the reconnect your battery.
You are done!
Check out the EGR Valve Cleaning DISCUSSION thread to make suggestions on making this article better.
Tools needed:
- 10mm socket
- 10�€�-ish socket extension.
- Torque Wrench
- Gasket Scraper
- small flexible brush. The bristles should be 1 to 1.5 inches long.
- rubber stopper or anything to plug the intake port (I used a large vacuum cap turned upside down and then added electrical tape to get it to the right diameter) This is for optional step 4.
Materials needed:
- A spray can of carbon cleaner. I used STP carburetor cleaner and it seemed to work fine.
- New EGR gasket (get the one with the screen�€�see the picture below in step 6)
Approximate time: 30 �€“ 45 minutes.
Your EGR valve is towards the front of your intake manifold.
Step 1:
Disconnect positive battery cable and then remove the electrical connector from the top of the EGR valve.
Step 2:
Remove the 2 bolts holding the EGR valve to the intake manifold and pull the EGR valve off of the engine. The cavity in the bottom of the EGR valve is what you�€™re going to clean out.
Step 3:
Spray a healthy amount of carbon cleaner into the cavity and then use your brush to scrub as much of the cavity as you can get to. Rinse the cavity out with more carbon cleaner. Repeat until you�€™re not getting any more carbon in your rinse. It�€™s hard to tell in the pictures because the carbon absorbs light and makes the cavity look like a black hole, but if you look carefully at the before and after pictures, you�€™ll see the difference.
This is what it looked like before I started:
This is what it should look like when you�€™re done.
Step 4 (Optional, but recommended):
While the EGR valve is still off, start the engine for a few seconds to let the pressure from the exhaust blow out through the exhaust side opening for the EGR valve. This step is a good idea because it cleans out any loose chunks of carbon in the exhaust-side plumbing of your EGR circuit. You have to be aware, however, that there will be a huge vacuum leak because the intake manifold port is open and this can cause the engine to race. What I did to prevent the engine from racing (and to prevent the intake vacuum from sucking any of that debris into the intake side of the circuit) was to plug the intake side port. It worked well and gave me the piece of mind to let the engine run for a few more seconds than I would have if the engine was racing.
Step 5:
Using the gasket scraper, clean off any of the old gasket from the intake manifold and bottom of the EGR valve. Then use some of the cleaner on a rag and wipe both surfaces so you have a clean surface for your new gasket.
Step 6:
Install your new gasket (the bolts in the picture are only there to hold the gasket in place for the picture), place the EGR valve over the gasket, and then install the bolts. Torque to 20-25 ft/lbs.
Step 7:
Plug the electrical connector in and the reconnect your battery.
You are done!
Check out the EGR Valve Cleaning DISCUSSION thread to make suggestions on making this article better.

Thread
Thread Starter
Forum
Replies
Last Post
garry2000blazer
Article Submissions/Discussions
55
Jul 22, 2022 01:41 PM
IndianaBlazerGirl
2nd Generation S-series (1995-2005) Tech
5
Sep 6, 2011 06:22 PM
swearingsailor6
1st Generation S-series (1983-1994) Tech
6
Dec 21, 2006 01:41 AM