
How-To: EGR Valve Cleaning - DISCUSSION THREAD


Thread Starter
|
Starting Member
Joined: Feb 2007
Posts: 141
From: Huntsville, AL

This will guide you through removing, cleaning, and reinstalling your Exhaust Gas Recirculation (EGR) valve. It’s an easy job that takes less than an hour.
Tools needed:
- 10mm socket
- 10”-ish socket extension.
- Torque Wrench
- Gasket Scraper
- small flexible brush. The bristles should be 1 to 1.5 inches long.
- rubber stopper or anything to plug the intake port (I used a large vacuum cap turned upside down and then added electrical tape to get it to the right diameter) This is for optional step 4.
Materials needed:
- A spray can of carbon cleaner. I used STP carburetor cleaner and it seemed to work fine.
- New EGR gasket (get the one with the screen…see the picture below in step 6)
Approximate time: 30 – 45 minutes.
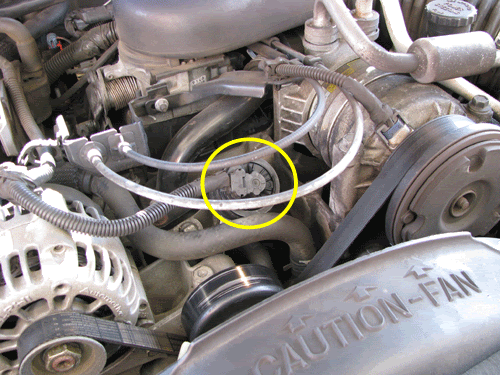
Your EGR valve is towards the front of your intake manifold.
Step 1:
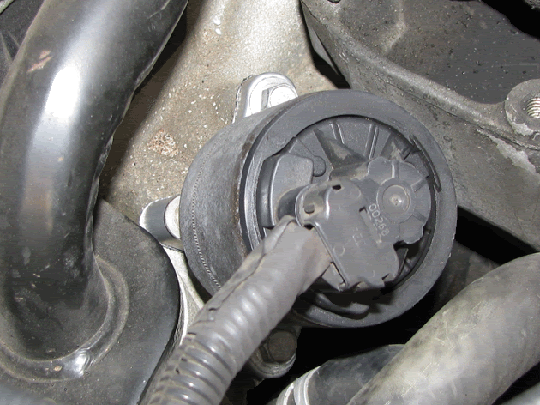
Disconnect positive battery cable and then remove the electrical connector from the top of the EGR valve.
Step 2:
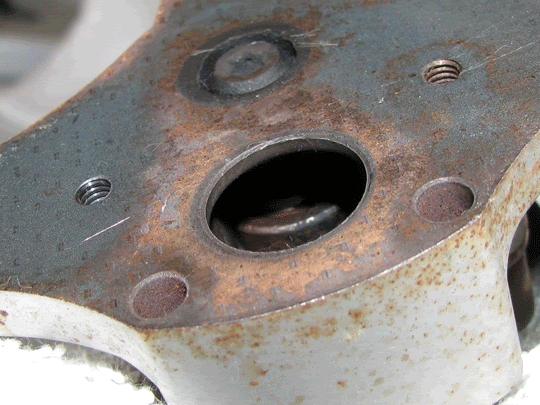
Remove the 2 bolts holding the EGR valve to the intake manifold and pull the EGR valve off of the engine. The cavity in the bottom of the EGR valve is what you’re going to clean out.
Step 3:
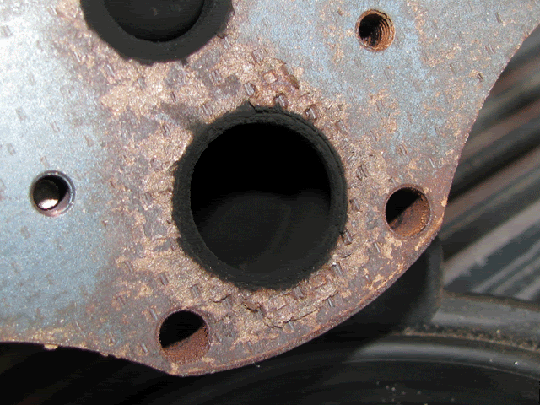
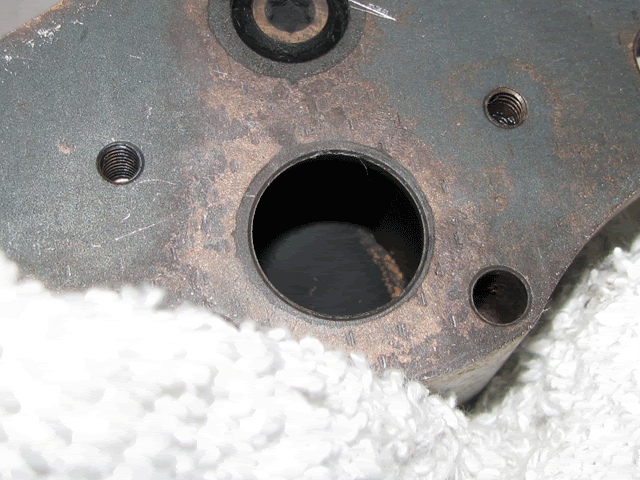
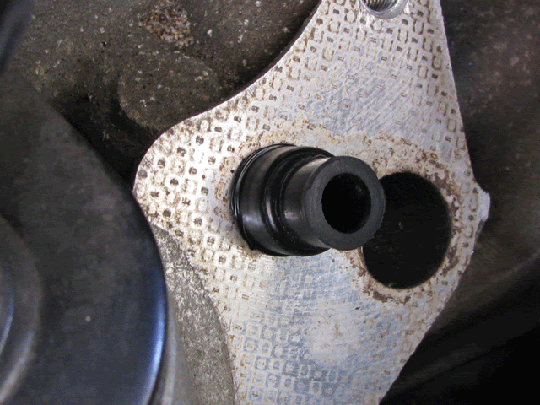
Spray a healthy amount of carbon cleaner into the cavity and then use your brush to scrub as much of the cavity as you can get to. Rinse the cavity out with more carbon cleaner. Repeat until you’re not getting any more carbon in your rinse. It’s hard to tell in the pictures because the carbon absorbs light and makes the cavity look like a black hole, but if you look carefully at the before and after pictures, you’ll see the difference.
This is what it looked like before I started:
This is what it should look like when you’re done.
Step 4 (Optional, but recommended):
While the EGR valve is still off, start the engine for a few seconds to let the pressure from the exhaust blow out through the exhaust side opening for the EGR valve. This step is a good idea because it cleans out any loose chunks of carbon in the exhaust-side plumbing of your EGR circuit. You have to be aware, however, that there will be a huge vacuum leak because the intake manifold port is open and this can cause the engine to race. What I did to prevent the engine from racing (and to prevent the intake vacuum from sucking any of that debris into the intake side of the circuit) was to plug the intake side port. It worked well and gave me the piece of mind to let the engine run for a few more seconds than I would have if the engine was racing.
Step 5:
Using the gasket scraper, clean off any of the old gasket from the intake manifold and bottom of the EGR valve. Then use some of the cleaner on a rag and wipe both surfaces so you have a clean surface for your new gasket.
Step 6:
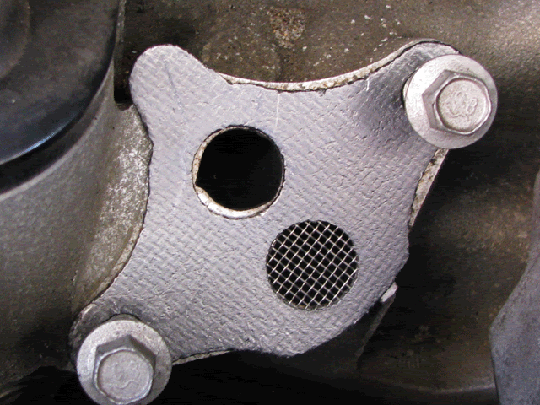
Install your new gasket (the bolts in the picture are only there to hold the gasket in place for the picture), place the EGR valve over the gasket, and then install the bolts. Torque to 20-25 ft/lbs.
Step 7:
Plug the electrical connector in and the reconnect your battery.
You are done!
Tools needed:
- 10mm socket
- 10”-ish socket extension.
- Torque Wrench
- Gasket Scraper
- small flexible brush. The bristles should be 1 to 1.5 inches long.
- rubber stopper or anything to plug the intake port (I used a large vacuum cap turned upside down and then added electrical tape to get it to the right diameter) This is for optional step 4.
Materials needed:
- A spray can of carbon cleaner. I used STP carburetor cleaner and it seemed to work fine.
- New EGR gasket (get the one with the screen…see the picture below in step 6)
Approximate time: 30 – 45 minutes.
Your EGR valve is towards the front of your intake manifold.
Step 1:
Disconnect positive battery cable and then remove the electrical connector from the top of the EGR valve.
Step 2:
Remove the 2 bolts holding the EGR valve to the intake manifold and pull the EGR valve off of the engine. The cavity in the bottom of the EGR valve is what you’re going to clean out.
Step 3:
Spray a healthy amount of carbon cleaner into the cavity and then use your brush to scrub as much of the cavity as you can get to. Rinse the cavity out with more carbon cleaner. Repeat until you’re not getting any more carbon in your rinse. It’s hard to tell in the pictures because the carbon absorbs light and makes the cavity look like a black hole, but if you look carefully at the before and after pictures, you’ll see the difference.
This is what it looked like before I started:
This is what it should look like when you’re done.
Step 4 (Optional, but recommended):
While the EGR valve is still off, start the engine for a few seconds to let the pressure from the exhaust blow out through the exhaust side opening for the EGR valve. This step is a good idea because it cleans out any loose chunks of carbon in the exhaust-side plumbing of your EGR circuit. You have to be aware, however, that there will be a huge vacuum leak because the intake manifold port is open and this can cause the engine to race. What I did to prevent the engine from racing (and to prevent the intake vacuum from sucking any of that debris into the intake side of the circuit) was to plug the intake side port. It worked well and gave me the piece of mind to let the engine run for a few more seconds than I would have if the engine was racing.
Step 5:
Using the gasket scraper, clean off any of the old gasket from the intake manifold and bottom of the EGR valve. Then use some of the cleaner on a rag and wipe both surfaces so you have a clean surface for your new gasket.
Step 6:
Install your new gasket (the bolts in the picture are only there to hold the gasket in place for the picture), place the EGR valve over the gasket, and then install the bolts. Torque to 20-25 ft/lbs.
Step 7:
Plug the electrical connector in and the reconnect your battery.
You are done!


Great writeup Garry!
One thing to note, the area that is often overlooked is the pintle area (the torx head in your pictures). This is the actual place that is known for getting built up with carbon, holding the valve open. You can push the pintle back and clean the sealing surfaces real good. What I do is put some carbon cleaner in a small, but suitable container (I have a 1" deep 3x3 stamped metal tray) and then just stand up the EGR valve in about a 1/4" of carbon cleaner. You may have to use a small flexible straw to let the air out of the valve itself so that the cleaner can get up inside and eat away at the carbon. Anyway, if you do this while you are messing around cleaning up the gasket surface on the lower intake and running the engine to flush out the EGR supply tube, it should be nice and soaked in by the time you have finished that work and ready for some easy cleaning. You will want to push the pintle back a bit and work a brush down into the area to clean out the carbon on the sealing faces.
One thing to note, the area that is often overlooked is the pintle area (the torx head in your pictures). This is the actual place that is known for getting built up with carbon, holding the valve open. You can push the pintle back and clean the sealing surfaces real good. What I do is put some carbon cleaner in a small, but suitable container (I have a 1" deep 3x3 stamped metal tray) and then just stand up the EGR valve in about a 1/4" of carbon cleaner. You may have to use a small flexible straw to let the air out of the valve itself so that the cleaner can get up inside and eat away at the carbon. Anyway, if you do this while you are messing around cleaning up the gasket surface on the lower intake and running the engine to flush out the EGR supply tube, it should be nice and soaked in by the time you have finished that work and ready for some easy cleaning. You will want to push the pintle back a bit and work a brush down into the area to clean out the carbon on the sealing faces.

i think i have a different engine then the one in the pics (94 4.3 vortech) but my EGR looks like it has two sections to it does this require anymore additional cleaning?
The pictures in this thread are for the 96+ trucks. Yours will be slightly different. You still want to thoroughly clean the inside and the pintle valve area of the EGR valve. This is true for all EGR valves whether electronic or vacuum controlled.
Thread Starter
|
Starting Member
Joined: Feb 2007
Posts: 141
From: Huntsville, AL
ORIGINAL: Smoked
Awesome writeup... what are the benefits to performing this procedure and how are they realized? ...thought that would be a cool addition to the how-to
Awesome writeup... what are the benefits to performing this procedure and how are they realized? ...thought that would be a cool addition to the how-to
I posted a How-To for the MAF sensor a week or so ago.

Super Member
Joined: May 2007
Posts: 1,980
From: Appleton, WI / Houghton, MI
Cool write up, thanks for posting it, this summer I will be cleaning both the MAF and EGR hopefully to get an increase in gas mileage, since mine seems to be low lately for even winter time driving. I drove home and normally get close to 20mpg on the highway and got like 16 so betweent the tires and the fact that the EGR and MAF have probably never been cleaned in 140k miles I hope it should help.
EDIT: COuld you post a picture of the brush you used?
EDIT: COuld you post a picture of the brush you used?
Thread Starter
|
Starting Member
Joined: Feb 2007
Posts: 141
From: Huntsville, AL
I'm leaving for Vegas in the morning (gotta love business trips to sin city), so I won't be able to get a picture of the actual brush for a week or so. Here is a snapshotI found on the net that shows the type I used. I ended up using the bristles on the end because the cavity is so shallow a bottle brush is pretty much useless to get into the area under the pintle. A narrow paint brush would probably work just as well. Just stick the ends of the bristles into the cavity and work it around (and around and around....).
