
How to: DIY Roof Basket (in progress) - DISCUSSION THREAD

Ok, so being a mall crawler on a budget and wanting a roof basket what do you do?
bueller? bueller?
you look to your local big box one stop fix it shop...(home depot ftw)
and the glorious conduit selection
(and some **cough**jeep forums)

this DIY also is based on some MIG welding - sorry
*********all cash-Ola amounts in dollars and units in inches*********
so here we go:
1. tools
drill press / drill
hacksaw and miter box / metal blade on miter saw
measuring tape
3/4" drill bit
something to mark with (marker)
grinder - sand paper
MIG welder
patients
2. materials
for the outer frame:
1" emt conduit 10' length - 3 @ 5.50
90 degree emt conduit elbow - 8 @ 3.50
joint emt conduit - 16 @ 1.50
(get steel ones not zinc..pics show wrong joints)
floor of basket and rail supports:
1/2" emt conduit 10' length - 4 @ 1.50
grand total of 75.00 (no taxes included)
this does not include paint/finish material or mounting equip.
i am using u bolts for the mounting.
3. what your making
now for my tastes i went with a basket with dimensions of
67" X 41" out to out
7" tall
***out to out is based on mounting to rails of stock roof equip.***
4. whatcha doin'
so after you have all your conduit goodies here is what we do.
take your cutting method of choice and do some chopping:
1" dia.
4 @ 22" length (ends for outer rails upper and lower)
4 @ 47 1/2" length (sides for outer rails upper and lower)
1/2" dia.
8 @ 40 3/4" length (floor of basket)
14 @ 7" length (rail supports - determines basket height so make it your own)
what that all looks like

5. assembly
now take the to side lower rails and lets make some holes.
now the spacing is up to you, i went with 7 1/2" on center for the floor of the basket. again spacing is up to you.

this part is tricky. make sure you maintain the center line and drill away. this is probably the biggest p.i.t.a. part.
you should get something like this when done.

now that you have done all that assemble for a test fit.
you should have what looks like the floor of a roof basket.

now with the joints i used i plan on welding them in place and calling it good
i don't believe using the screws that come in the joint will do the job.
for the side rail supports you repeat the drilling of the holes.
now the spacing on the side supports will be determined by the floor support spacing. i went with 3 supports on the ends and 4 on the sides, all spaced evenly.

i feel that this will support anything i find while tromping around the mall.

(test fit)

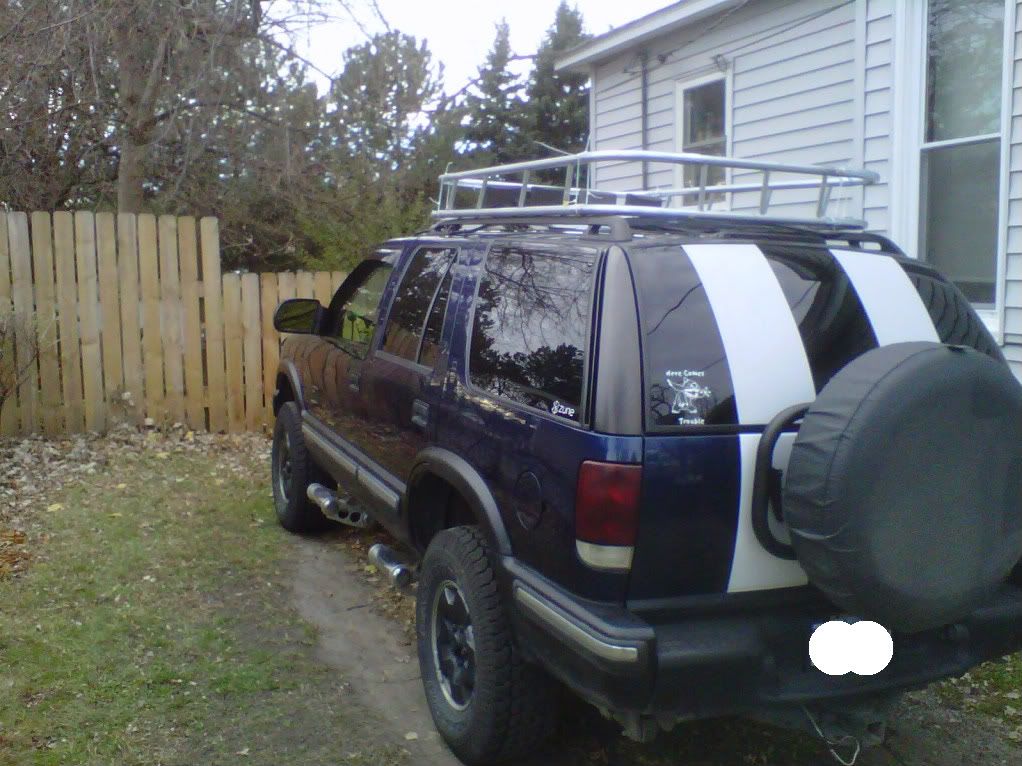
test fit, not squared all the way but you get the idea, zip ties for temporary hold.
and no the light are not staying there.
now if you have made it this far and are ready to weld this baby up..be sure to grind at the weld points...this is galvanized so you need to remove that as best as you can at the weld points.
paint and finish as you see fit. what the heck, go ahead and throw some lights on that bad boy...you know you want to
6. and where we stop
as of today i have not welded or applied paint.
i hope this helps to jump start some projects.
i think this is a good starting point and gets the idea across.
and if you do beat me to it post up some pics
bueller? bueller?
you look to your local big box one stop fix it shop...(home depot ftw)
and the glorious conduit selection
(and some **cough**jeep forums)

this DIY also is based on some MIG welding - sorry
*********all cash-Ola amounts in dollars and units in inches*********
so here we go:
1. tools
drill press / drill
hacksaw and miter box / metal blade on miter saw
measuring tape
3/4" drill bit
something to mark with (marker)
grinder - sand paper
MIG welder
patients
2. materials
for the outer frame:
1" emt conduit 10' length - 3 @ 5.50
90 degree emt conduit elbow - 8 @ 3.50
joint emt conduit - 16 @ 1.50
(get steel ones not zinc..pics show wrong joints)
floor of basket and rail supports:
1/2" emt conduit 10' length - 4 @ 1.50
grand total of 75.00 (no taxes included)
this does not include paint/finish material or mounting equip.
i am using u bolts for the mounting.
3. what your making
now for my tastes i went with a basket with dimensions of
67" X 41" out to out
7" tall
***out to out is based on mounting to rails of stock roof equip.***
4. whatcha doin'
so after you have all your conduit goodies here is what we do.
take your cutting method of choice and do some chopping:
1" dia.
4 @ 22" length (ends for outer rails upper and lower)
4 @ 47 1/2" length (sides for outer rails upper and lower)
1/2" dia.
8 @ 40 3/4" length (floor of basket)
14 @ 7" length (rail supports - determines basket height so make it your own)
what that all looks like

5. assembly
now take the to side lower rails and lets make some holes.
now the spacing is up to you, i went with 7 1/2" on center for the floor of the basket. again spacing is up to you.

this part is tricky. make sure you maintain the center line and drill away. this is probably the biggest p.i.t.a. part.
you should get something like this when done.

now that you have done all that assemble for a test fit.
you should have what looks like the floor of a roof basket.

now with the joints i used i plan on welding them in place and calling it good
i don't believe using the screws that come in the joint will do the job.
for the side rail supports you repeat the drilling of the holes.
now the spacing on the side supports will be determined by the floor support spacing. i went with 3 supports on the ends and 4 on the sides, all spaced evenly.

i feel that this will support anything i find while tromping around the mall.

(test fit)

test fit, not squared all the way but you get the idea, zip ties for temporary hold.
and no the light are not staying there.
now if you have made it this far and are ready to weld this baby up..be sure to grind at the weld points...this is galvanized so you need to remove that as best as you can at the weld points.
paint and finish as you see fit. what the heck, go ahead and throw some lights on that bad boy...you know you want to
6. and where we stop
as of today i have not welded or applied paint.
i hope this helps to jump start some projects.
i think this is a good starting point and gets the idea across.
and if you do beat me to it post up some pics
Last edited by warthogdriver; Nov 6, 2010 at 04:22 PM.


BF Veteran
Joined: Jan 2009
Posts: 3,545
From: Tacoma-ish

Damn man! at first i was like: he's building a toddler bed??? 
then as it progressed.... i was like


That turned out AWESOME! very nice work man.
looks beastly! now what's the plan to make the roof rack stand up to more than 200 lbs
*EDIT* the fact that you did this in November and it flew under the radar is a travesty!
then as it progressed.... i was like
That turned out AWESOME! very nice work man.
looks beastly! now what's the plan to make the roof rack stand up to more than 200 lbs
*EDIT* the fact that you did this in November and it flew under the radar is a travesty!
Last edited by ABN31B; Jan 6, 2011 at 08:27 PM.
thanks, yup 200lbs plus shouldn't be a problem..holds my wide load 
yeah it looks like i am gonna be set for either zombie Apocalypse....or extended jungle excursion.
on the toddler bed thing....yeah thats what my brother said.....
"you making toddler bunk bed system????????"
yeah it looks like i am gonna be set for either zombie Apocalypse....or extended jungle excursion.
on the toddler bed thing....yeah thats what my brother said.....
"you making toddler bunk bed system????????"

Super Member
Joined: Dec 2007
Posts: 1,940
From: rison AR
Looks great, if ya were closer I'd offer to use my 1 inch hand bender and do away with having to weld up all those premade 90s. I actually plan on building one kinda like this but I'm gonna try to make mounts to bolt it to the factory cargo rack mounts and do away with it.