
How to open a stuck rear window/tailgate

Thread Starter
|
Starting Member
Joined: Oct 2008
Posts: 144
From: Las Vegas, NV

Well I've been sitting on this project for awhile, and since none of these posts really motivated me to do it, I finally just got fed up and did it! Of course since I'm doing something thats of high interest here, I brought my camera!
This post augments this one: https://blazerforum.com/forum/article-submissions-discussions-47/how-fix-rear-window-actuator-i-e-rear-window-wont-open-12396/
The other post has information as to where to order the part, and other helpful tips on how to get this done. This particular Blazer is a 2000 Chevy Blazer LT, with lift open window, drop down tailgate.
Step One:
Get inside the vehicle, and prepare to get warm and sweaty. Remove the tailgate pull handle. Sorry I don't have pics but it was already removed when I started this project. Its held on by two screws.
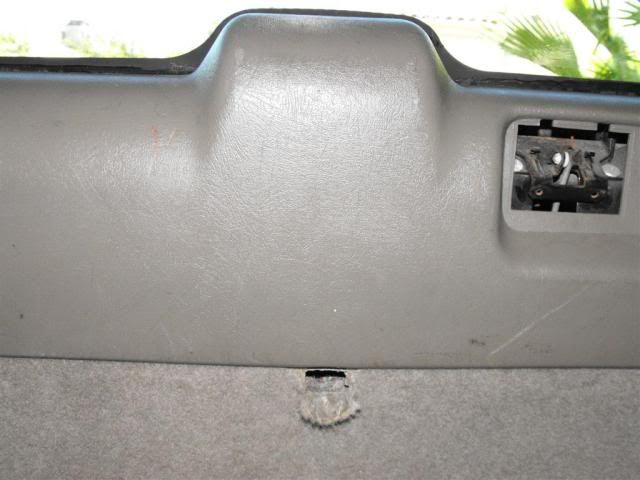
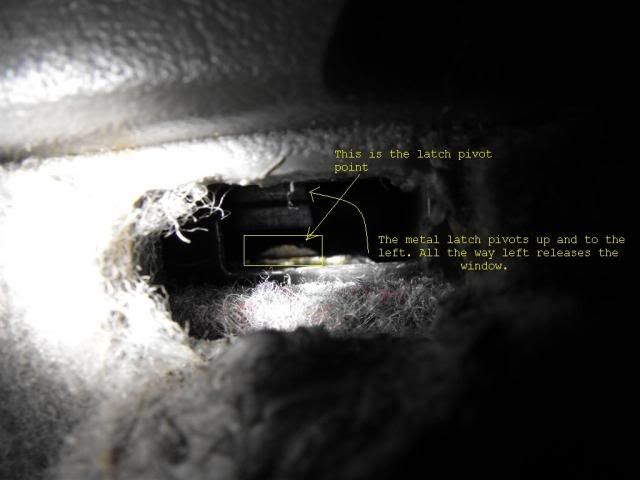
Locate the hole.


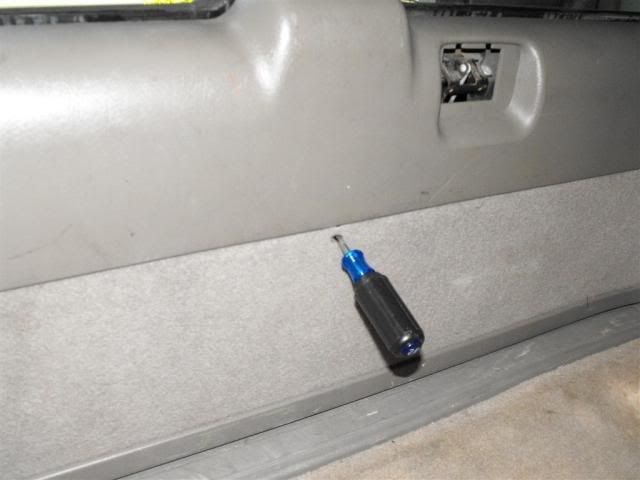
You can widen the hole to a rectangle shape if you have difficulty.
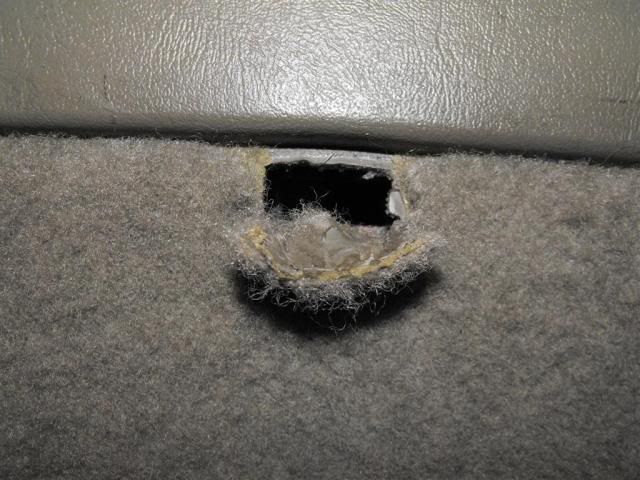
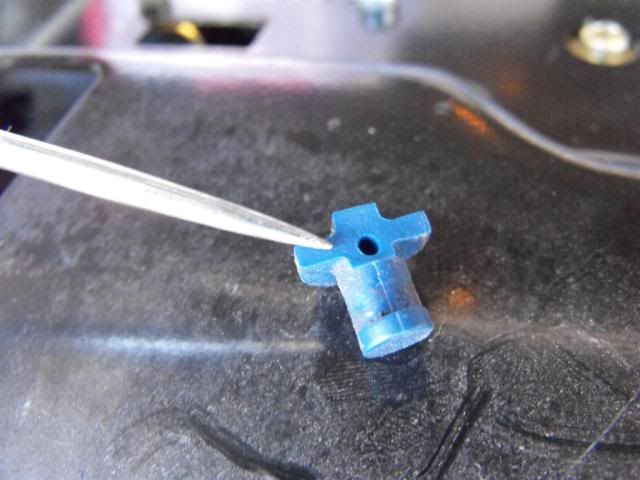
A view on the inside. You can see the blue arm, the end snapped off.
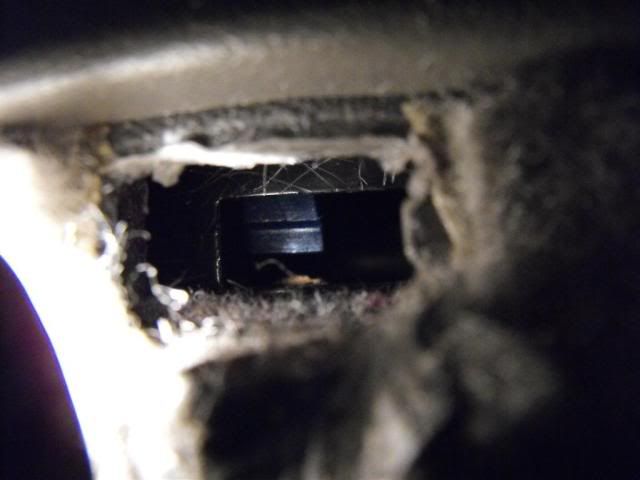
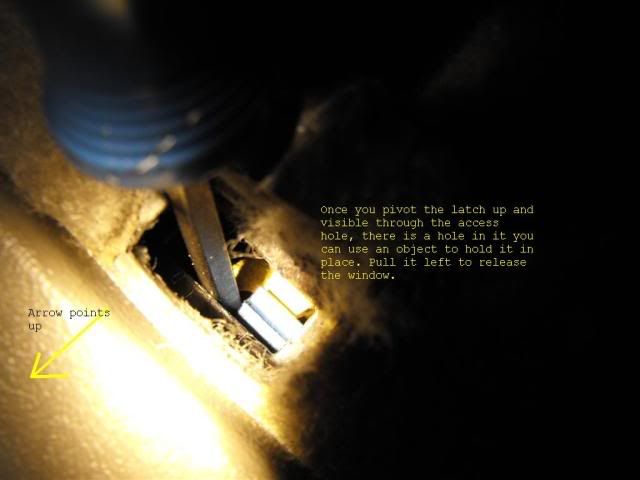
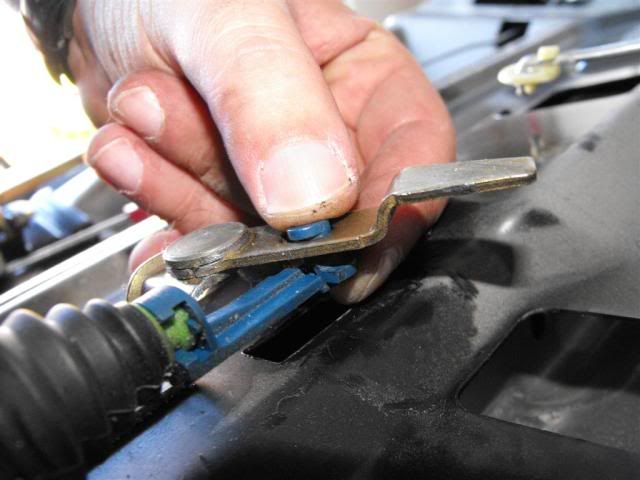
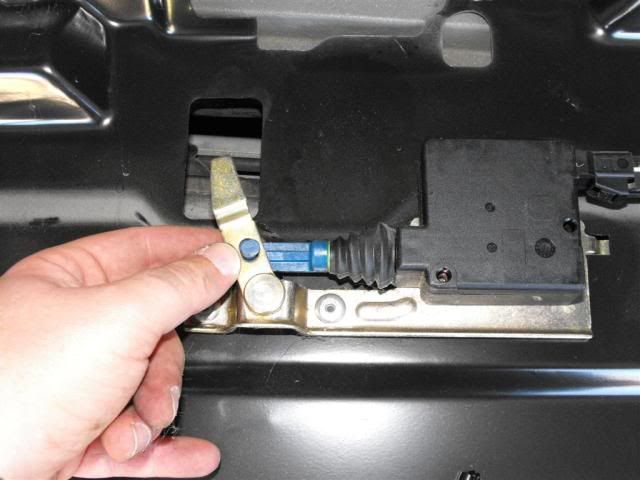
In the picture below, the actual metal lever that is pulled left (relative to facing aft) to release the window is hanging by the pivot point, pointing down. (unable to see) However, you can see the rounded pivot point peeking over the top of the mounting spot; I used a scribe to grab hold of it and rotate it up and to the left. Once you get it rotated, there's a hole in the tab that the end of the blue arm "should" be in. You can insert another tool into this hole to keep it upright, and push it left to release the window.
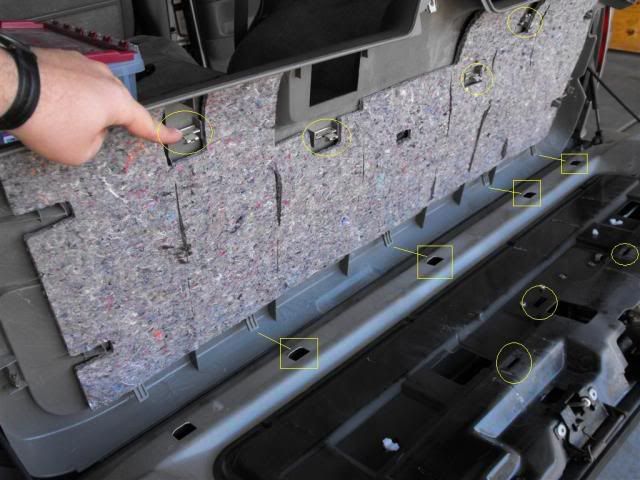
Now that the window is open, we can remove the inner molding.
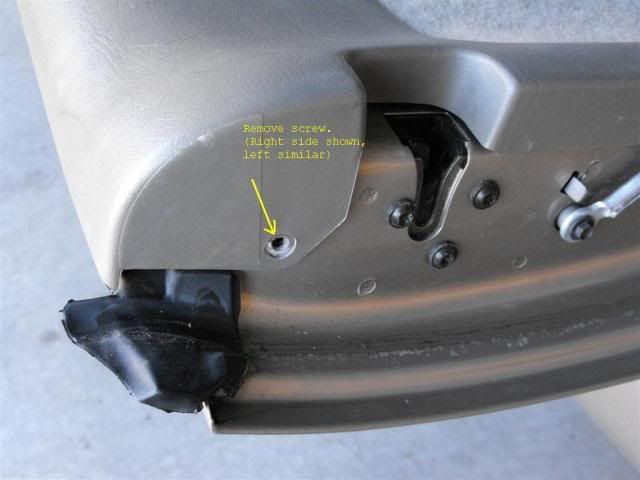
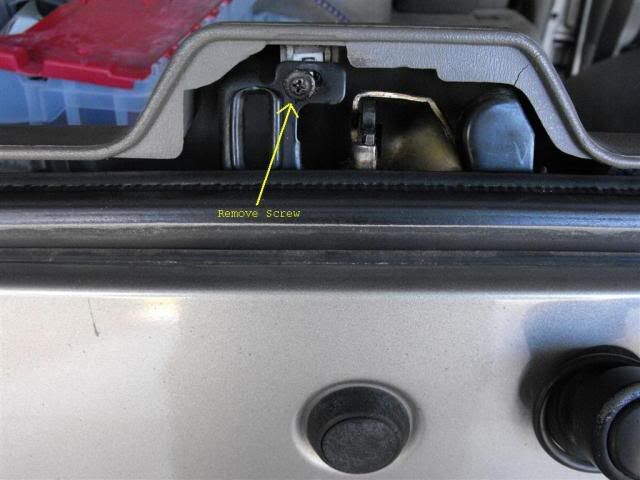
Once all three screws are removed, pull up on the upper molding. DO NOT PULL UP on the bottom. In the below picture, you'll see the resistance clips that slide into their respective slots. This is whats keeping the molding in place. Once the clips are free, the bottom tabs/slots come out freely.
Next, remove the 12 screws holding on the black metal aluminum cover. Be careful, the edges are sharp.
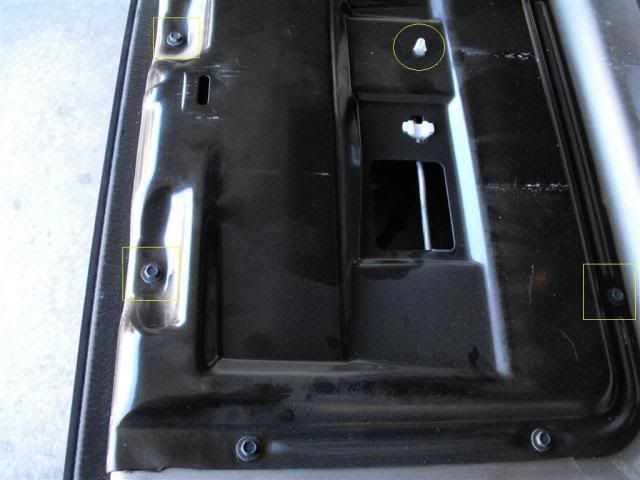
Now before you remove the cover, find the metal connecting rods that attach the handle to the latches on either side of the door. You'll see these rods in plastic carriers. All you have to do is push down on the rods to release them. I used a screwdriver and a light tap. Also, you will see a plastic compression clamp. Use a pair of needle nose to release this. (Its far left in the below pic) This allows extra slack on the wires that are attached to the black plate.
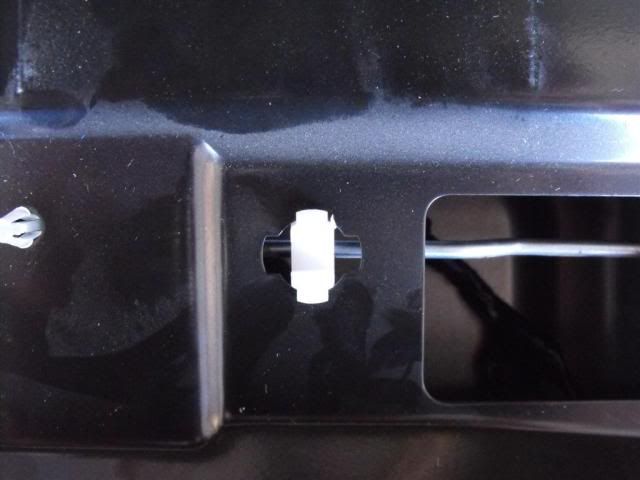

The rod that connects to the tailgate release handle is a little tricky. Rotate the plastic grommet that attaches the end of the rod to the release mechanism. Once you rotate it, the rod will come free of the grommet and mechanism. Do not lose this grommet!
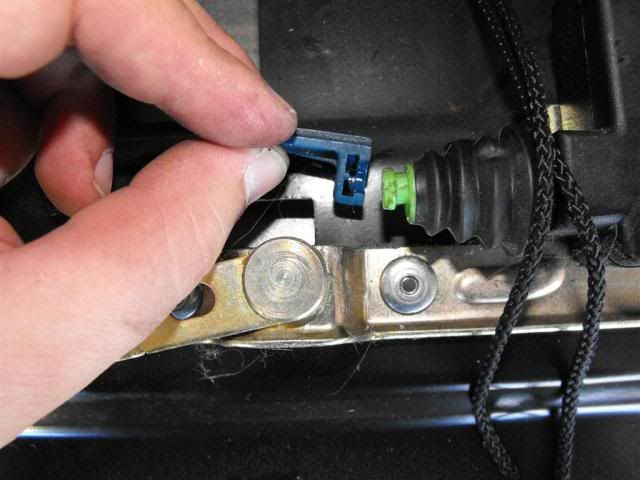
Here are a few pics of the culprit:
To remove the blue arm, simply rotate it until you can slide it off of the actuator.
Replace the arm. Installation is reverse of removal.
This post augments this one: https://blazerforum.com/forum/article-submissions-discussions-47/how-fix-rear-window-actuator-i-e-rear-window-wont-open-12396/
The other post has information as to where to order the part, and other helpful tips on how to get this done. This particular Blazer is a 2000 Chevy Blazer LT, with lift open window, drop down tailgate.
Step One:
Get inside the vehicle, and prepare to get warm and sweaty. Remove the tailgate pull handle. Sorry I don't have pics but it was already removed when I started this project. Its held on by two screws.
Locate the hole.
You can widen the hole to a rectangle shape if you have difficulty.
A view on the inside. You can see the blue arm, the end snapped off.
In the picture below, the actual metal lever that is pulled left (relative to facing aft) to release the window is hanging by the pivot point, pointing down. (unable to see) However, you can see the rounded pivot point peeking over the top of the mounting spot; I used a scribe to grab hold of it and rotate it up and to the left. Once you get it rotated, there's a hole in the tab that the end of the blue arm "should" be in. You can insert another tool into this hole to keep it upright, and push it left to release the window.
Now that the window is open, we can remove the inner molding.
Once all three screws are removed, pull up on the upper molding. DO NOT PULL UP on the bottom. In the below picture, you'll see the resistance clips that slide into their respective slots. This is whats keeping the molding in place. Once the clips are free, the bottom tabs/slots come out freely.
Next, remove the 12 screws holding on the black metal aluminum cover. Be careful, the edges are sharp.
Now before you remove the cover, find the metal connecting rods that attach the handle to the latches on either side of the door. You'll see these rods in plastic carriers. All you have to do is push down on the rods to release them. I used a screwdriver and a light tap. Also, you will see a plastic compression clamp. Use a pair of needle nose to release this. (Its far left in the below pic) This allows extra slack on the wires that are attached to the black plate.
The rod that connects to the tailgate release handle is a little tricky. Rotate the plastic grommet that attaches the end of the rod to the release mechanism. Once you rotate it, the rod will come free of the grommet and mechanism. Do not lose this grommet!
Here are a few pics of the culprit:
To remove the blue arm, simply rotate it until you can slide it off of the actuator.
Replace the arm. Installation is reverse of removal.
Last edited by ravenhurst; Sep 24, 2009 at 12:13 PM.

Thread Starter
|
Starting Member
Joined: Oct 2008
Posts: 144
From: Las Vegas, NV
There's room for something like that between the inner metal sheeting of the tailgate and the body paneling on the outside... but between the metal and the plastic/carpet... I would have to say no. But there may be some nooks and cranny's you can something like that in. Hard to tell from memory, I had the tailgate apart about 4 months ago.

Starting Member
Joined: Oct 2009
Posts: 1

I definitely WILL keep this for Future reference! Found a solution, If & when it comes up! Thanks, Before it happens!!
On another note, I'm having Problems with our rear back seats, wouldn't you know, both rods/pull cords are Broken to put Down the seats. How do you Get to them or what do you do to find the broken cords.Took the seat off, Found ONLY one cable, LOOKS to US, as if there were TWO of them, Once upon a time, That somehow worked it's way to the back of the seat that Has a Latch like box, when Pulled that's when the Cable Unlocks the seat to go Down!! It's DOING NOTHING!!! (the Other seat is the same way). Just CAN'T Figure it out!! Any HELP would be Greatly Appreciated. Working on it as I text!! Thanks
On another note, I'm having Problems with our rear back seats, wouldn't you know, both rods/pull cords are Broken to put Down the seats. How do you Get to them or what do you do to find the broken cords.Took the seat off, Found ONLY one cable, LOOKS to US, as if there were TWO of them, Once upon a time, That somehow worked it's way to the back of the seat that Has a Latch like box, when Pulled that's when the Cable Unlocks the seat to go Down!! It's DOING NOTHING!!! (the Other seat is the same way). Just CAN'T Figure it out!! Any HELP would be Greatly Appreciated. Working on it as I text!! Thanks
Last edited by bruja03; Mar 31, 2011 at 01:43 PM.
BF Veteran
Joined: May 2007
Posts: 2,713
From: Chicago, IL

I definitely WILL keep this for Future reference! Found a solution, If & when it comes up! Thanks, Before it happens!!
On another note, I'm having Problems with our rear back seats, wouldn't you know, both rods/pull cords are Broken to put Down the seats. How do you Get to them or what do you do to find the broken cords. Any HELP would be Greatly Appreciated. Thanks
On another note, I'm having Problems with our rear back seats, wouldn't you know, both rods/pull cords are Broken to put Down the seats. How do you Get to them or what do you do to find the broken cords. Any HELP would be Greatly Appreciated. Thanks
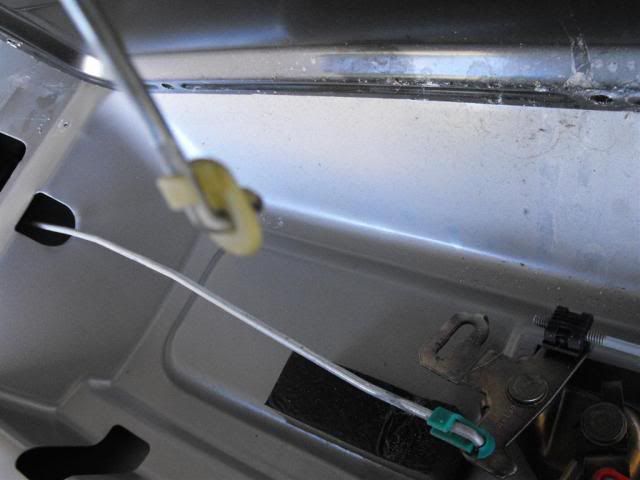
edit: Found the picture. The lever is attached to a small spring that keeps it in the forward position. The cable is connected via a small metal clasp (it's unattached and resting against the carpet in this picture) but you can push it back just as the cable would in order to drop the seat. The lever and tip of the cable are circled in green

Last edited by mdehoogh; Mar 31, 2011 at 12:18 PM.

