
How-To: Roof rack light bar w/ quick disconnect DISCUSSION
#1
 02-28-2012, 12:32 PM


Finally my light bar is complete! Total time invested was 13 hours however thats due to inexperience and lack of proper planning. I would estimate that if i had planned it properly and did a bit more reading it would have been half that.
To start, i wanted the quick disconnect type feature as I do a good amount of camping and often haul kayaks/canoes. With this setup i unplug it then take out the 4 torq/star-key type screws that hold on the roof rack, slide out the light bar, slide up the old front bar that now sits in the middle of the pack and put the screws back in. Total time is about 5 minutes.
Expenses:
I started off by getting 2 used roof rack cross member bars off ebay for 20 bucks.

Purchased from Radioshack:
10 AWG wire (35 foot spool - $18)
35-Ft. Red Automotive Hookup Wire (10AWG) - RadioShack.com
Two 30 Amp Relays -7 bucks a piece.
12VDC/30A SPST Automotive Relay - RadioShack.com
Purchased from Autozone:
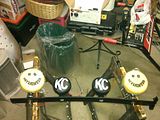
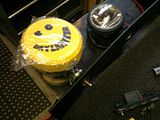
KC hilites Daylighters (100 Watt)
KC HiLiTES/2 pcs. 6 in. round light (232) | Auxiliary Lights | AutoZone.com
KC Hilites Apollo (55 Watt)
KC HiLiTES/6 in. 55 Watts round black plastic Apollo DIY series driving light kit (156) | Auxiliary Lights | AutoZone.com
Write-up:
With everything in hand the next step was laying it out. I had measured and drilled the top of the cross member to a size slightly larger then the bolt, then the bottom of the cross member bar large enough to fit the nut and a socket.
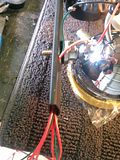
With the lights now semi secure I used the wires coming out of the lights as a guide for where to drill a secondary top hole to feed wires through as my plan was to run wires in the cross member bar. Once marked i removed the lights and drilled another set of holes.
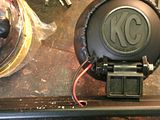
Holes now complete started the tedious task of splicing wire together and running it through the cross member bar. Further on down the line the harder it was due to having multiple 10AWG wires and a few 14AWG ground wires to contend with for space. The last one being the biggest pain because it takes such a large socket to tighten the nut down and wires were in the way. I needed a second set of hands to keep the wires to the sides of the bar so i could tighten the nut up.
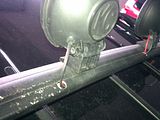
With the wiring complete the next challenge was the bracket that keeps the bar on the roof rack. It would no longer fit with all the wire coming out of the end.
What i needed to do was use a drill & dremel to cut into the light bar bottom to create a channel for the wire to come out. Even after making two 1 and a half inch long channels along both sides it still wasnt enough clearance so i need to trim a bit of the bracket.
All of the above took a few hours. Between drilling, running wire and heavy modification to the bar/ bracket it was pretty labor extensive for a noob.
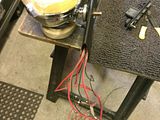
**Pro tip, use a vice or a second set of hands to hold the bar when drilling. I learned the hard way of what a 7/8 bit can do to a hand when it slips.
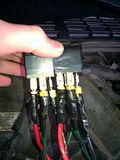
With the bar now complete the next step was running wire in the vehicle. It was a relatively simple setup. Inline fuses, relays and switches and for a quick disconnect used a trailer wire harness inside the vehicle.
Fuse:
Relay:
Switches:
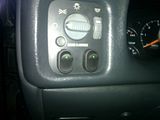
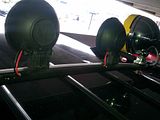
I ended up wiring the 2 inner lights to 1 switch and 2 outer lights to the other switch.
Majority of the time on this project was due to the fact i ran the wires twice. The first time i thought it would be ok to run the wires through the door jam and into the engine bay since i was able to see through the quarter panel, but after a day of opening/ closing the door I didnt like the crunched look of the wire.
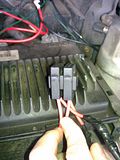
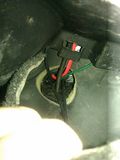
With a bit of research on the forums it was mentioned about the grommet used for the antenna wire. I removed the grommet and had plenty of room to run all wiring needed for the interior wiring. That includes power/ ground and switch wires and also the wire from the relay to the quick disconnect trailer harness. (I plan on cutting the grommet out, making the hole larger then using it again to seal up the hole. If any space is still present ill use silicone sealant)
Floor board (antenna hole)
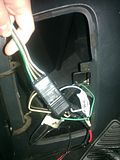
Right now im hiding the quick disconnect in the little bay compartment in the back. Im not sure if im going to notch this out so that im not pinching the wires when the door is closed or if im going to try to run it under the panel yet.
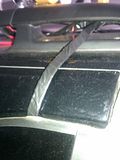
As for the wire from the QD to the lights, i ran it up the side and through the window.
At this point i have some cosmetic work to complete. I plan on getting some calk and sealing the top holes of the bar so that water doesnt get in the bar and im also going to get some wire wrap to better protect the exposed wires going from the bar to the lights. Similar to the larger lights but ill use plastic.
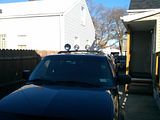
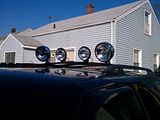
Here is the truck all done up.

Thanks all for your time, ill post pics later tonight with turned on.
To start, i wanted the quick disconnect type feature as I do a good amount of camping and often haul kayaks/canoes. With this setup i unplug it then take out the 4 torq/star-key type screws that hold on the roof rack, slide out the light bar, slide up the old front bar that now sits in the middle of the pack and put the screws back in. Total time is about 5 minutes.
Expenses:
I started off by getting 2 used roof rack cross member bars off ebay for 20 bucks.
Purchased from Radioshack:
10 AWG wire (35 foot spool - $18)
35-Ft. Red Automotive Hookup Wire (10AWG) - RadioShack.com
Two 30 Amp Relays -7 bucks a piece.
12VDC/30A SPST Automotive Relay - RadioShack.com
Purchased from Autozone:
KC hilites Daylighters (100 Watt)
KC HiLiTES/2 pcs. 6 in. round light (232) | Auxiliary Lights | AutoZone.com
KC Hilites Apollo (55 Watt)
KC HiLiTES/6 in. 55 Watts round black plastic Apollo DIY series driving light kit (156) | Auxiliary Lights | AutoZone.com
Write-up:
With everything in hand the next step was laying it out. I had measured and drilled the top of the cross member to a size slightly larger then the bolt, then the bottom of the cross member bar large enough to fit the nut and a socket.


With the lights now semi secure I used the wires coming out of the lights as a guide for where to drill a secondary top hole to feed wires through as my plan was to run wires in the cross member bar. Once marked i removed the lights and drilled another set of holes.


Holes now complete started the tedious task of splicing wire together and running it through the cross member bar. Further on down the line the harder it was due to having multiple 10AWG wires and a few 14AWG ground wires to contend with for space. The last one being the biggest pain because it takes such a large socket to tighten the nut down and wires were in the way. I needed a second set of hands to keep the wires to the sides of the bar so i could tighten the nut up.


With the wiring complete the next challenge was the bracket that keeps the bar on the roof rack. It would no longer fit with all the wire coming out of the end.
What i needed to do was use a drill & dremel to cut into the light bar bottom to create a channel for the wire to come out. Even after making two 1 and a half inch long channels along both sides it still wasnt enough clearance so i need to trim a bit of the bracket.

All of the above took a few hours. Between drilling, running wire and heavy modification to the bar/ bracket it was pretty labor extensive for a noob.
**Pro tip, use a vice or a second set of hands to hold the bar when drilling. I learned the hard way of what a 7/8 bit can do to a hand when it slips.
With the bar now complete the next step was running wire in the vehicle. It was a relatively simple setup. Inline fuses, relays and switches and for a quick disconnect used a trailer wire harness inside the vehicle.
Fuse:

Relay:

Switches:

I ended up wiring the 2 inner lights to 1 switch and 2 outer lights to the other switch.
Majority of the time on this project was due to the fact i ran the wires twice. The first time i thought it would be ok to run the wires through the door jam and into the engine bay since i was able to see through the quarter panel, but after a day of opening/ closing the door I didnt like the crunched look of the wire.
With a bit of research on the forums it was mentioned about the grommet used for the antenna wire. I removed the grommet and had plenty of room to run all wiring needed for the interior wiring. That includes power/ ground and switch wires and also the wire from the relay to the quick disconnect trailer harness. (I plan on cutting the grommet out, making the hole larger then using it again to seal up the hole. If any space is still present ill use silicone sealant)
Floor board (antenna hole)

Right now im hiding the quick disconnect in the little bay compartment in the back. Im not sure if im going to notch this out so that im not pinching the wires when the door is closed or if im going to try to run it under the panel yet.

As for the wire from the QD to the lights, i ran it up the side and through the window.

At this point i have some cosmetic work to complete. I plan on getting some calk and sealing the top holes of the bar so that water doesnt get in the bar and im also going to get some wire wrap to better protect the exposed wires going from the bar to the lights. Similar to the larger lights but ill use plastic.

Here is the truck all done up.


Thanks all for your time, ill post pics later tonight with turned on.
Last edited by Sonj; 02-28-2012 at 12:55 PM.
#2
02-28-2012, 01:41 PM
Hmmm, interesting. Personally I'd have run the quick disconnect through the roof somehow so you didn't have to run it through the window, but otherwise it's a pretty nice setup!
#3
02-28-2012, 01:44 PM
^^^ I was going to say down the door seal. I think thats the only option if you dont want to drill holes in your roof.
Edit: Wait how do you open the door if its ran through the window? Or am i missing something when im looking at that picture
Edit: Wait how do you open the door if its ran through the window? Or am i missing something when im looking at that picture
#4
02-28-2012, 02:17 PM

Submitted this thread in the DIY section and allowed for discussion here.
It's a 2dr so the wire goes through the triangle vent window.
It's a 2dr so the wire goes through the triangle vent window.
#5
02-28-2012, 03:07 PM
Rarely does anyone sit in the back of my blazer so i didnt want to get things to complicated of drilling in the roof or running down the door seal. Also, the purpose of the QD was to make it "quick" and what better way then through the sail window. Its a 6 inch gap from top of window to the roof rack and i used black tape to wrap the wires (blazer is black) so it blends right in.
To eliminate the open wire look inside the blazer I ended up just buying wire wrap (same stuff used to wrap wires in the engine comp) and a few of those 3M adhesive wrap clips to hold it in place. I plan on wrapping the wires up and then having it hug closely to the interior panels to that bay.
#6
02-28-2012, 03:09 PM
I was referring to having a QD up on the roof somewhere instead of inside the truck. Makes sense if you don't want to drill through the roof though.
#8
02-28-2012, 04:09 PM
Two reasons,
1.) Autozone only had one set of each in stock and I didnt feel like driving to multiple stores to get 4 of them nor ordering them and waiting for shipping.
2.) Functionality. The 2 middle lights (55 Watts) are "Driving lights". The lens helps focus the beam to be in a specific area rather then flooding the area with light. Right now they are focused to slightly overlap my headlight beam but also go a bit further. They help pickup things that my headlights dont see & im not sure if thats due to them being up top or if its due to the color contrast of bulbs. My headlights are a bluish tint where as the roof rack lights are white. Im thinking both at this point.
As for the outer 2 (100 Watts) are Flood/ spot lights. They shoot a beam out 500+ feet. These just blanket the area with light. I noticed that with these there was now light on my peripheral that stock nor driving lights gave me.
Something i haven't yet discussed with a cop buddy of mine yet is the legality of driving in NYS yet with them. Right now i keep the covers on the floods but not on the driving lights.
I guess thats where common sense comes in. Dont use em with people in front of me. (yes i know it says off road only, but there are some DARK roads in NYS that this extra light helps with)
#9
02-28-2012, 04:14 PM
Yeah I hear you, mine are all the flood/spot lights. Here in Utah at least, it's illegal to use on road because they are to far away from my headlights,  but every state is different.
Funny thing is, when I asked a cop if I could use them with my highbeams, he said if I didn't feel confident driving at night, to just drive slow and pull over when people are behind me. (I look like I'm 16 so he was assuming I was scared to drive without them at night. )
)
but every state is different.Funny thing is, when I asked a cop if I could use them with my highbeams, he said if I didn't feel confident driving at night, to just drive slow and pull over when people are behind me. (I look like I'm 16 so he was assuming I was scared to drive without them at night.

Thread
Thread Starter
Forum
Replies
Last Post
texas rebal
Lighting & Electrical
2
12-06-2011 11:01 PM