
How to: Visor Vanity Mirror Replacement

Thread Starter
|
Super Member
Joined: Apr 2014
Posts: 1,968
From: Lake City, Florida

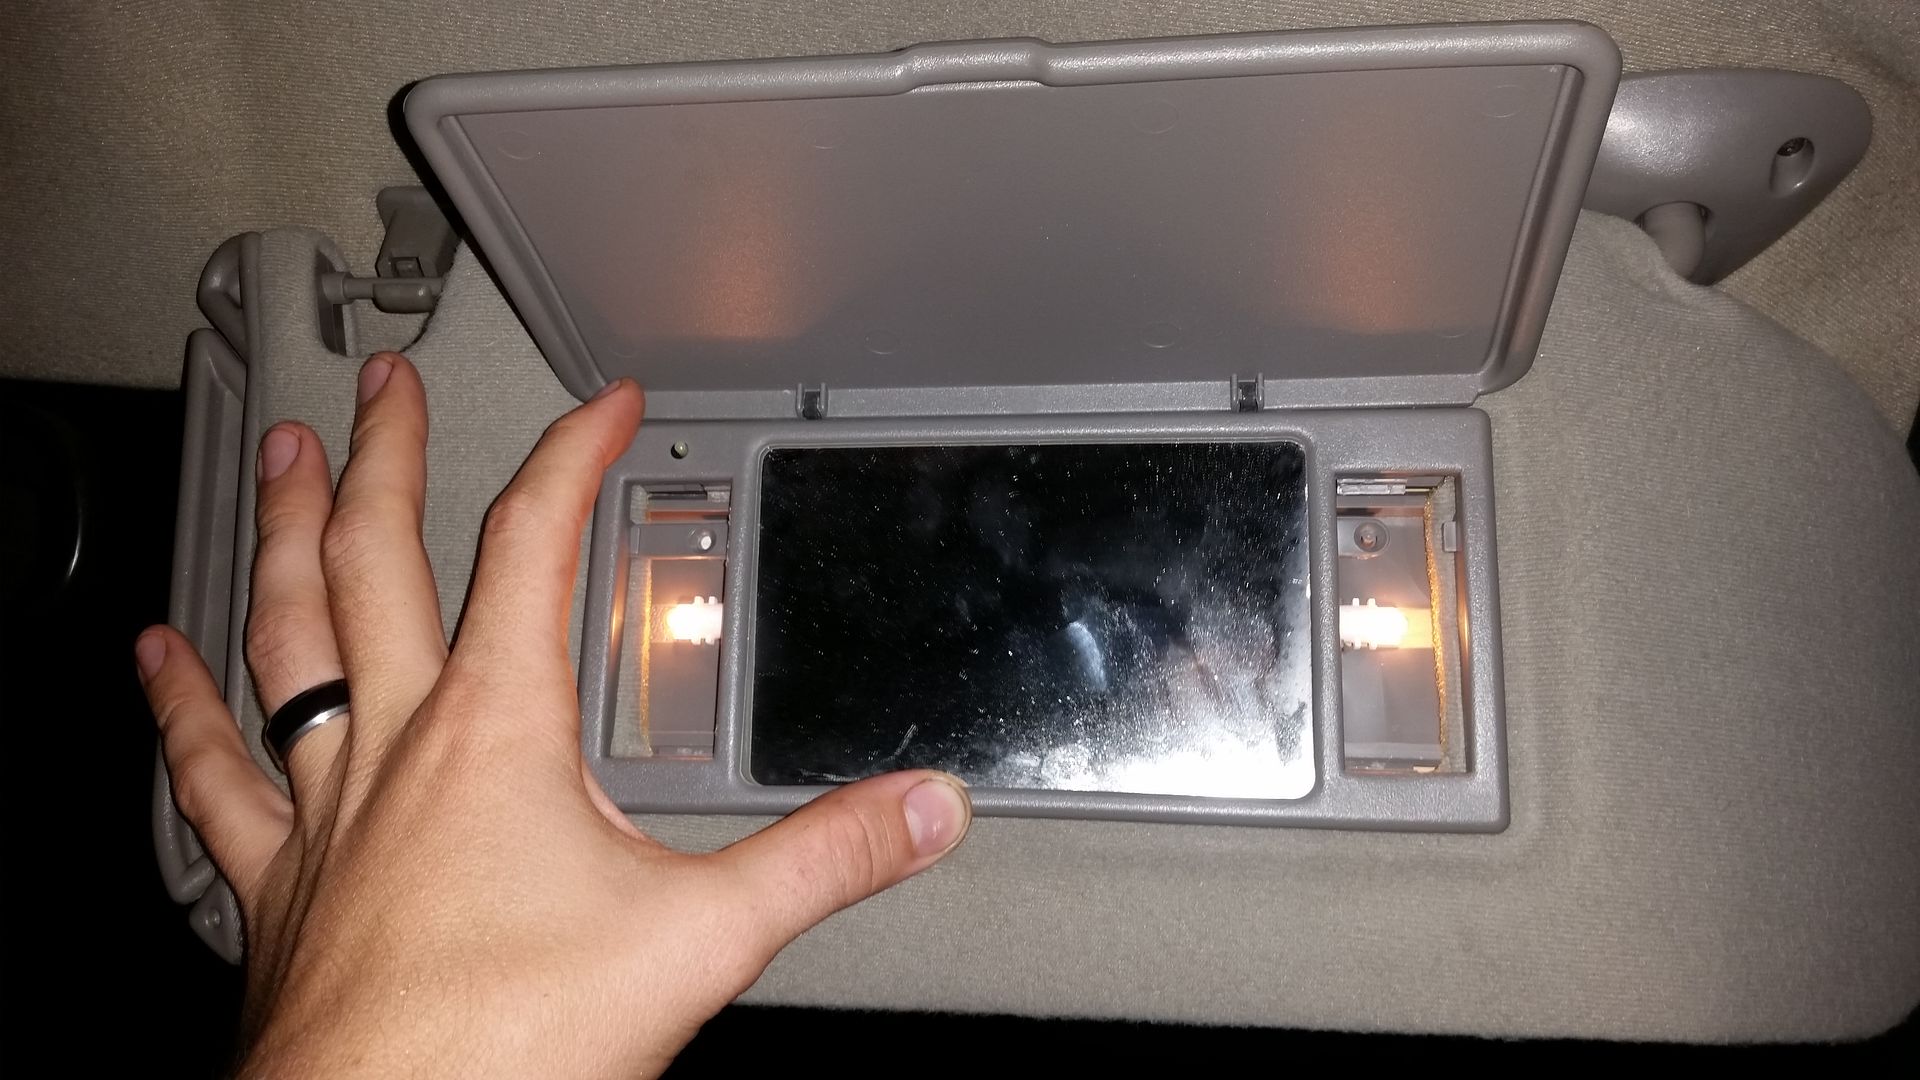
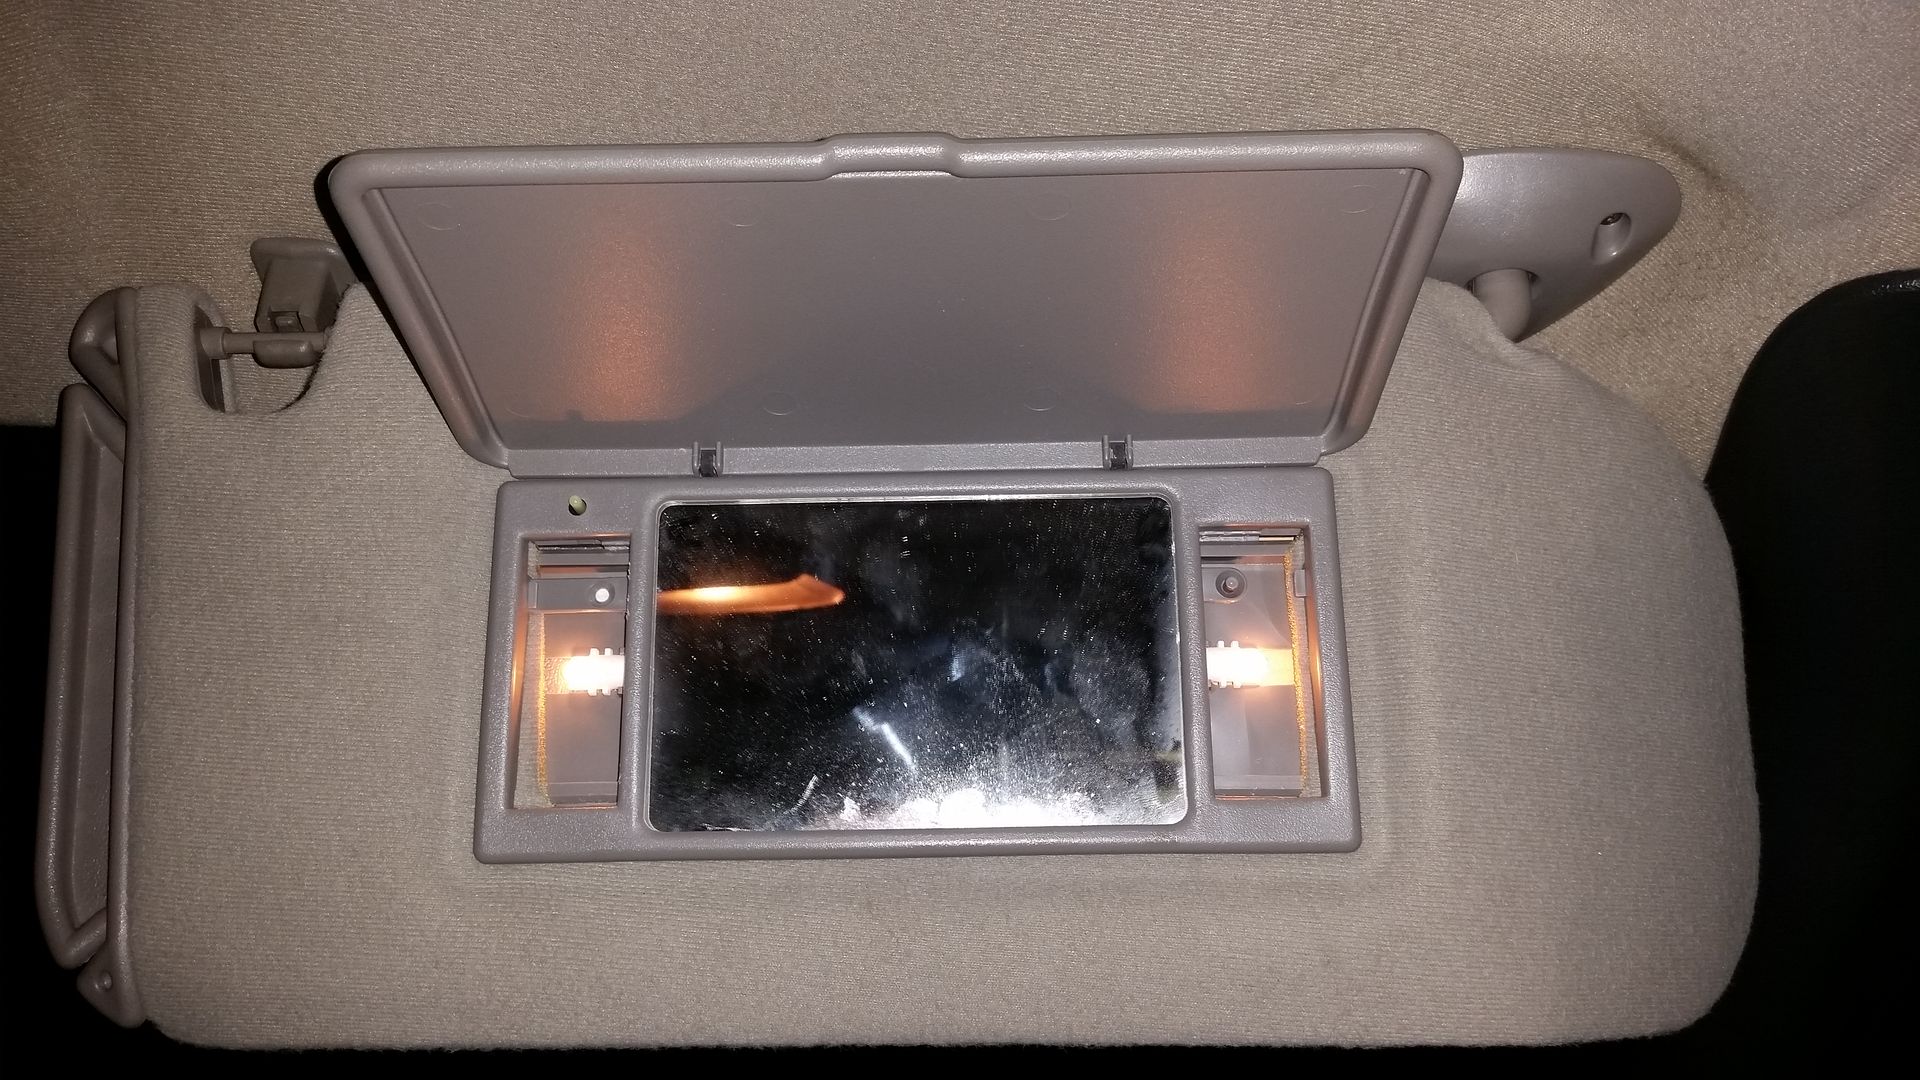
Common problem that plagues every Blazer/Jimmy/Bravada at some point. You (or more often the case your significant other) goes to flip open the lid of the vanity mirror on the sun visor, and the cover ends up on the floorboard...
Quick fix is to swap the hole visor, but often a junk yard will have a set price for things like lighted sun visors, and if the visor HAS a good vanity assembly in it and you're allowed to go into said yard and pull parts yourself, you might be able to get just what you need for cheaper Requires a little more patients than just pulling out the 3 screws for the entire visor, but it's still not that difficult of a task to remove and install just the vanity assembly.
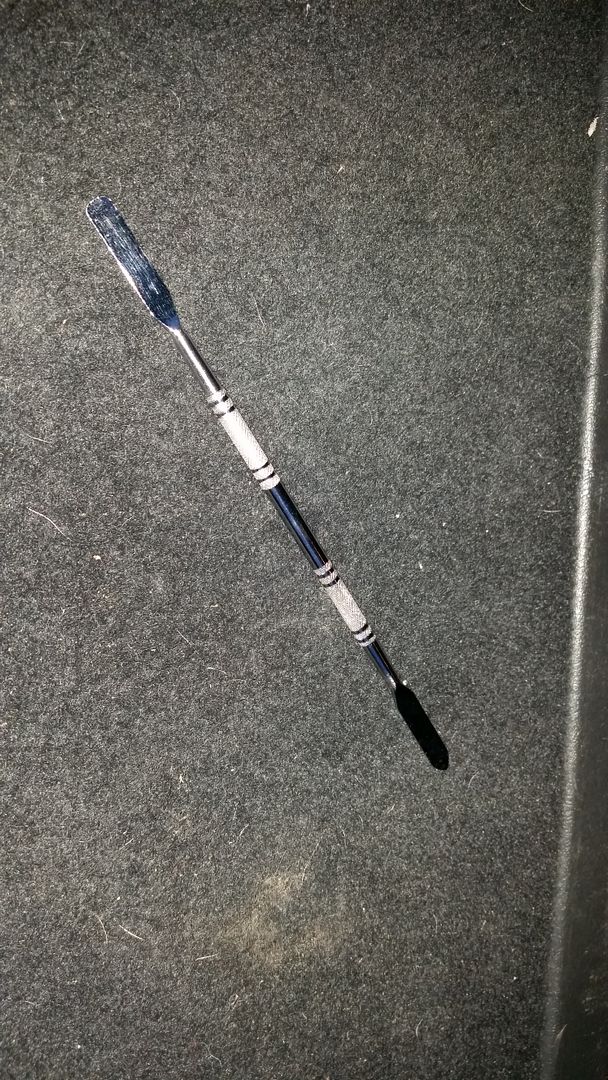
First off, the BEST tool I have found for this is a tool called a "spudger" (or just pry tool), typically used when working on cell phones. A tiny flat head will work too, but tends to leave scars in the plastic from my experience...
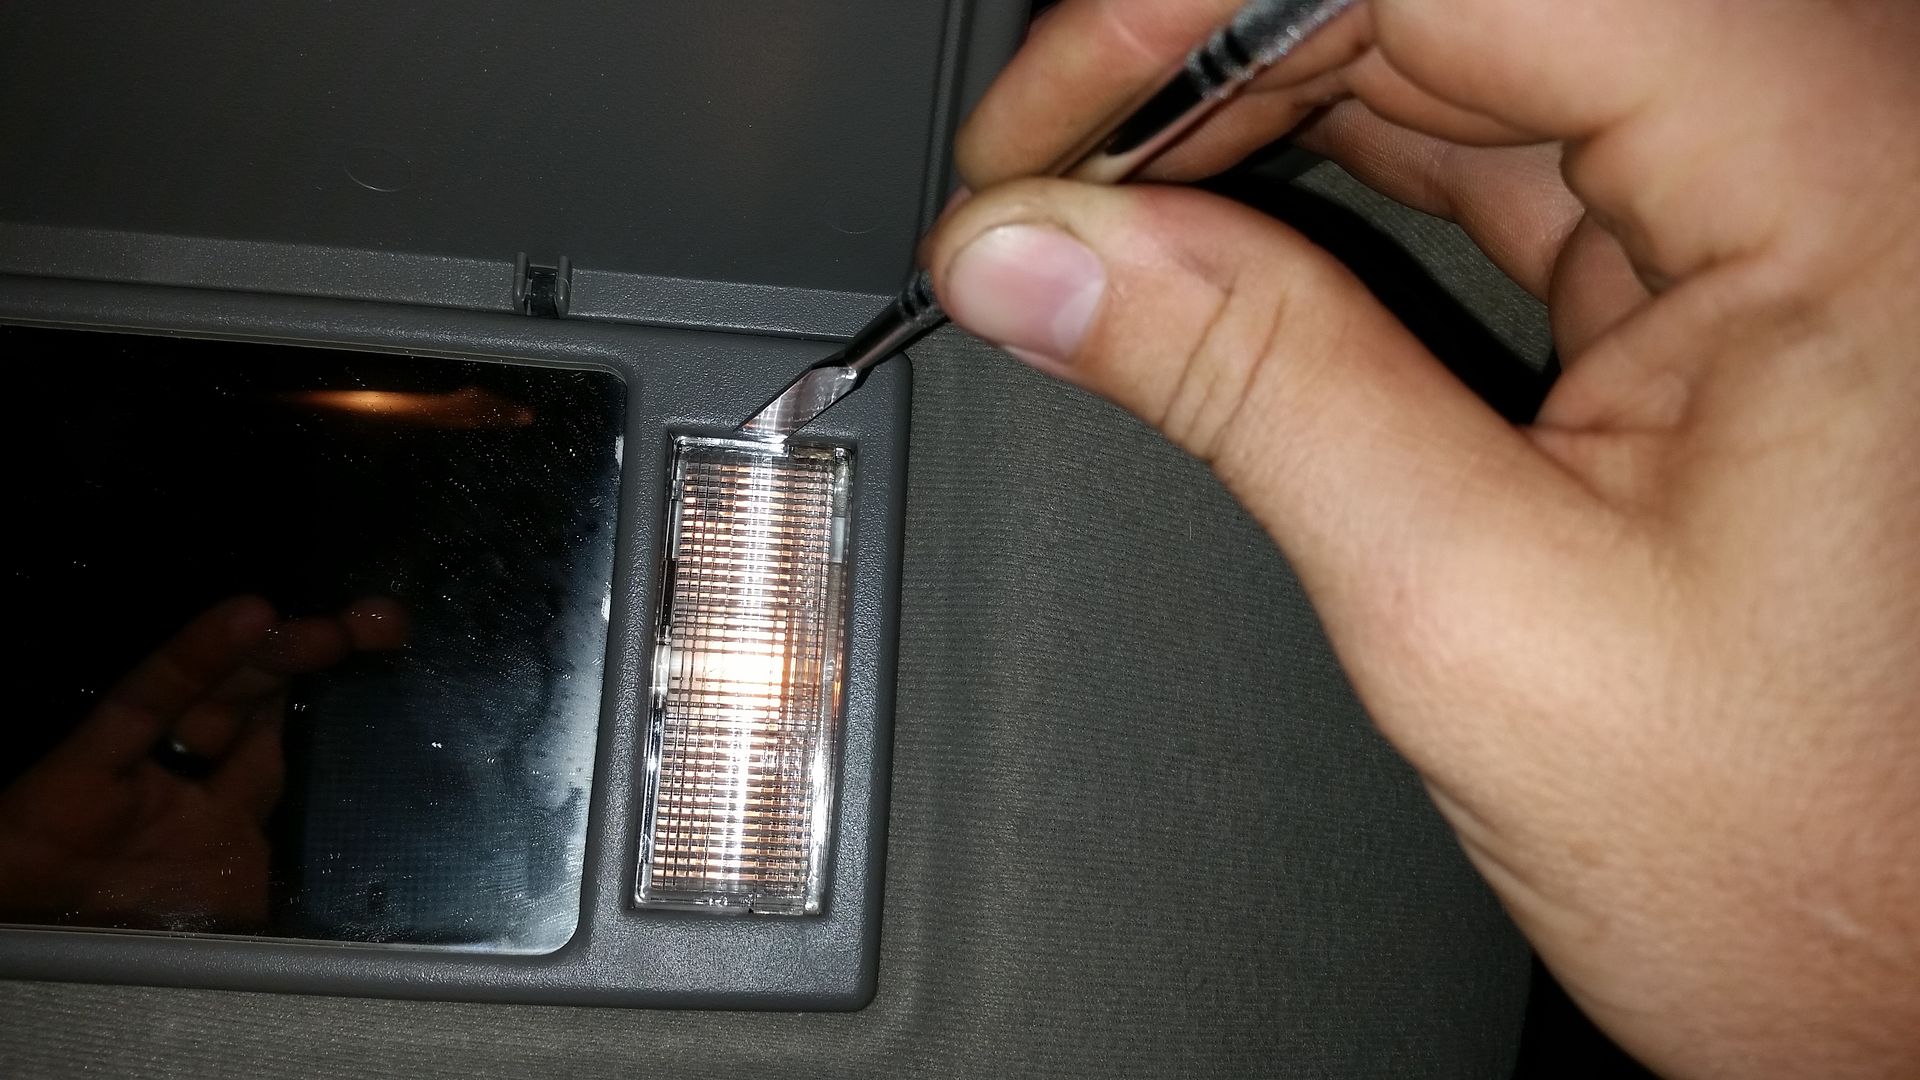
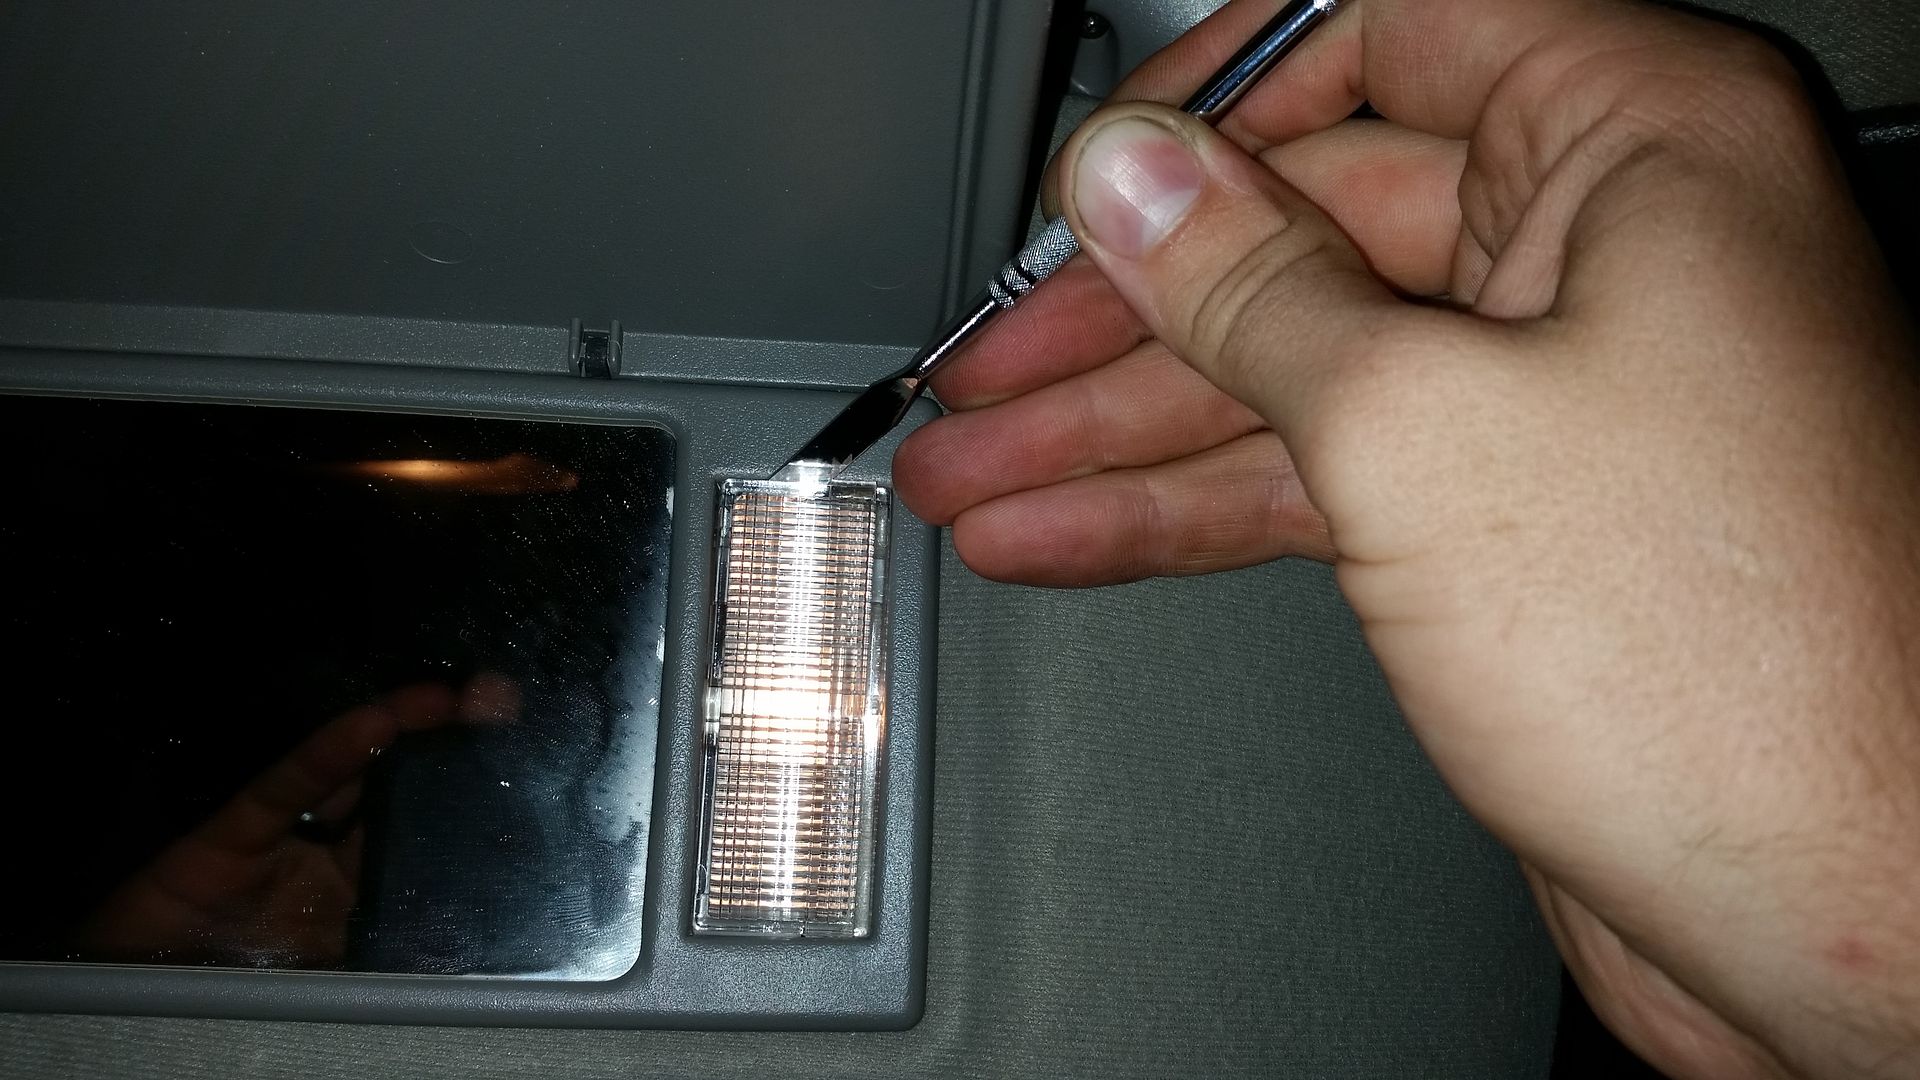
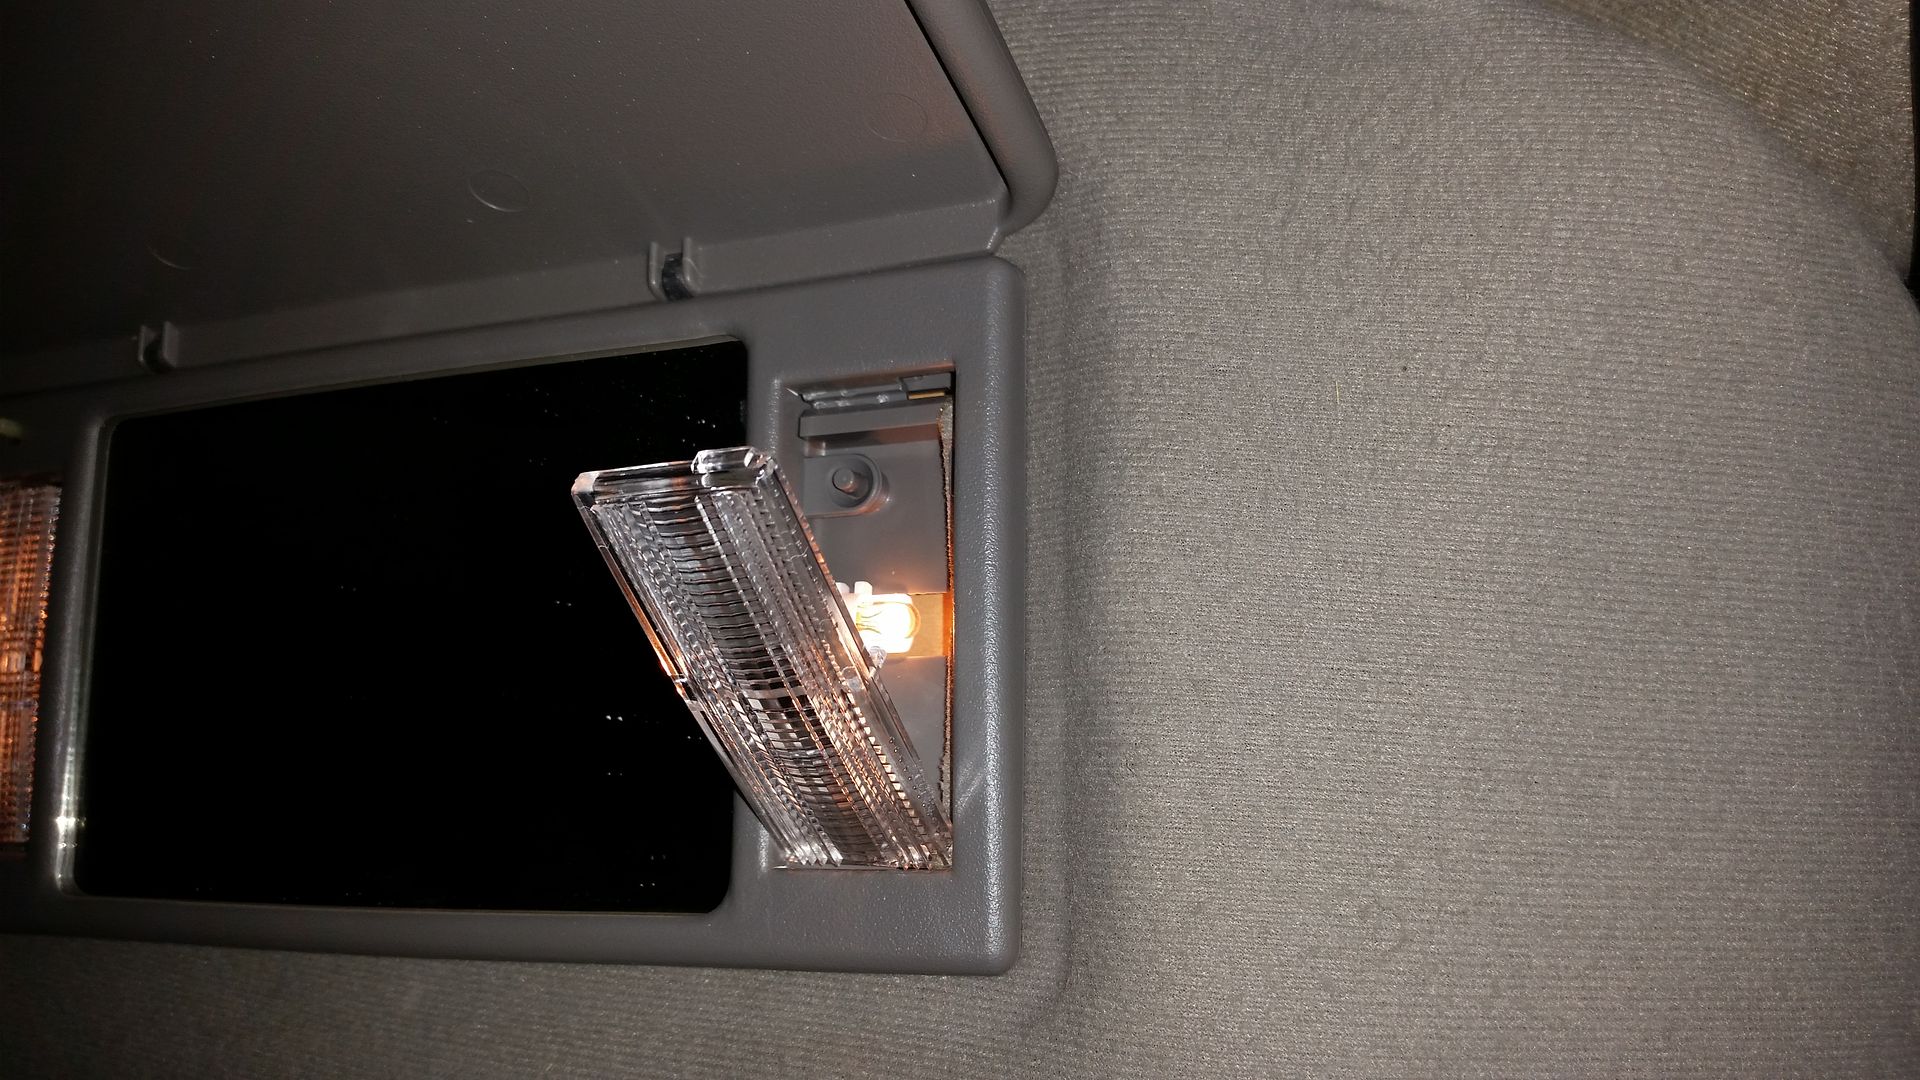
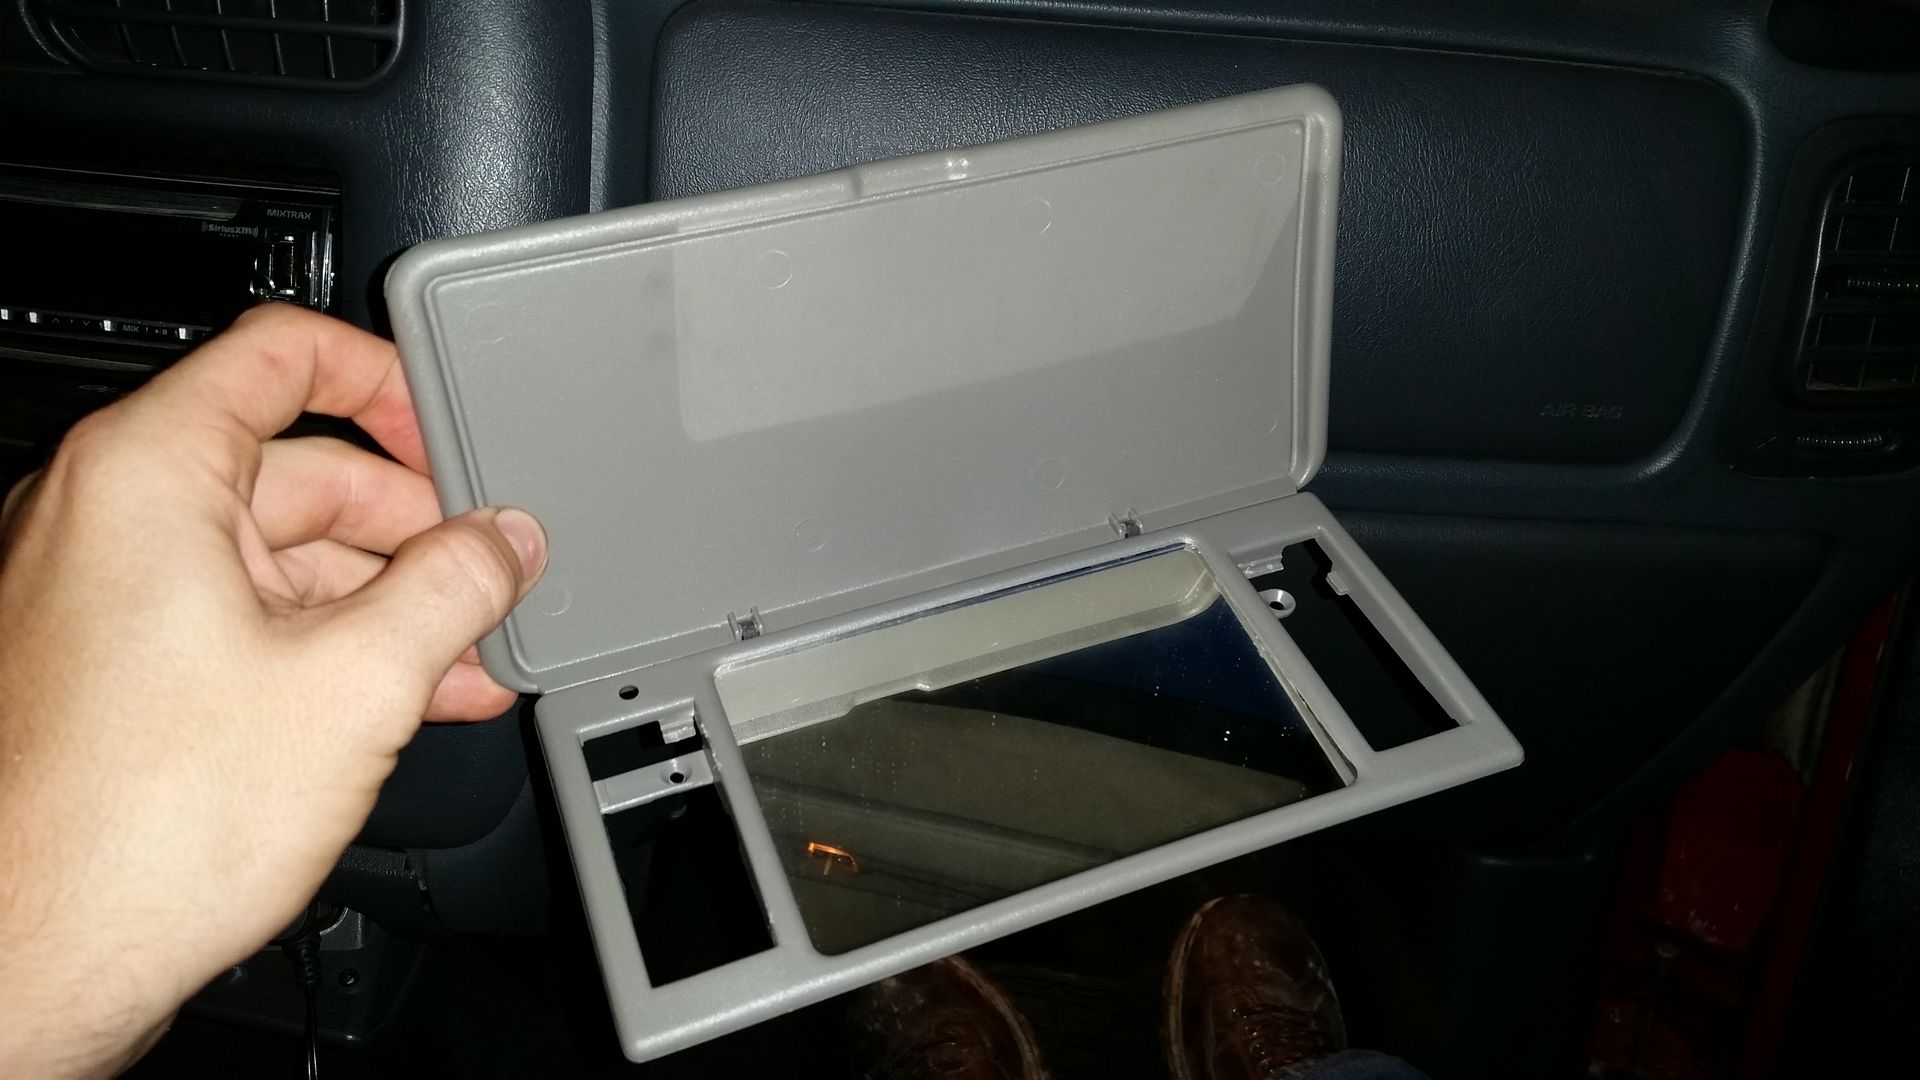
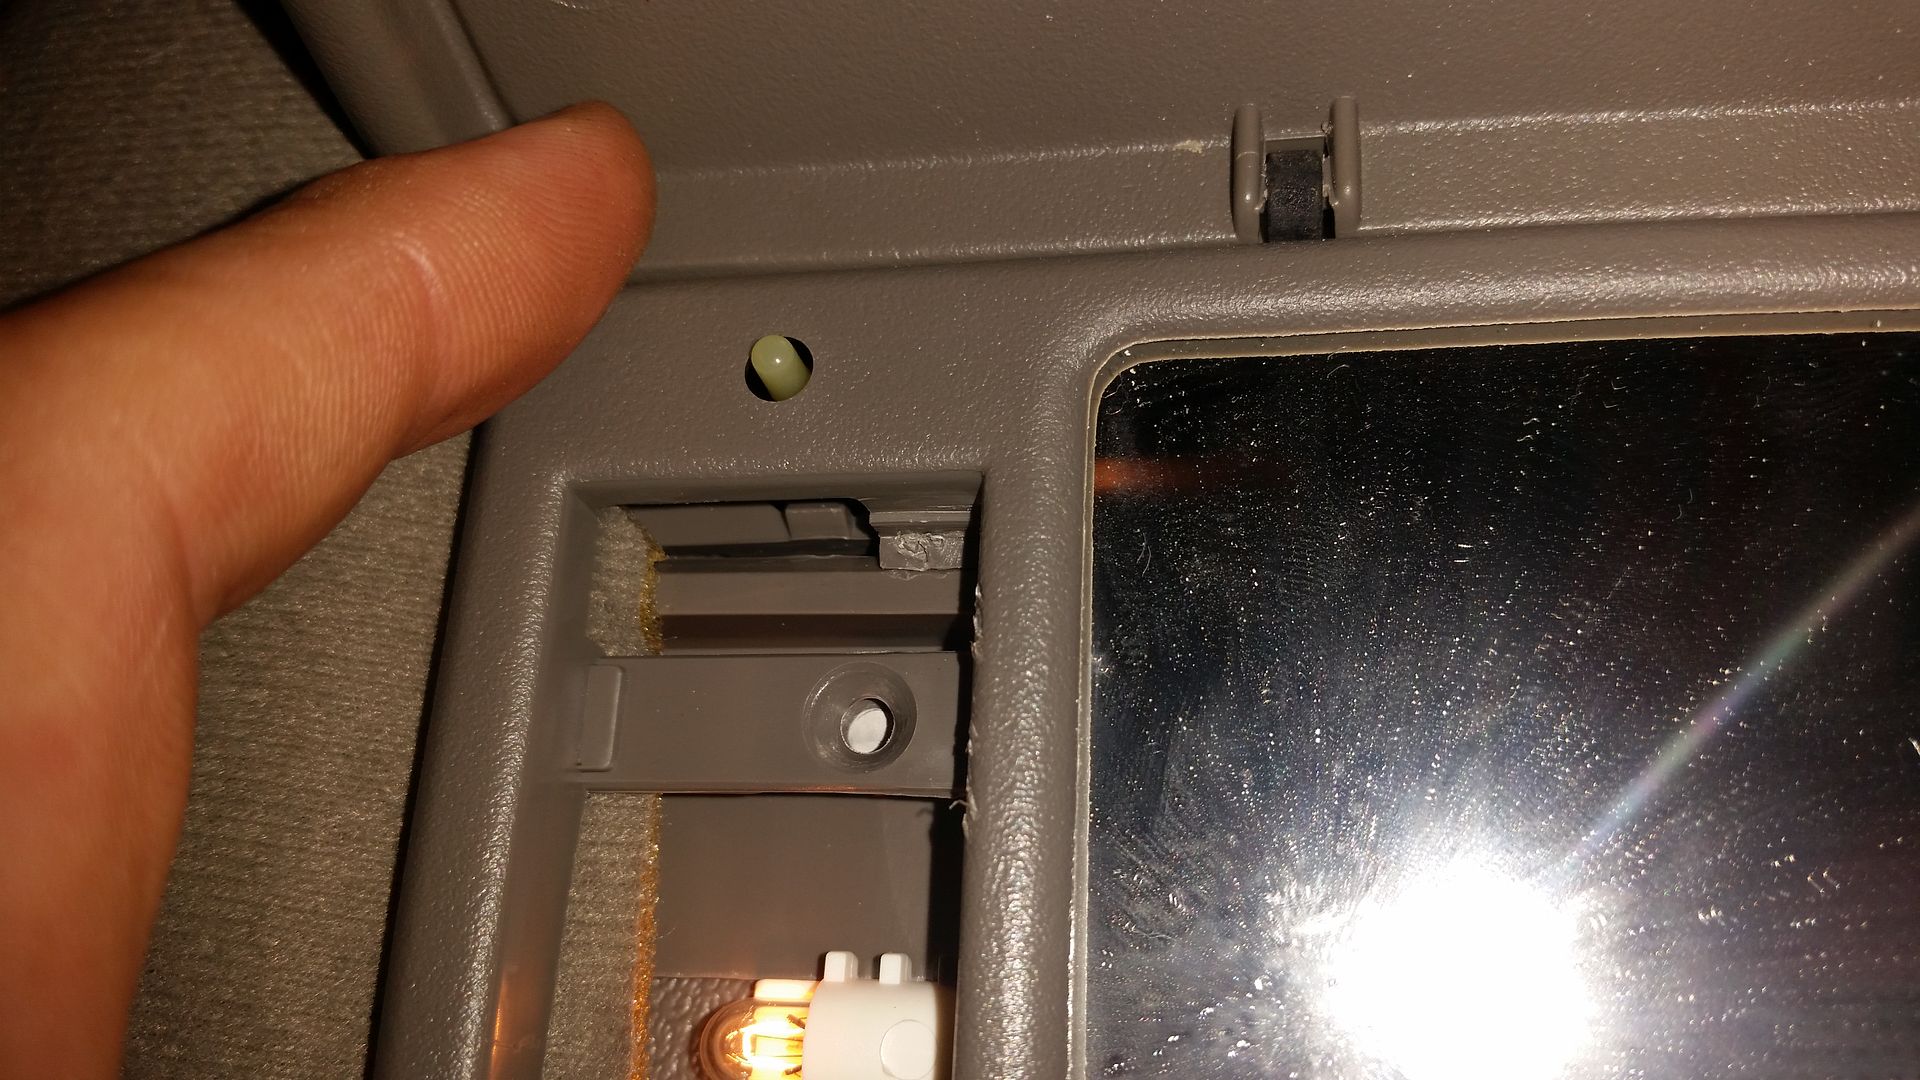
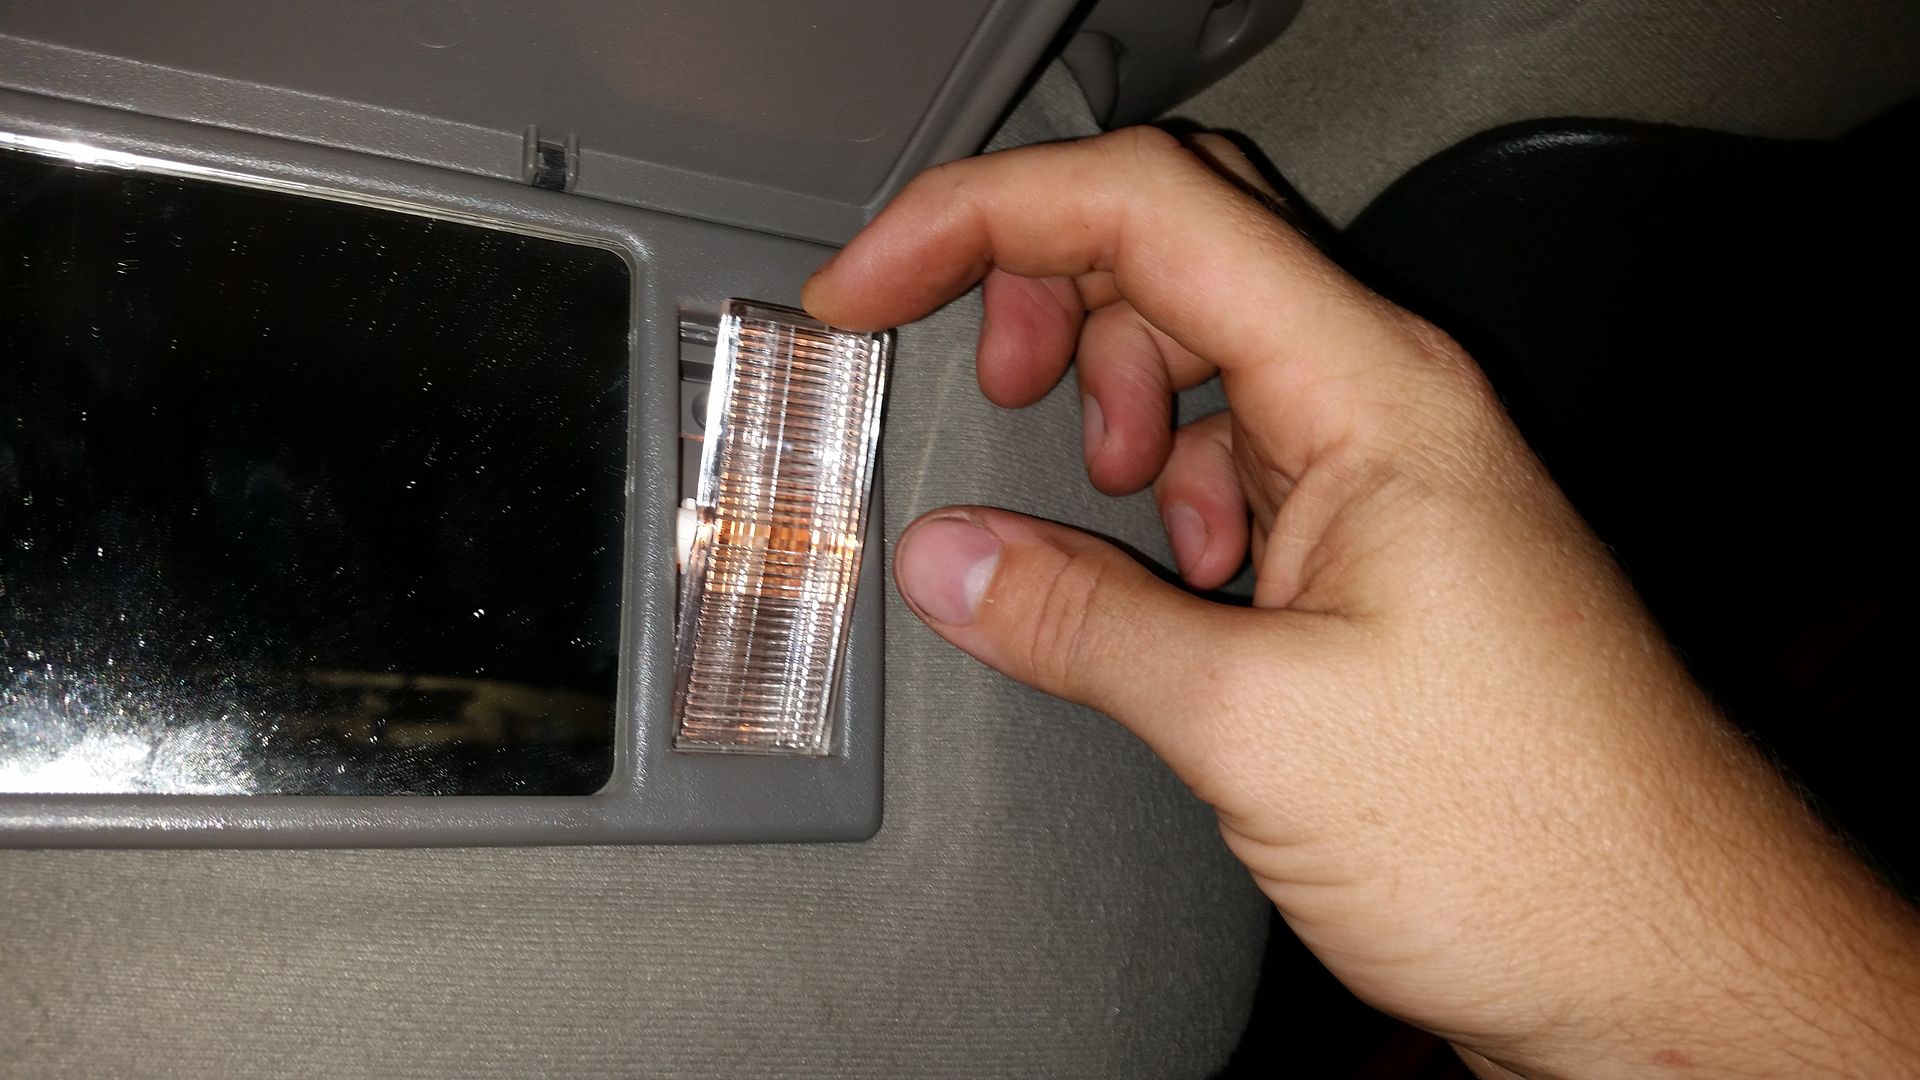
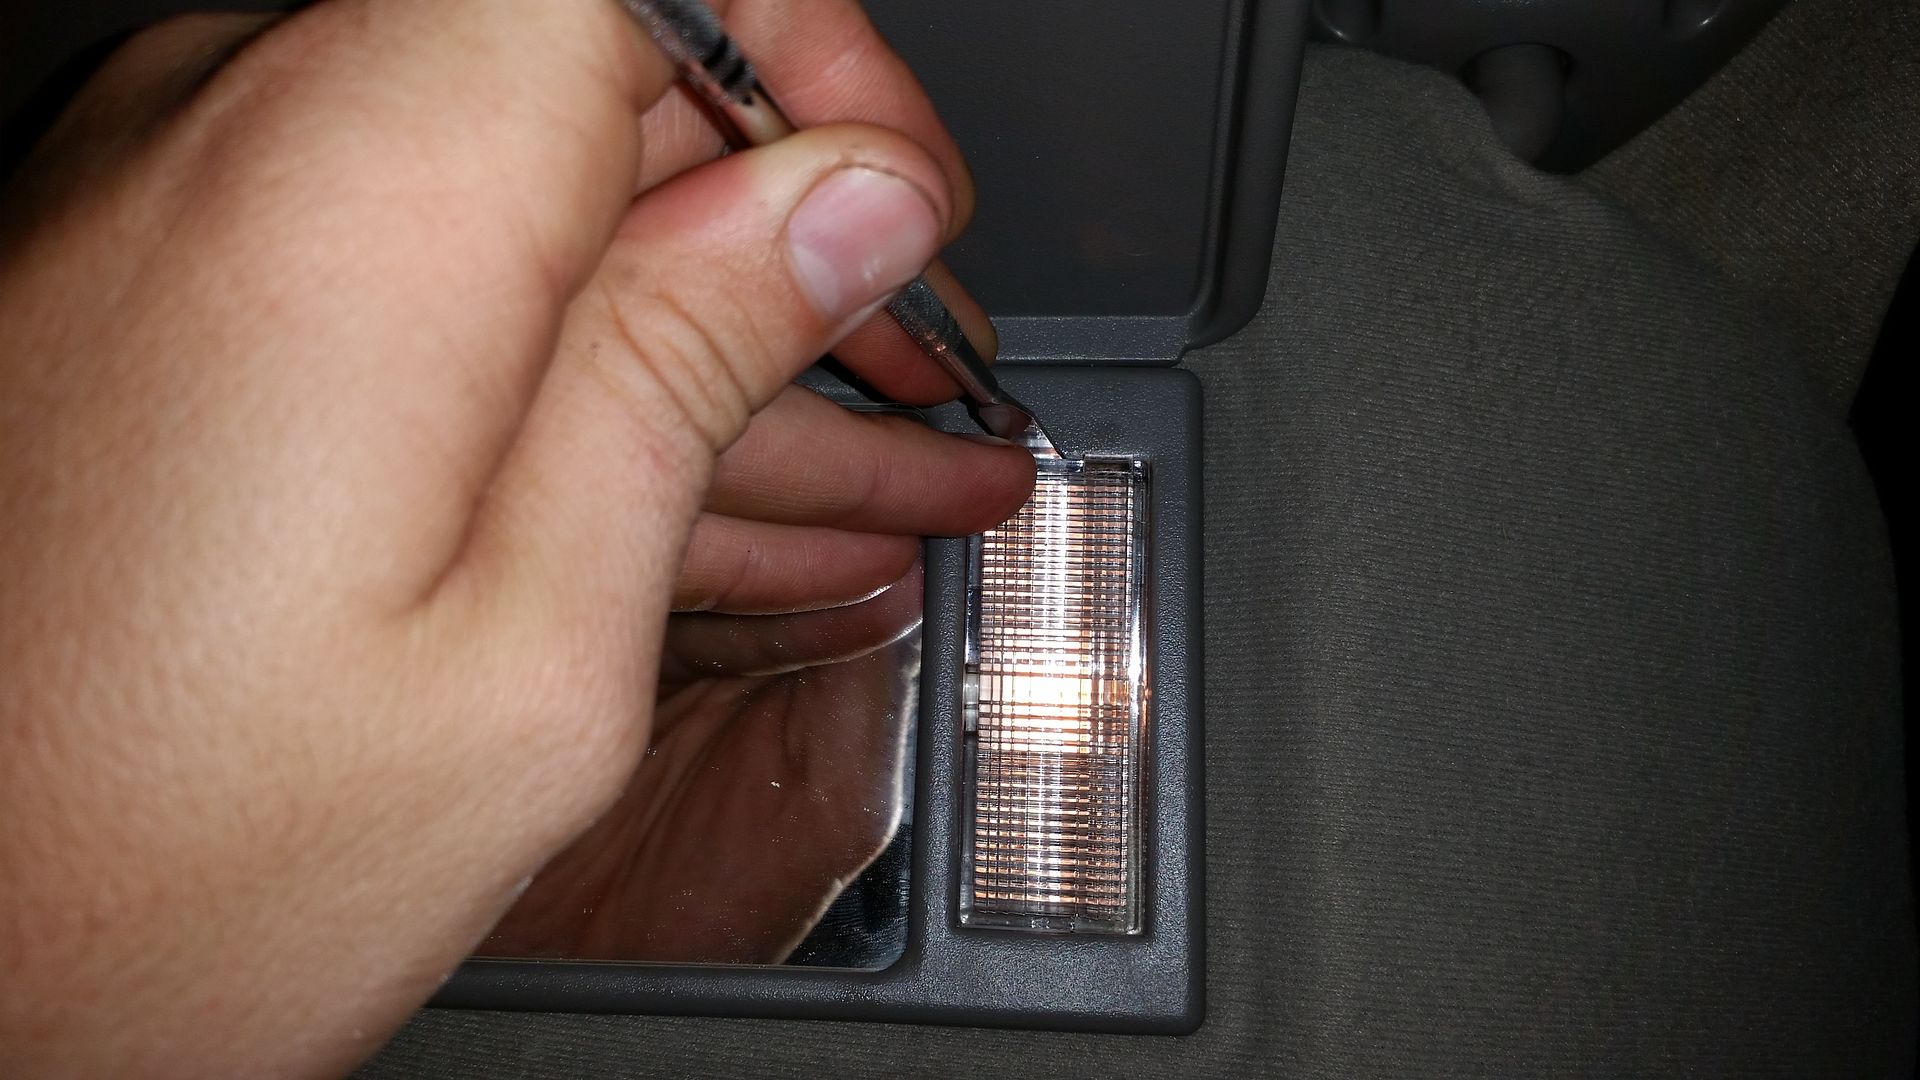
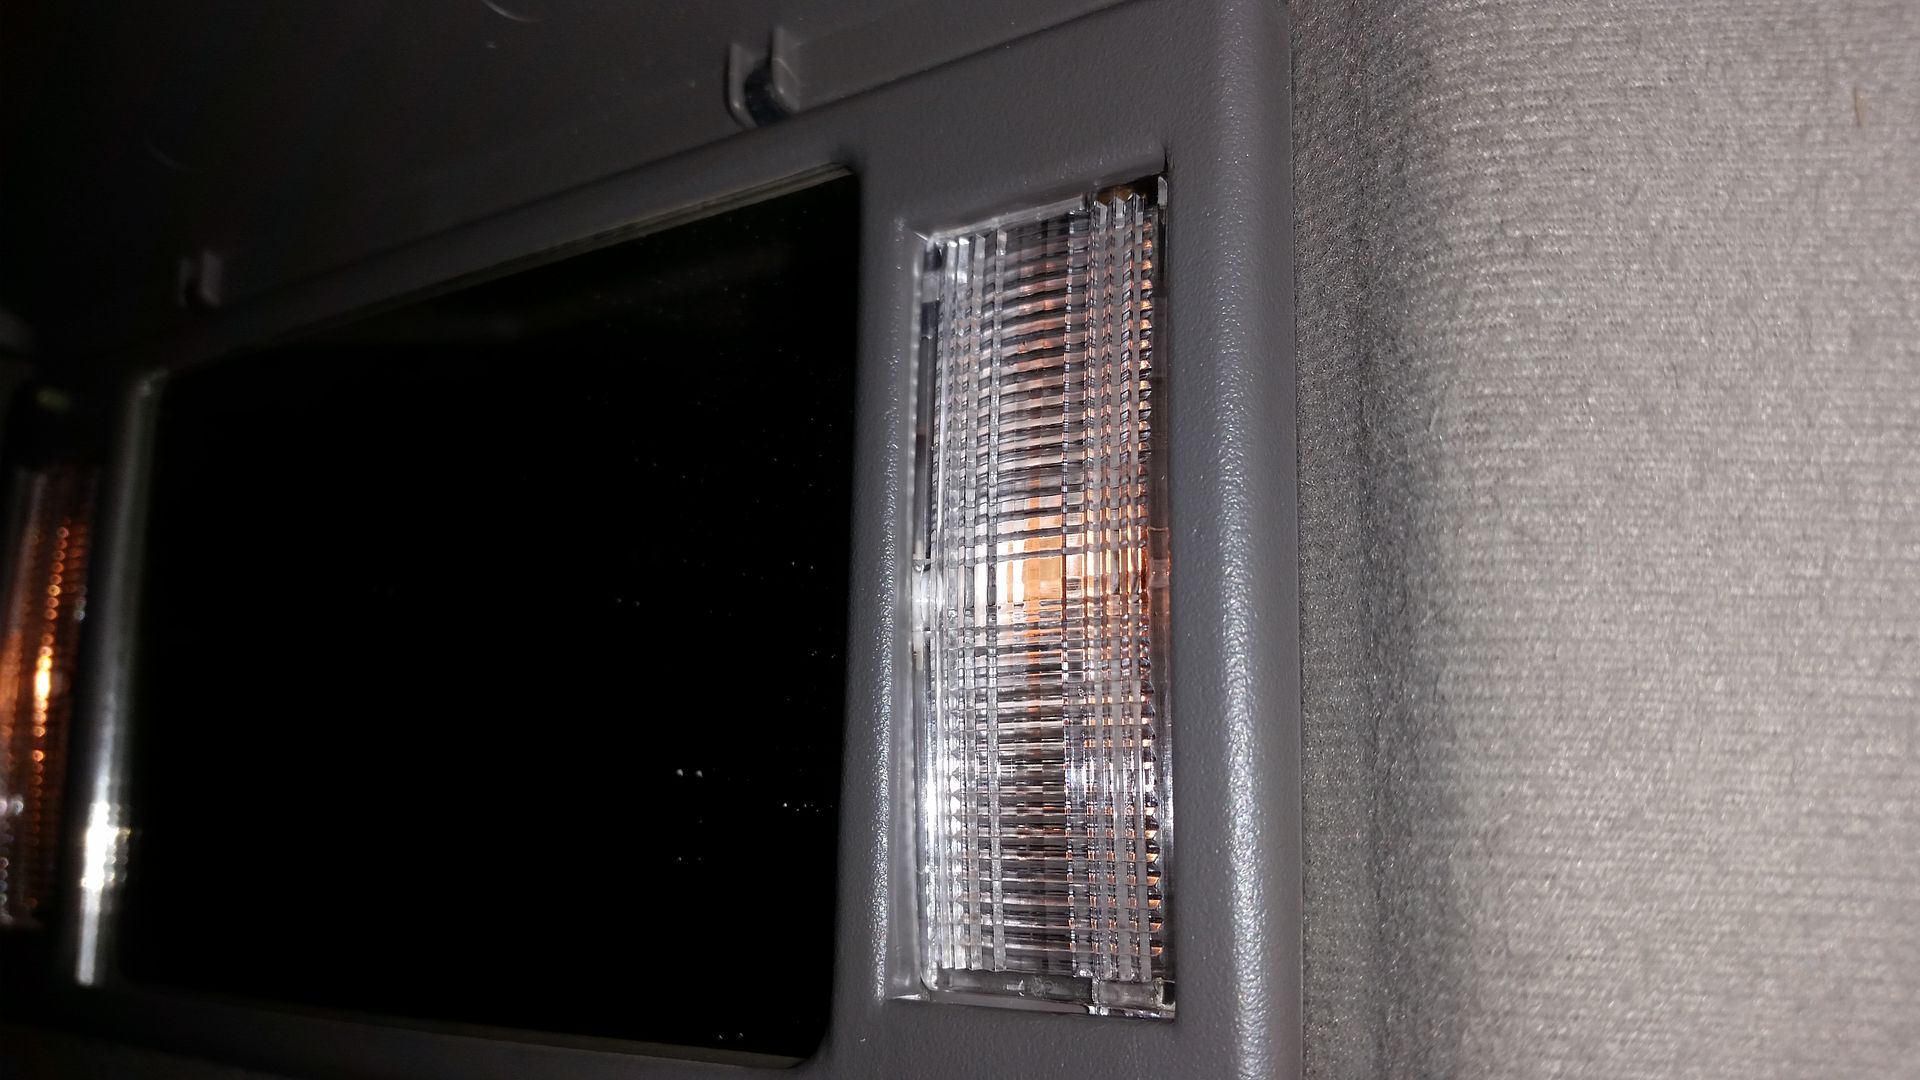
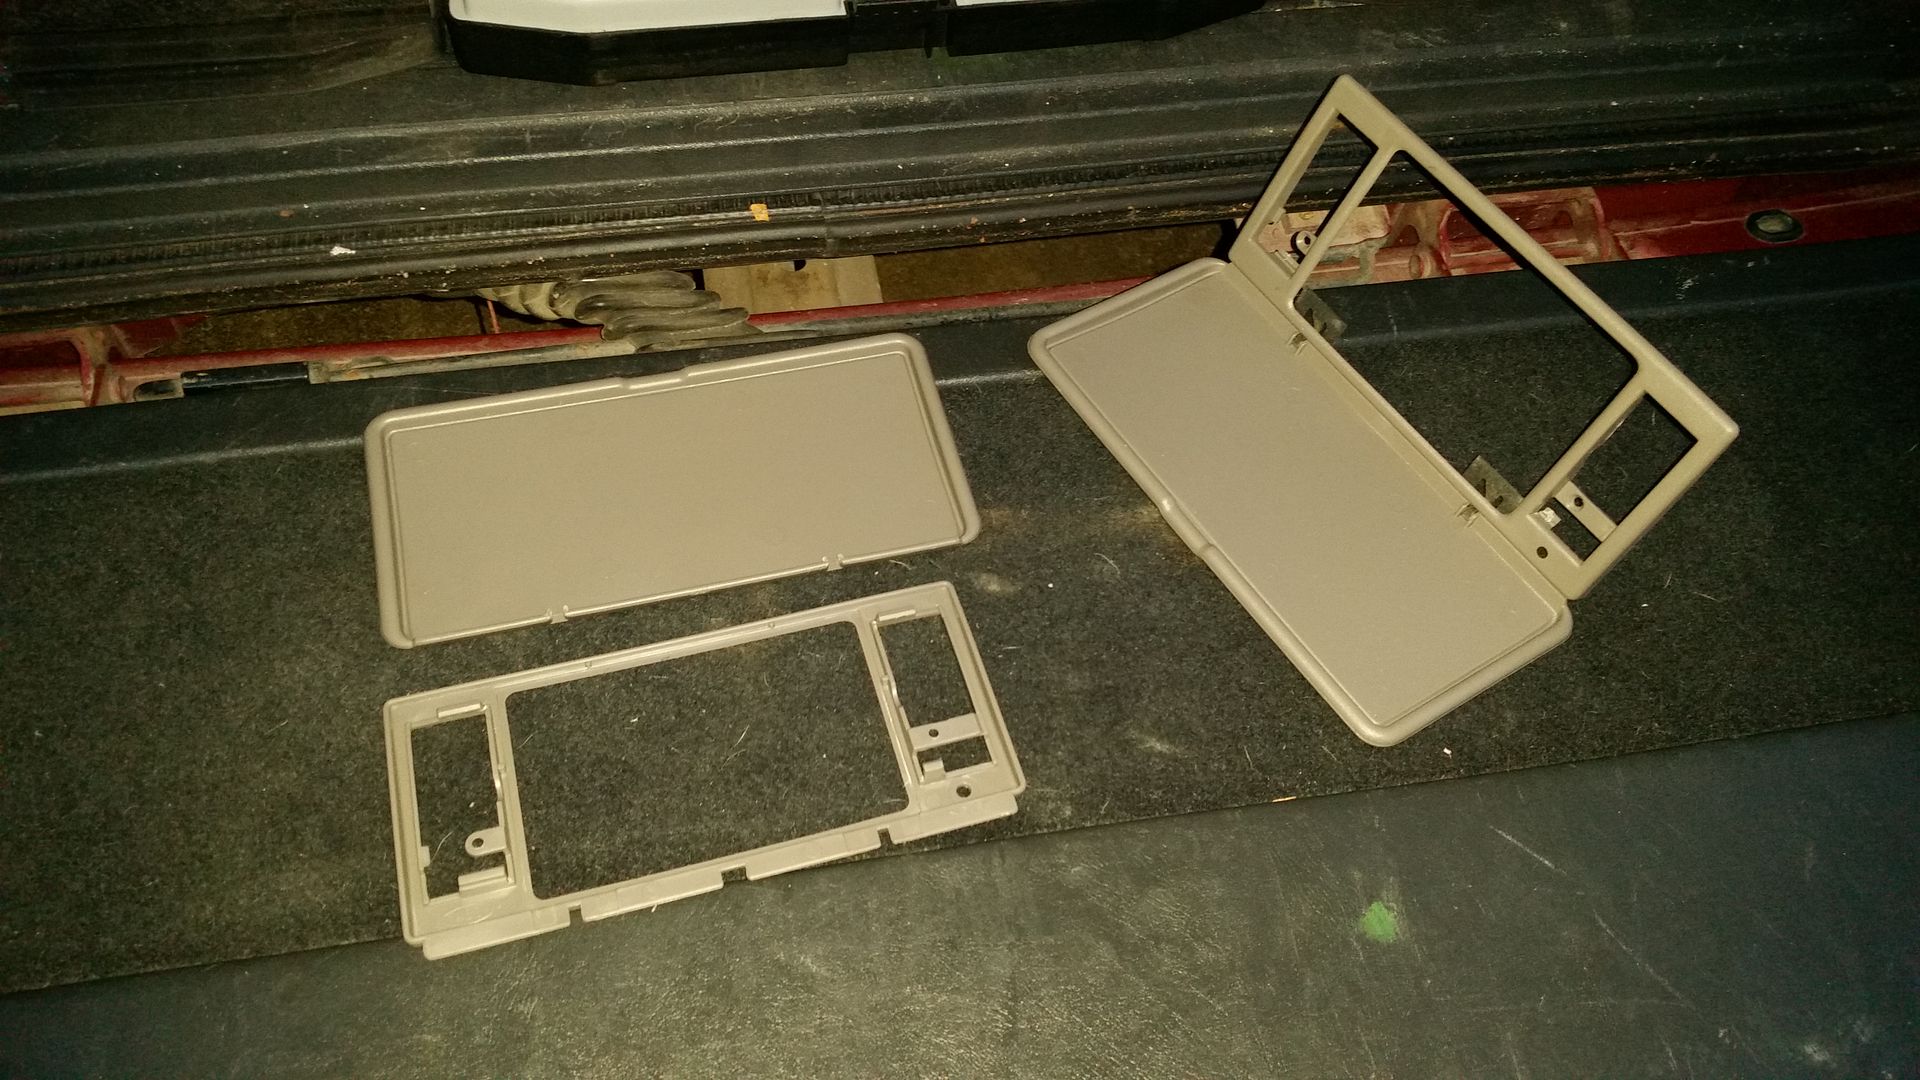
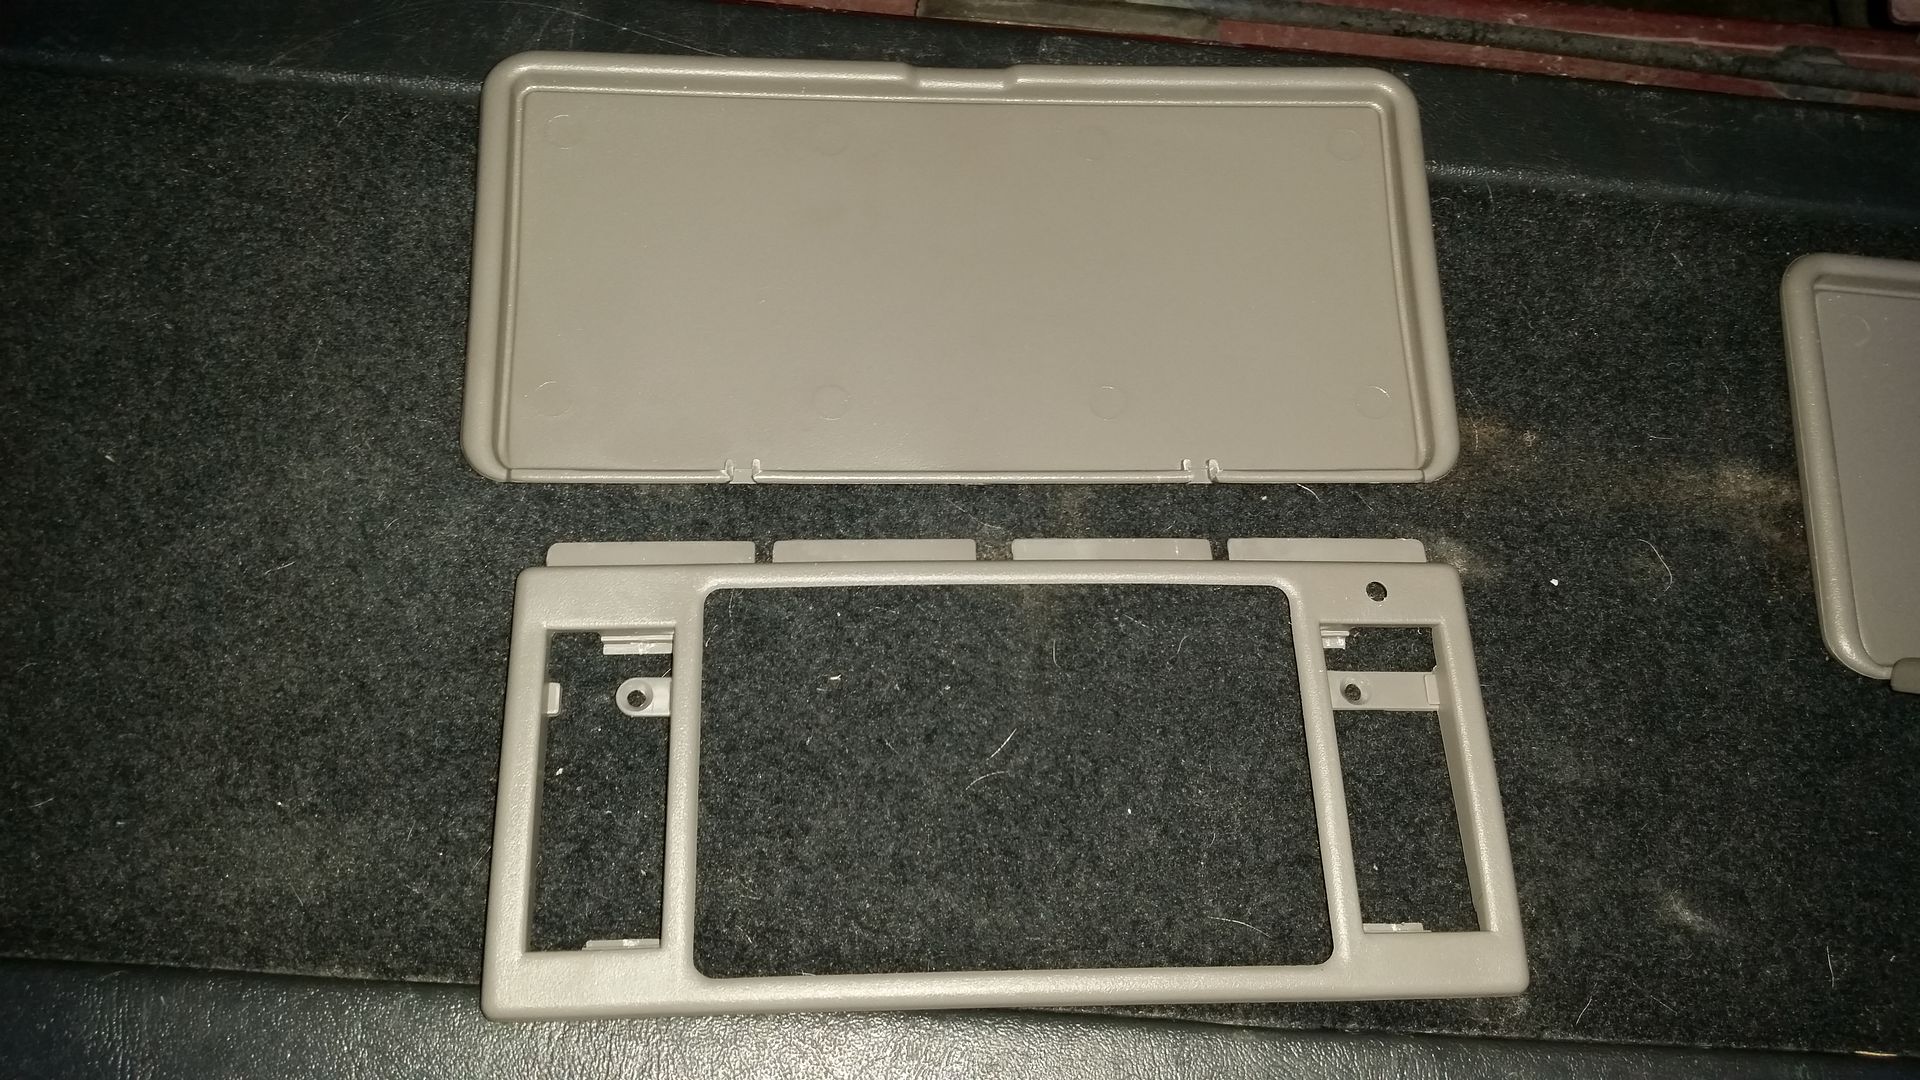
First you need to remove the vanity assembly, rather it be the good one from the donor or what's left of the broken one on your vehicle. To start off, you need to remove the light covers, as the clips that hold the assembly to the visor are behind them.
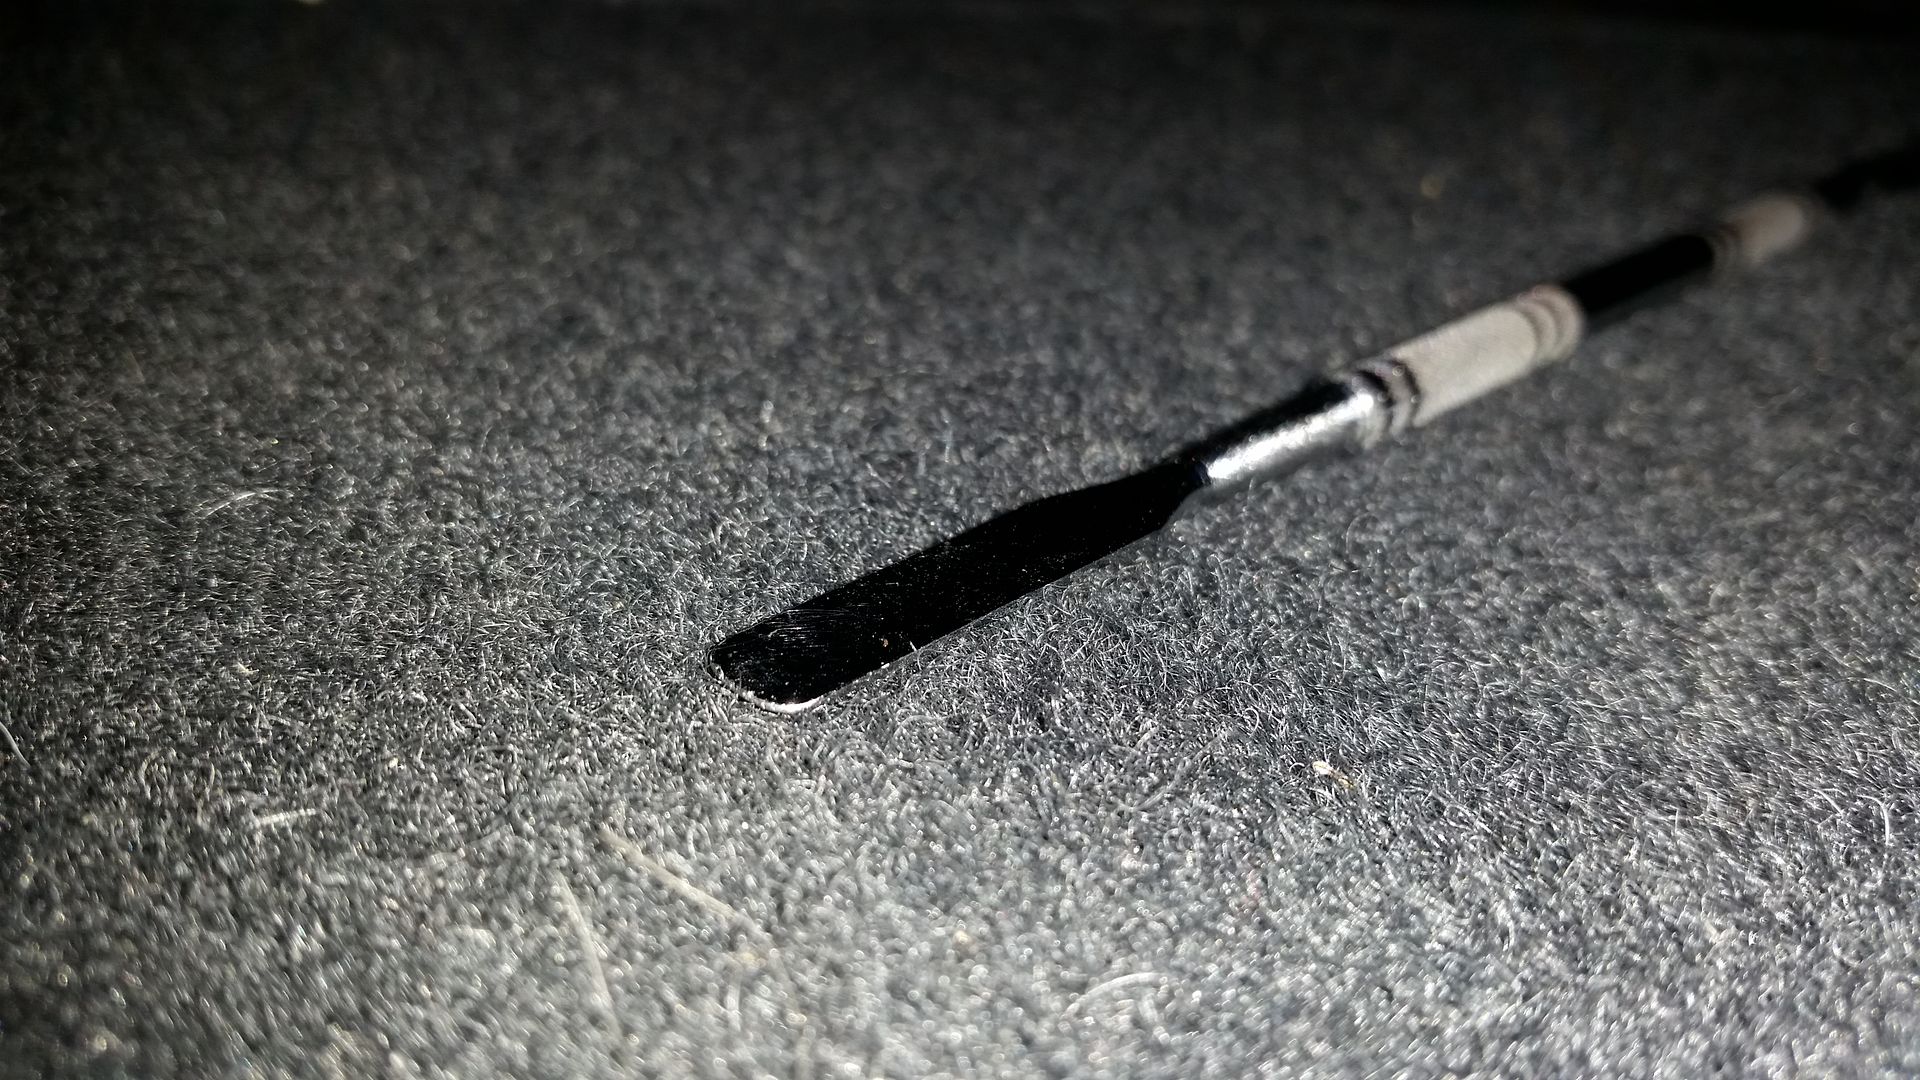
Place the spudger on the top of the lens like so:
Give a gentle pry upwards and the top of the lens should pop out of the housing.
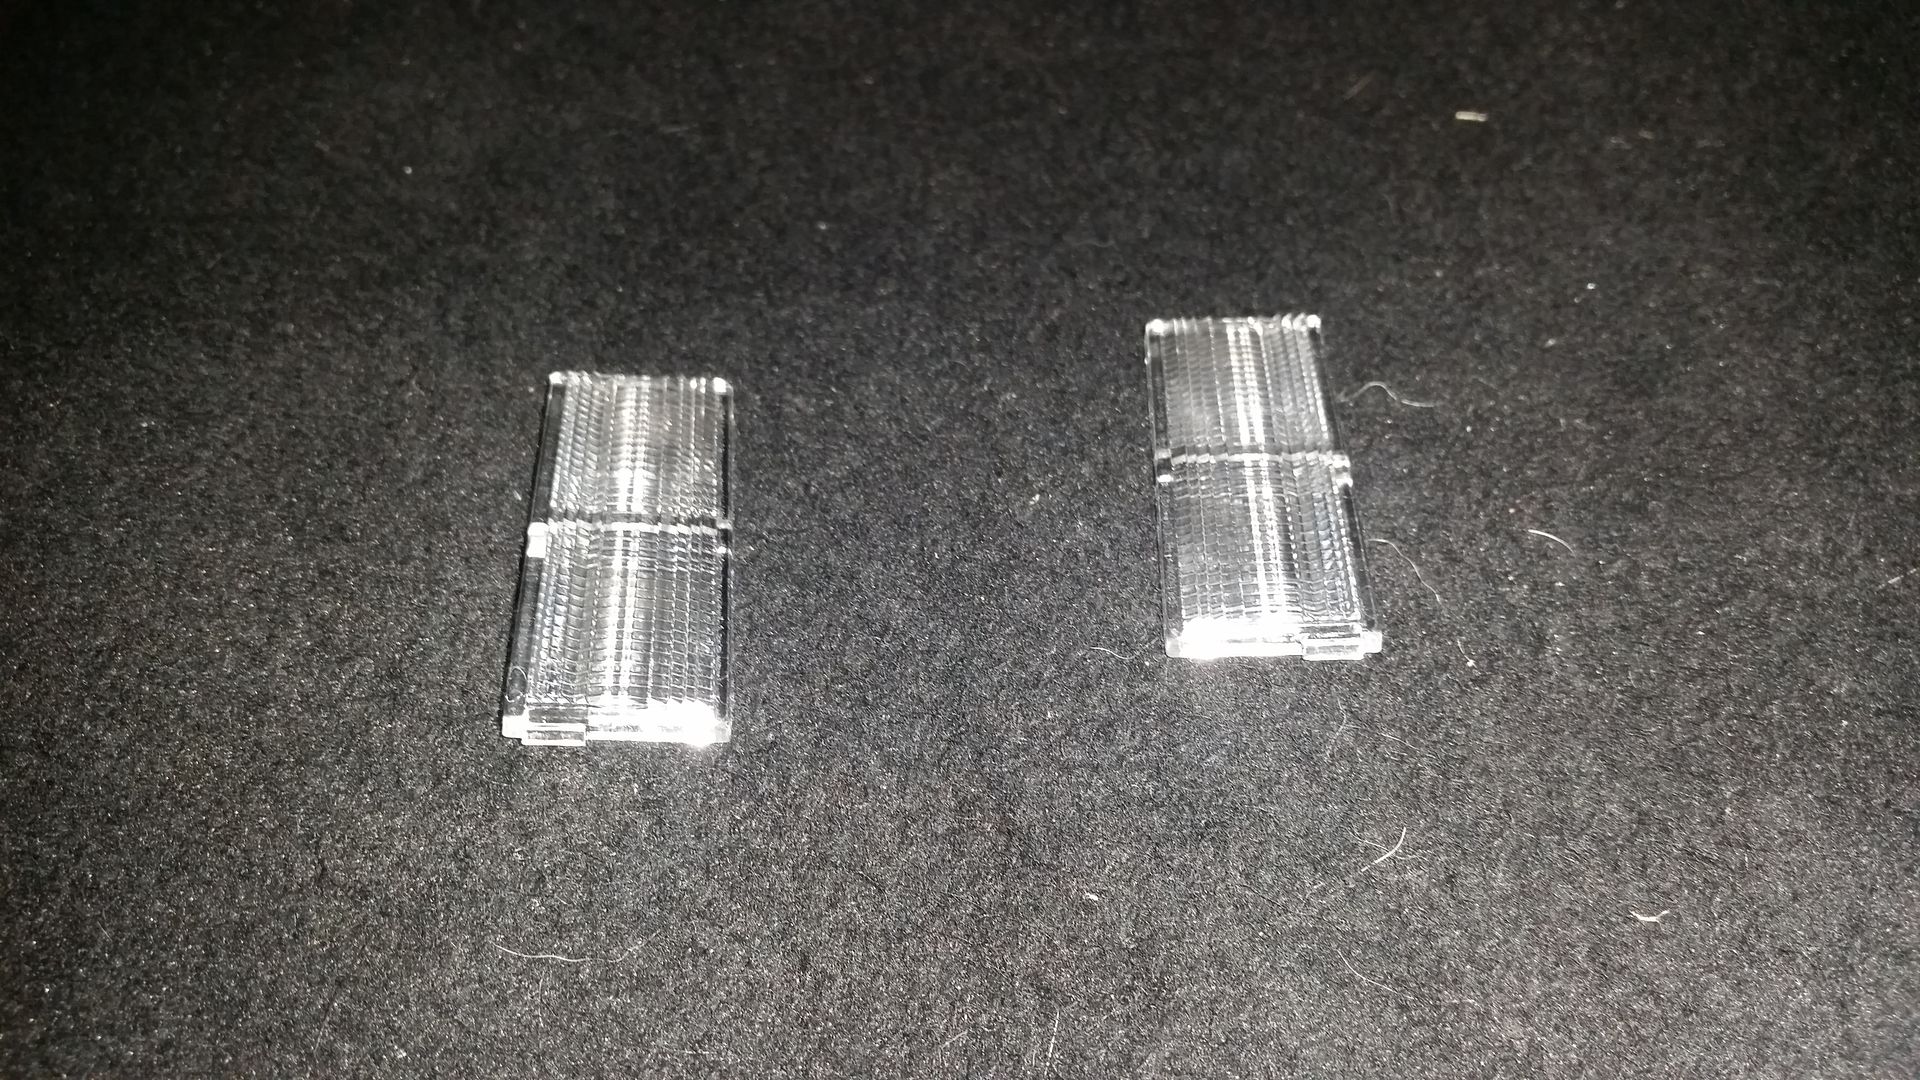
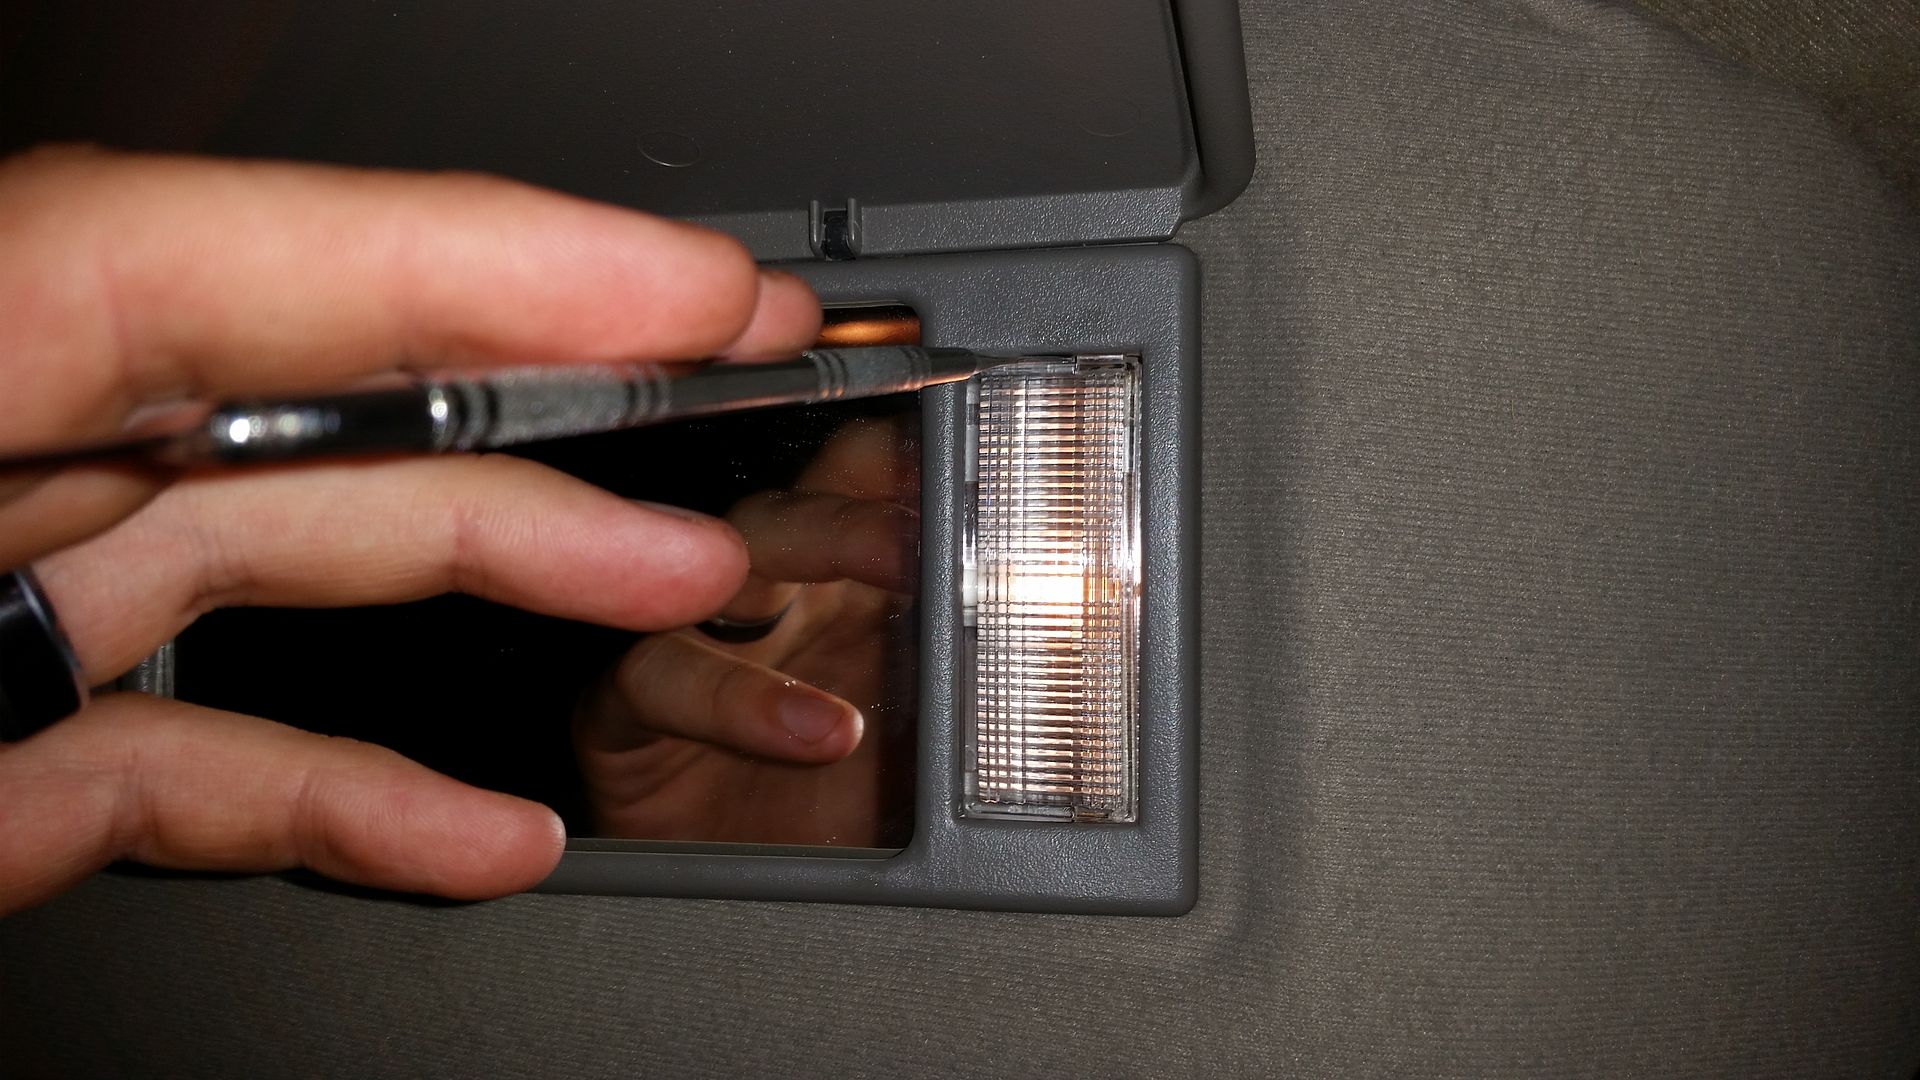
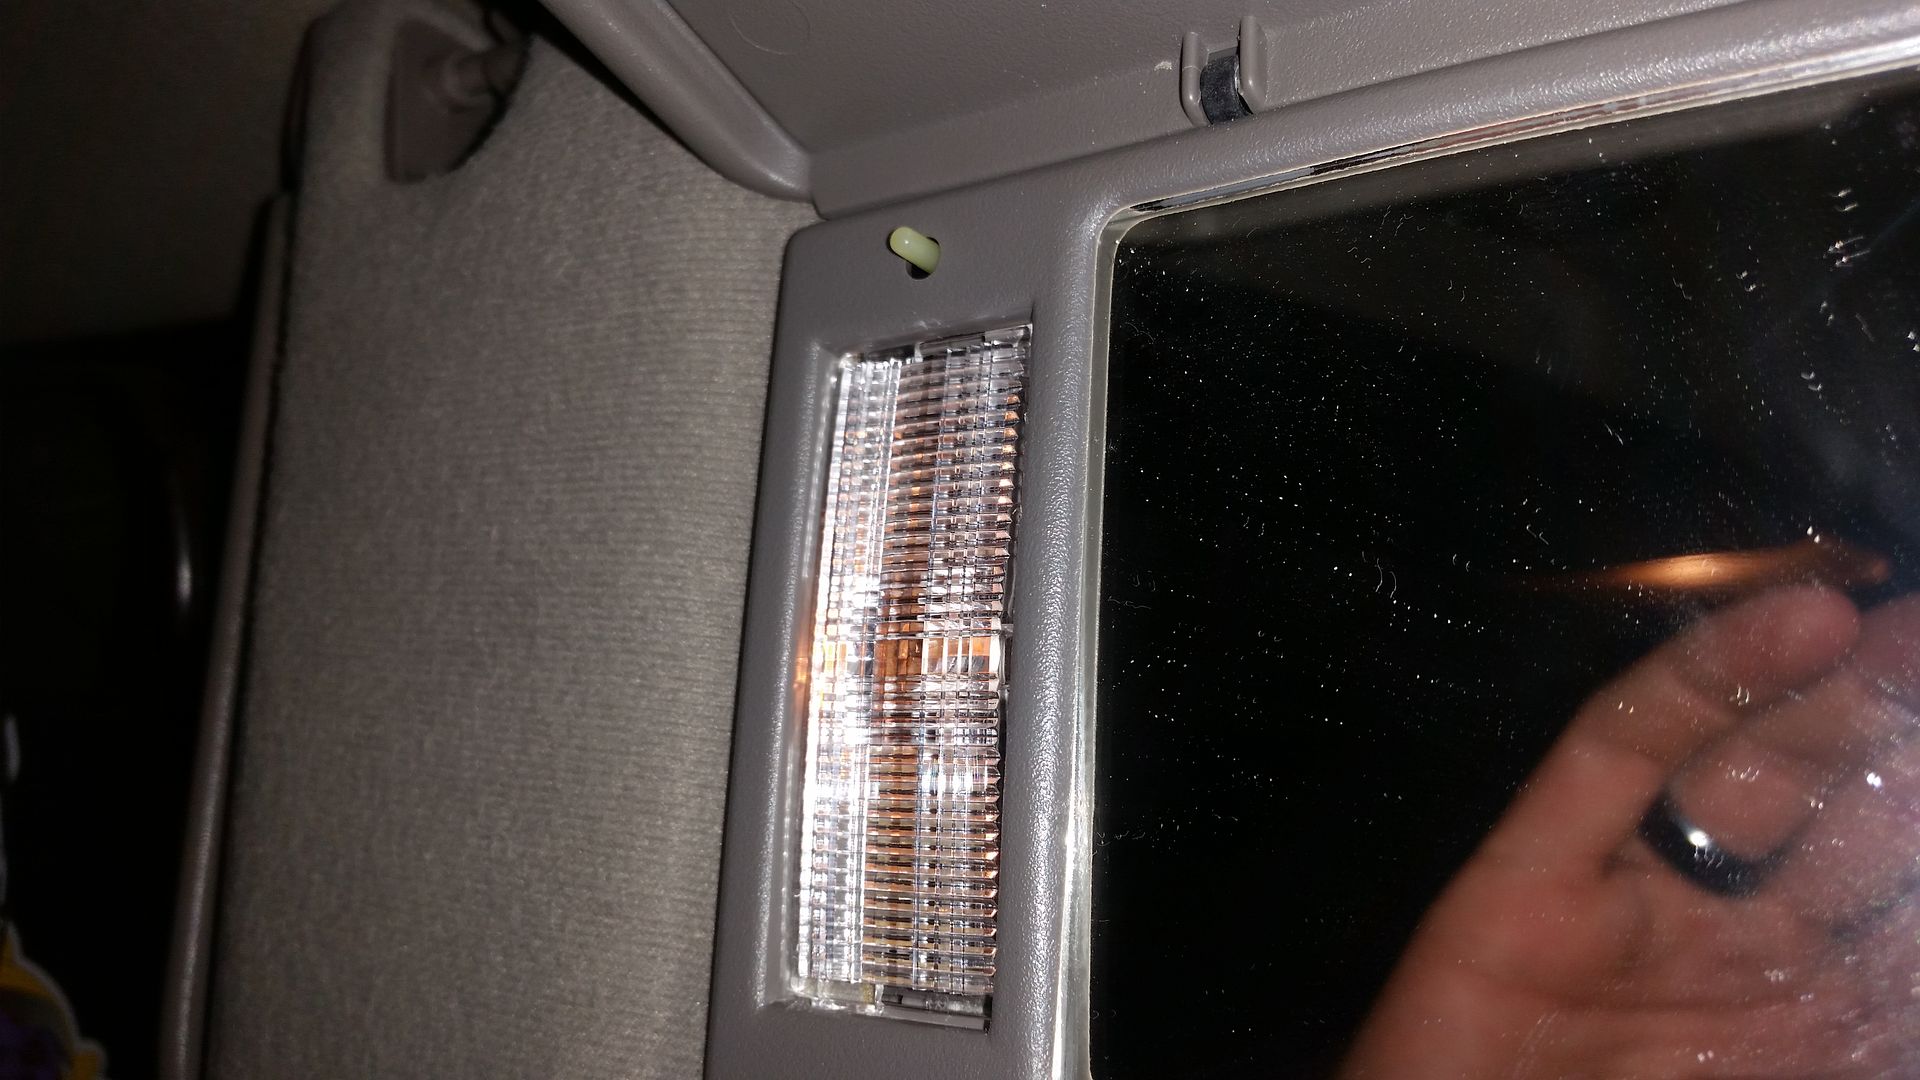
Same process for both sides. Lay the lenses somewhere in the orientation you removed them. It'll help you later when you go to reinstall them
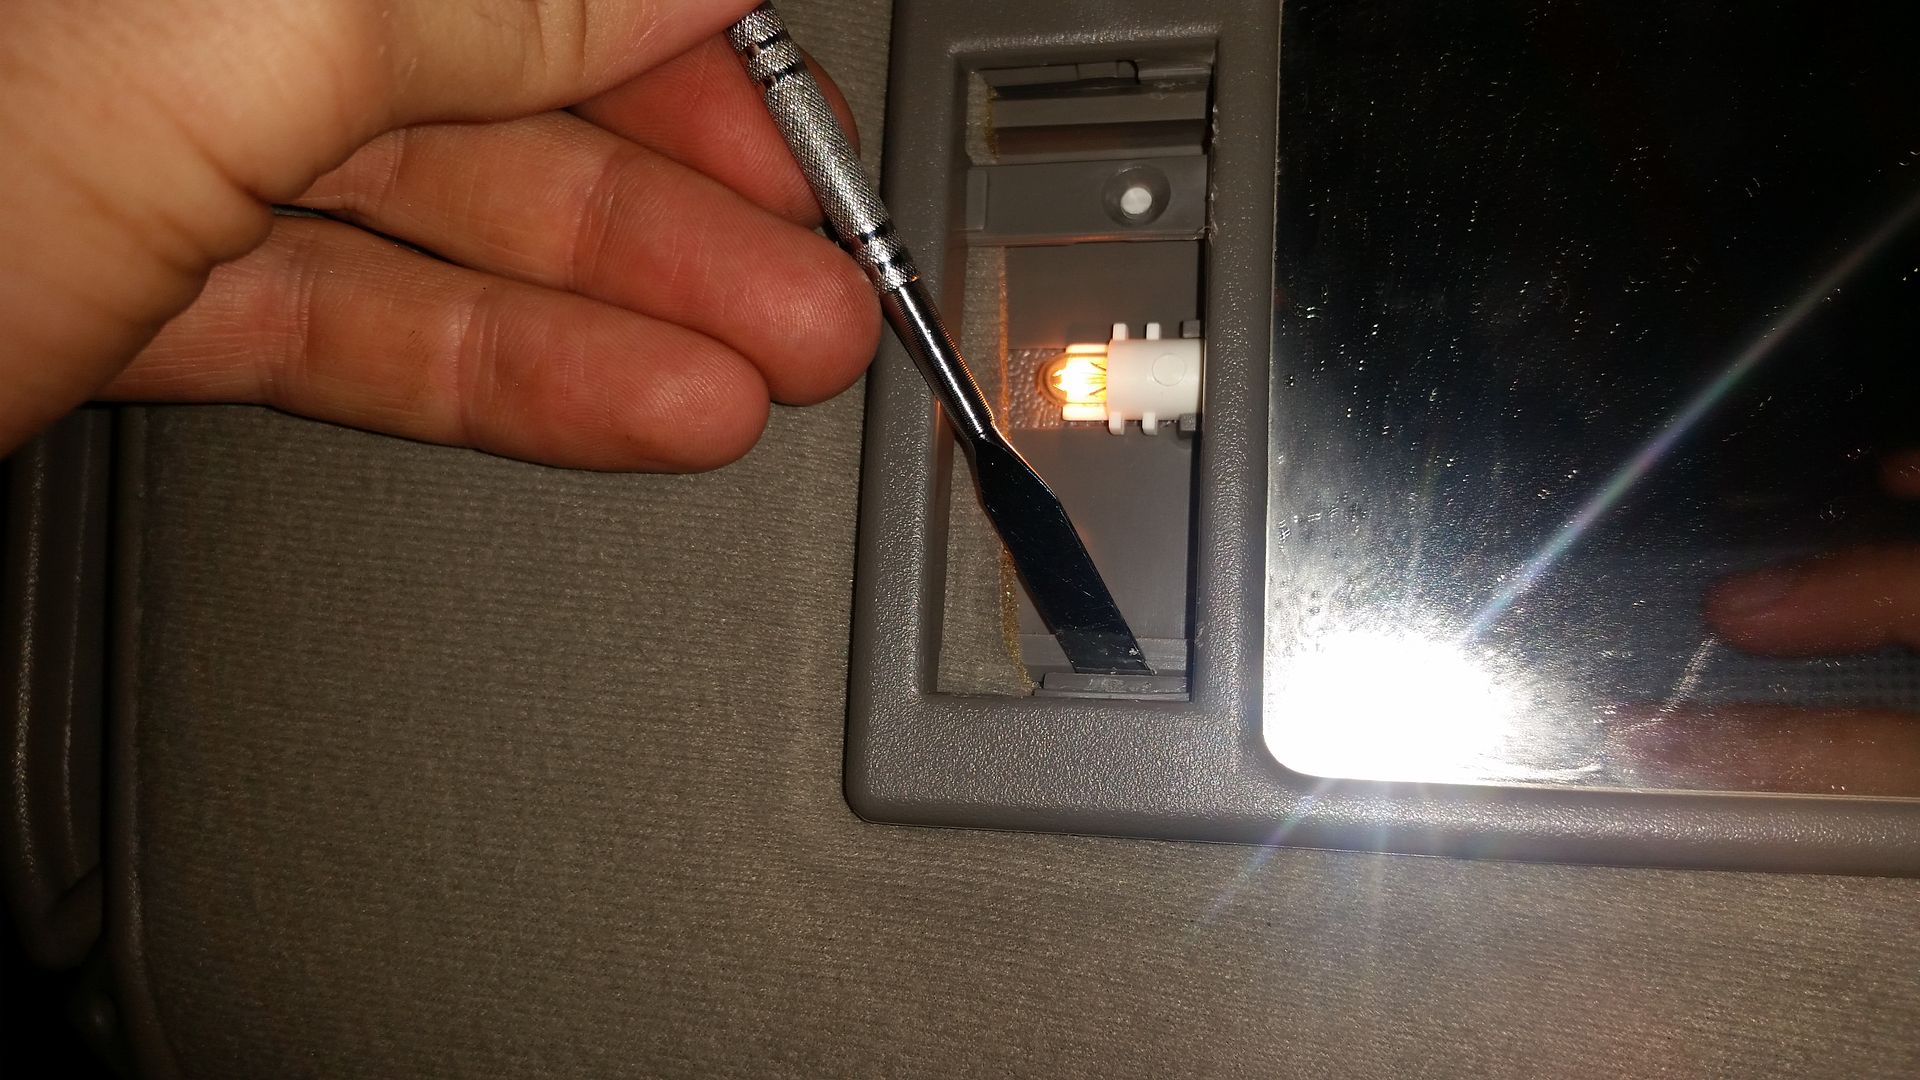
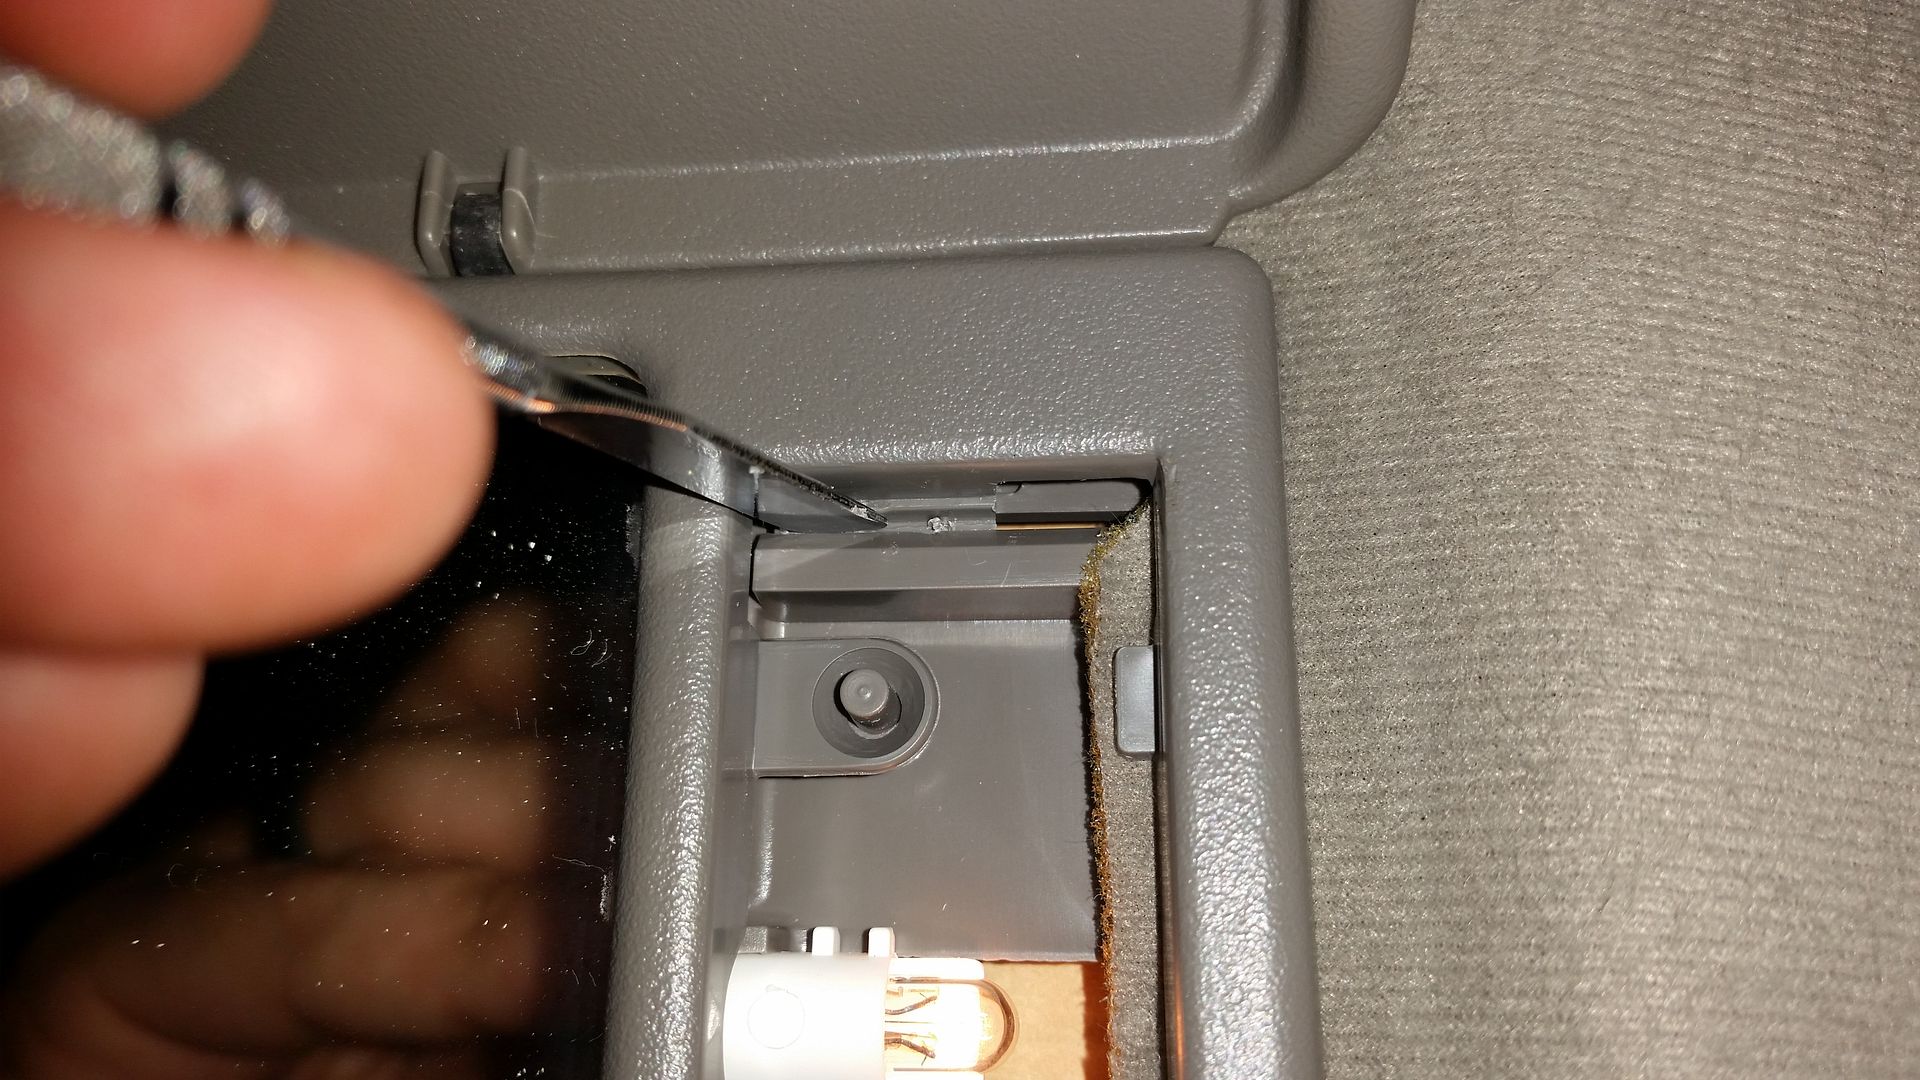
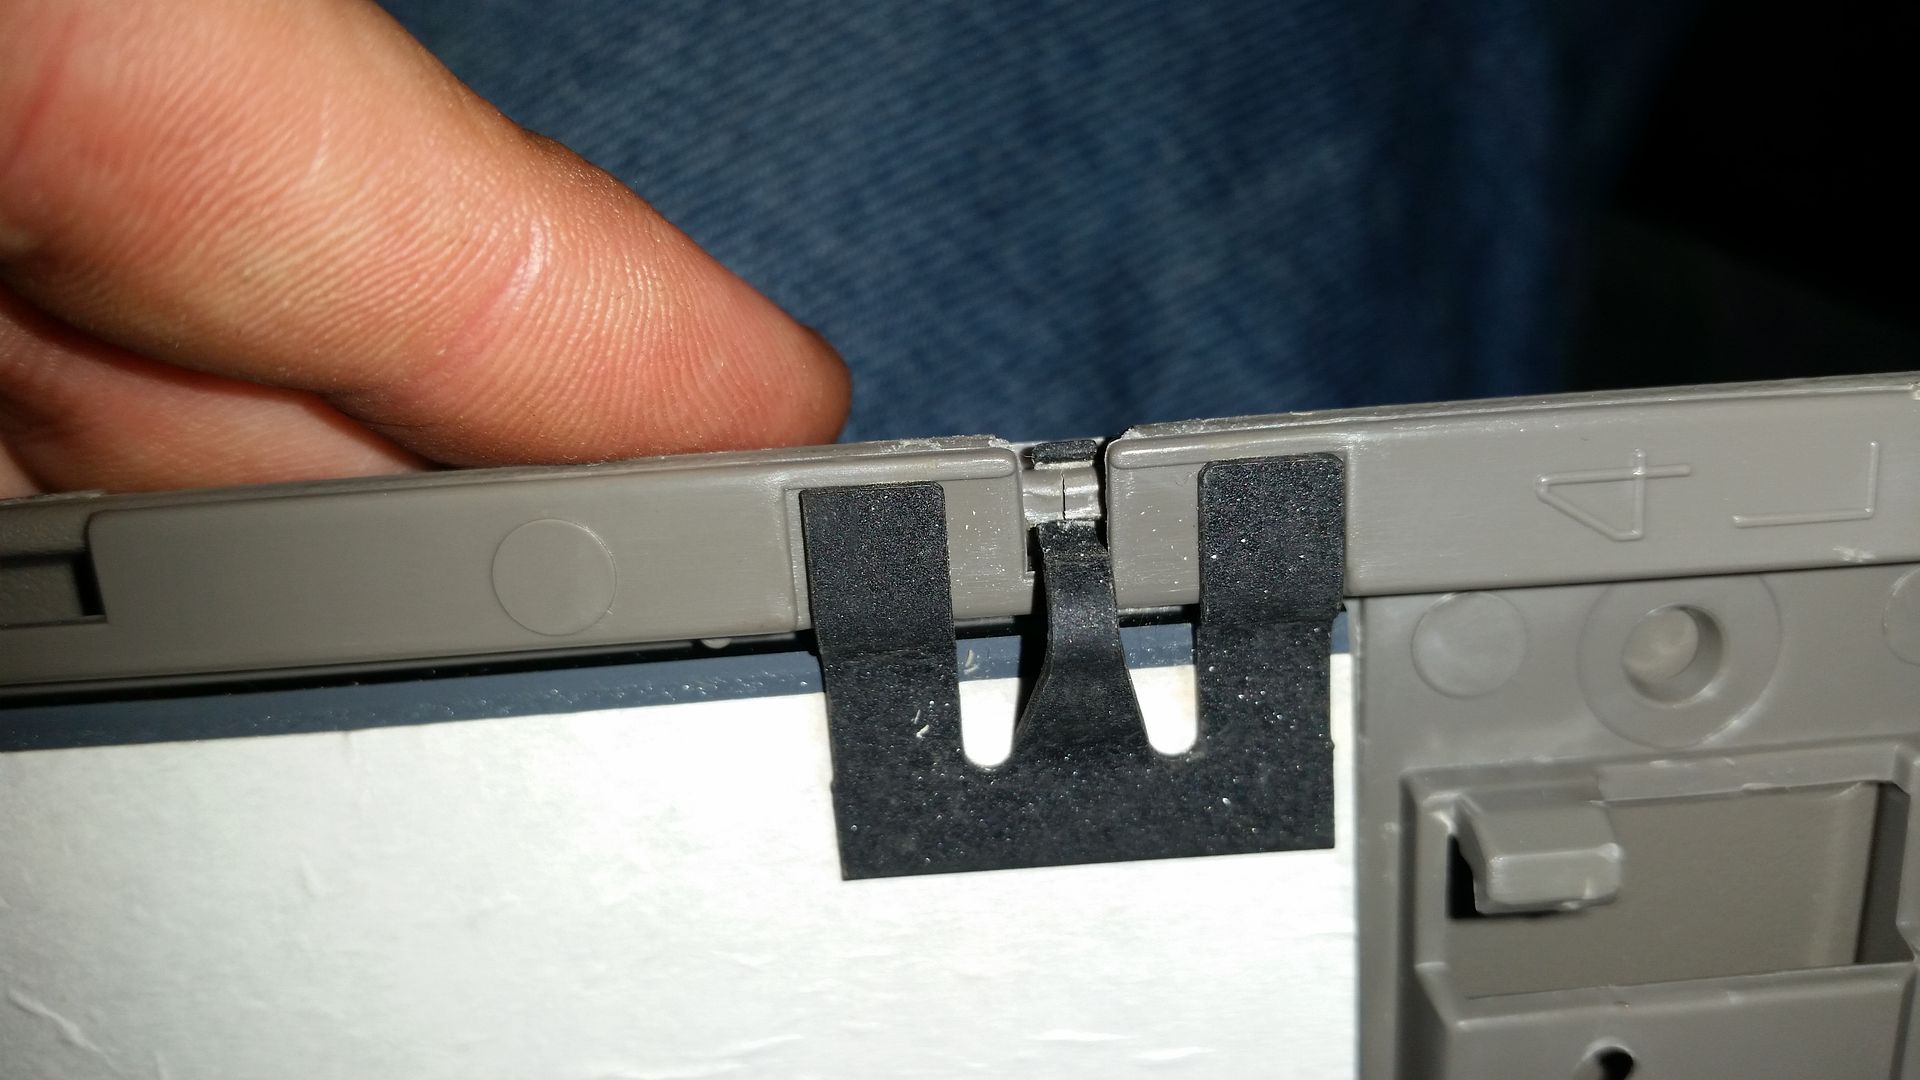
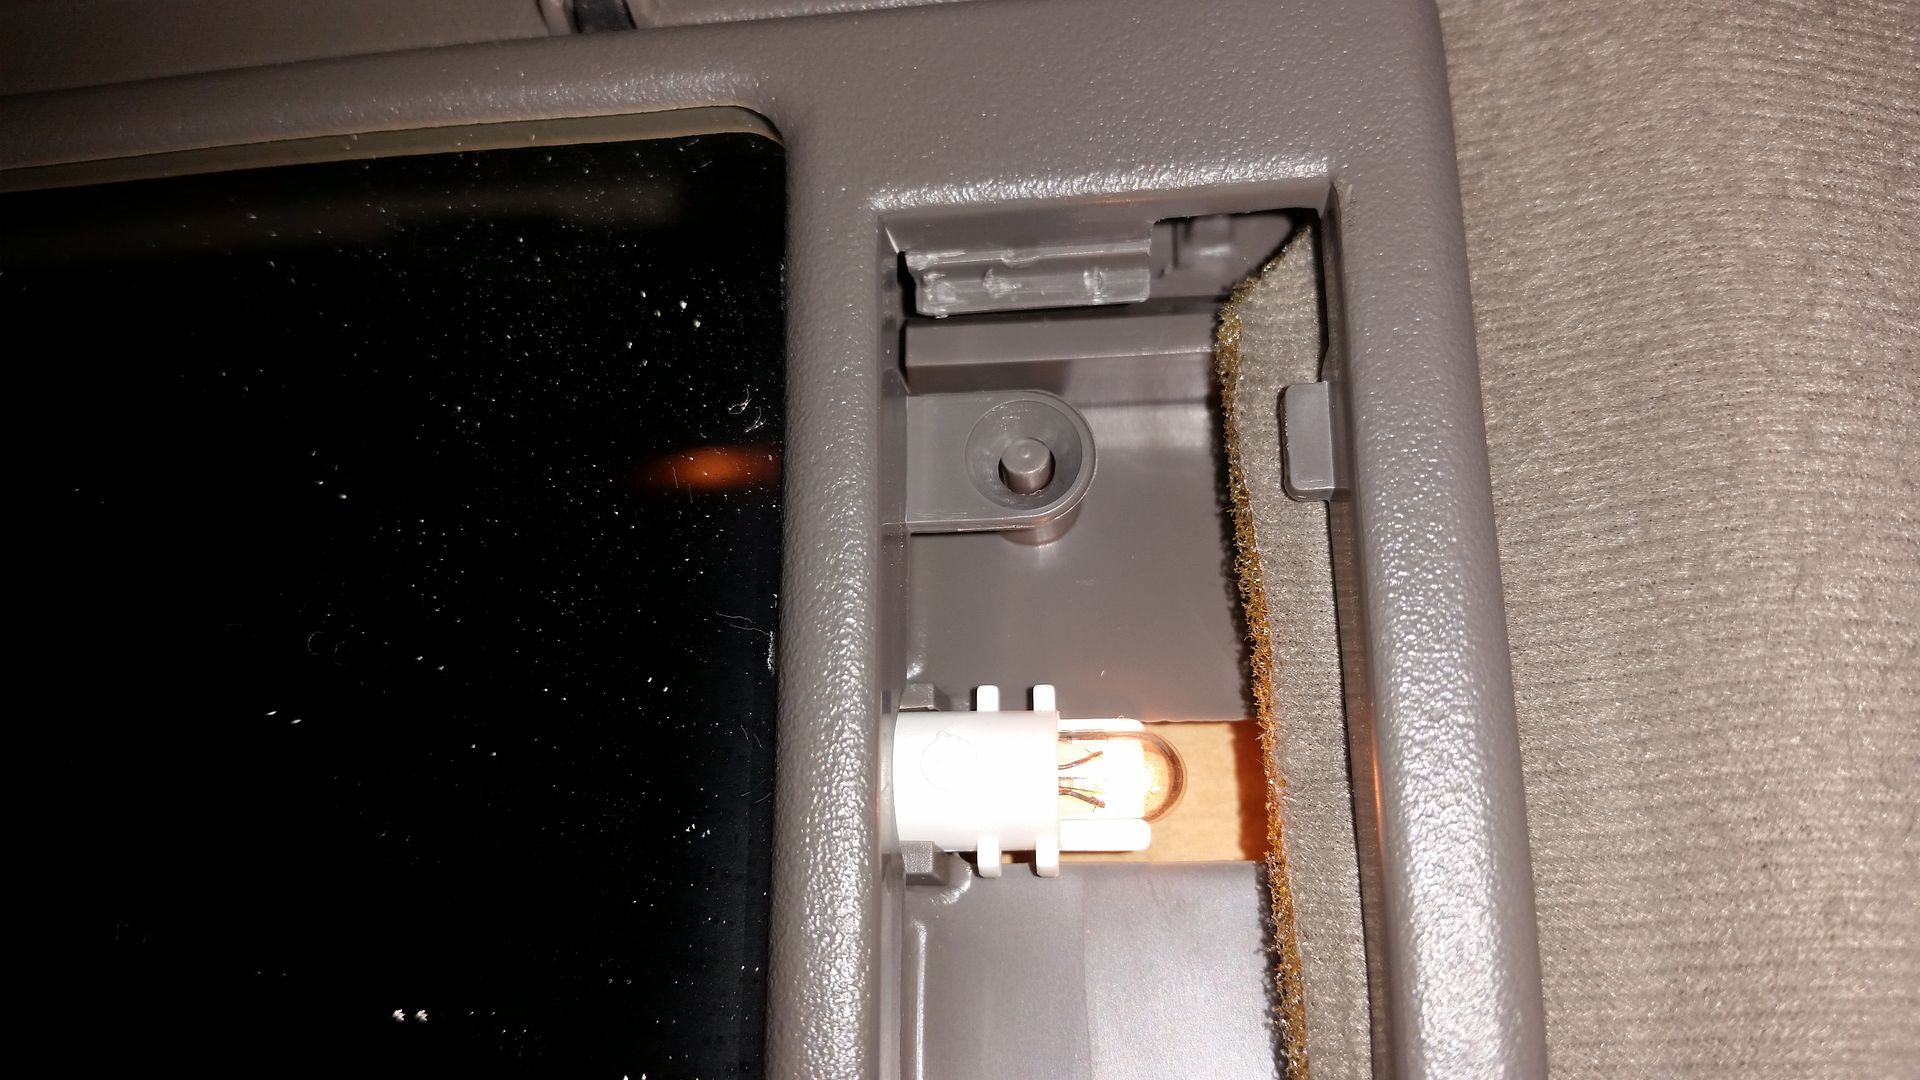
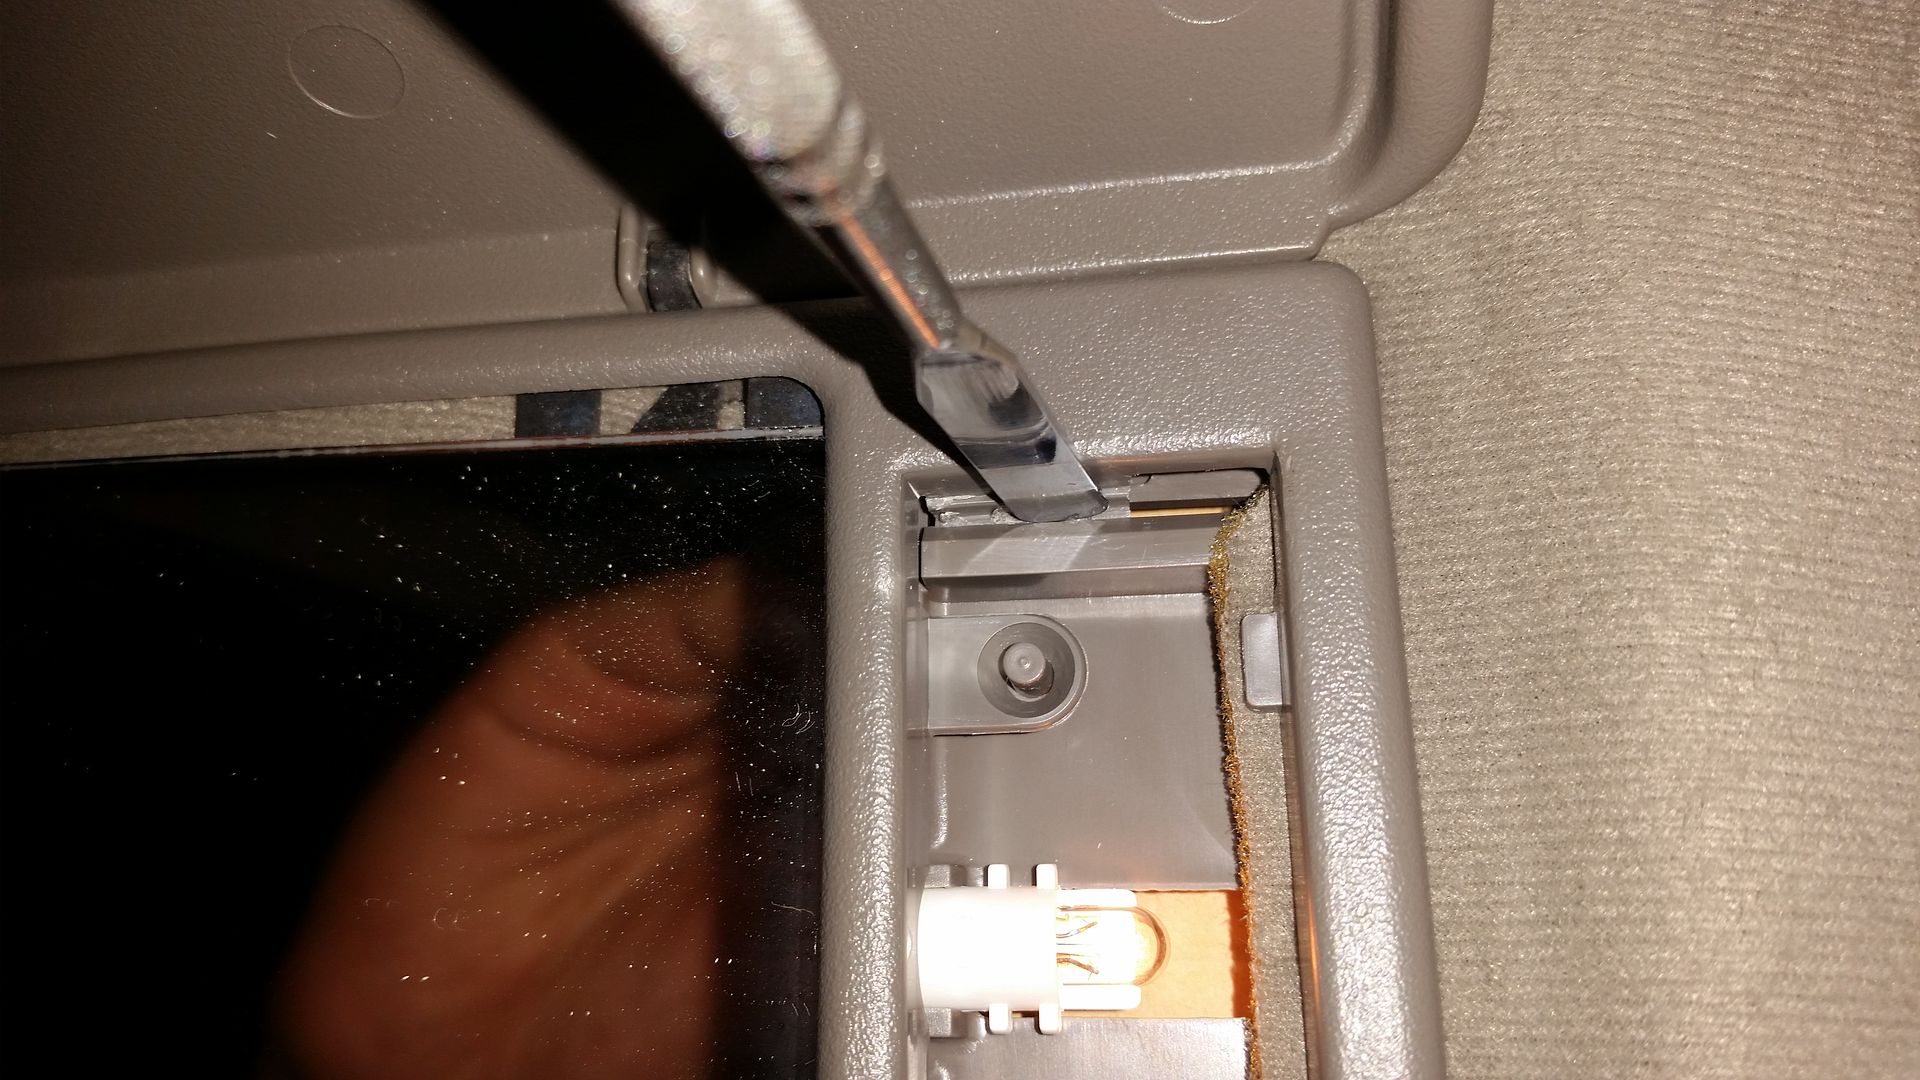
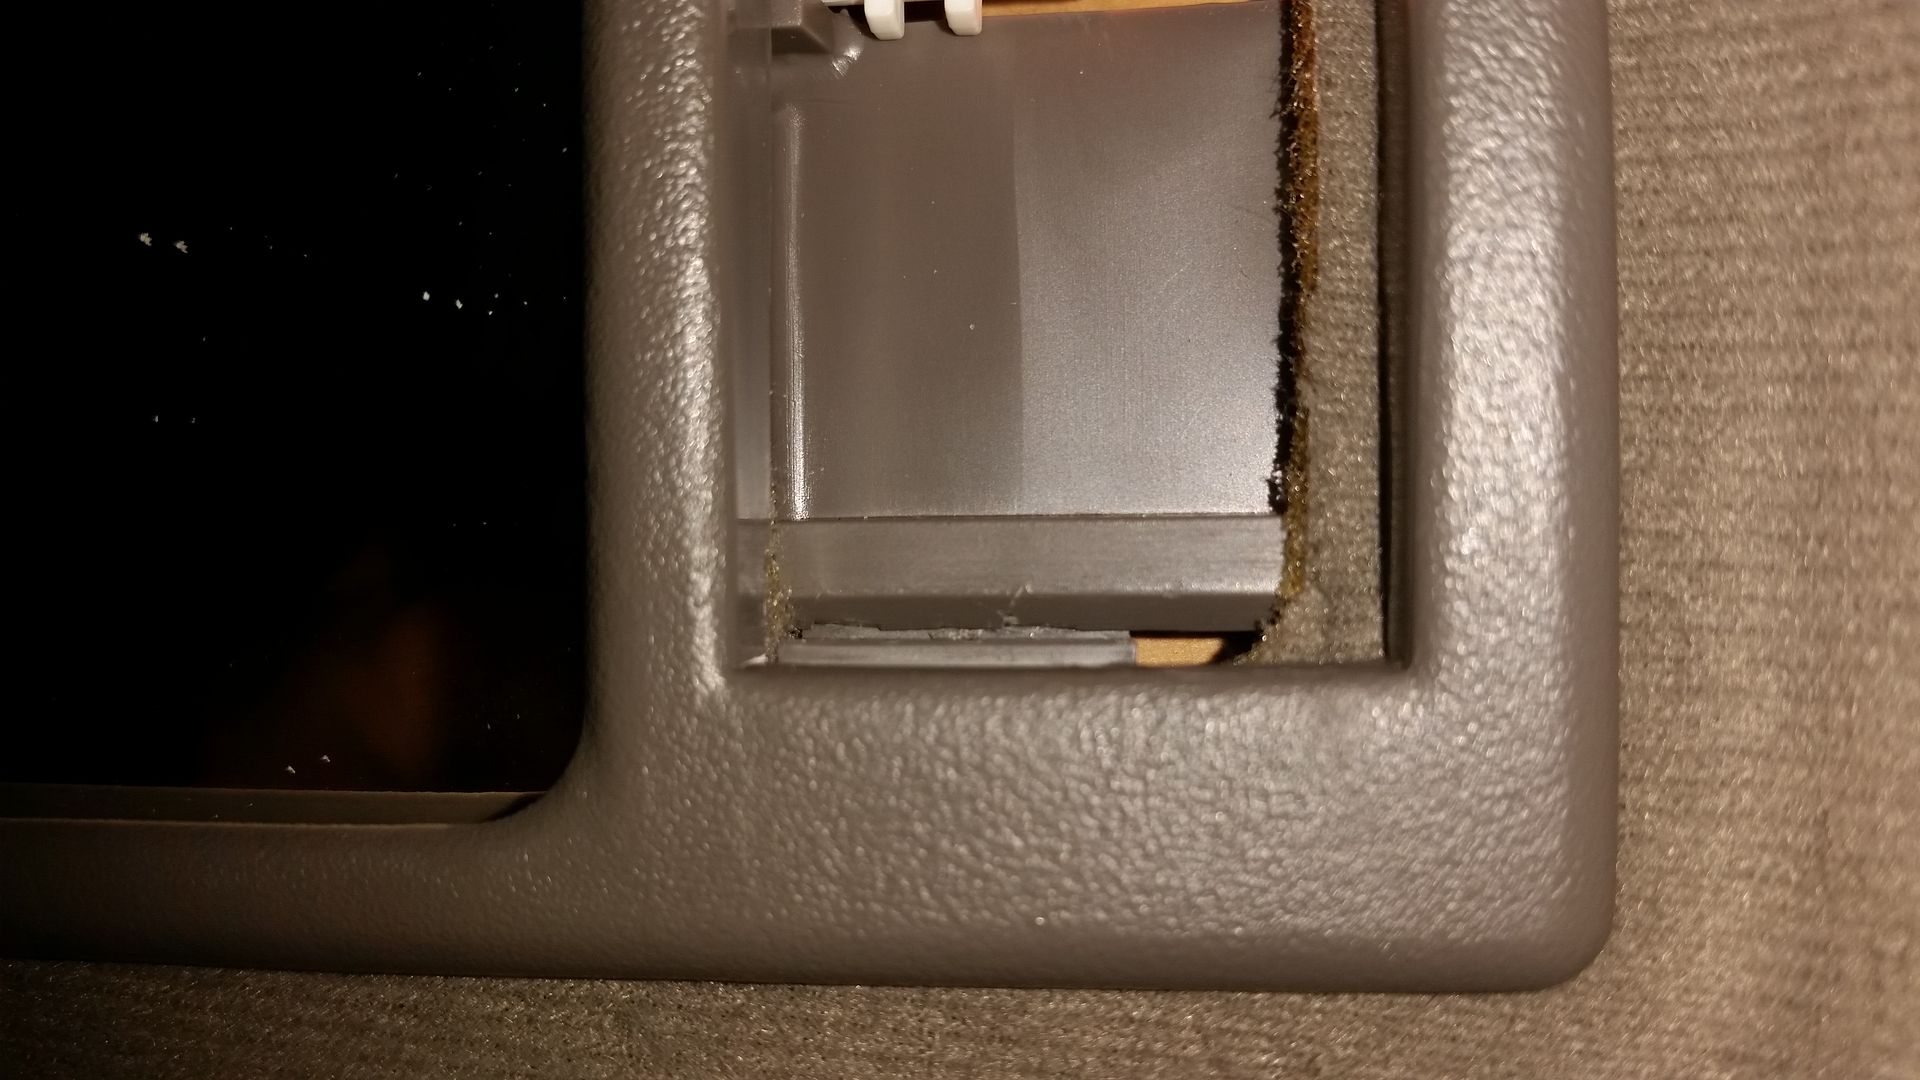
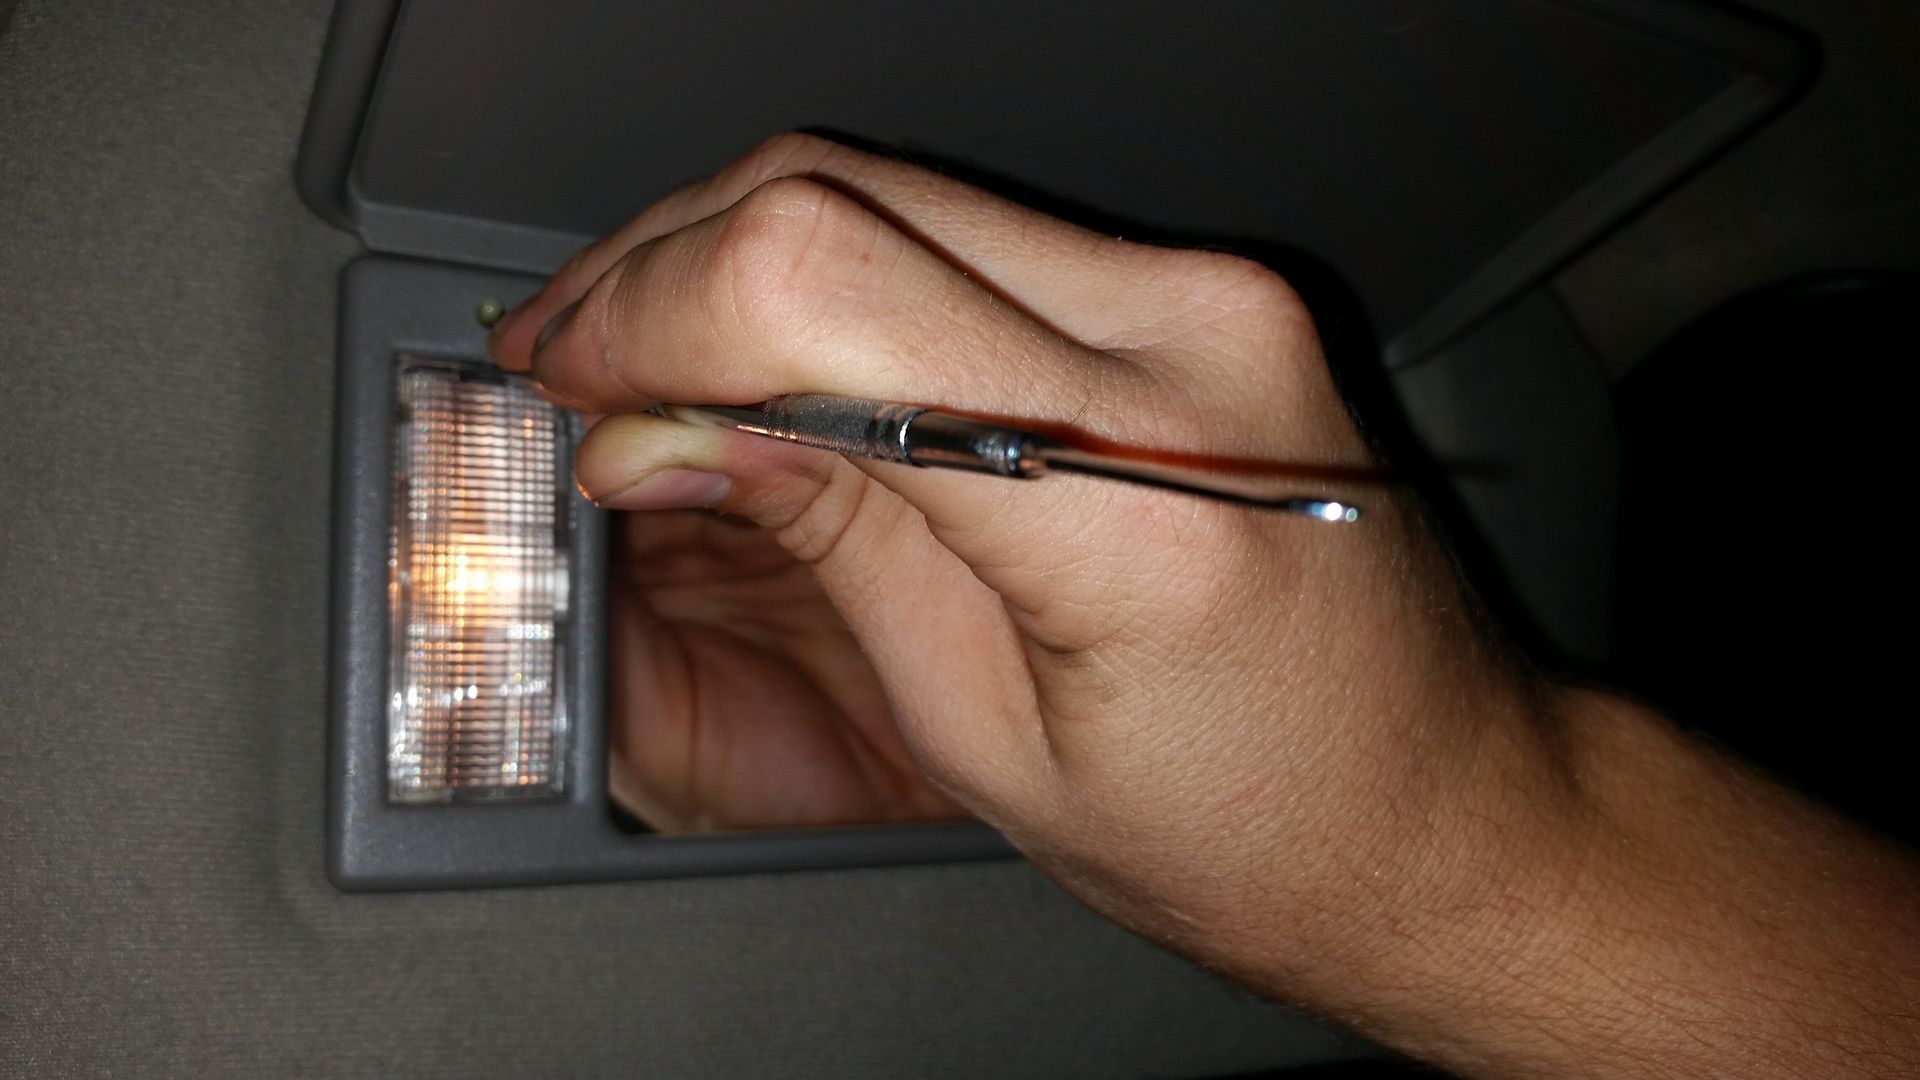
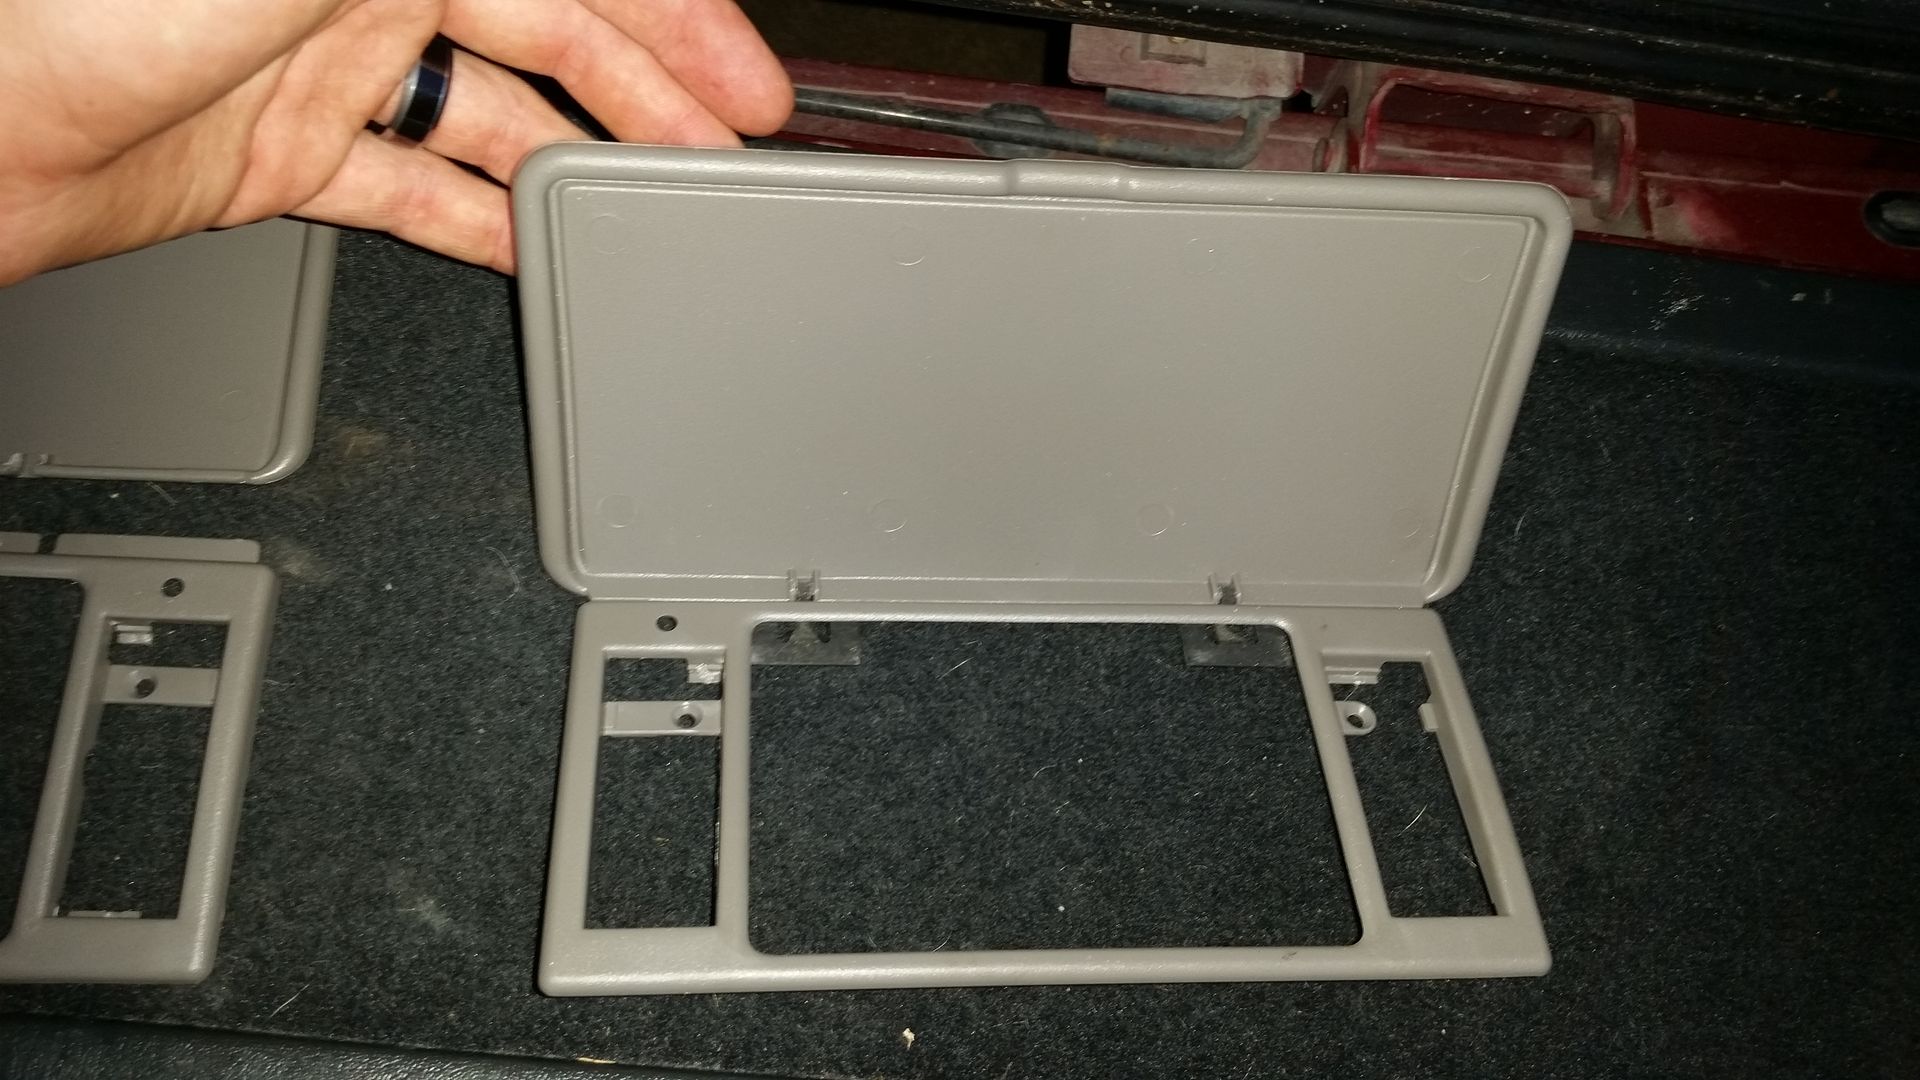
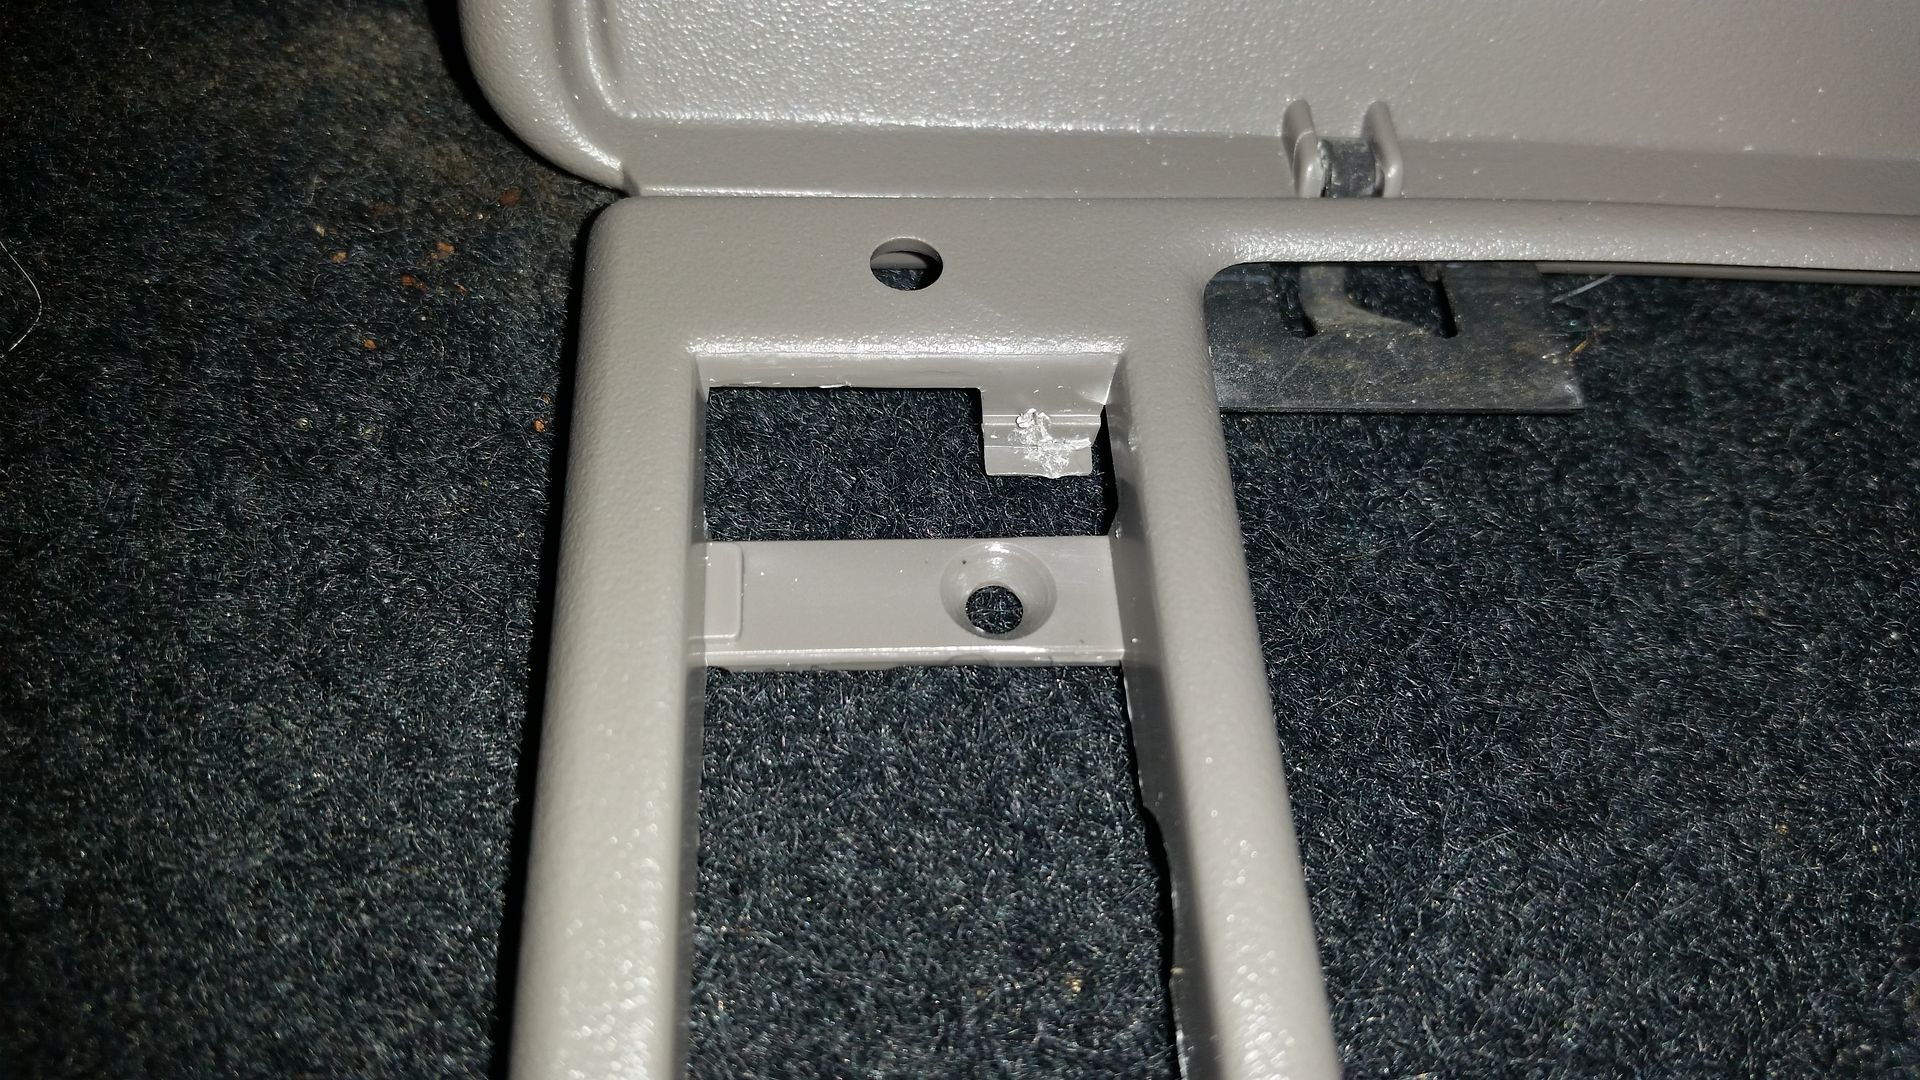
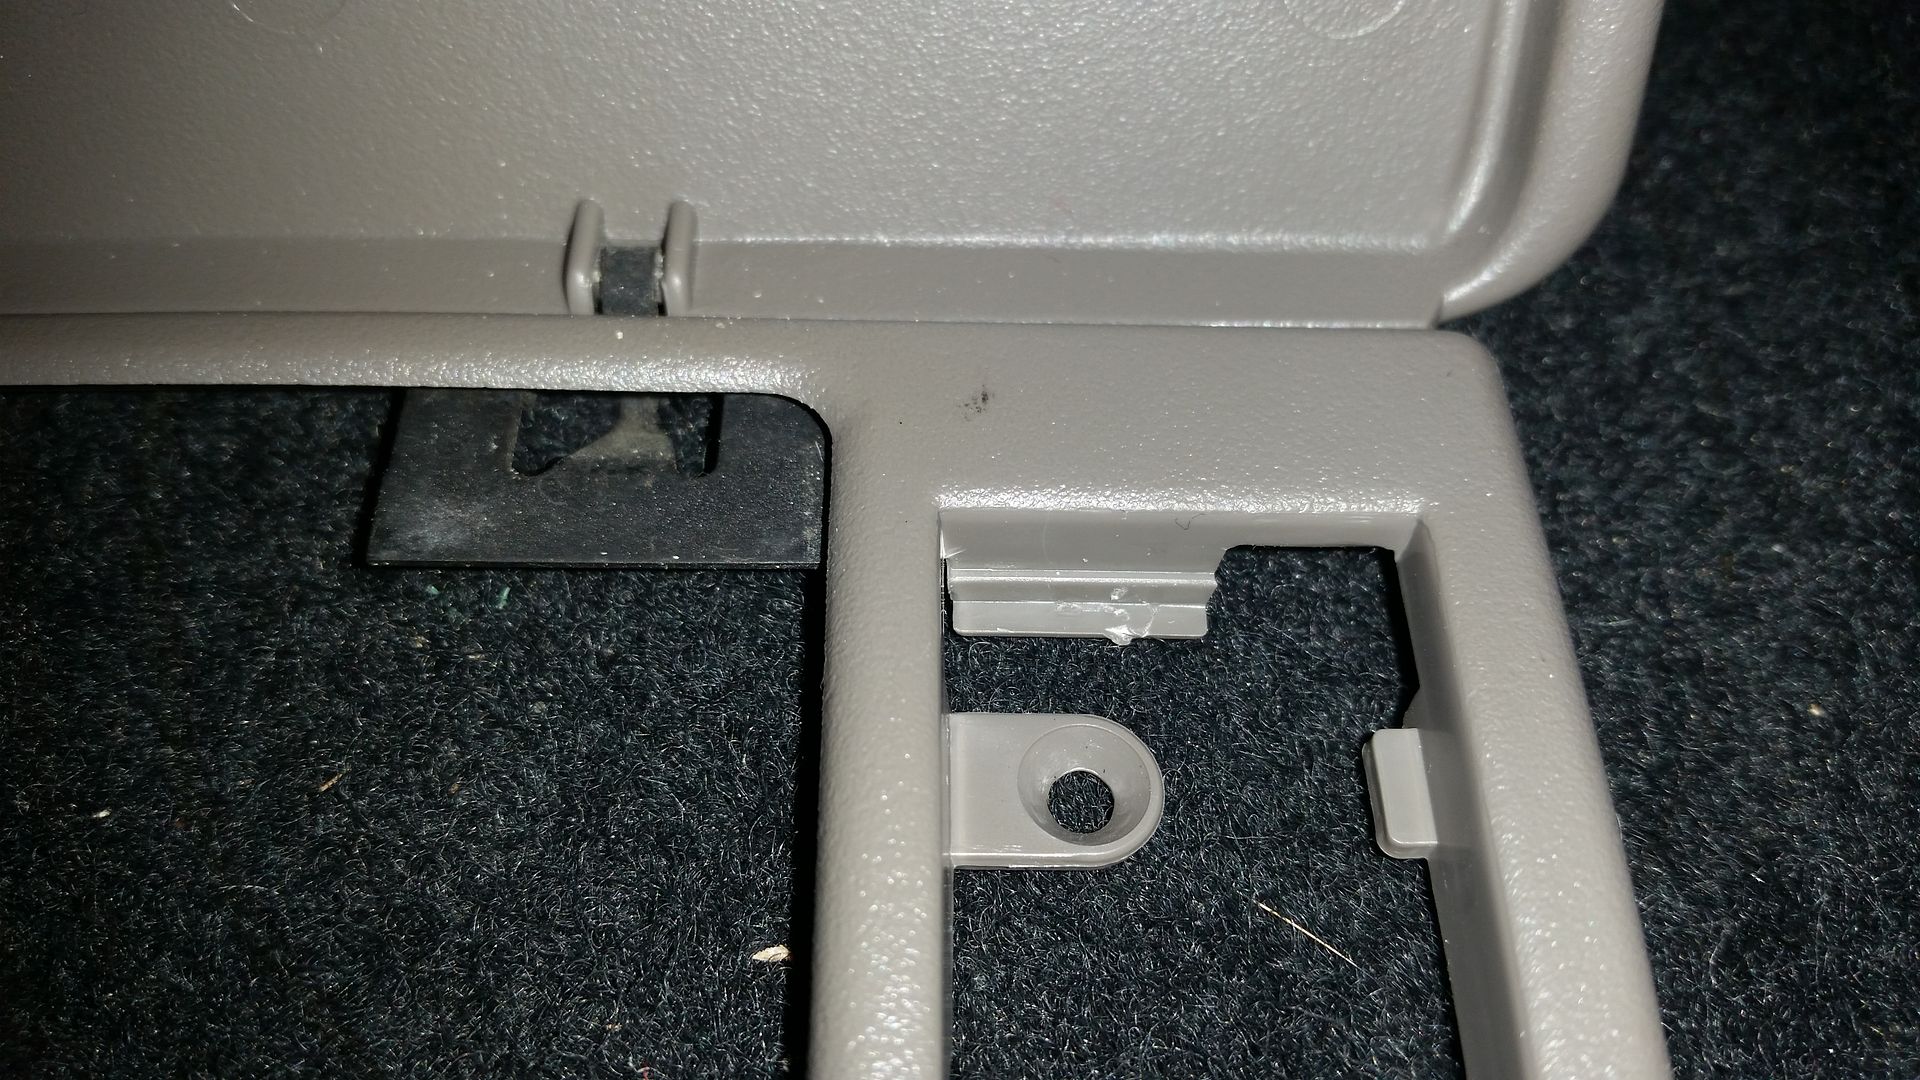
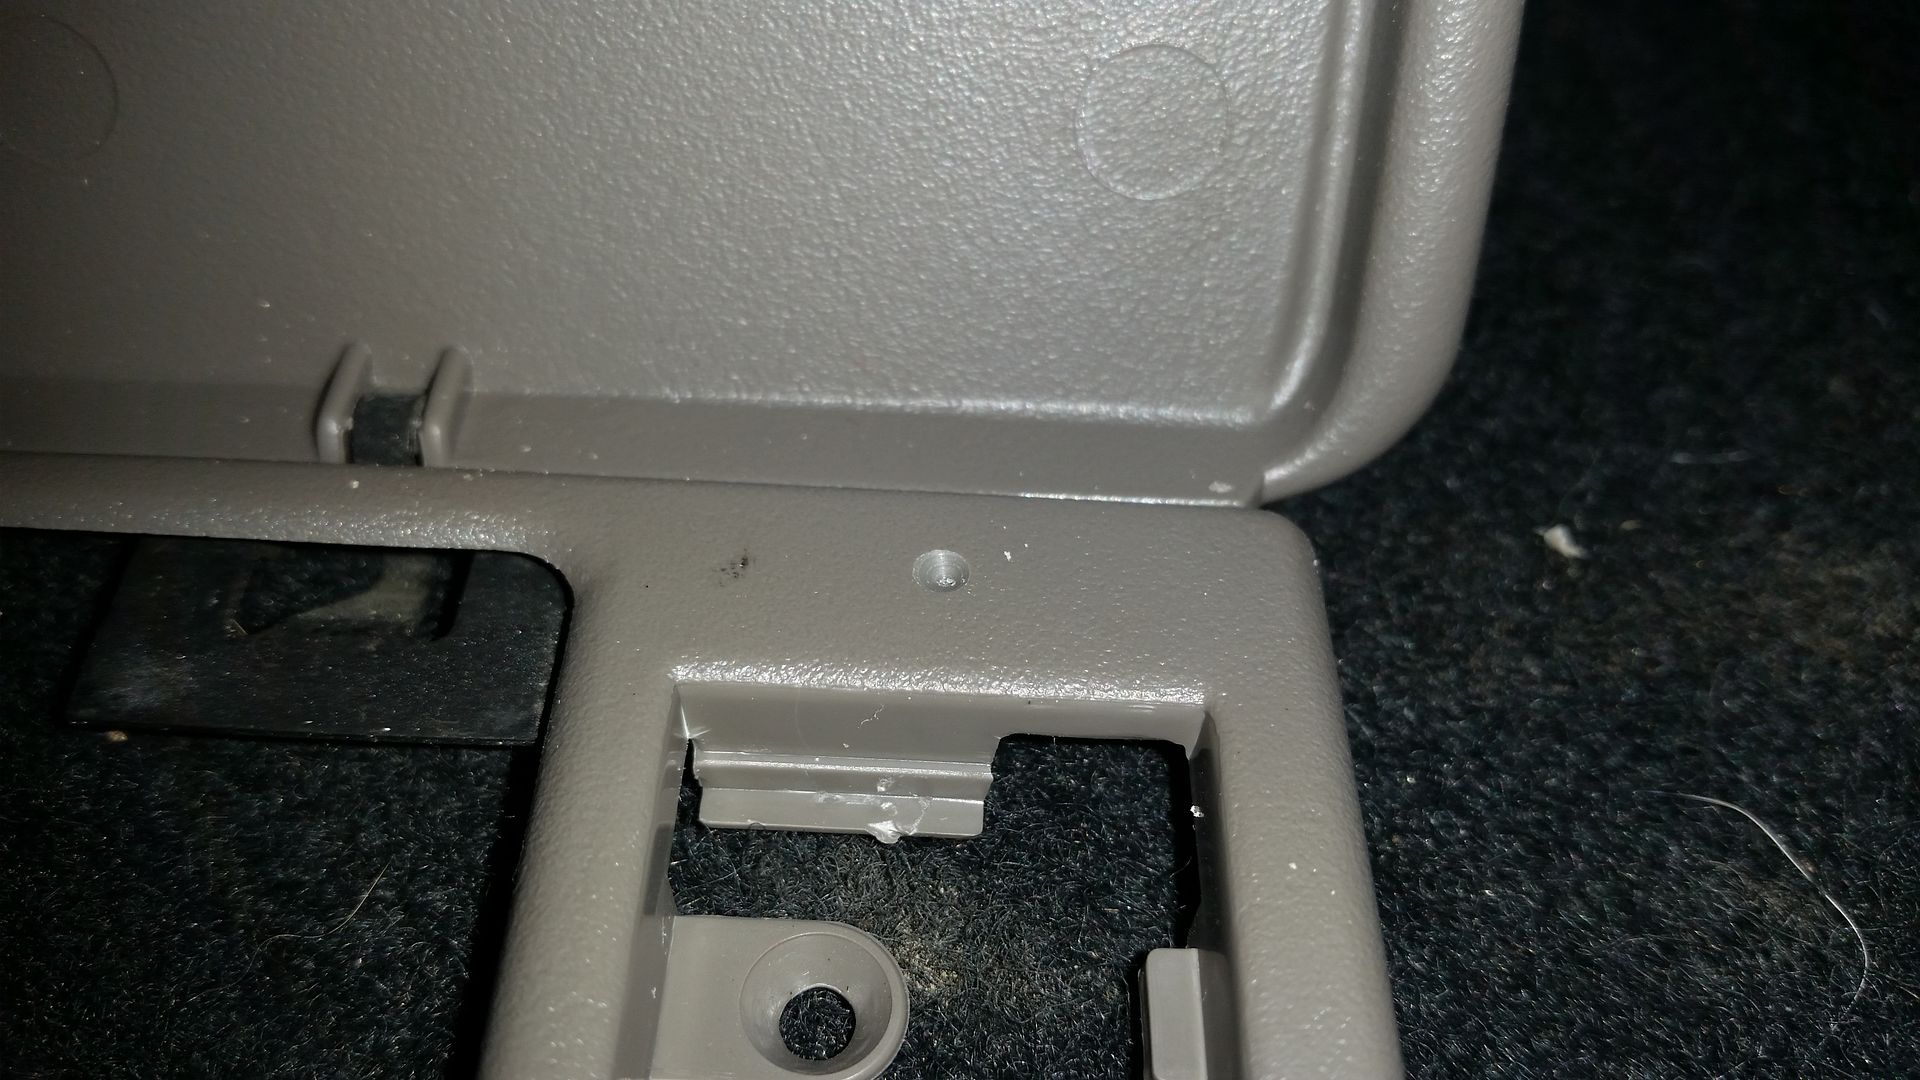
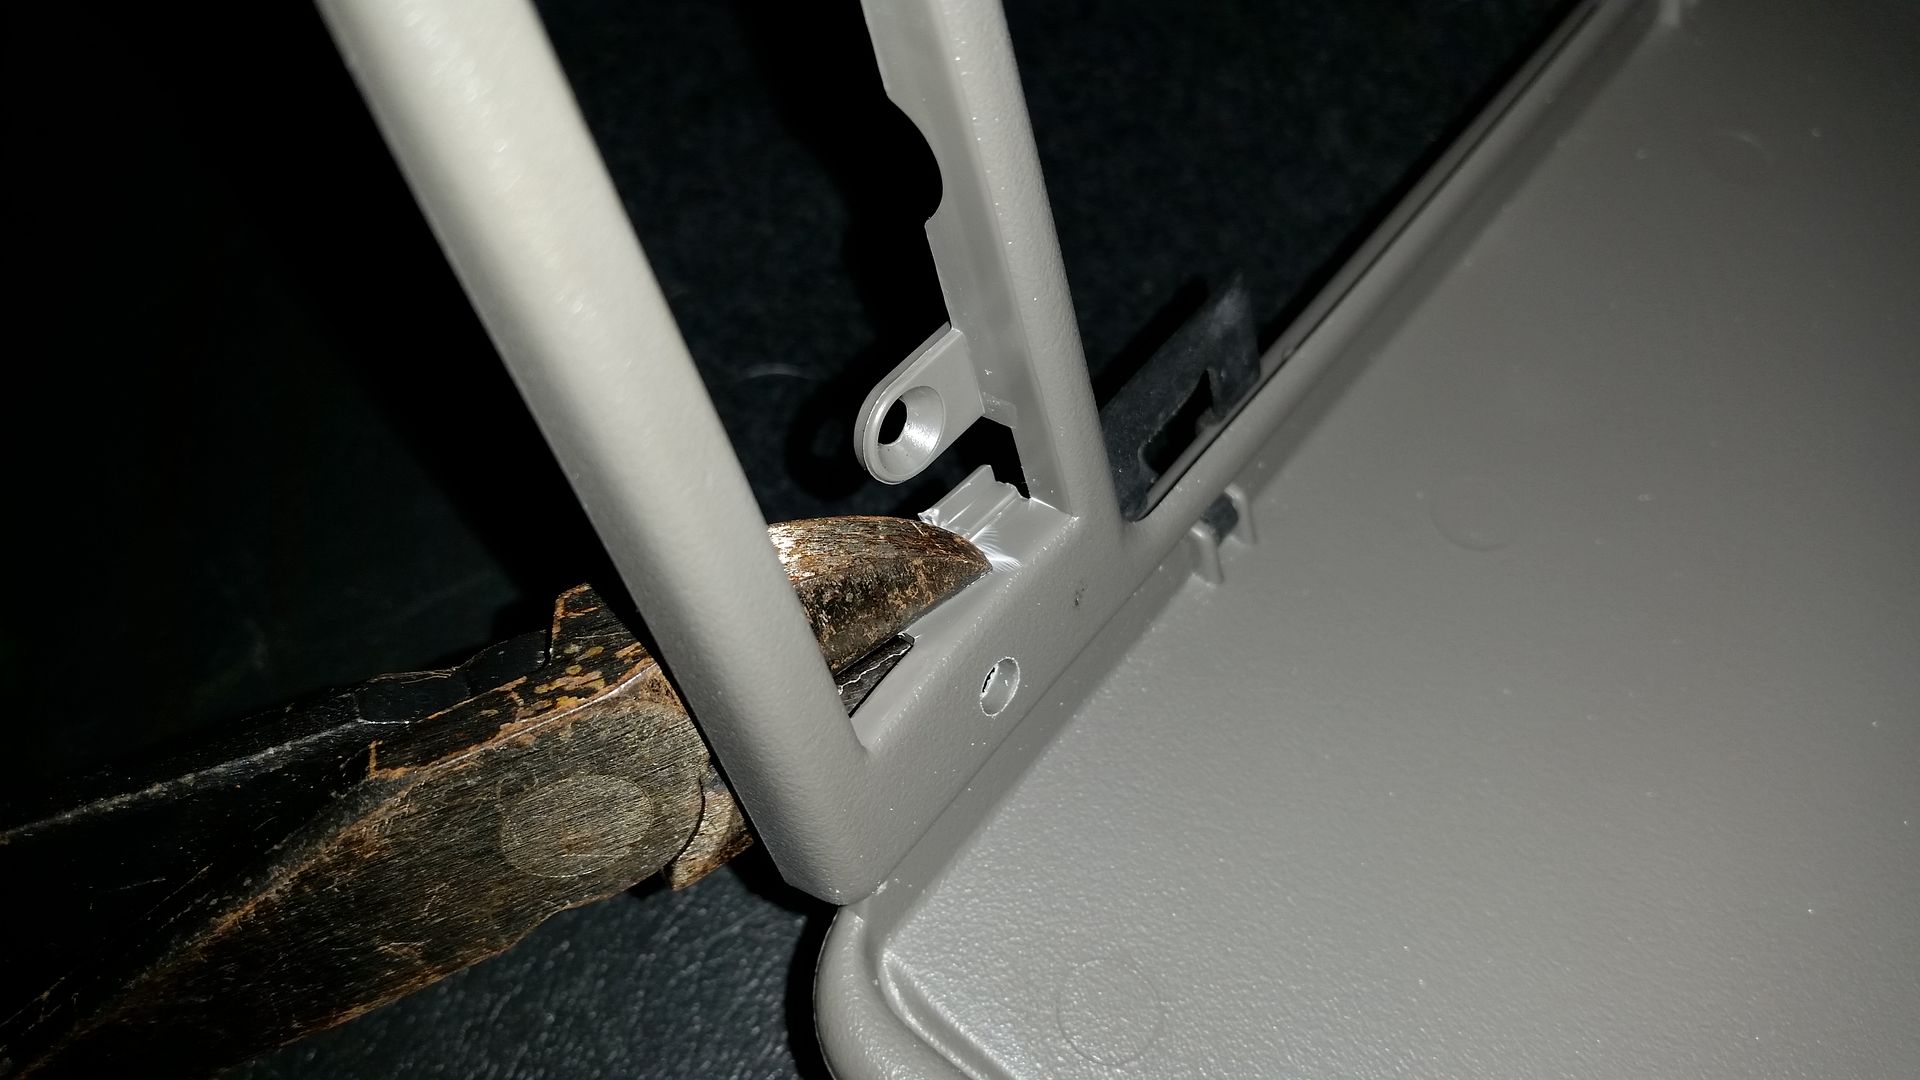
Now you can access the 4 clips that hold the assembly to the visor. Starting with the clip on the bottom side that's under the side with the pin that triggers the light to come on, insert the spudger as shown here:
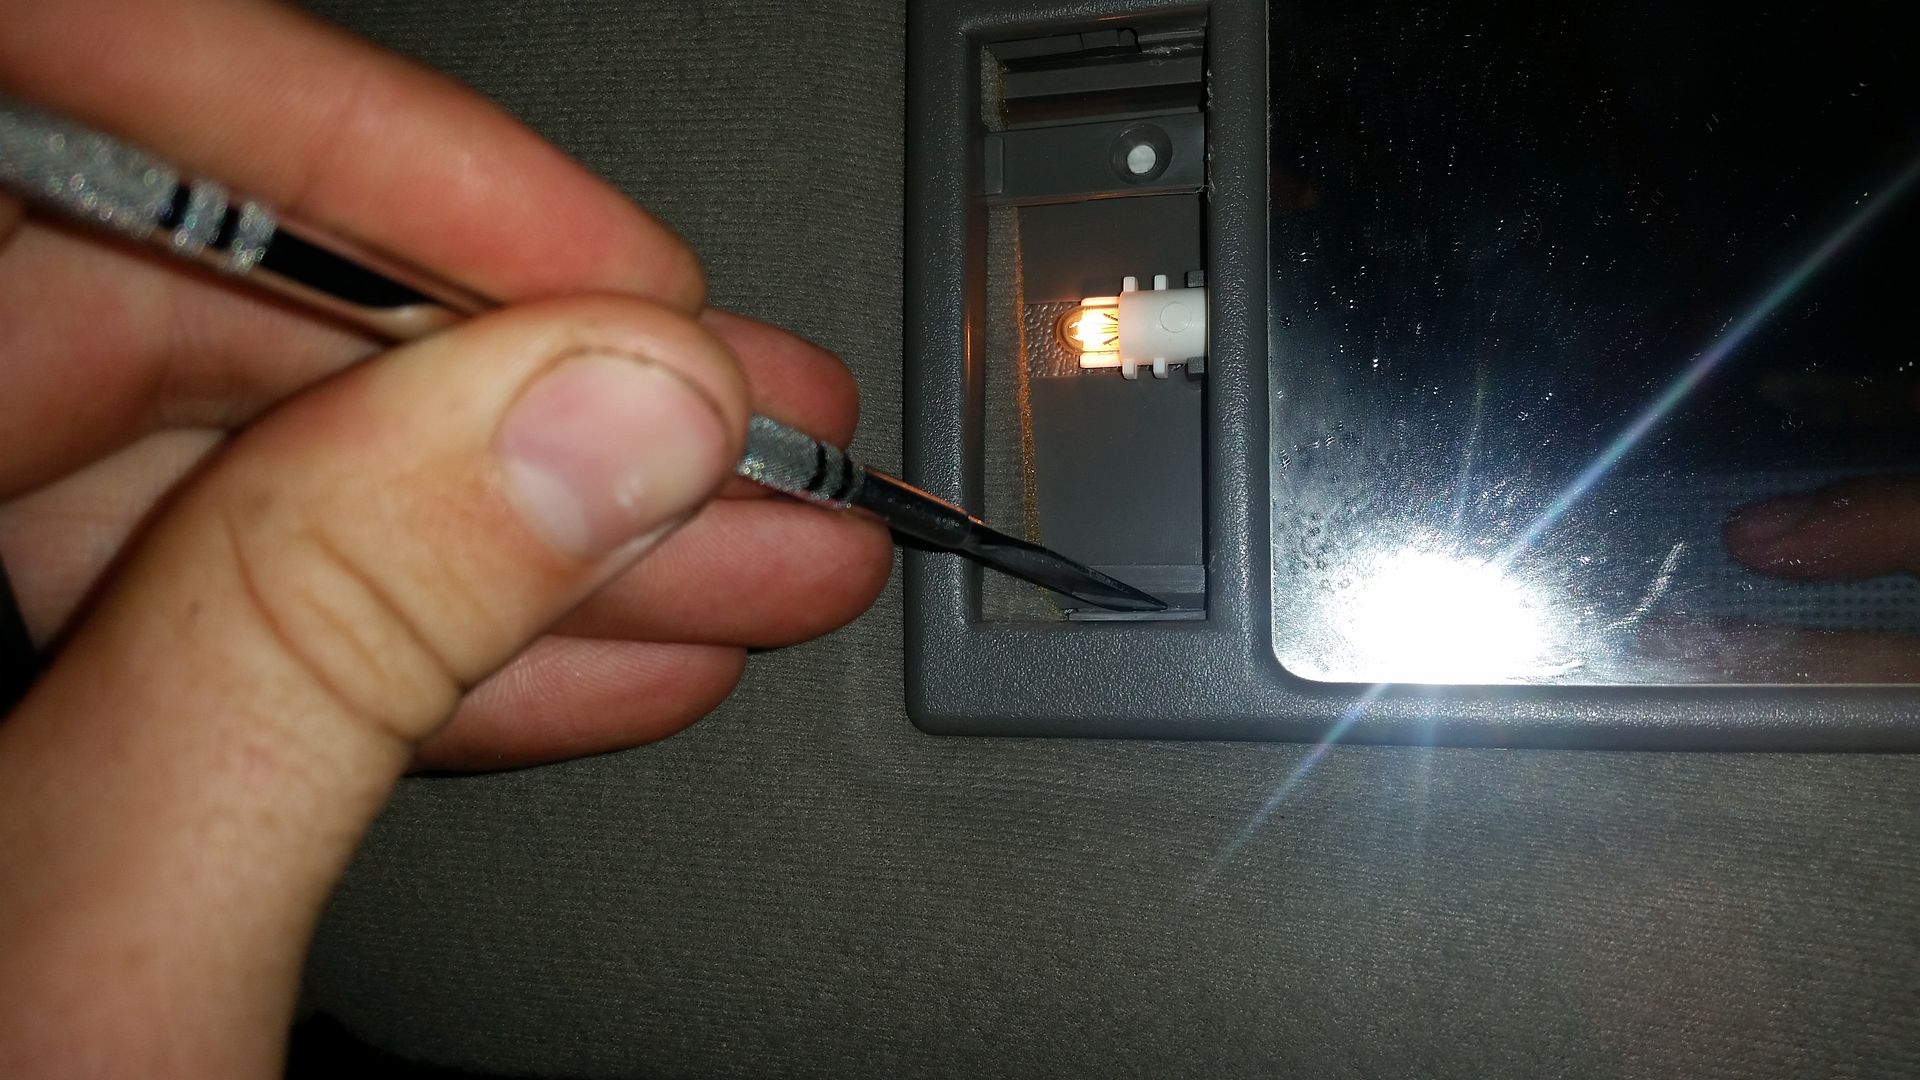
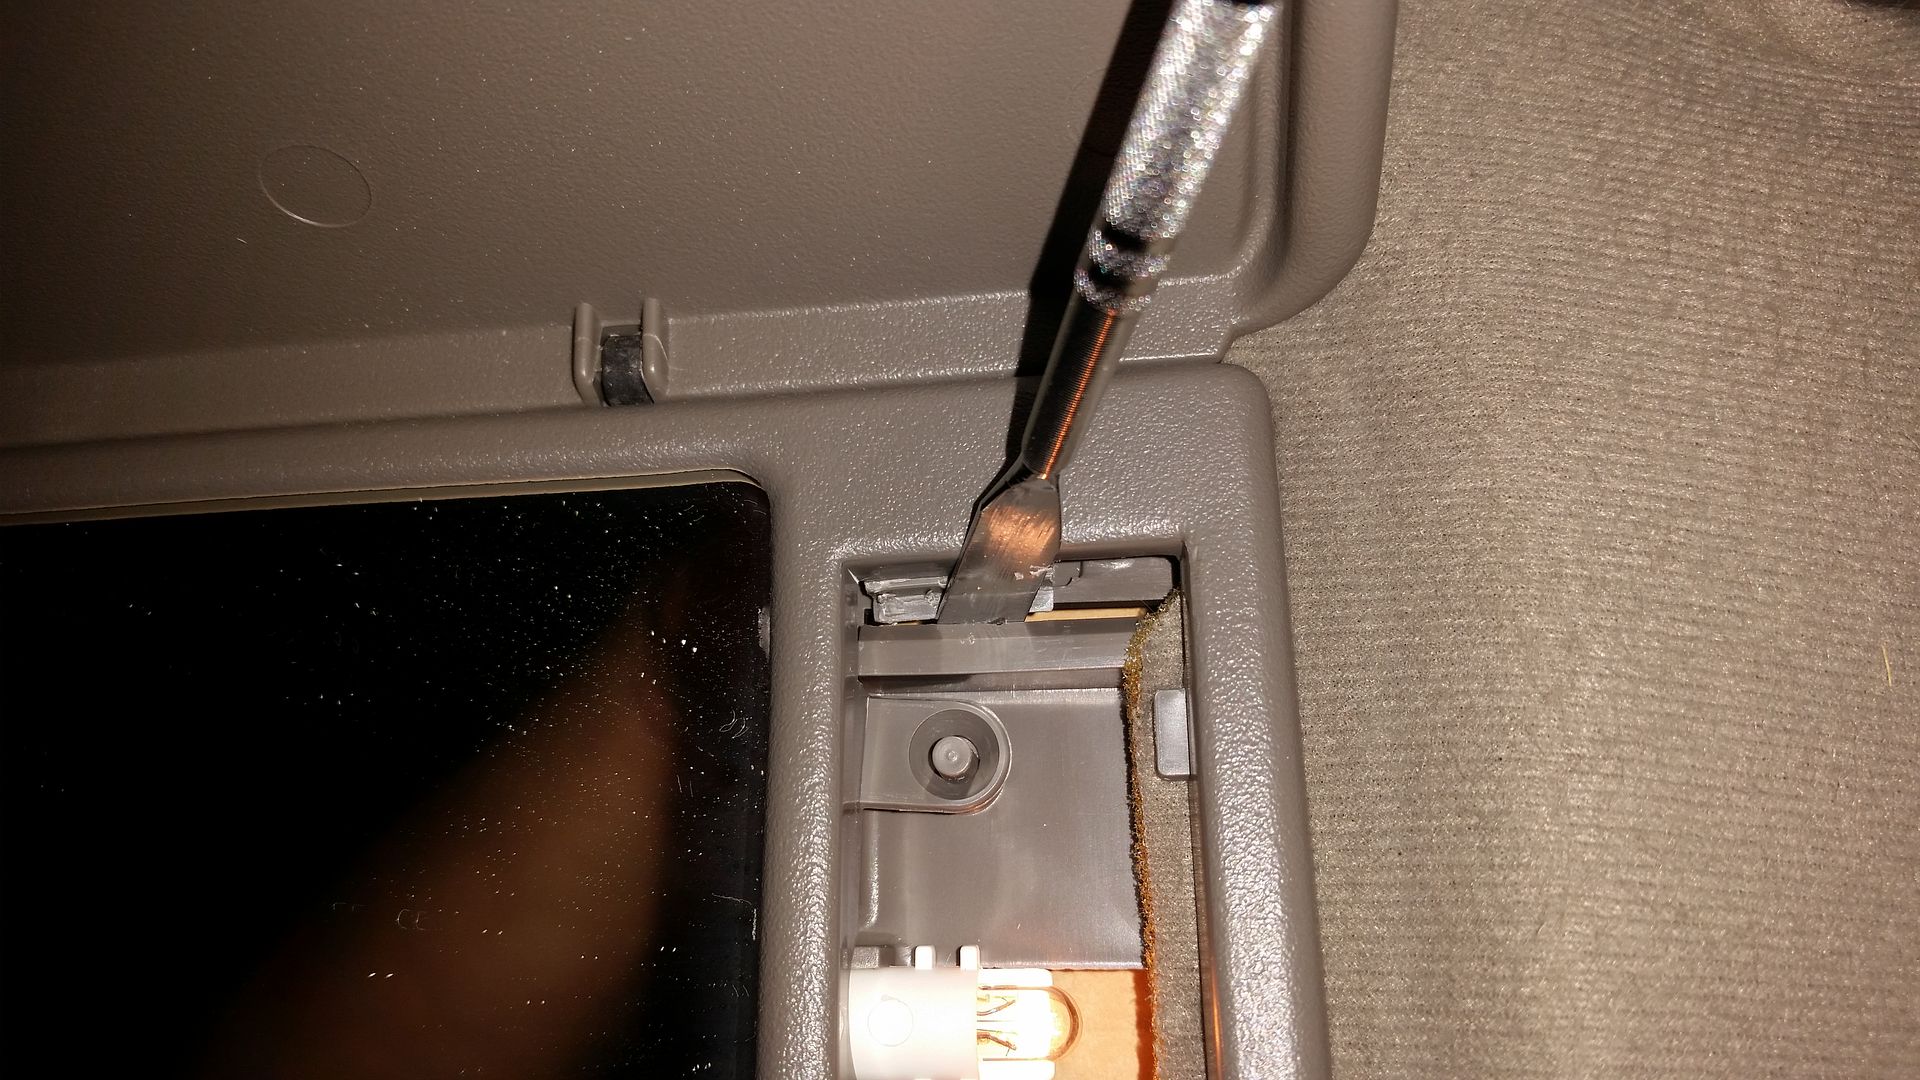
Gently pry down and push in at the same time. This will get the spudger to release the clip and get between the vanity assembly and the visor parts of the clip.
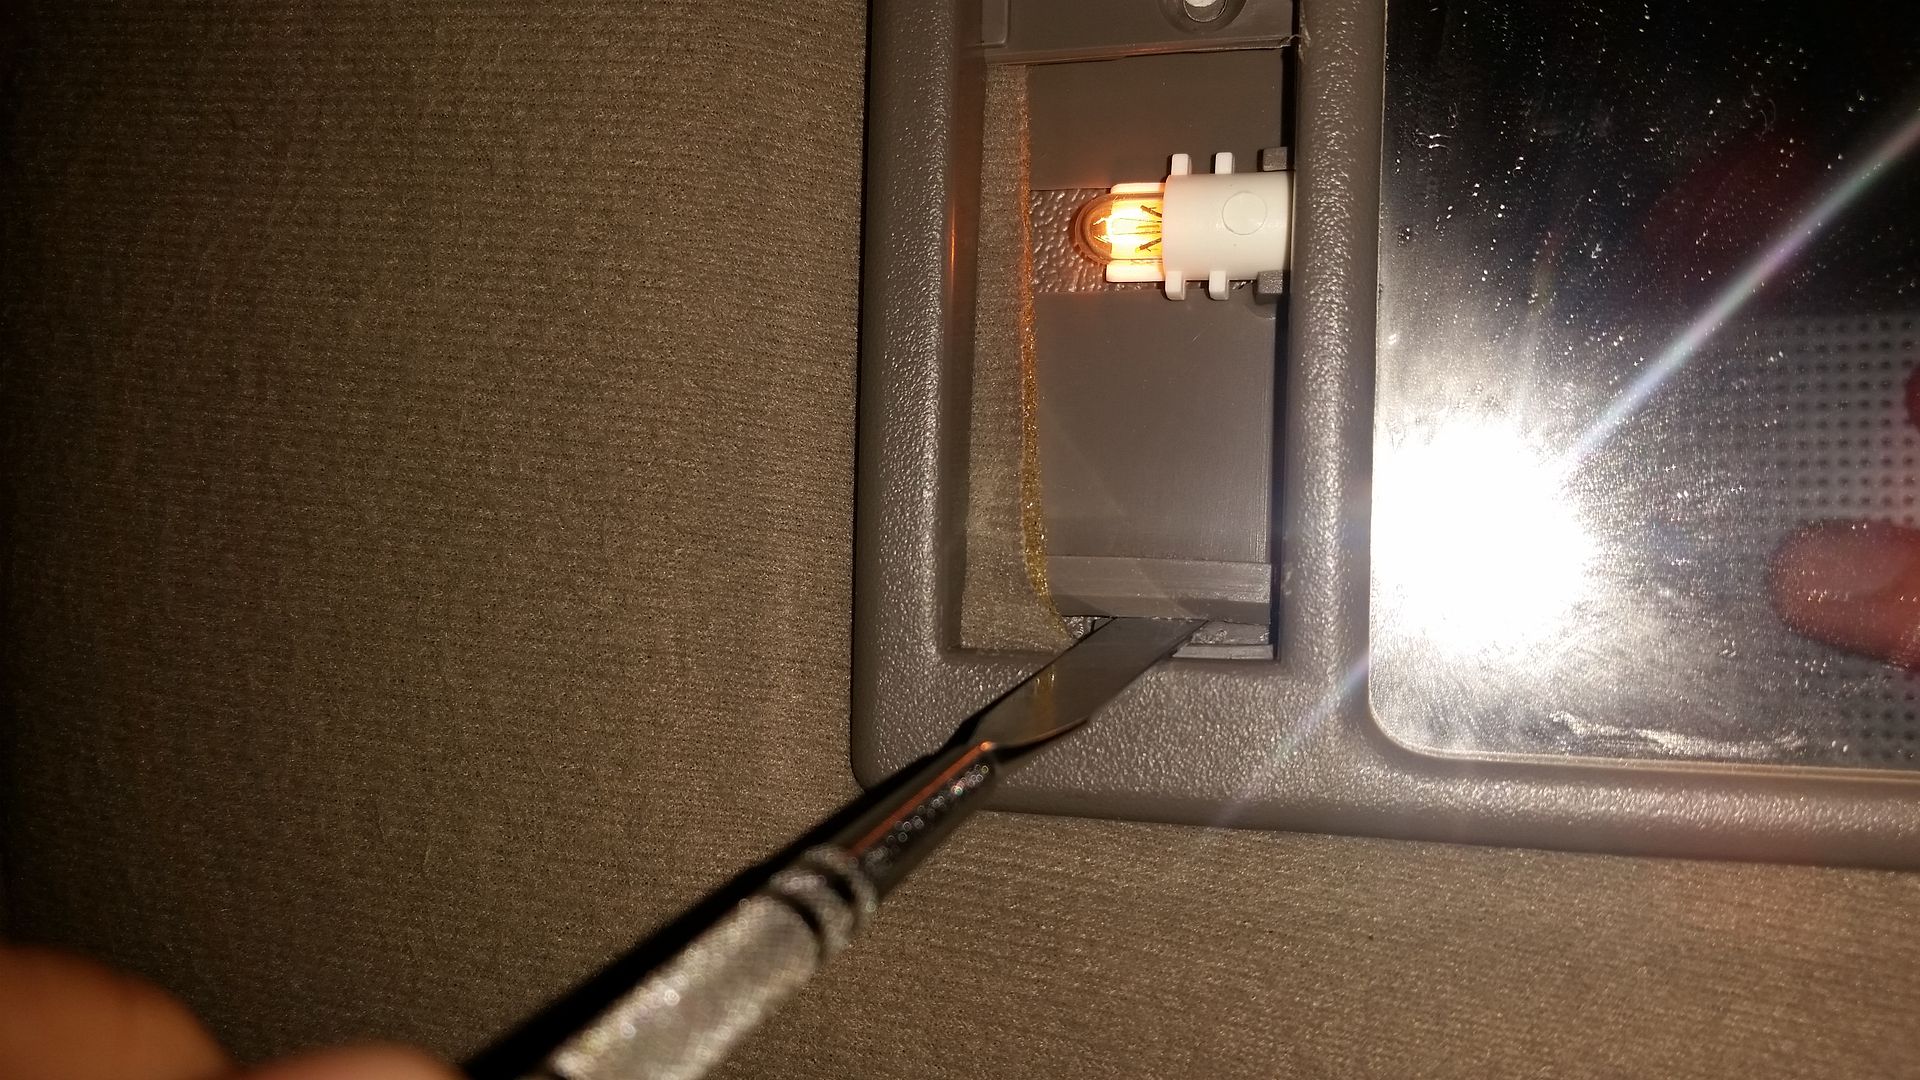
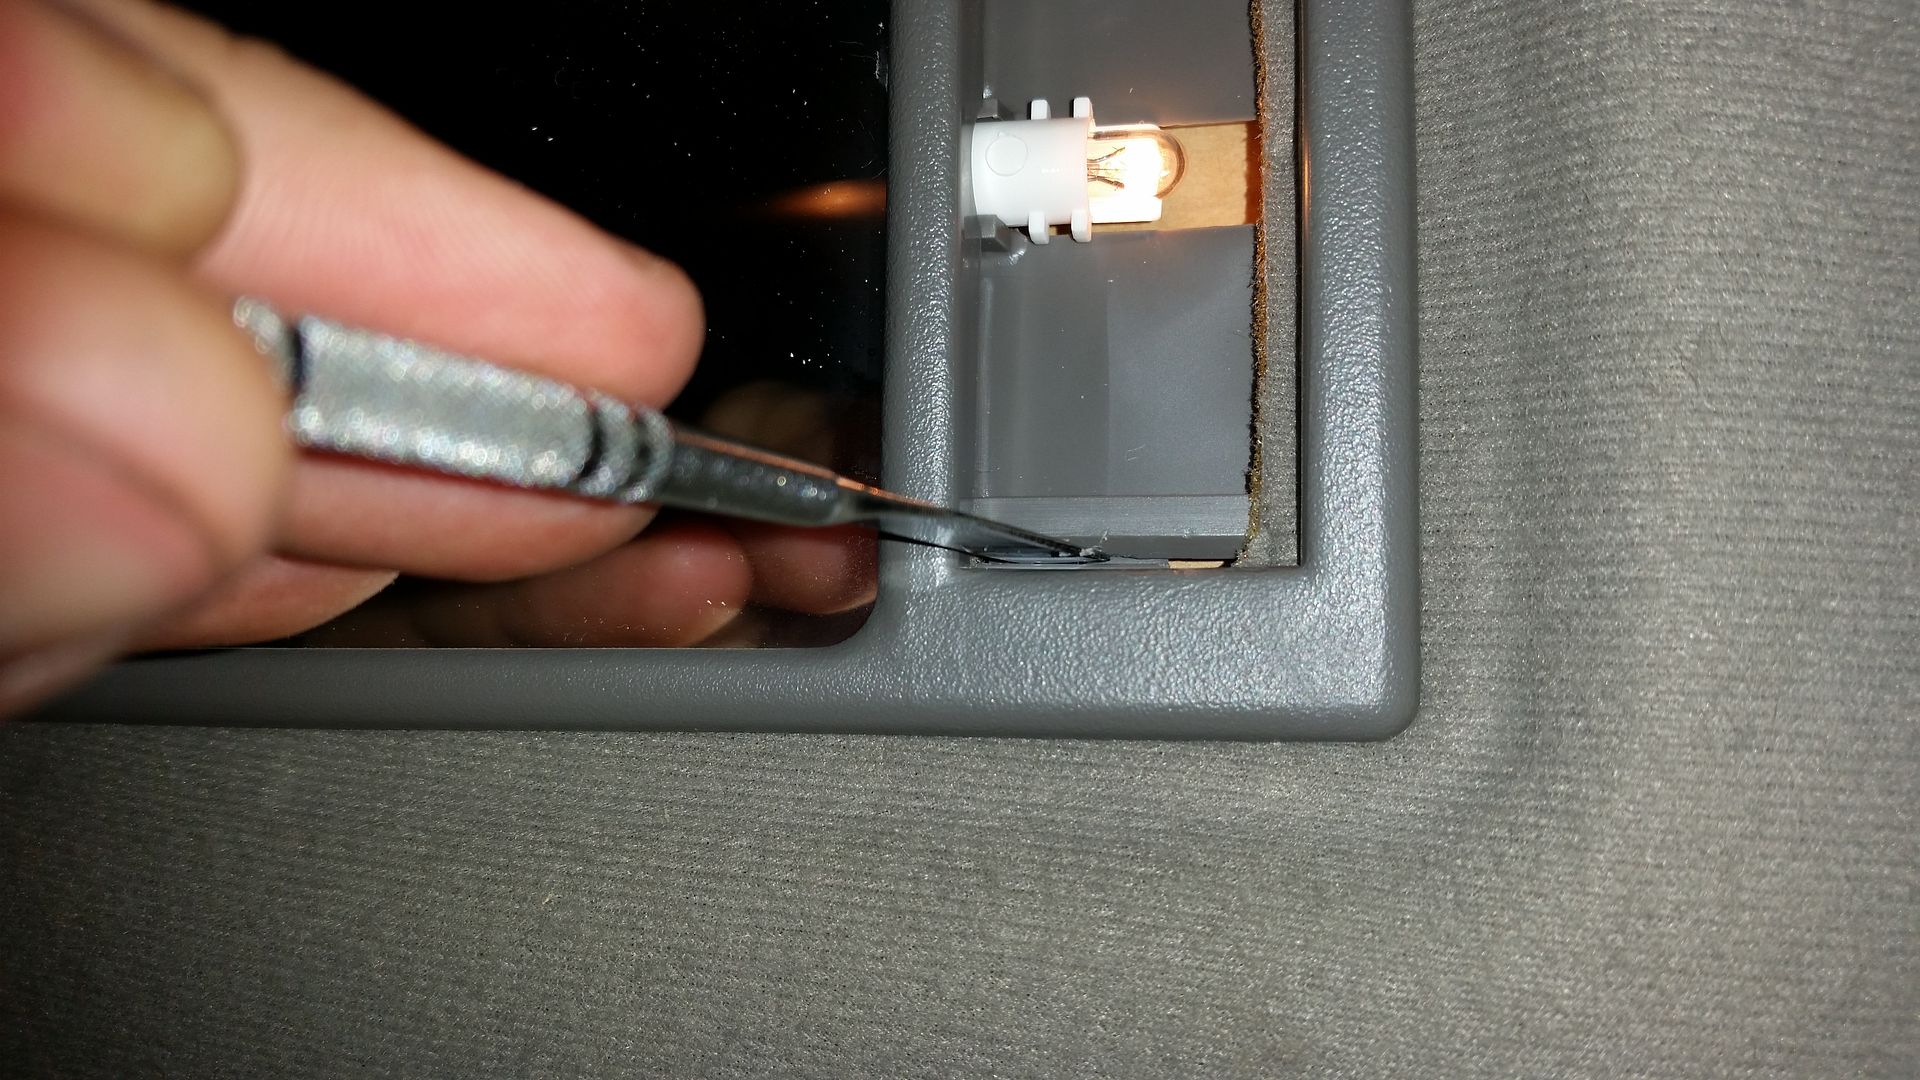
Then a gently pry upwards will fully release the clip and the vanity from that part of the visor.
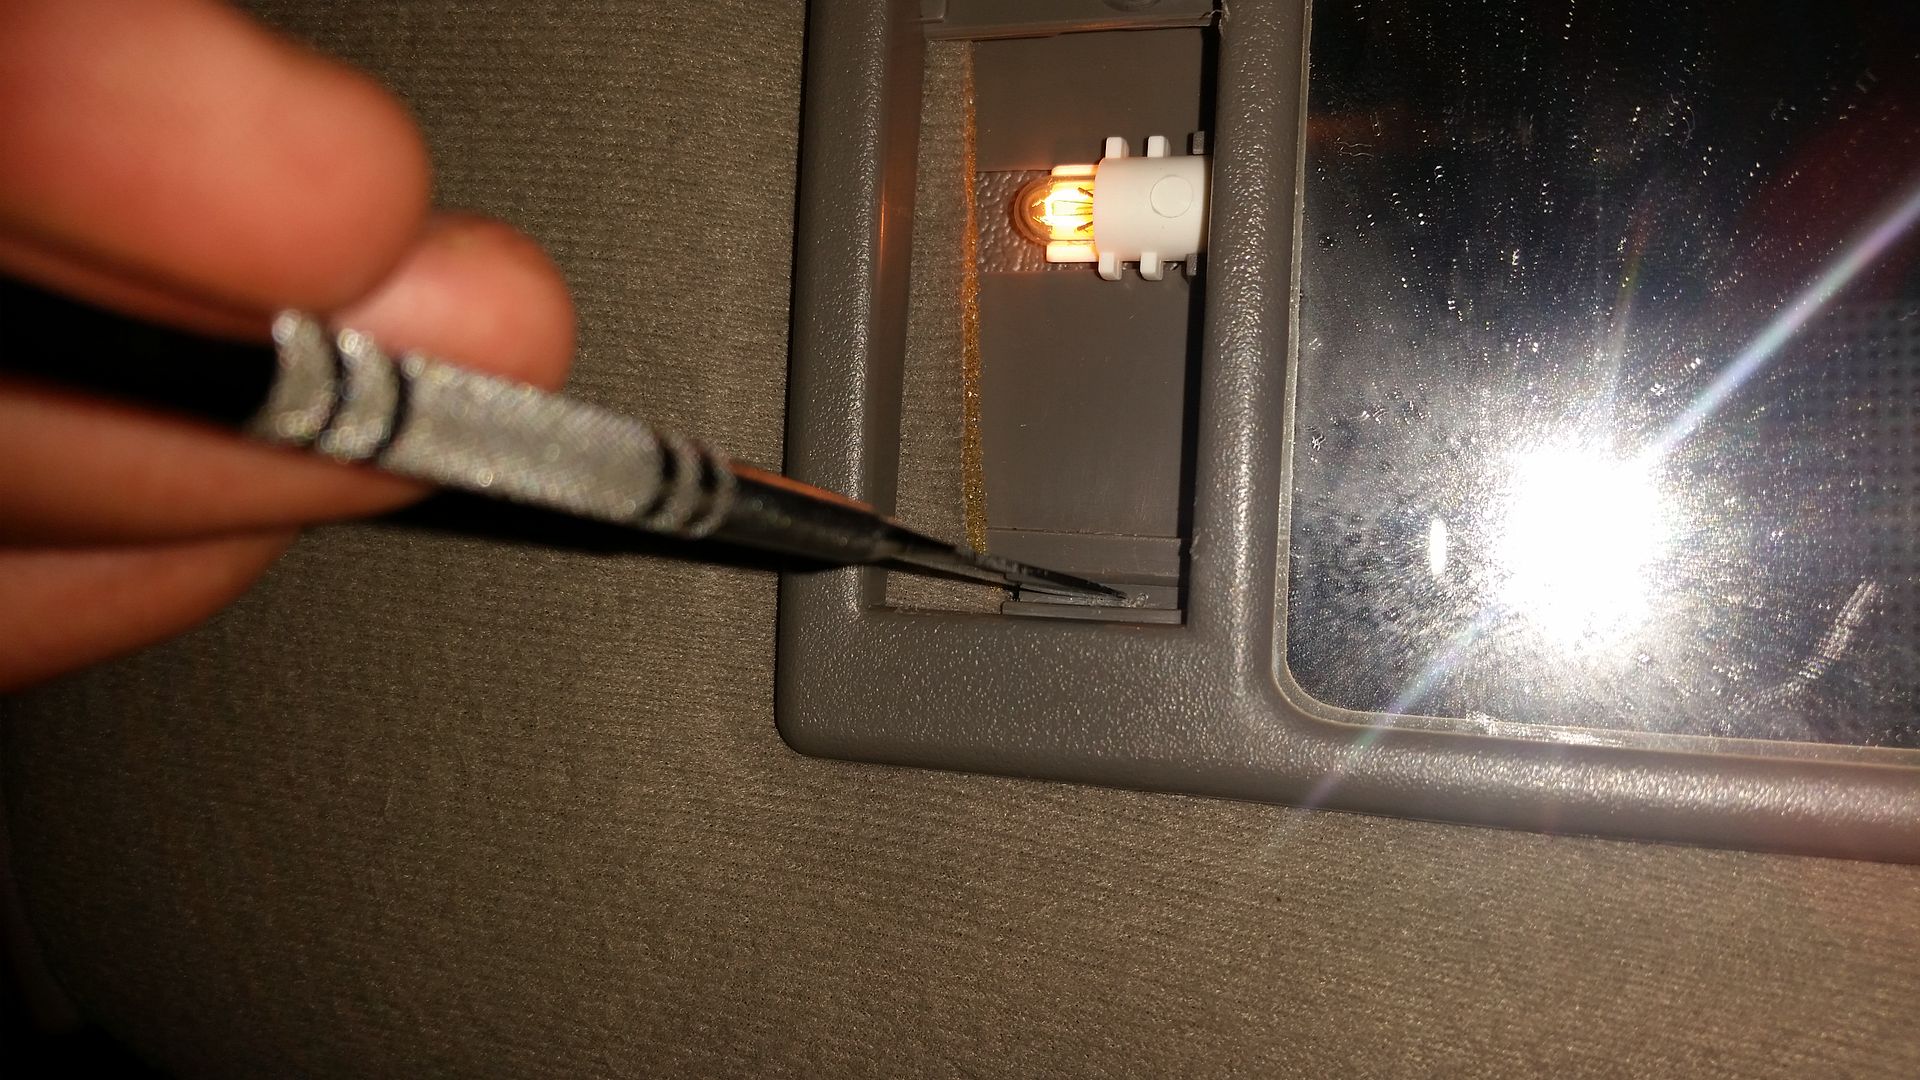
Repeat the process with the remaining 3 clips, working your way to the other bottom clip first, then up, then lastly to the clip closest to the pin switch that turns the lights on.
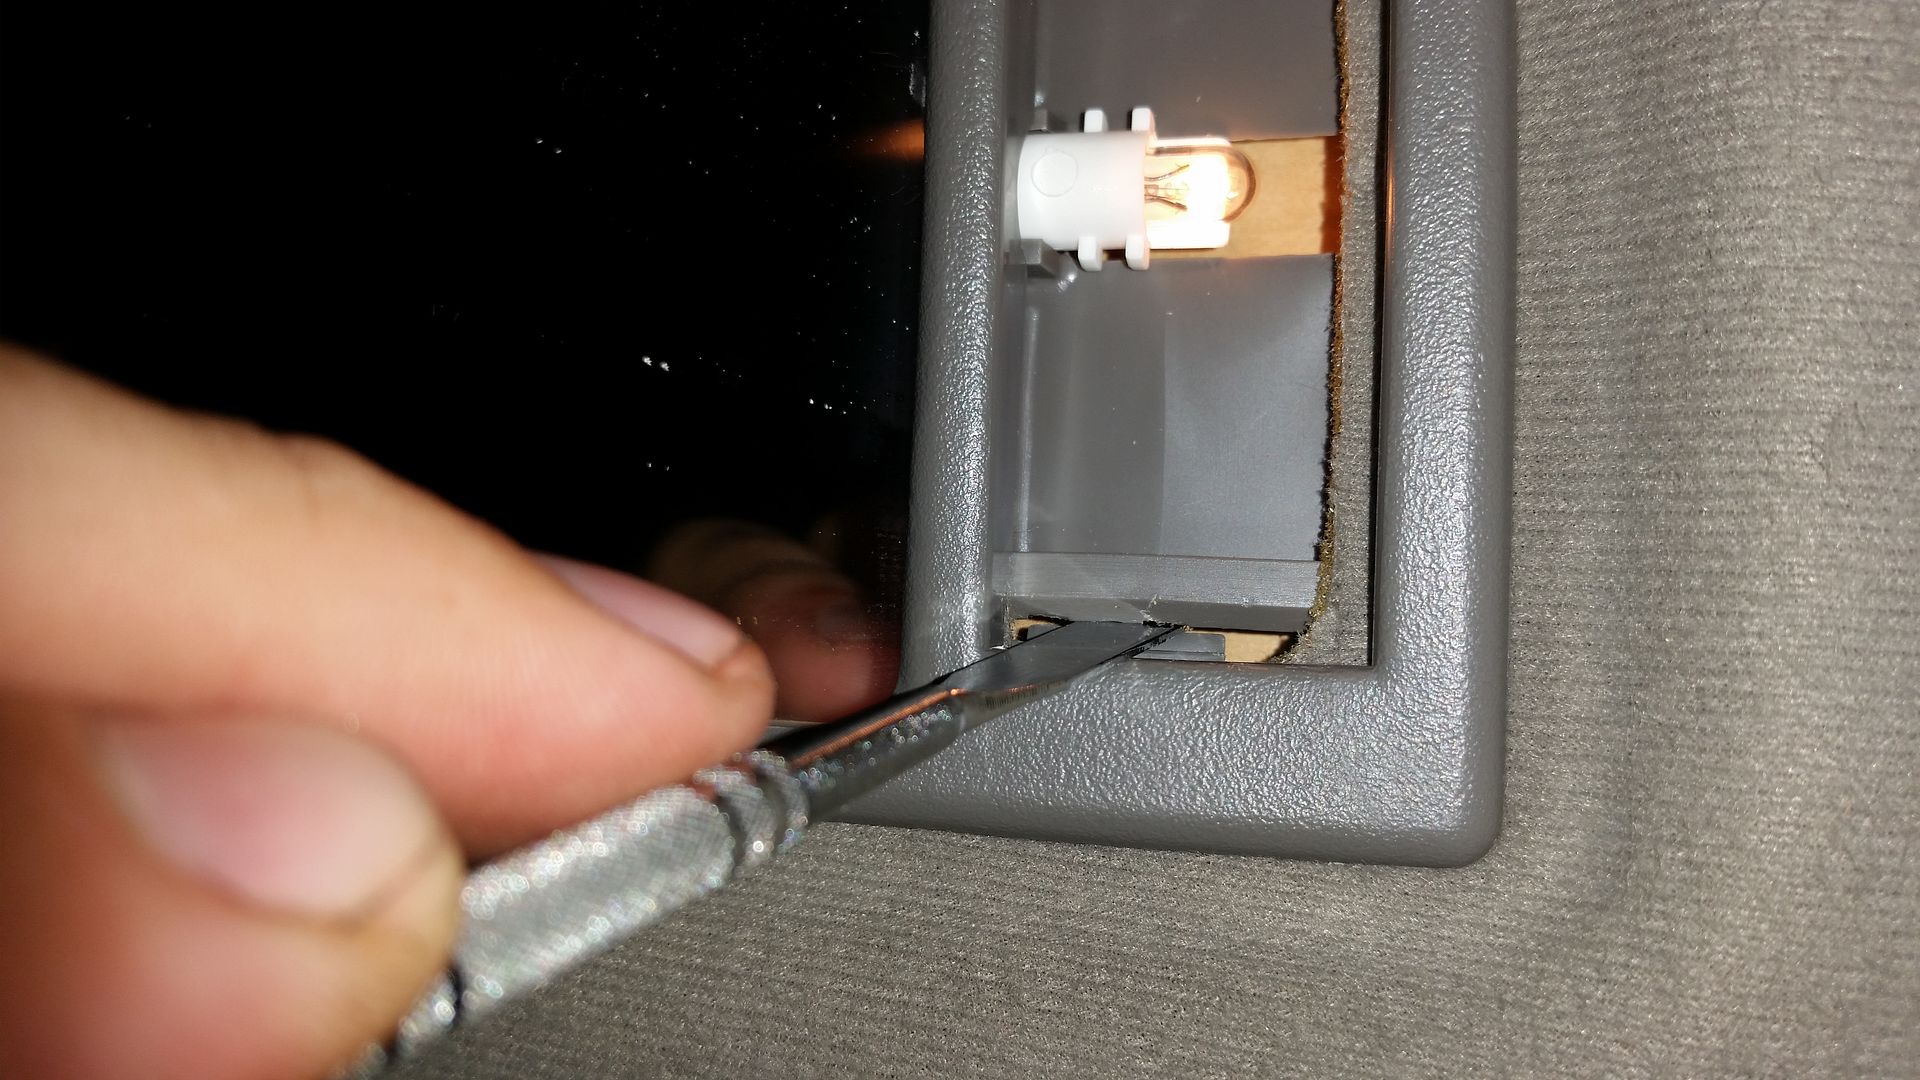
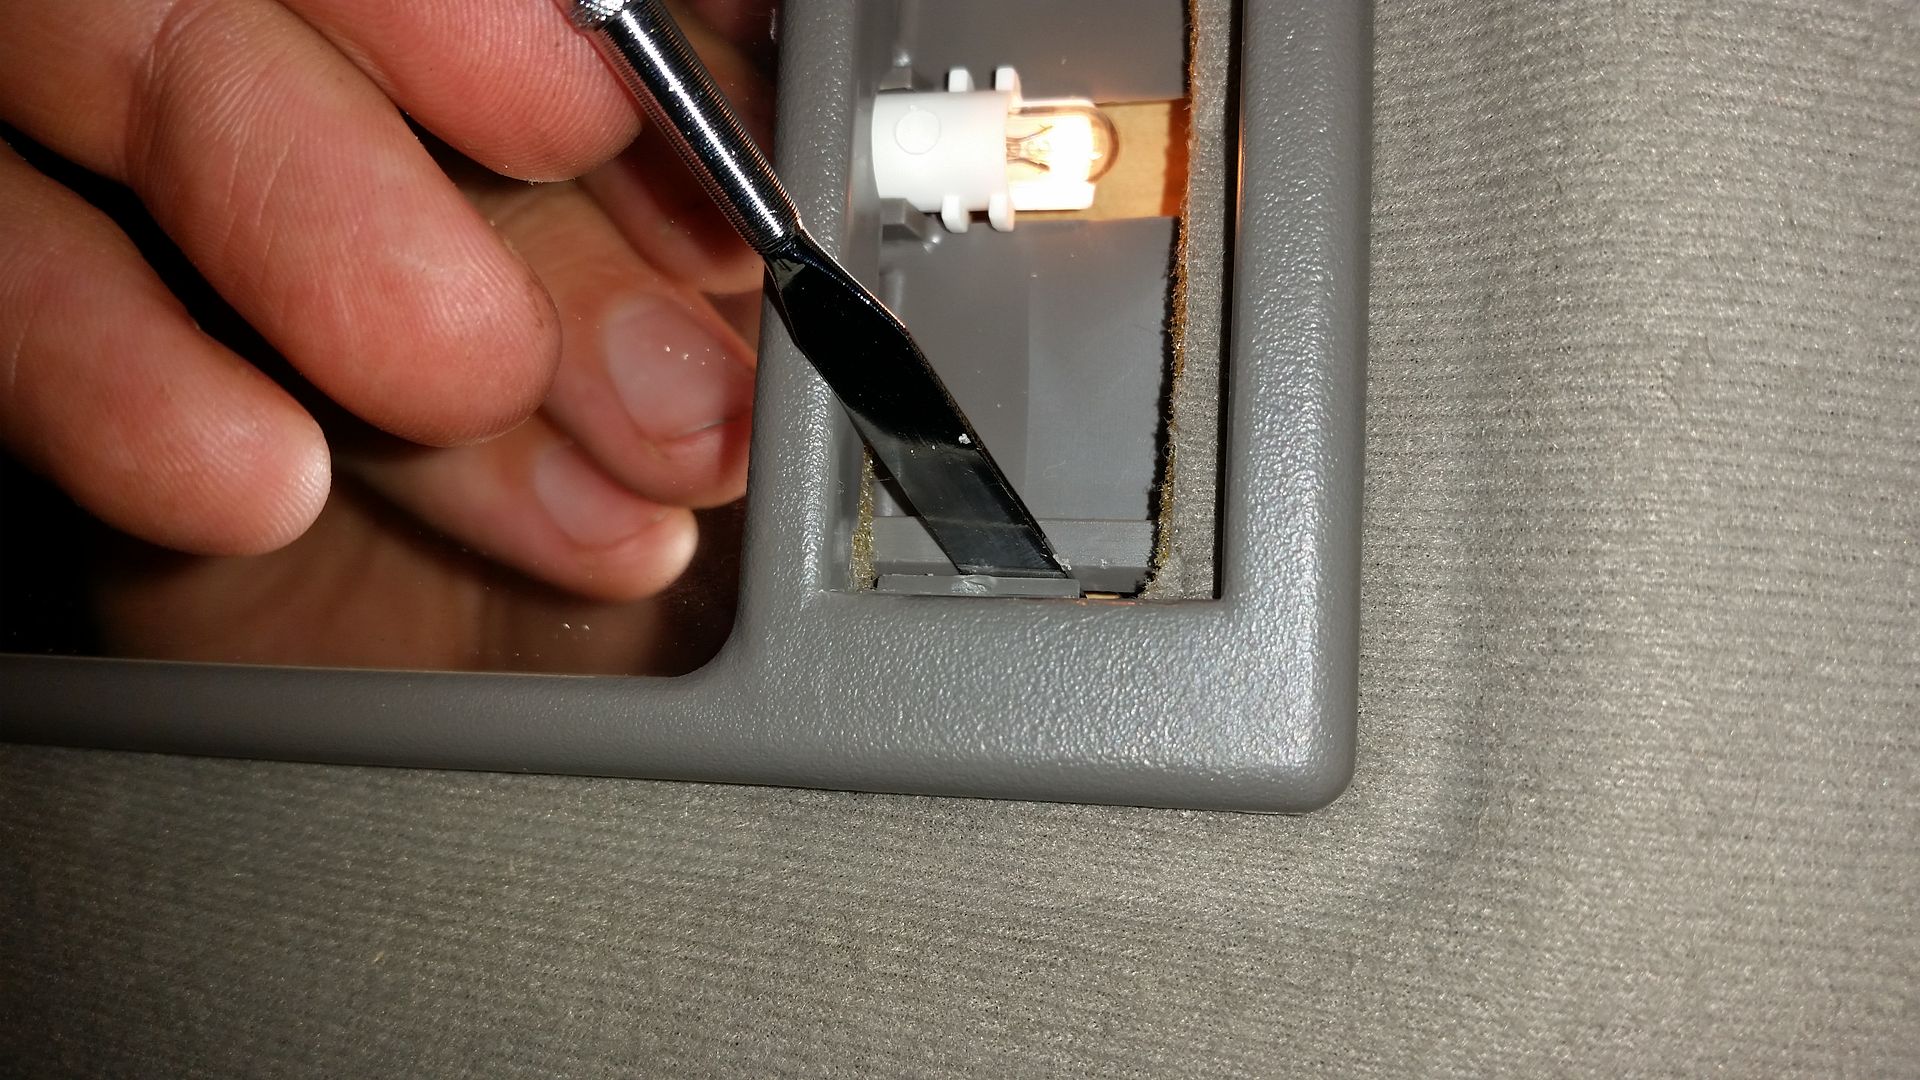


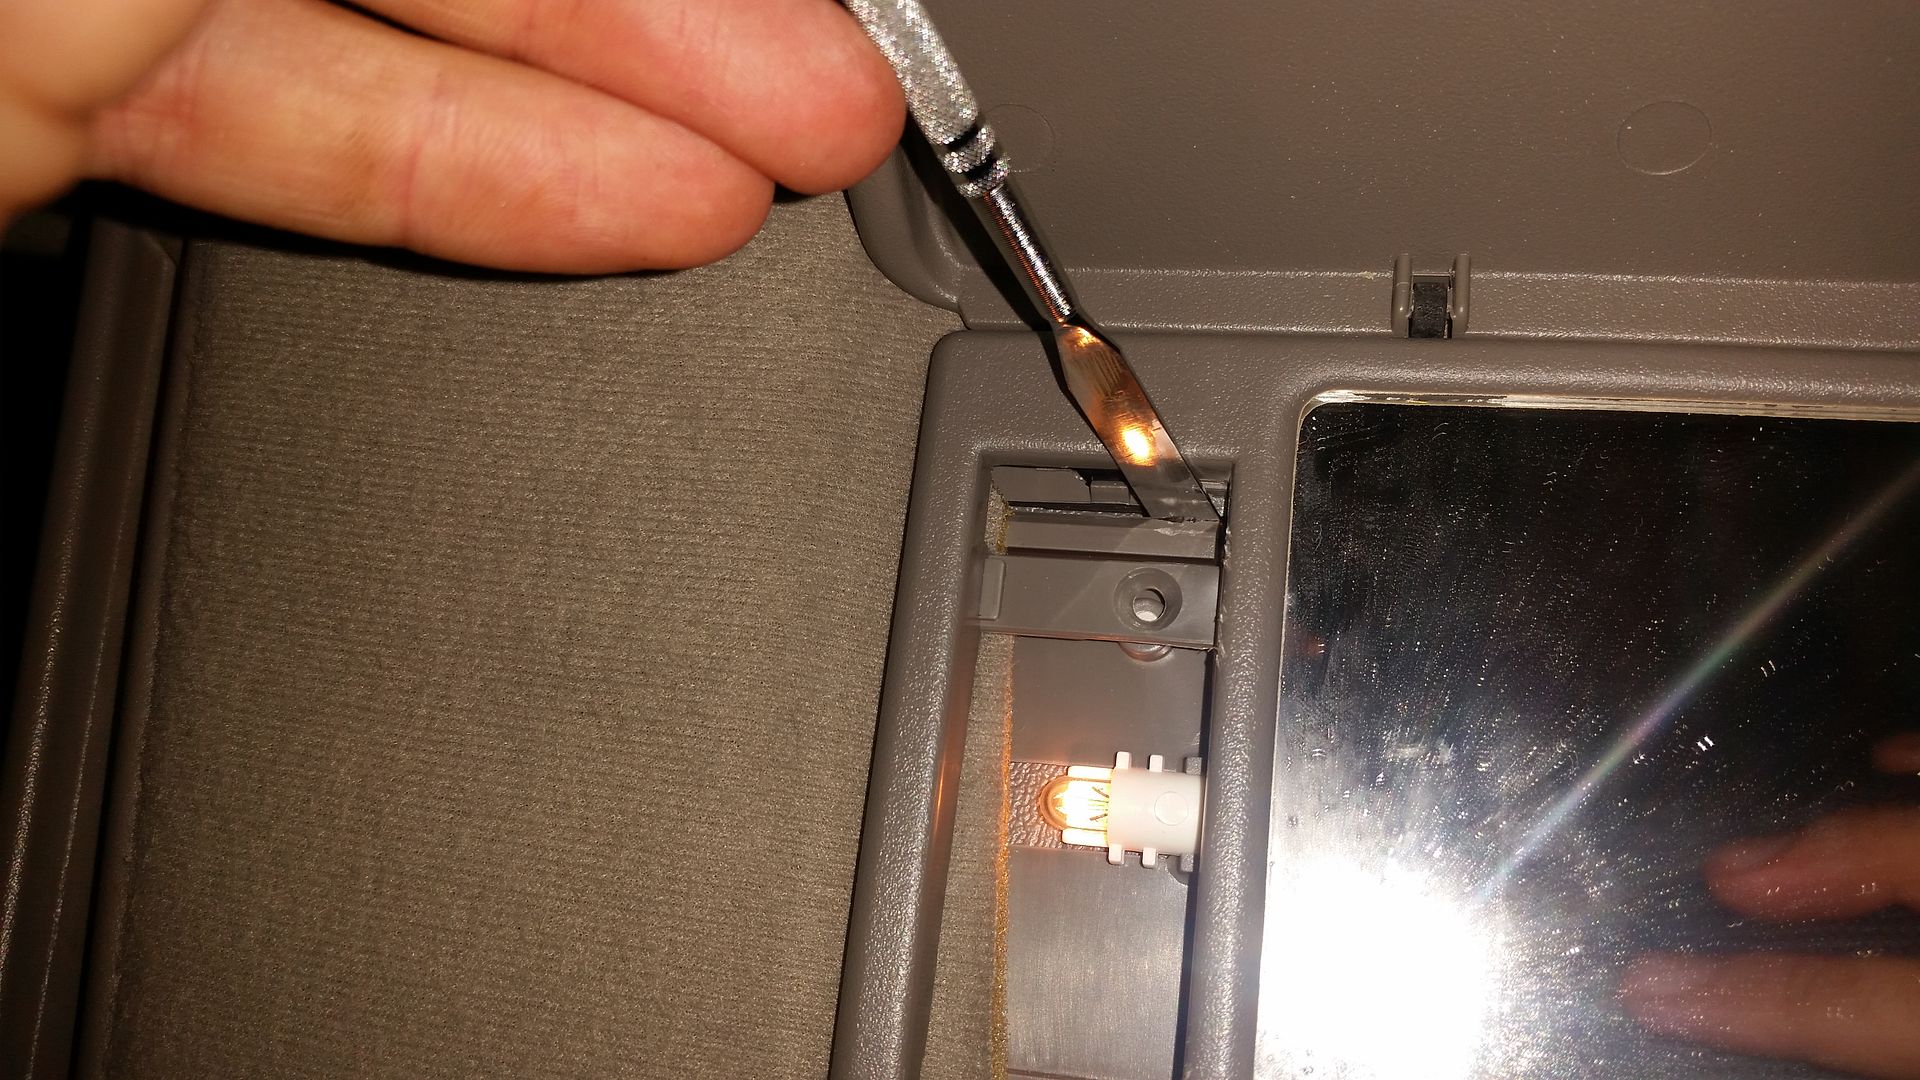
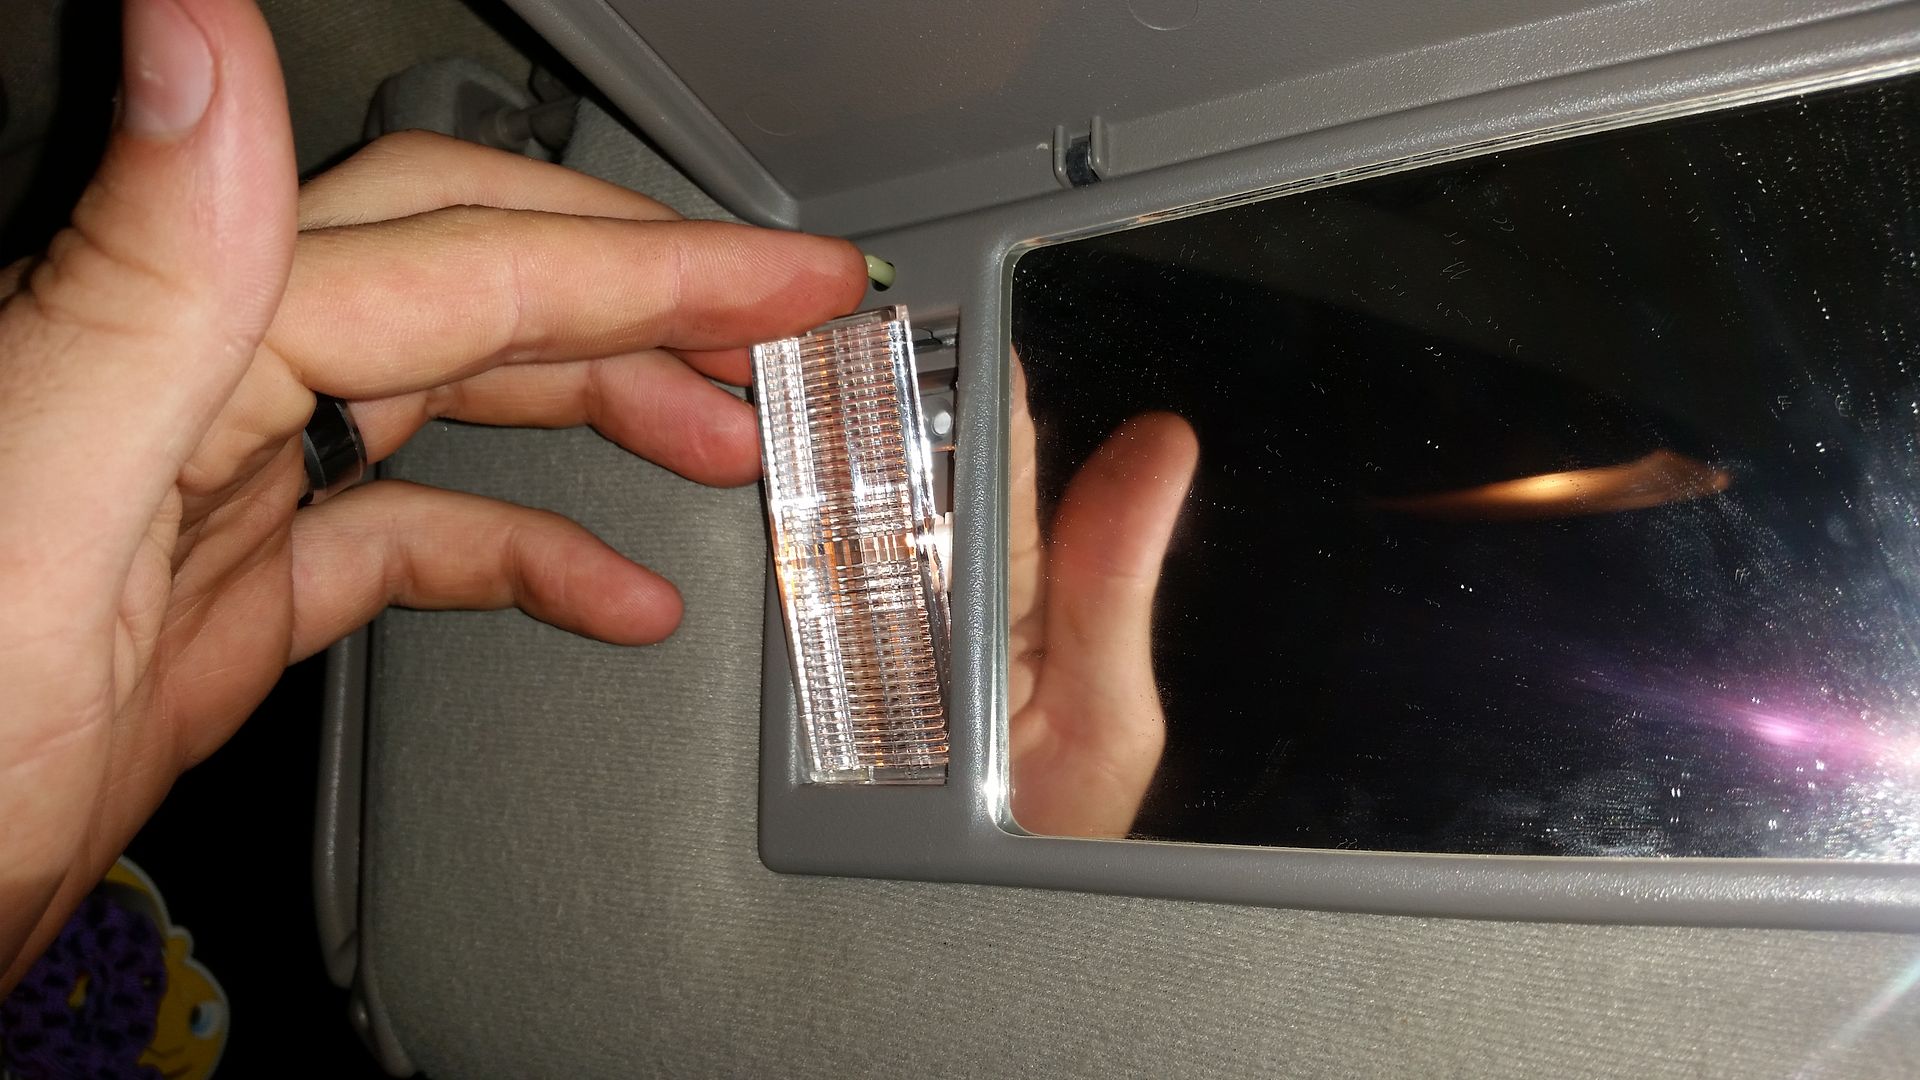
When you get to the final step on the last of the 4 clips, be ready for the vanity to fall off in your lap!
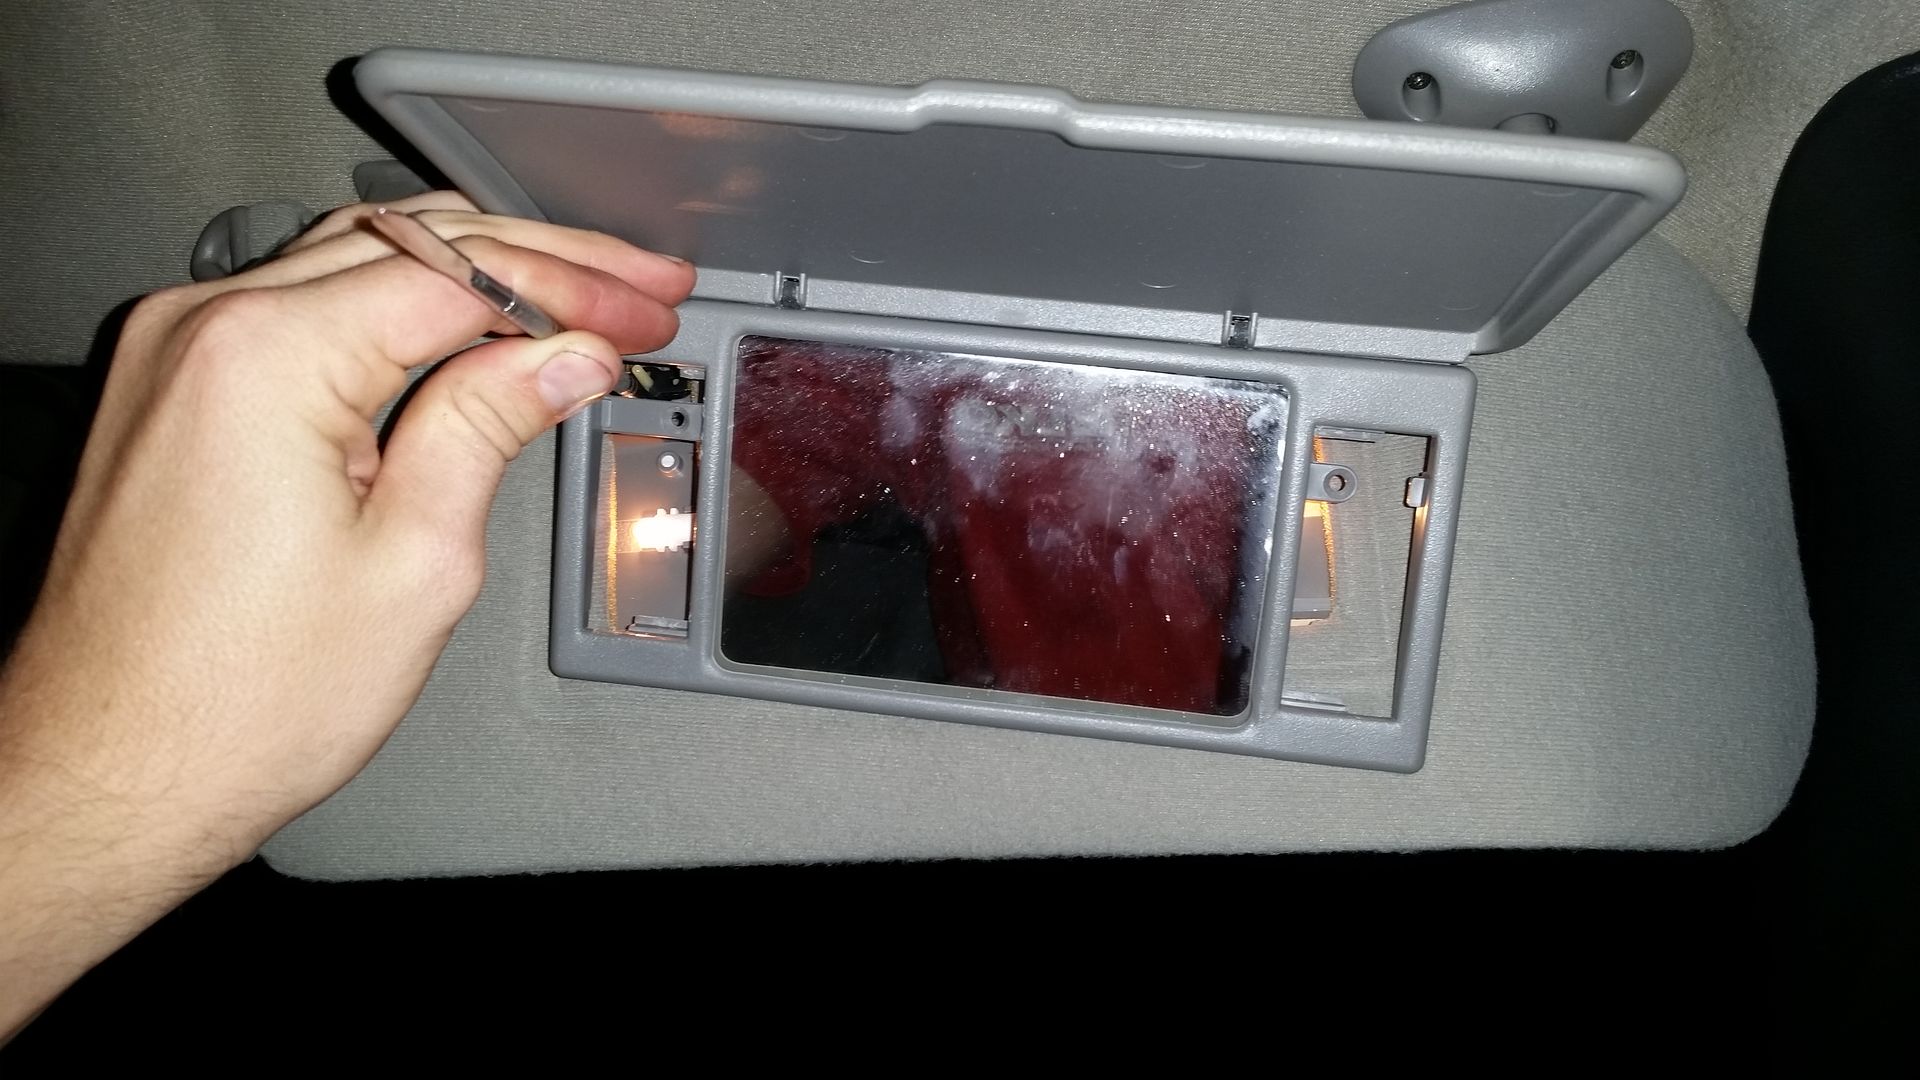
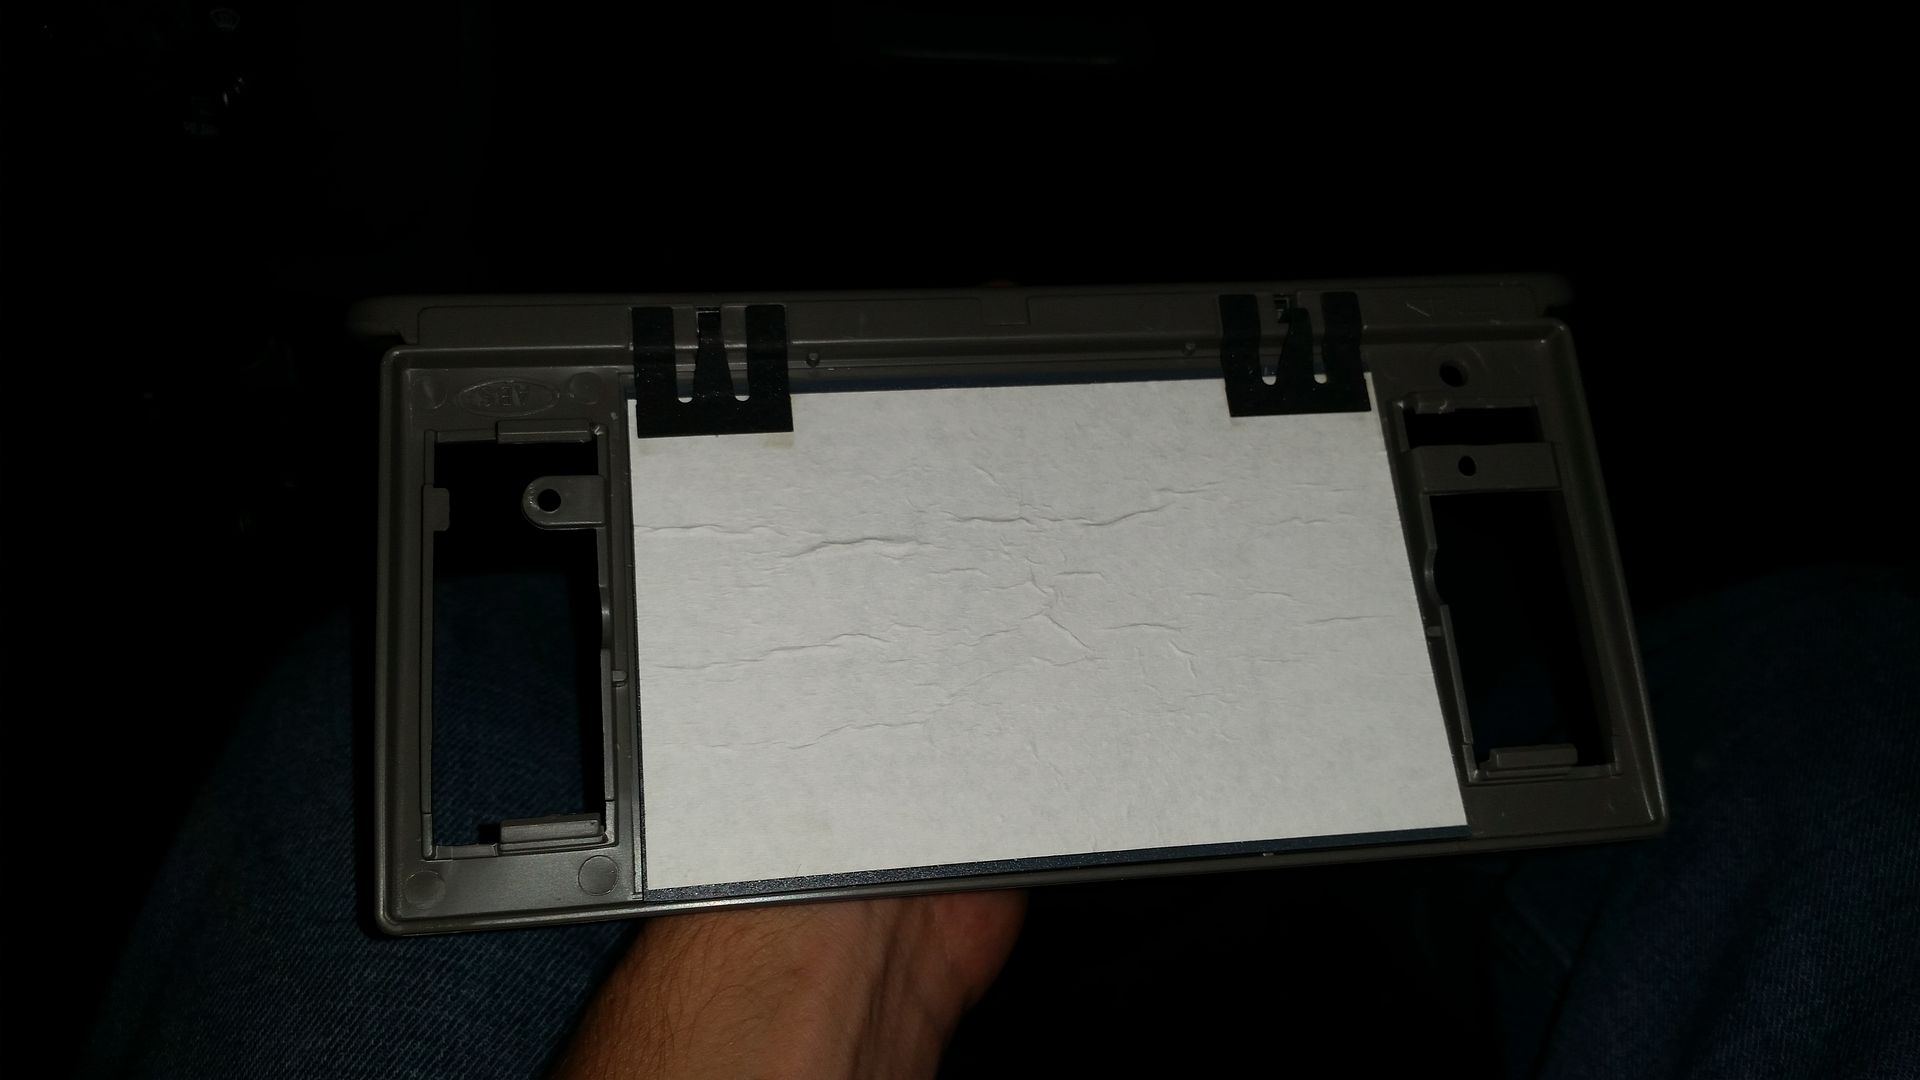
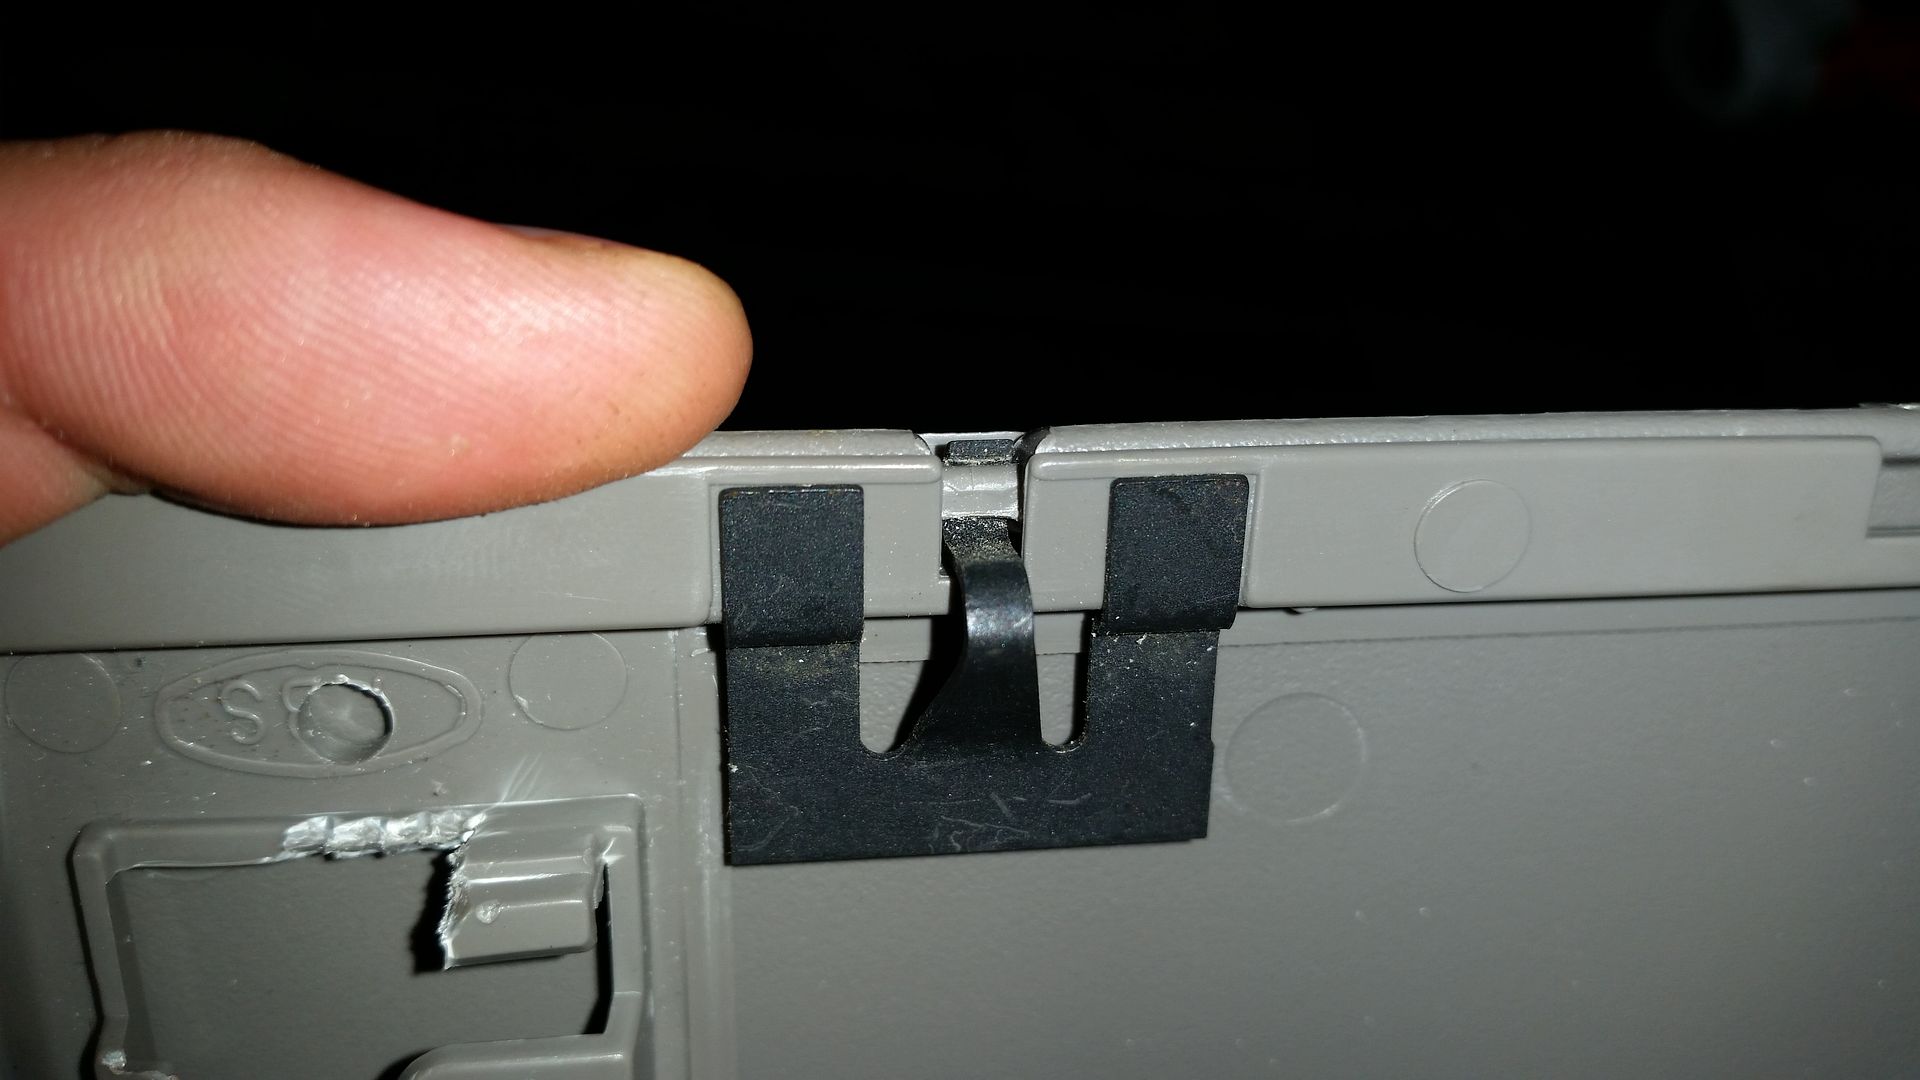
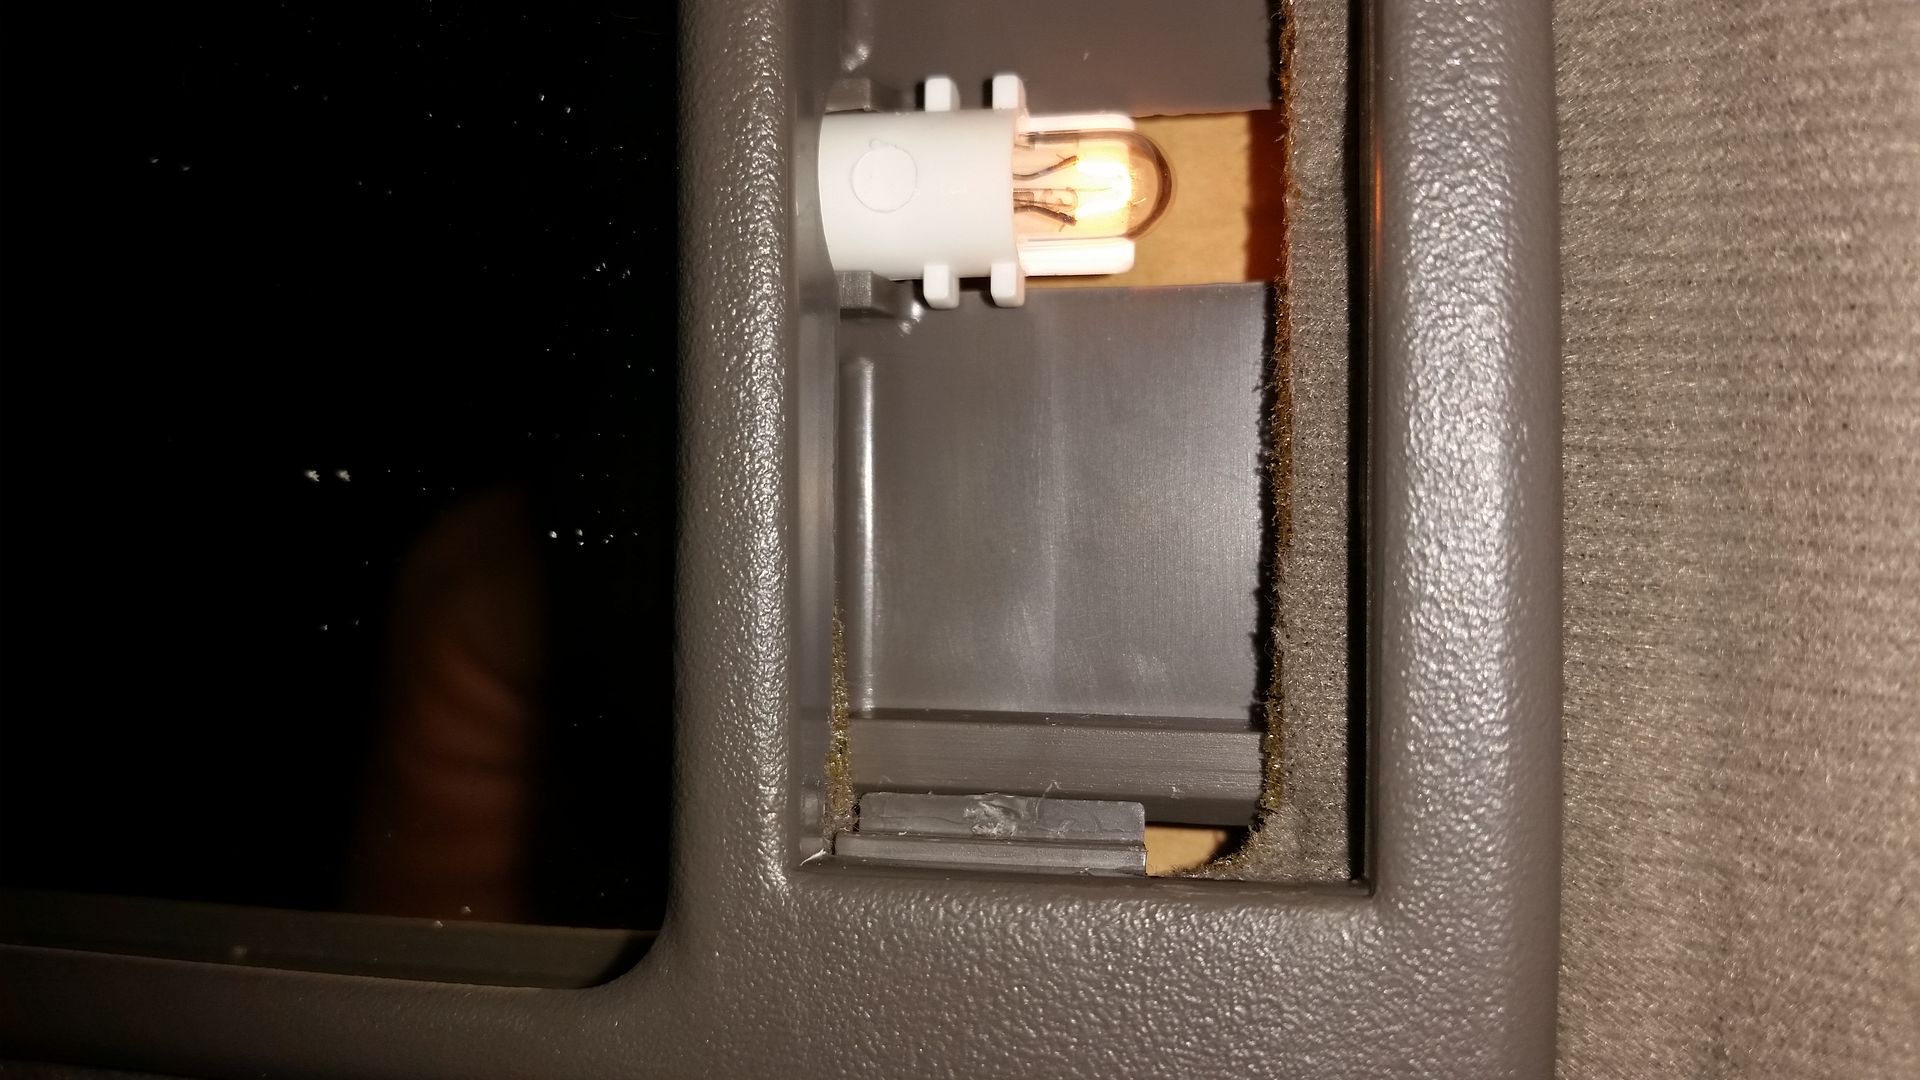
Also keep in mind that the only thing holding the mirror in place are the two little metal tabs. It's not glued, taped, or clipped in in any way to the assembly, so it's pretty easy for it to fall out once you the vanity removed from the visor.
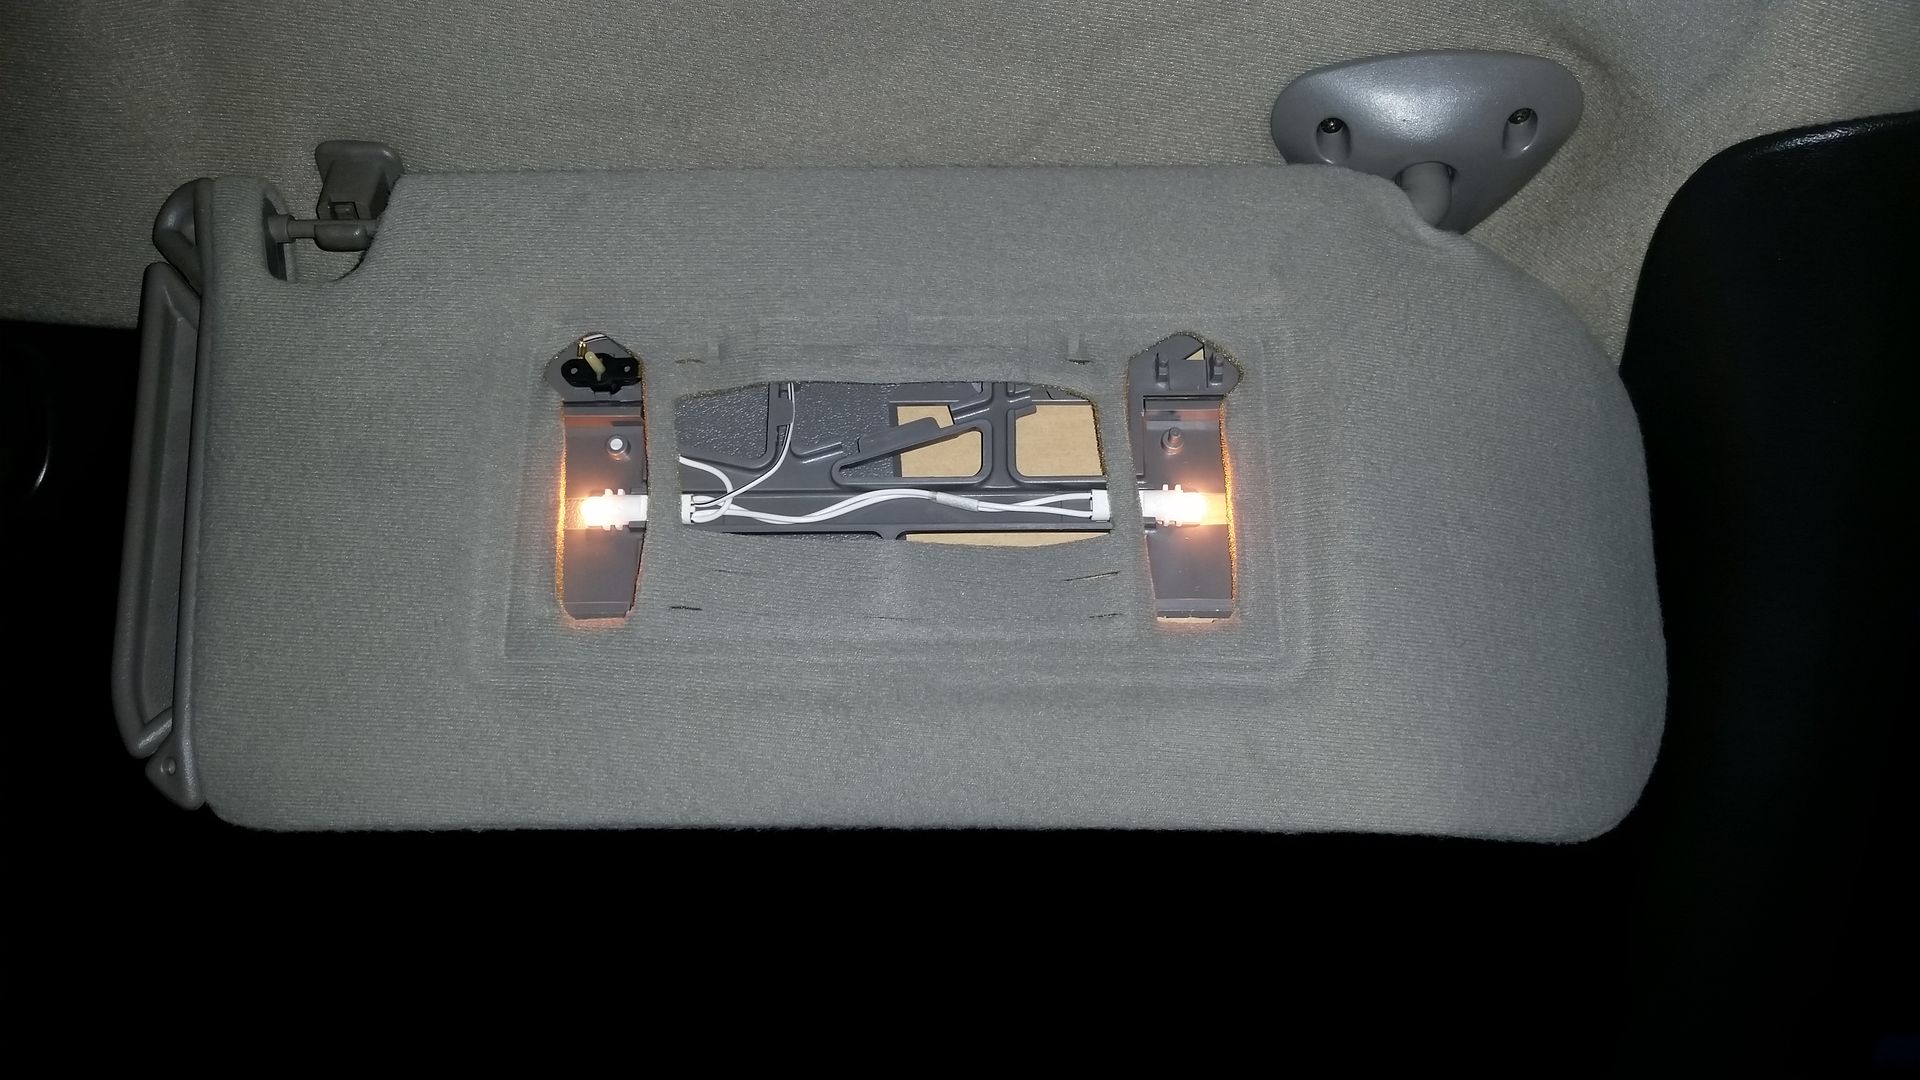
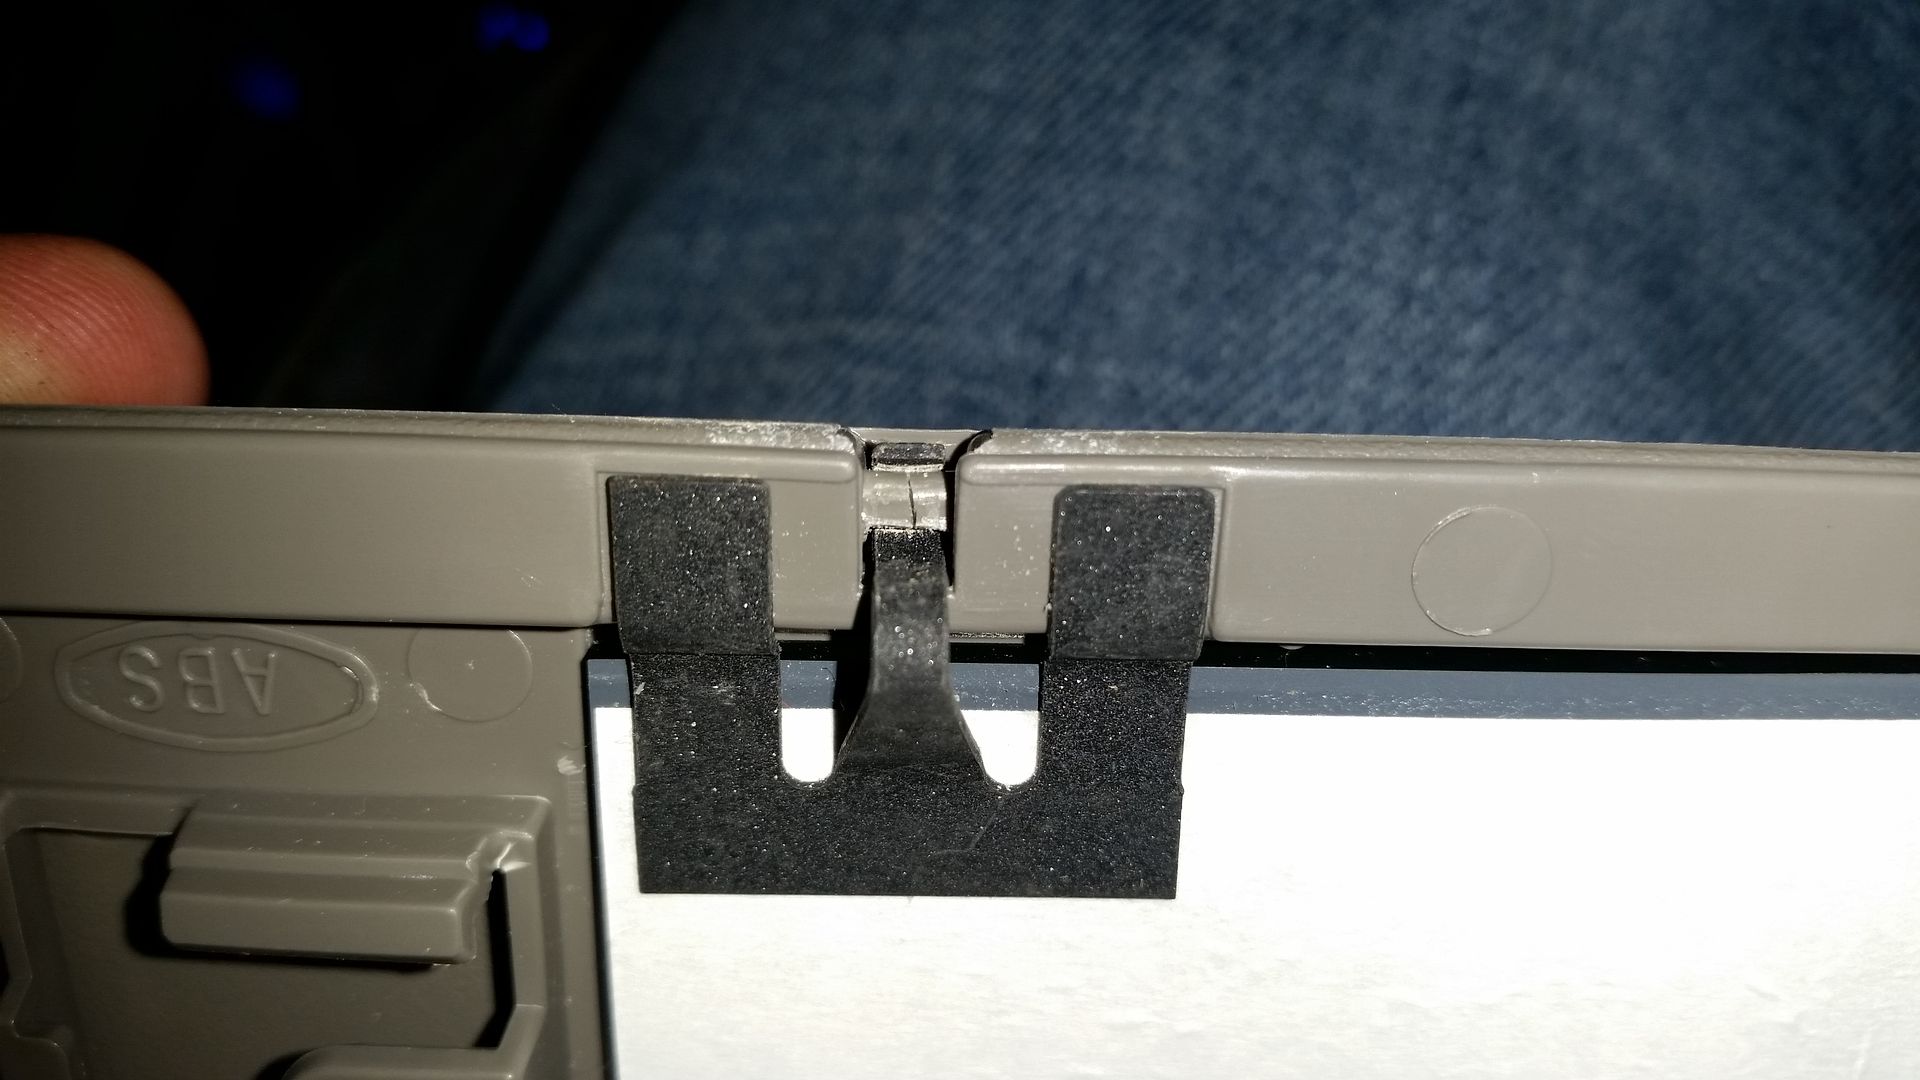
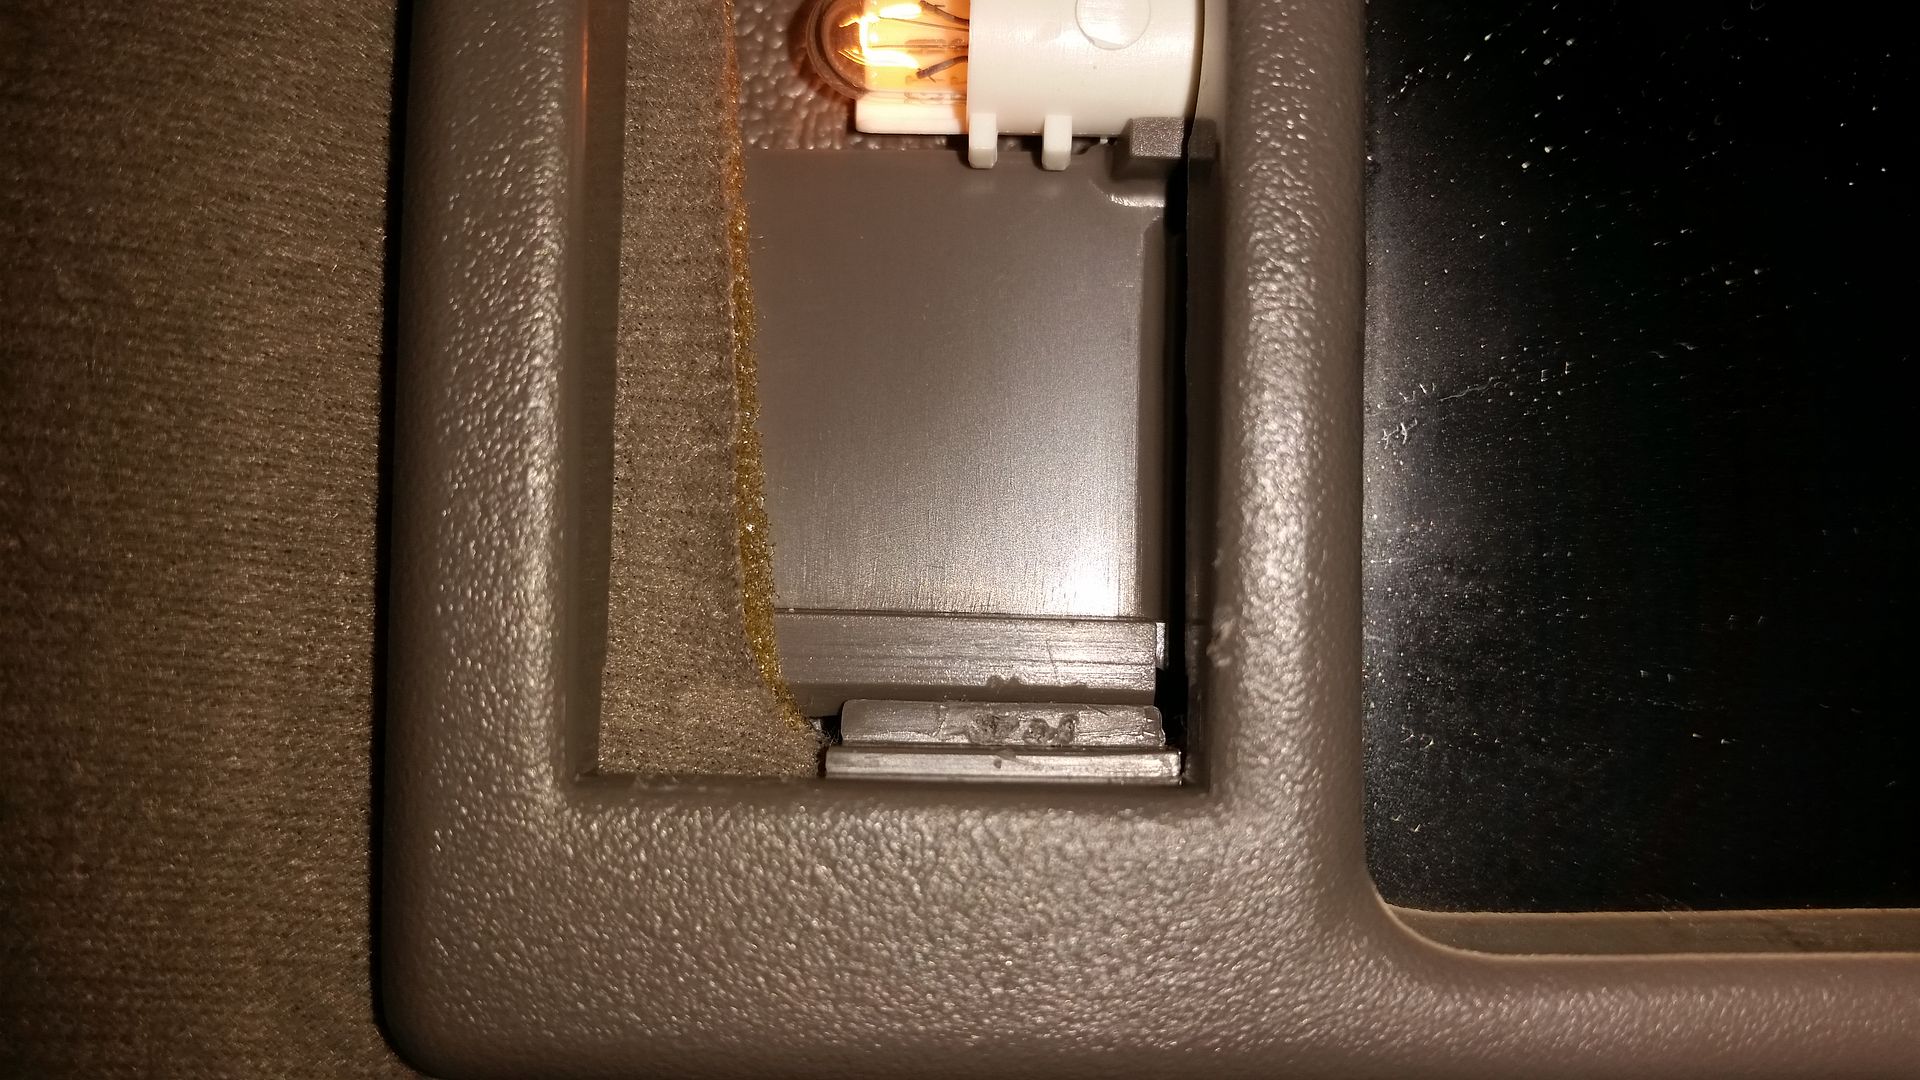
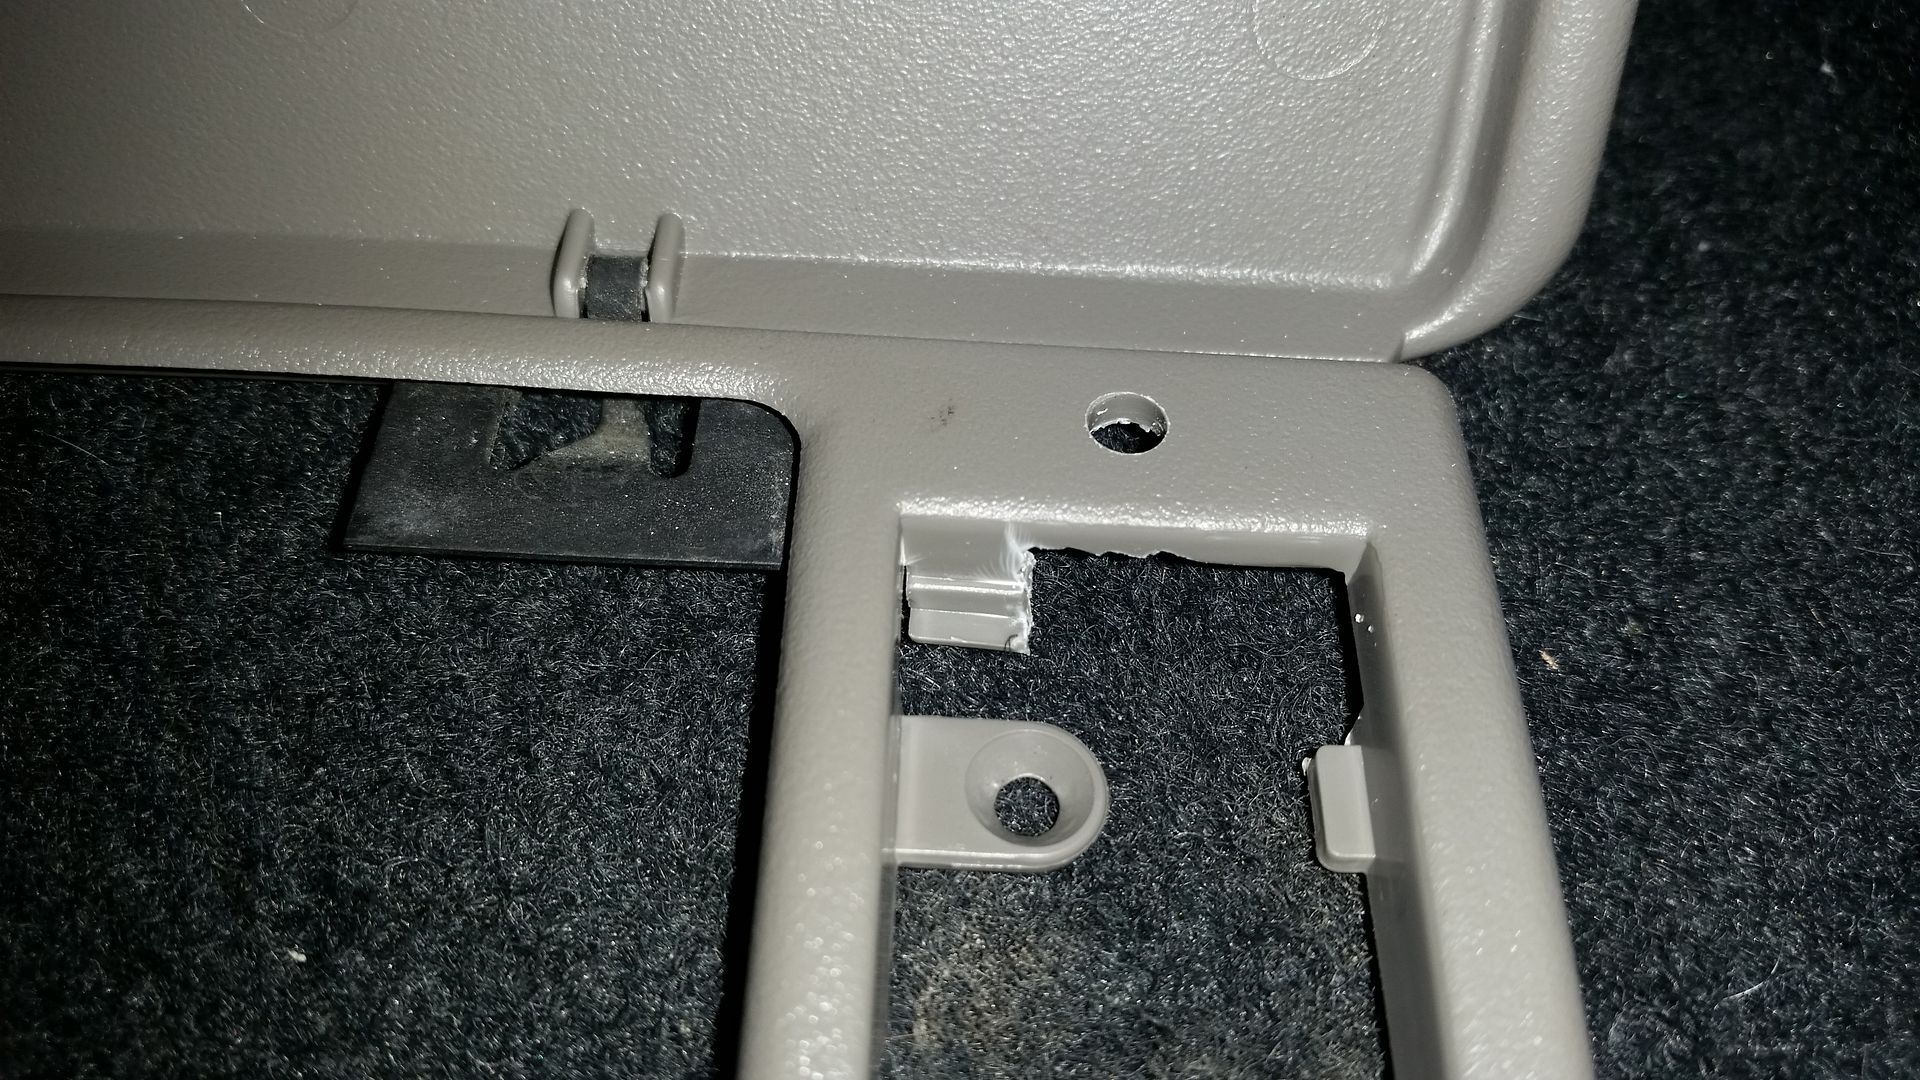
These little metal clips are also what gives the vanity lid it's spring action. The little plastic "pins" in the lid are actually the fail point on these. You can see in the next two pictures that these two are cracked and are not far from failing...
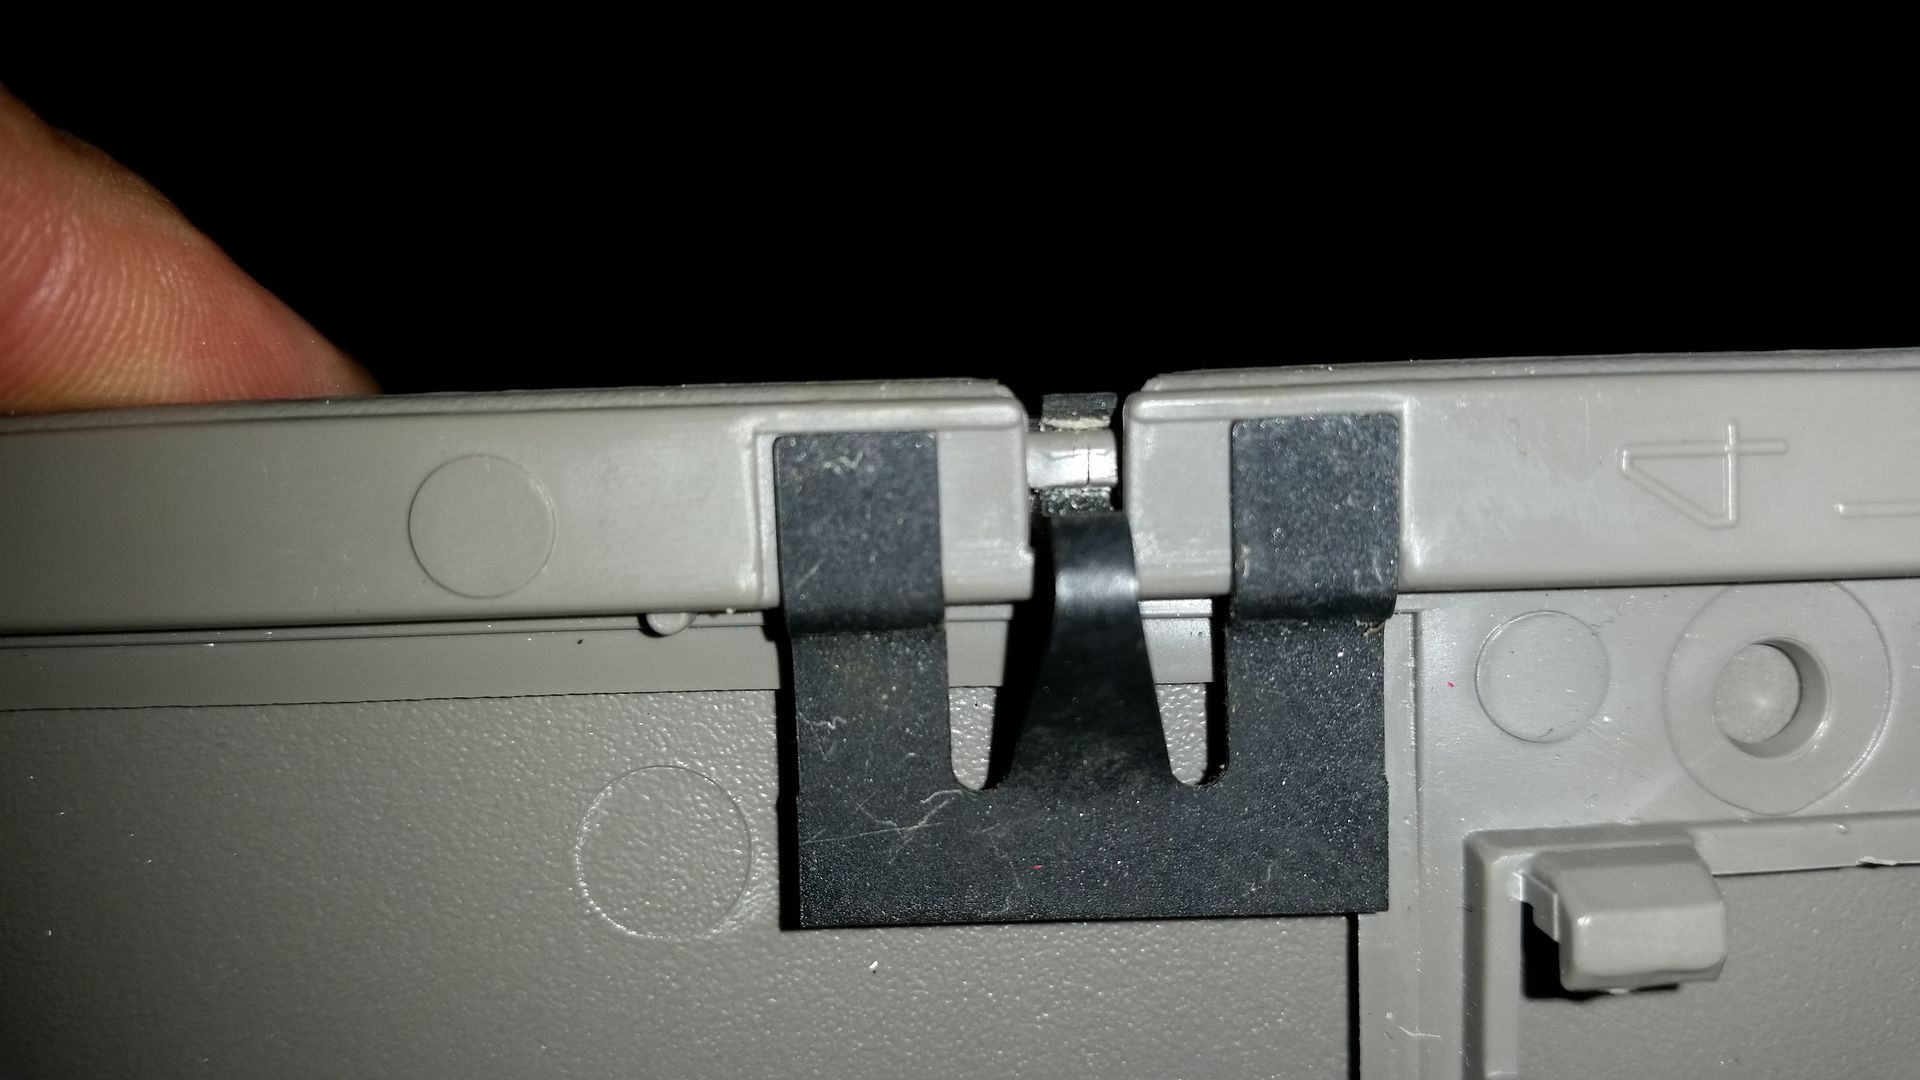
Here are some in better condition, with one showing signs that it's starting to crack.
When they COMPLETELY fail and brake, this is what you're left with... But I'm sure you're aware of this view :P
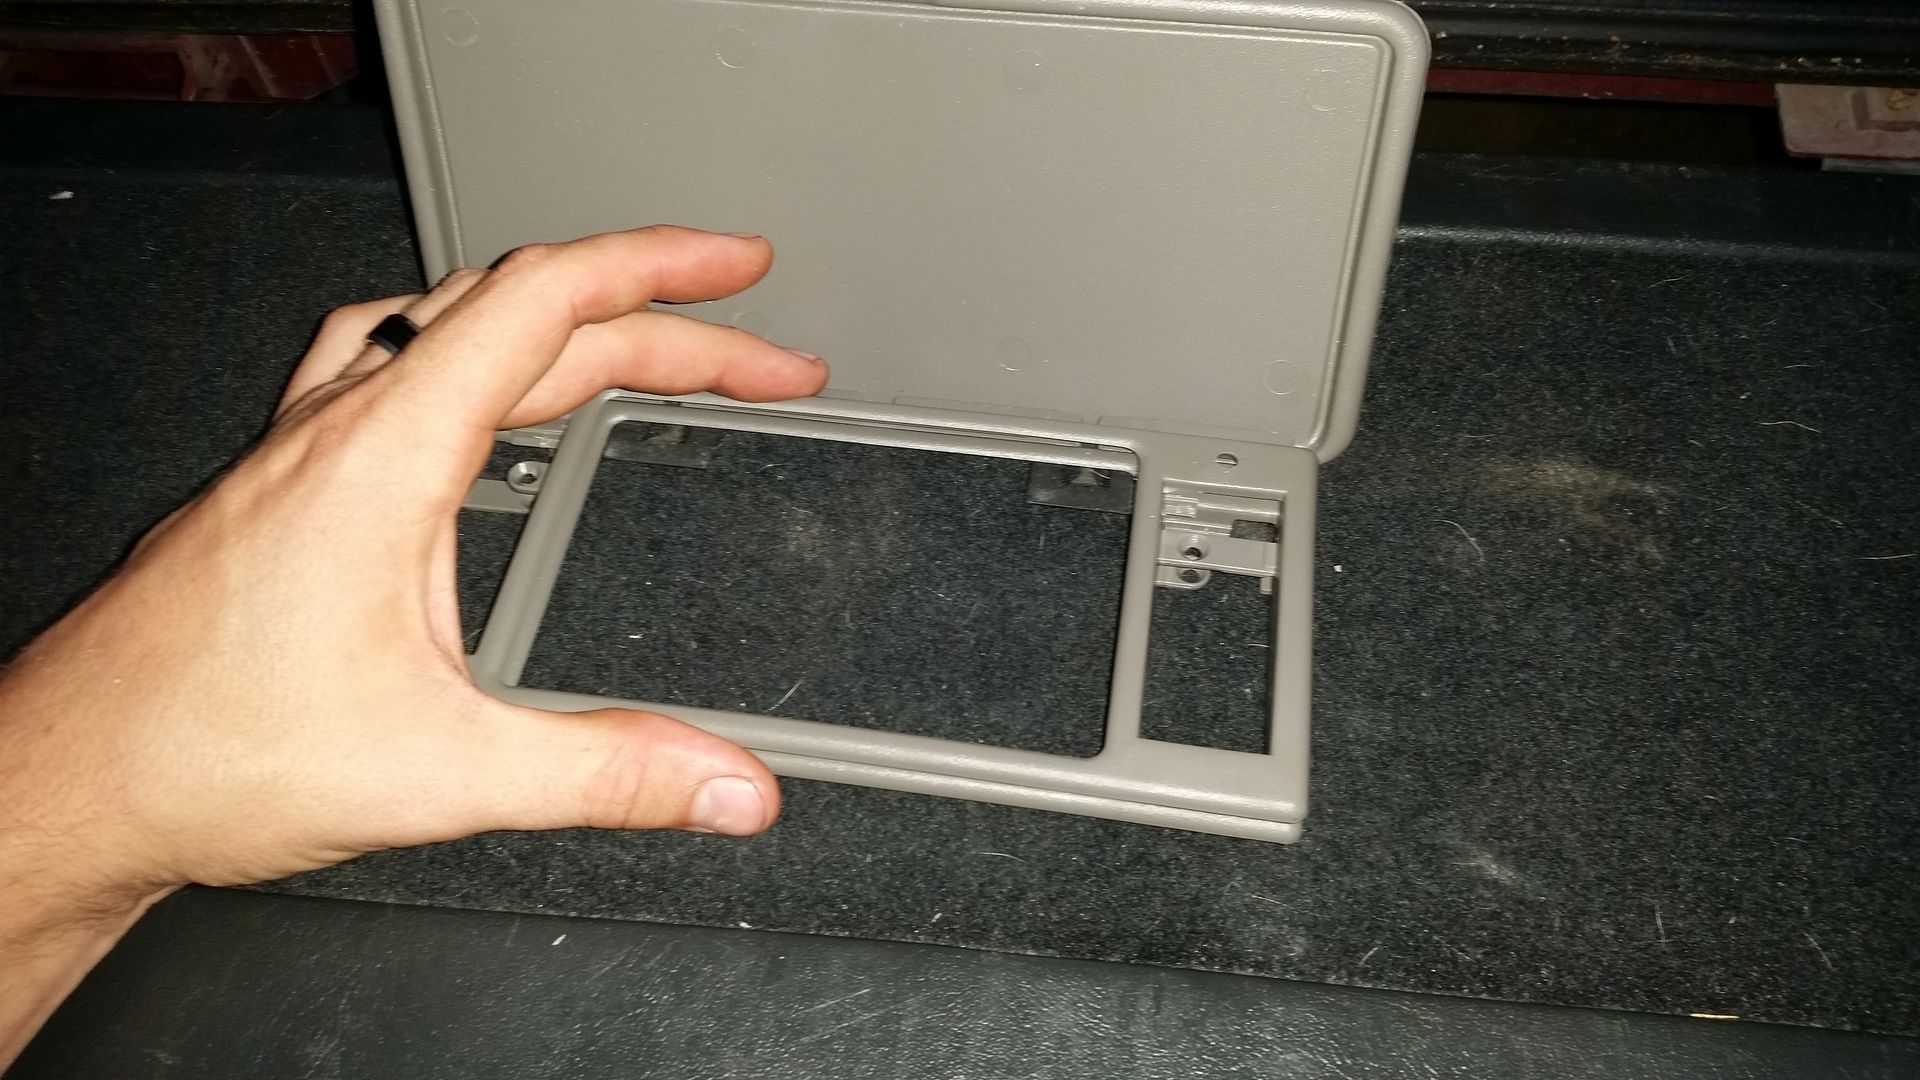
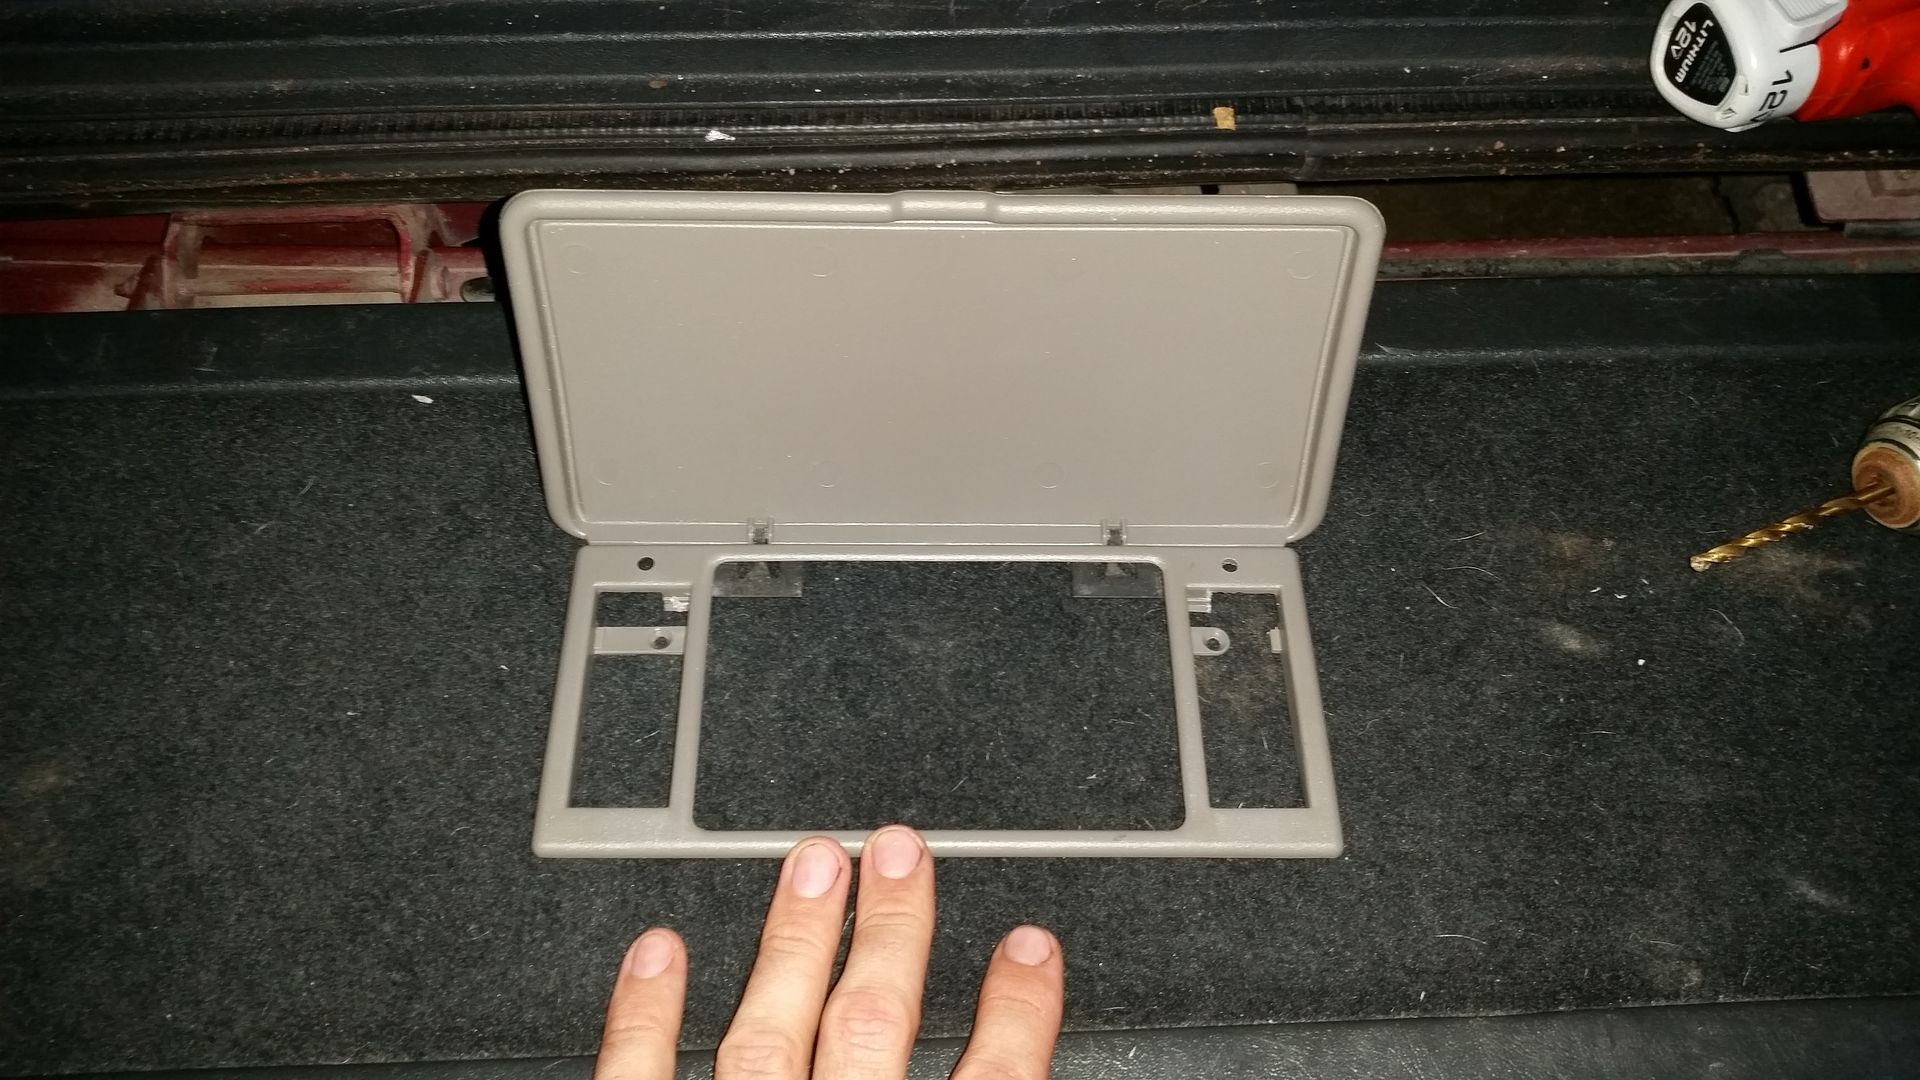
So you've got your replacement vanity assembly ready, and the broken one remove from the visor in your vehicle. Now time to put it in, more specifically, put it in without breaking it!
Start by simply lining it up on the visor, being sure to line the pin switch up with the hole in the vanity assembly. If you line that up, everything else will pretty much line itself up.
From my experience, you can usually get the clip closest to the pin switch in just by wiggling the assembly a little and pushing in on the clip until it drops in. For the other 3, bring the spudger (or tiny flat head if that's all you have) back out and use it to pop the clips back in. This process is much easier and quicker than removing them, as this time you're simply pushing in until they pop back into place.
Make sure you get all of the clips popped back into place or the vanity will NOT stay put on the visor, and the mirror will probably end up sliding out onto your lap or on the floor the first time the visor is flipped down...
NOT pushed in:
Pushed in:

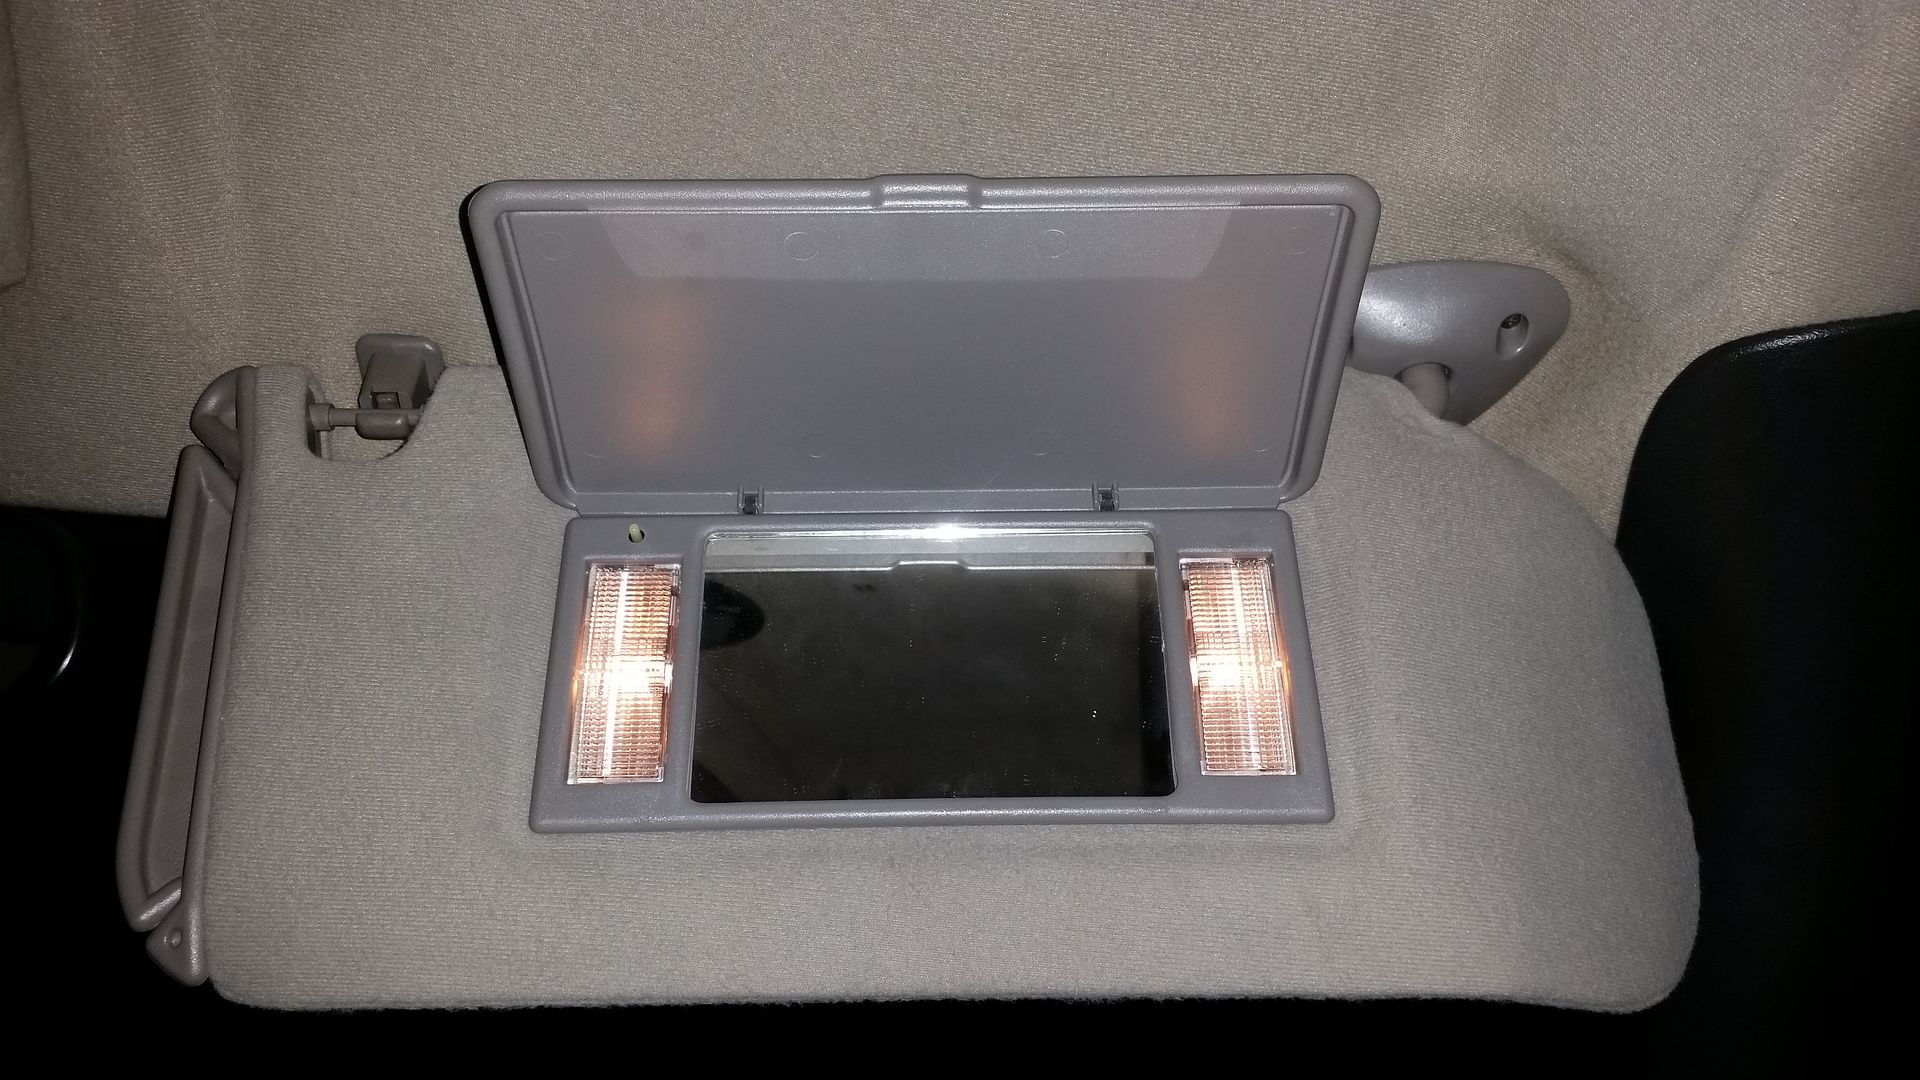
Now you're at this point:
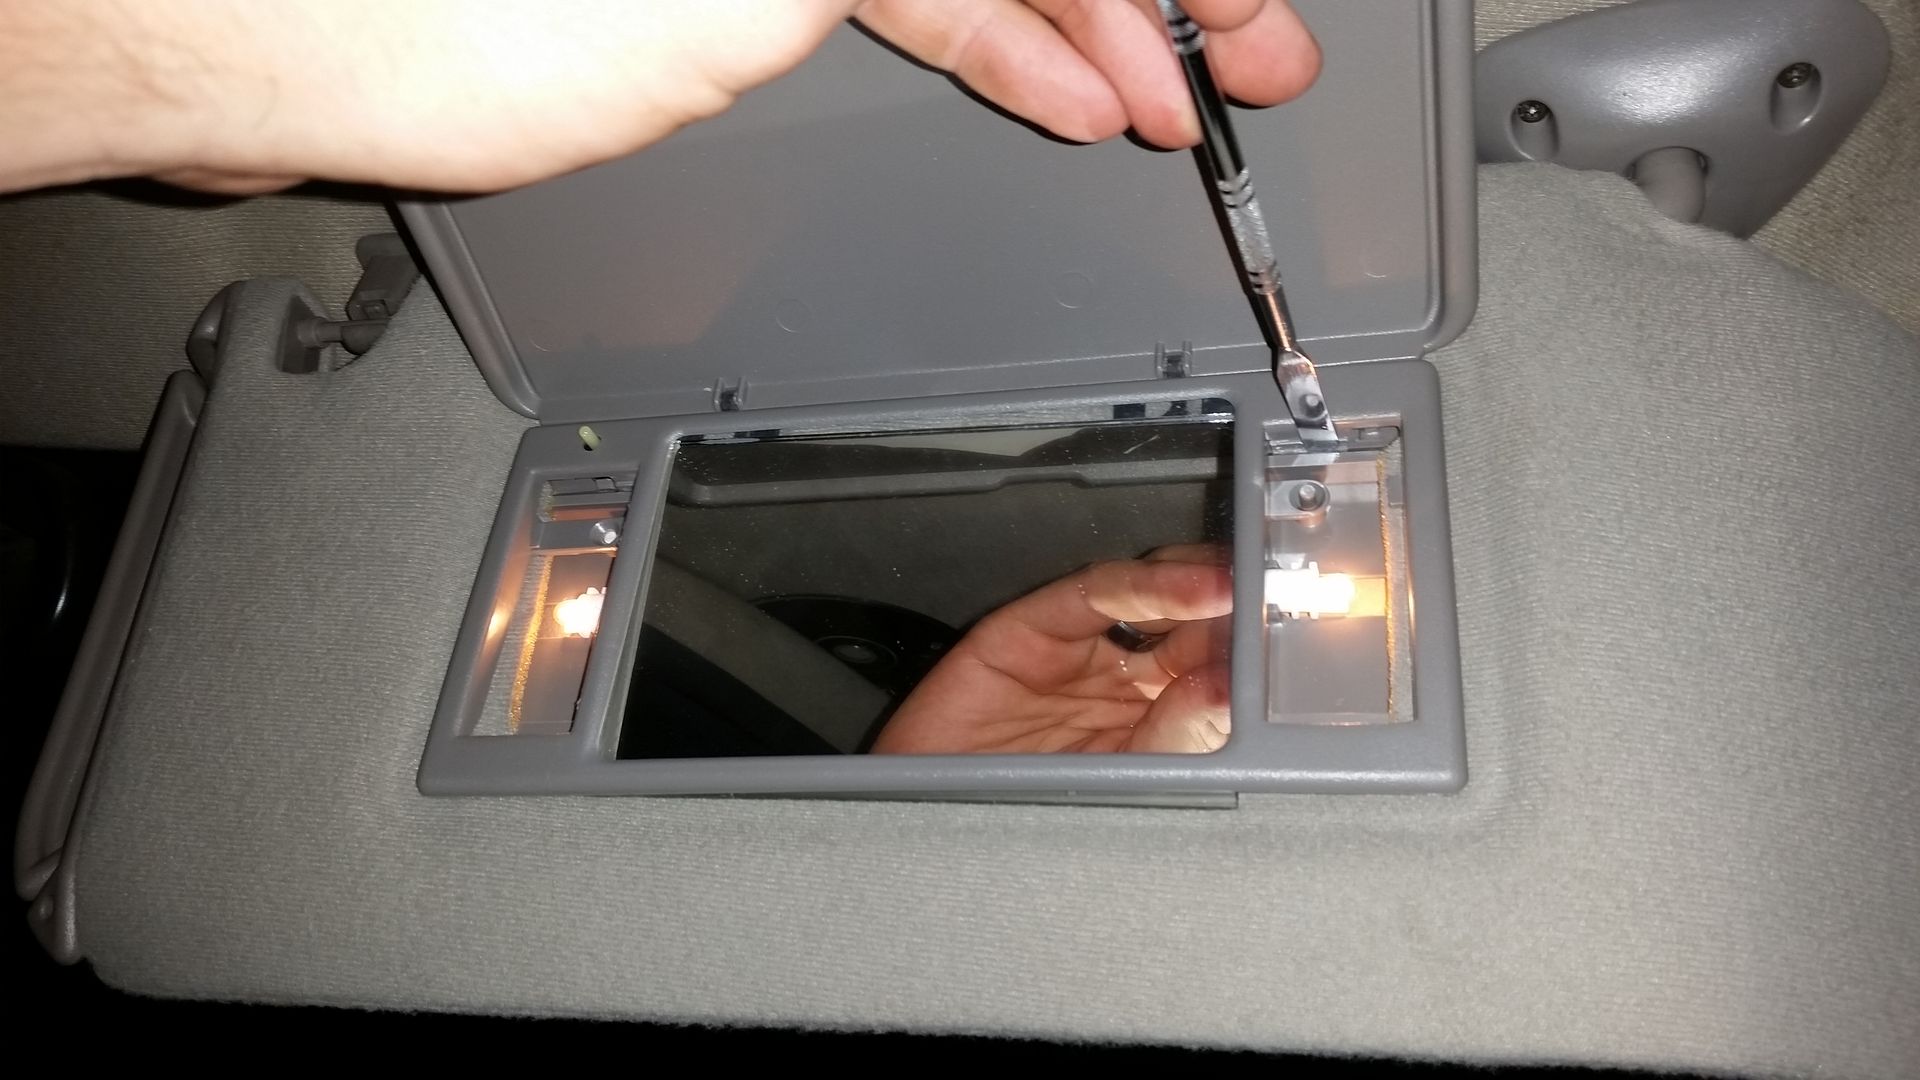
All that's left to do is pop the light lenses back in!
Grab one and drop the bottom in first. Be sure you're putting it in the correct side and the right way around. Remember earlier I mentioned setting them aside in the orientation they were removed?
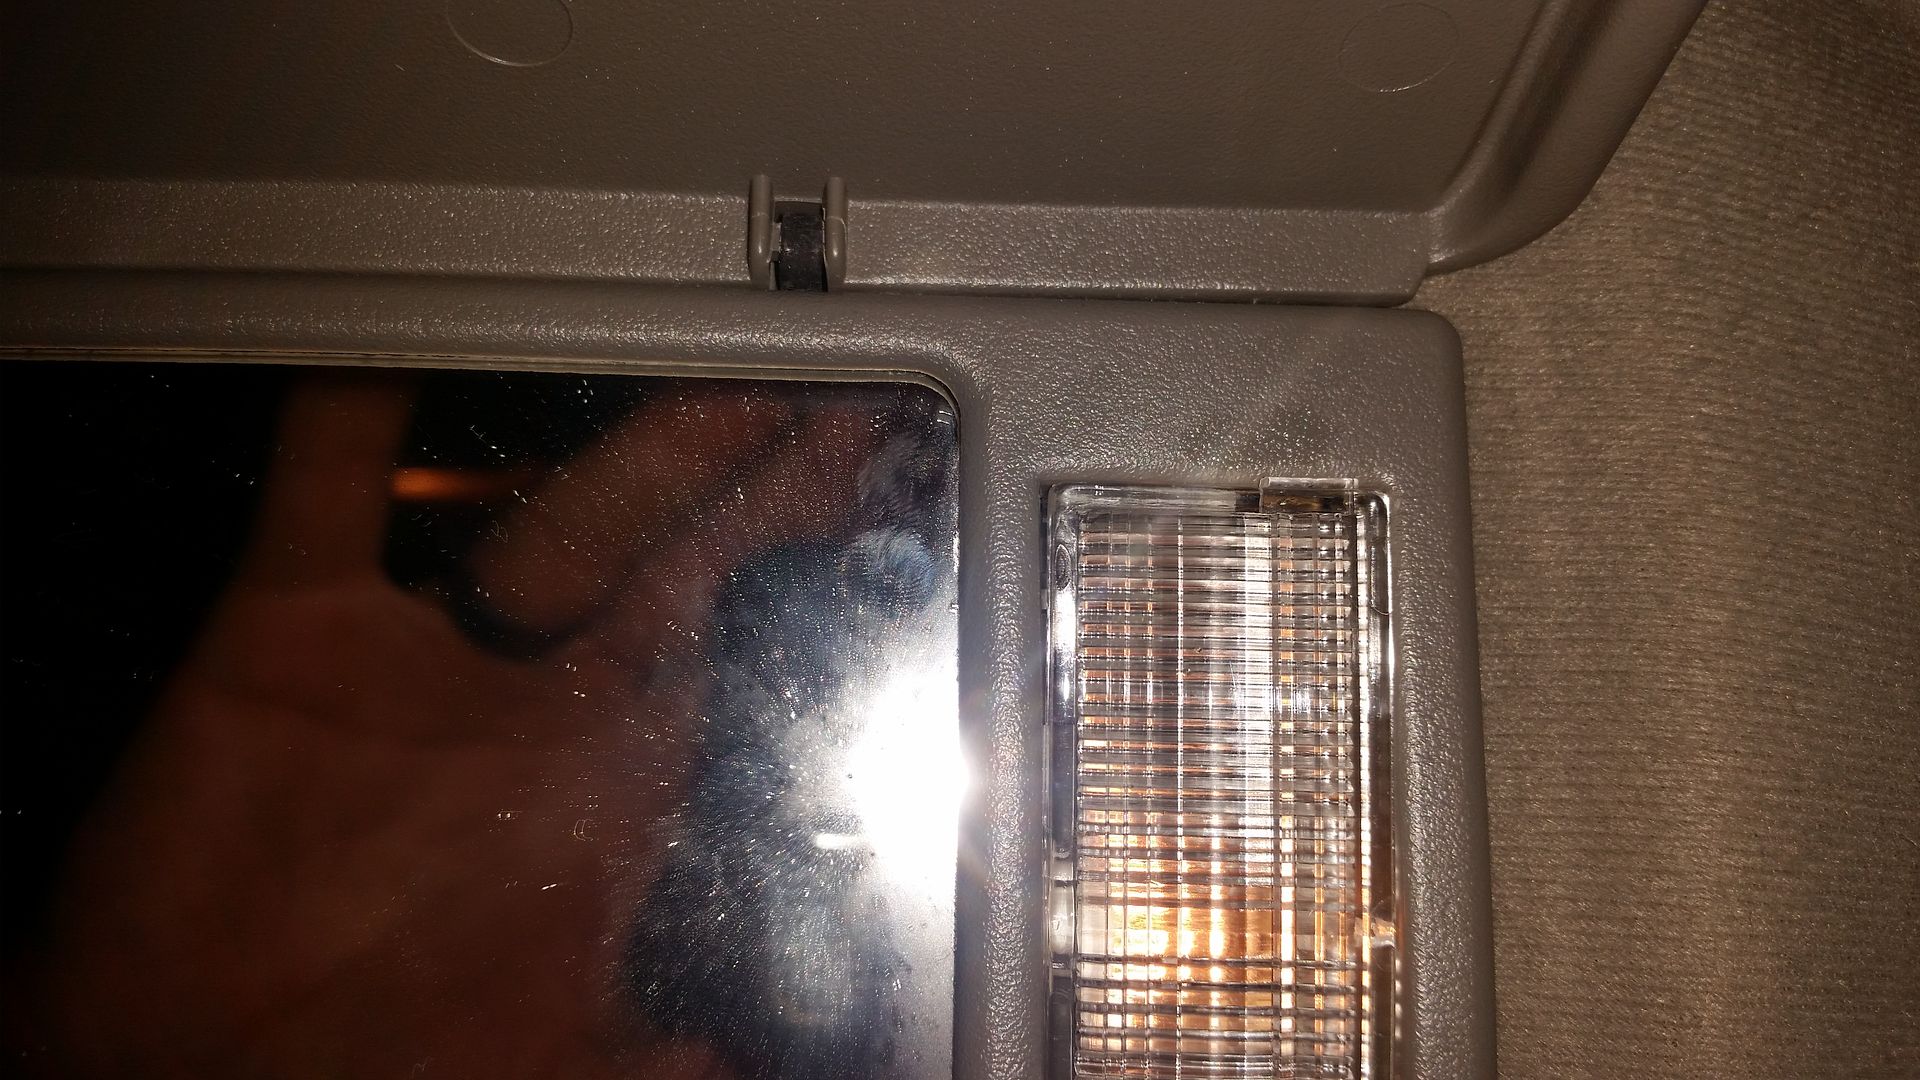
Back to the spudger. Slide it onto the top of the lens, between it and the vanity assembly.
Give a VERY gentle pry downwards, and at the same time push in gently on the lens. The lens will pop right in, and then you can slide the spudger out.
Repeat the process for the other lens.
Once the lenses are installed and correctly seated and popped into place, they should not protrude at all from the assembly.
And that's it! You're good to go! Until the next time if falls off, which to be honest is inevitable...
Quick fix is to swap the hole visor, but often a junk yard will have a set price for things like lighted sun visors, and if the visor HAS a good vanity assembly in it and you're allowed to go into said yard and pull parts yourself, you might be able to get just what you need for cheaper
Requires a little more patients than just pulling out the 3 screws for the entire visor, but it's still not that difficult of a task to remove and install just the vanity assembly.First off, the BEST tool I have found for this is a tool called a "spudger" (or just pry tool), typically used when working on cell phones. A tiny flat head will work too, but tends to leave scars in the plastic from my experience...
First you need to remove the vanity assembly, rather it be the good one from the donor or what's left of the broken one on your vehicle. To start off, you need to remove the light covers, as the clips that hold the assembly to the visor are behind them.
Place the spudger on the top of the lens like so:
Give a gentle pry upwards and the top of the lens should pop out of the housing.
Same process for both sides. Lay the lenses somewhere in the orientation you removed them. It'll help you later when you go to reinstall them
Now you can access the 4 clips that hold the assembly to the visor. Starting with the clip on the bottom side that's under the side with the pin that triggers the light to come on, insert the spudger as shown here:
Gently pry down and push in at the same time. This will get the spudger to release the clip and get between the vanity assembly and the visor parts of the clip.
Then a gently pry upwards will fully release the clip and the vanity from that part of the visor.
Repeat the process with the remaining 3 clips, working your way to the other bottom clip first, then up, then lastly to the clip closest to the pin switch that turns the lights on.
When you get to the final step on the last of the 4 clips, be ready for the vanity to fall off in your lap!
Also keep in mind that the only thing holding the mirror in place are the two little metal tabs. It's not glued, taped, or clipped in in any way to the assembly, so it's pretty easy for it to fall out once you the vanity removed from the visor.
These little metal clips are also what gives the vanity lid it's spring action. The little plastic "pins" in the lid are actually the fail point on these. You can see in the next two pictures that these two are cracked and are not far from failing...
Here are some in better condition, with one showing signs that it's starting to crack.
When they COMPLETELY fail and brake, this is what you're left with... But I'm sure you're aware of this view :P
So you've got your replacement vanity assembly ready, and the broken one remove from the visor in your vehicle. Now time to put it in, more specifically, put it in without breaking it!
Start by simply lining it up on the visor, being sure to line the pin switch up with the hole in the vanity assembly. If you line that up, everything else will pretty much line itself up.
From my experience, you can usually get the clip closest to the pin switch in just by wiggling the assembly a little and pushing in on the clip until it drops in. For the other 3, bring the spudger (or tiny flat head if that's all you have) back out and use it to pop the clips back in. This process is much easier and quicker than removing them, as this time you're simply pushing in until they pop back into place.
Make sure you get all of the clips popped back into place or the vanity will NOT stay put on the visor, and the mirror will probably end up sliding out onto your lap or on the floor the first time the visor is flipped down...
NOT pushed in:
Pushed in:
Now you're at this point:
All that's left to do is pop the light lenses back in!
Grab one and drop the bottom in first. Be sure you're putting it in the correct side and the right way around. Remember earlier I mentioned setting them aside in the orientation they were removed?
Back to the spudger. Slide it onto the top of the lens, between it and the vanity assembly.
Give a VERY gentle pry downwards, and at the same time push in gently on the lens. The lens will pop right in, and then you can slide the spudger out.
Repeat the process for the other lens.
Once the lenses are installed and correctly seated and popped into place, they should not protrude at all from the assembly.
And that's it! You're good to go! Until the next time if falls off, which to be honest is inevitable...
Thread Starter
|
Super Member
Joined: Apr 2014
Posts: 1,968
From: Lake City, Florida
To add to this how to, here's this little trick or piece of info. The left and right assemblies are actually different. The only difference that makes a left not work on the right or a right not work on the left is the placement of the hole for the pin switch and the width of 1 of the 4 clips that hold the assembly on. WHY GM didn't just make them the same left and right is beyond me... But it takes literally 30 seconds to converter either to work on the other side.
All you'll need is a small drill bit (an 11/64 is the perfect size to duplicate the factory hole) and a pair of cuttures/wire cutters/nips, or whatever you want to call them.
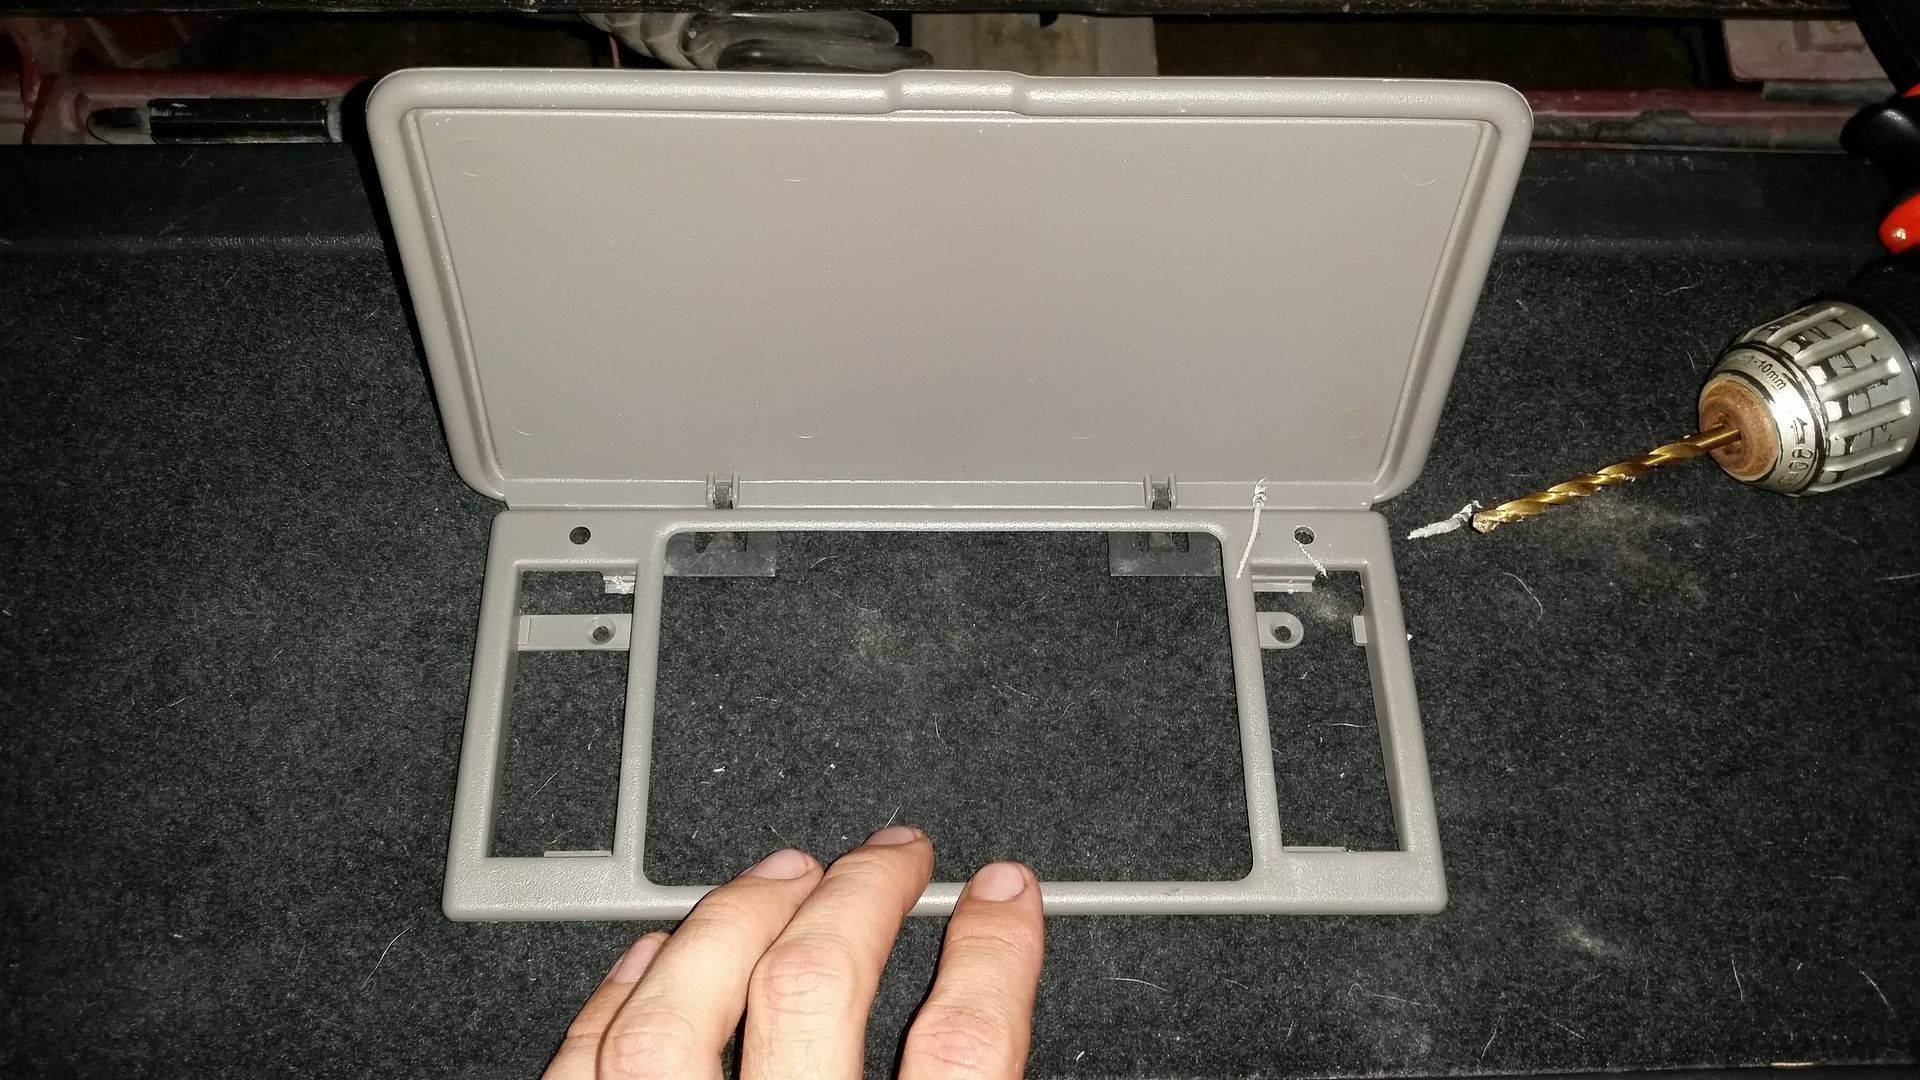
Here I have a left and a right vanity assembly. The one on the left is a driver's side broken one, the one on the right is a passenger side one that is NOT broken. I need to convert it to work on the driver's side.
If you have a keen eye, you may have already noticed the differences. Notice the placement of the pin switch hole on the one for the pictured broken driver's size. It's on the top right side of the assembly.
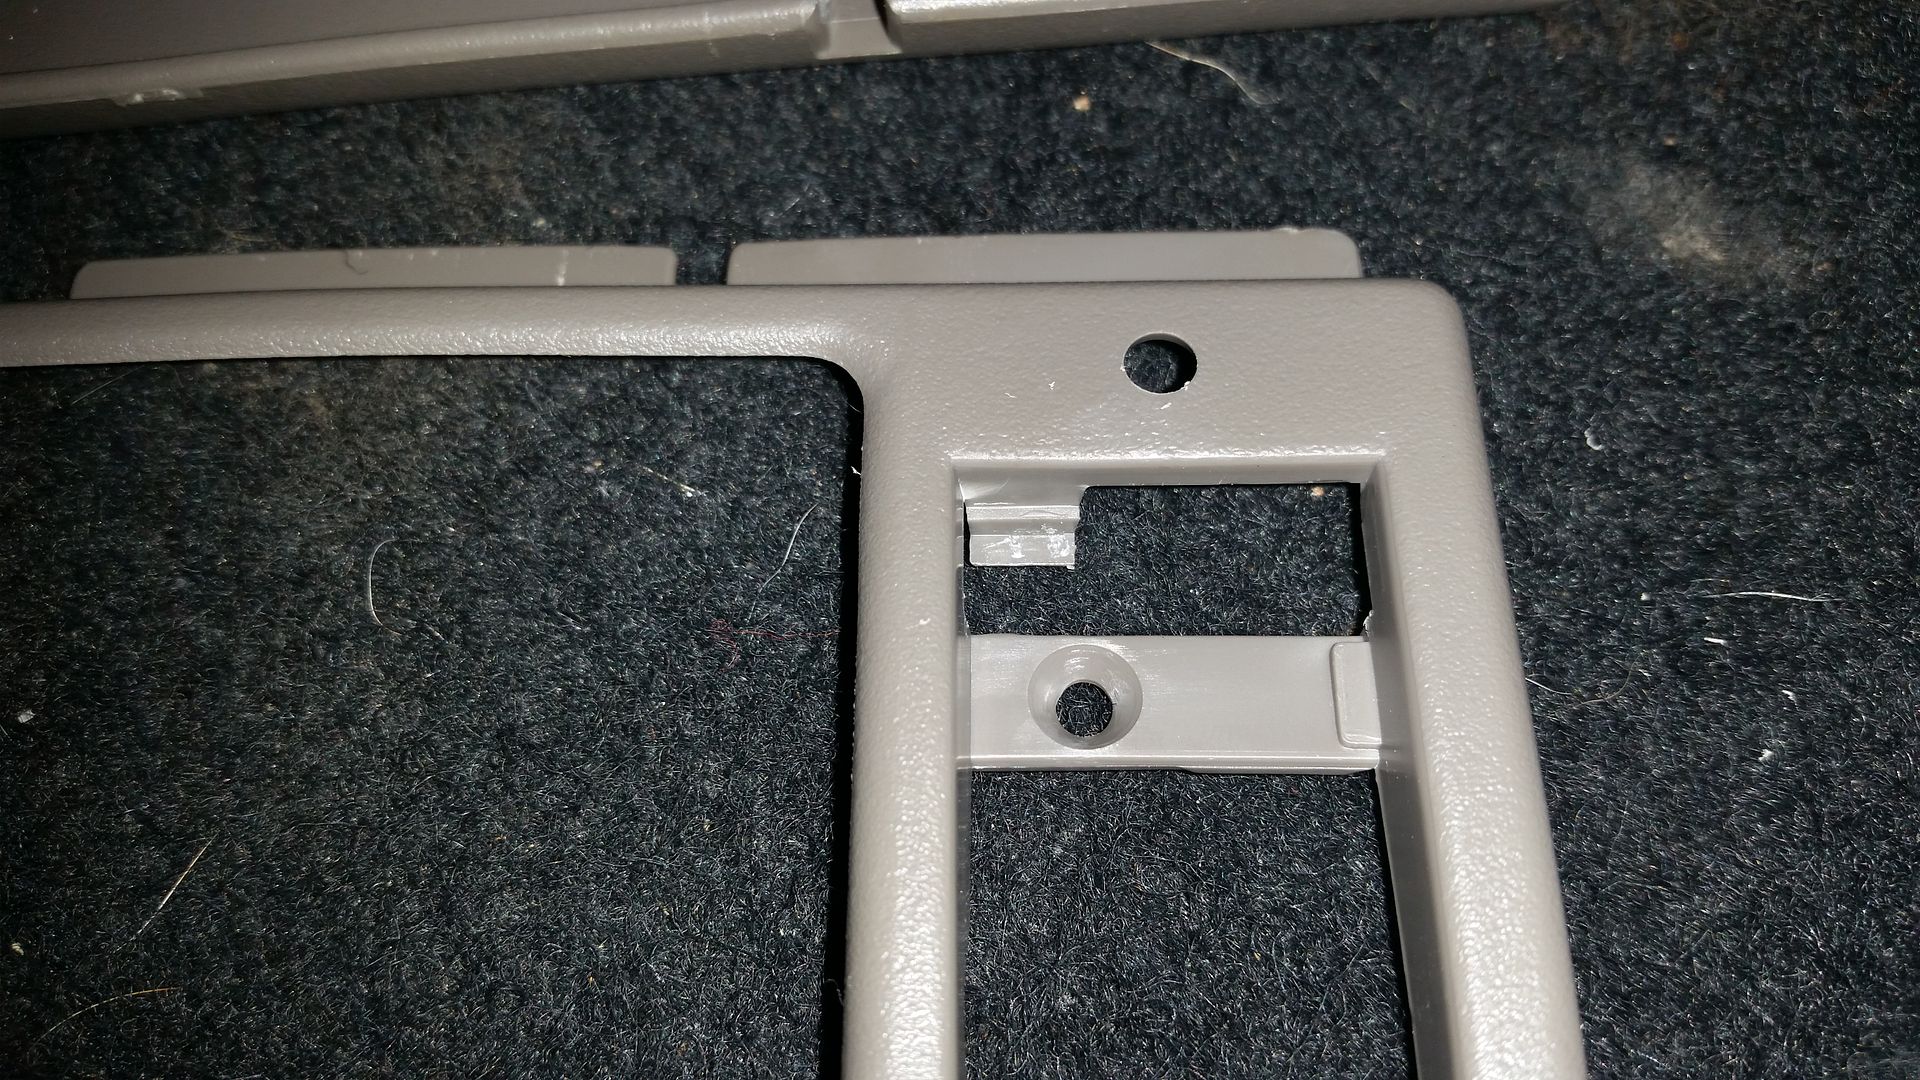
The area in the top left is just blank

However on the passenger side assembly this is reversed. The hole for the pin switch is on the top left side.
And the top right is blank.
Luckily there's literally plenty of room to simply drill a new hole for the pin switch in the blank spot so that it can be used on the other side visor.
To do this, just line up the broken panel over the new one you plan on using.
This allows you to line up the new hole for the pin switch in the exact spot the original is. Use your drill and drill bit and make a small divot into the new vanity assembly straight down through the hole.
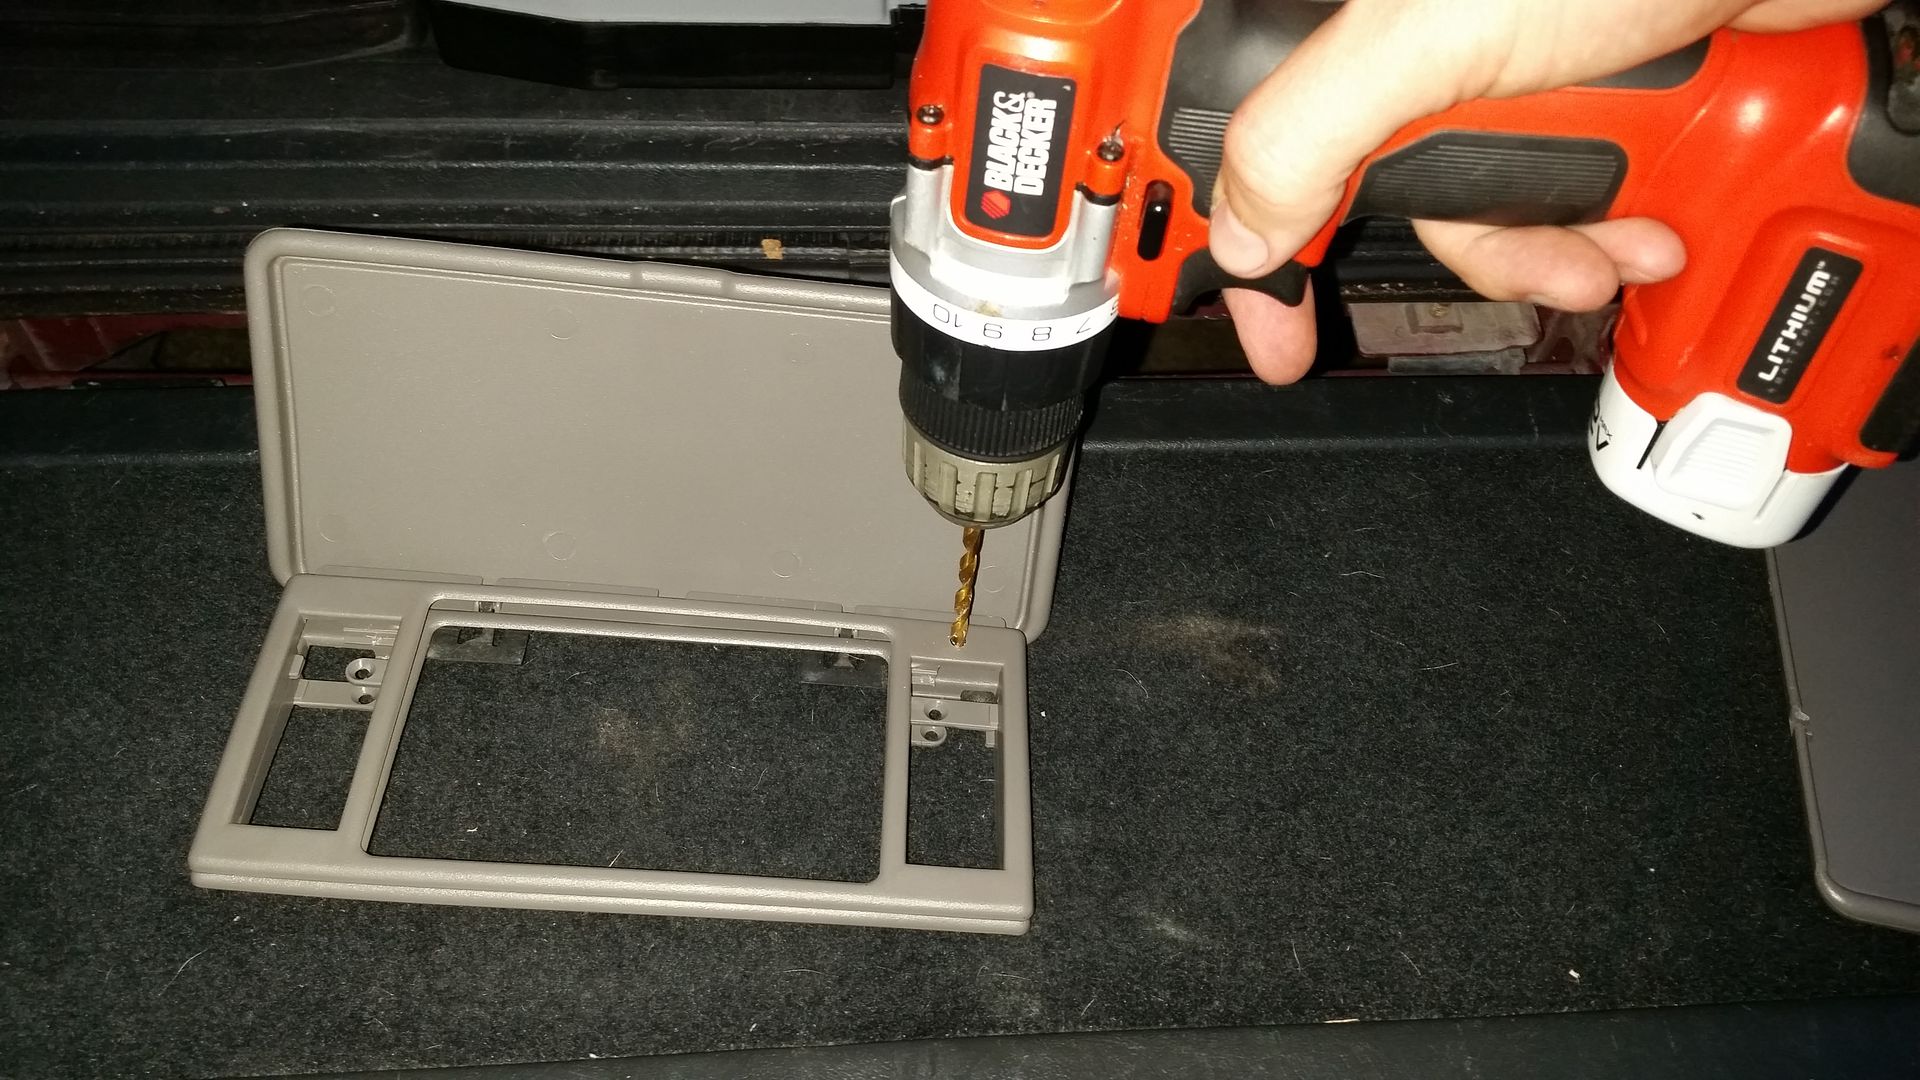
Then simply drill your hole the rest of the way through.
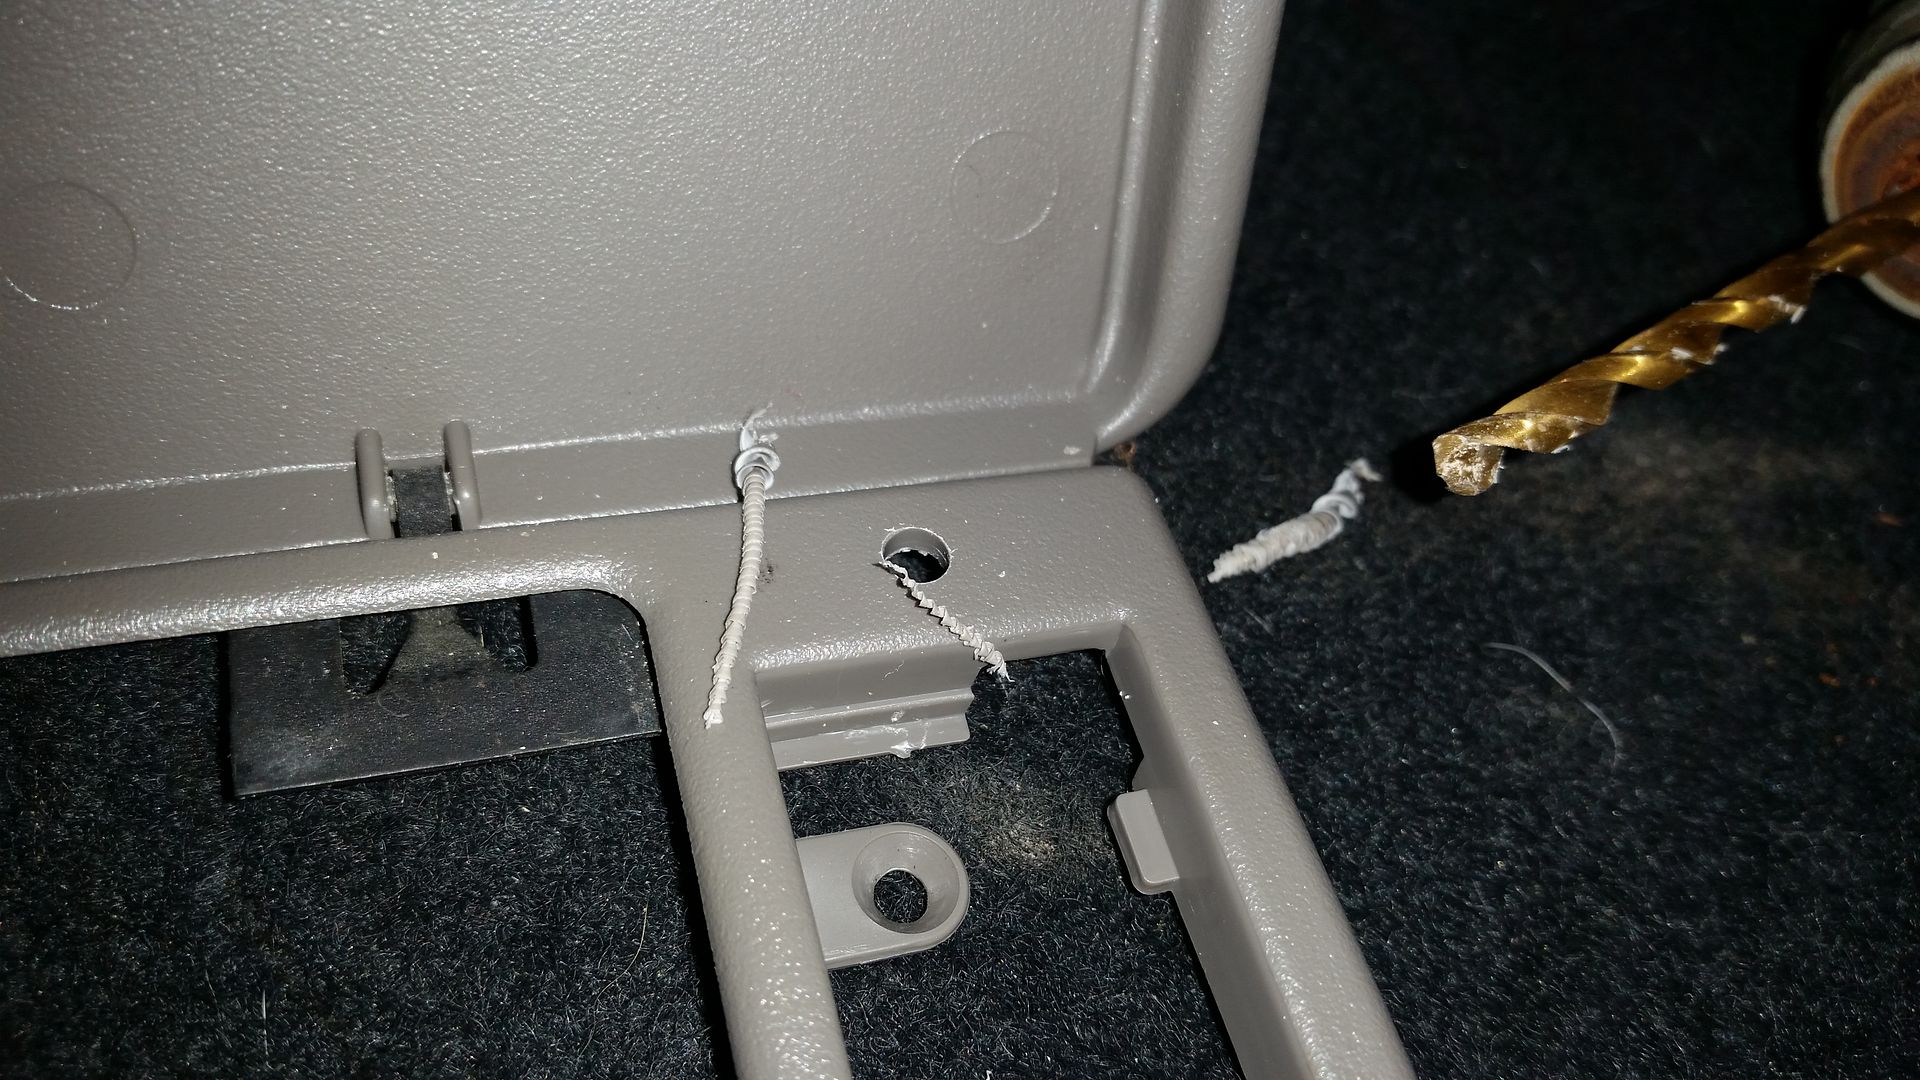
Now you have matching holes on both sides.
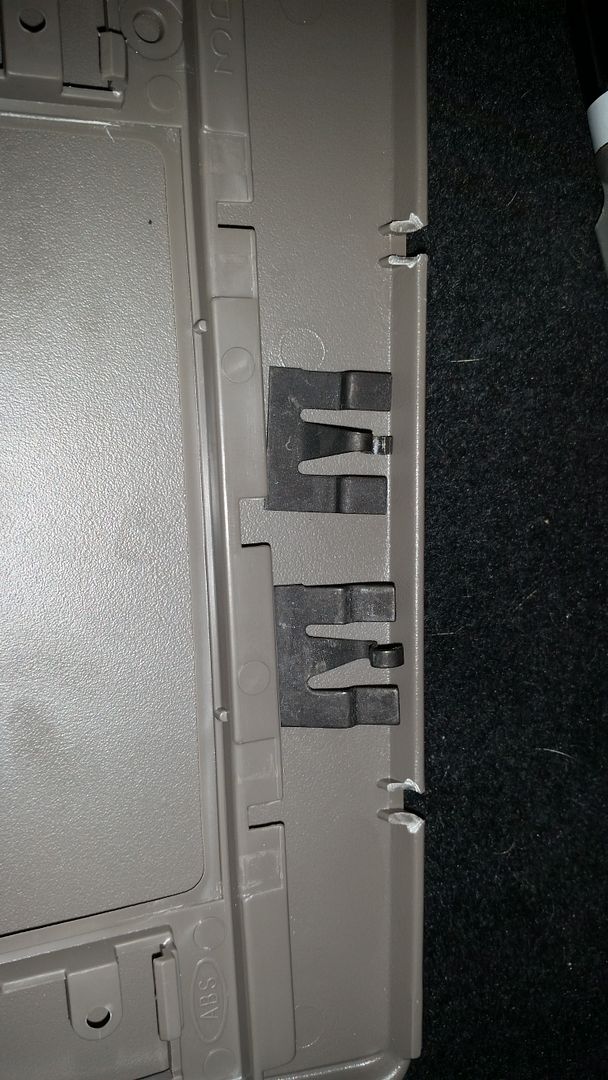
However if you refer back to these photos, you may notice another difference, the size of the clips that hold the assembly to the visor. The one directly under the pin switch hole is about half the size of the other 3 on the assembly. This is just so the clip will clear the pin switch itself when the assembly is installed.
To trim down the one by the hole we just make, just bust out a pair of cutters and nip the plastic away. Take TINY nips... Too much and you WILL split the assembly... But taking little nips at a time will get all the material off you need to.
Start by making the half width trim.
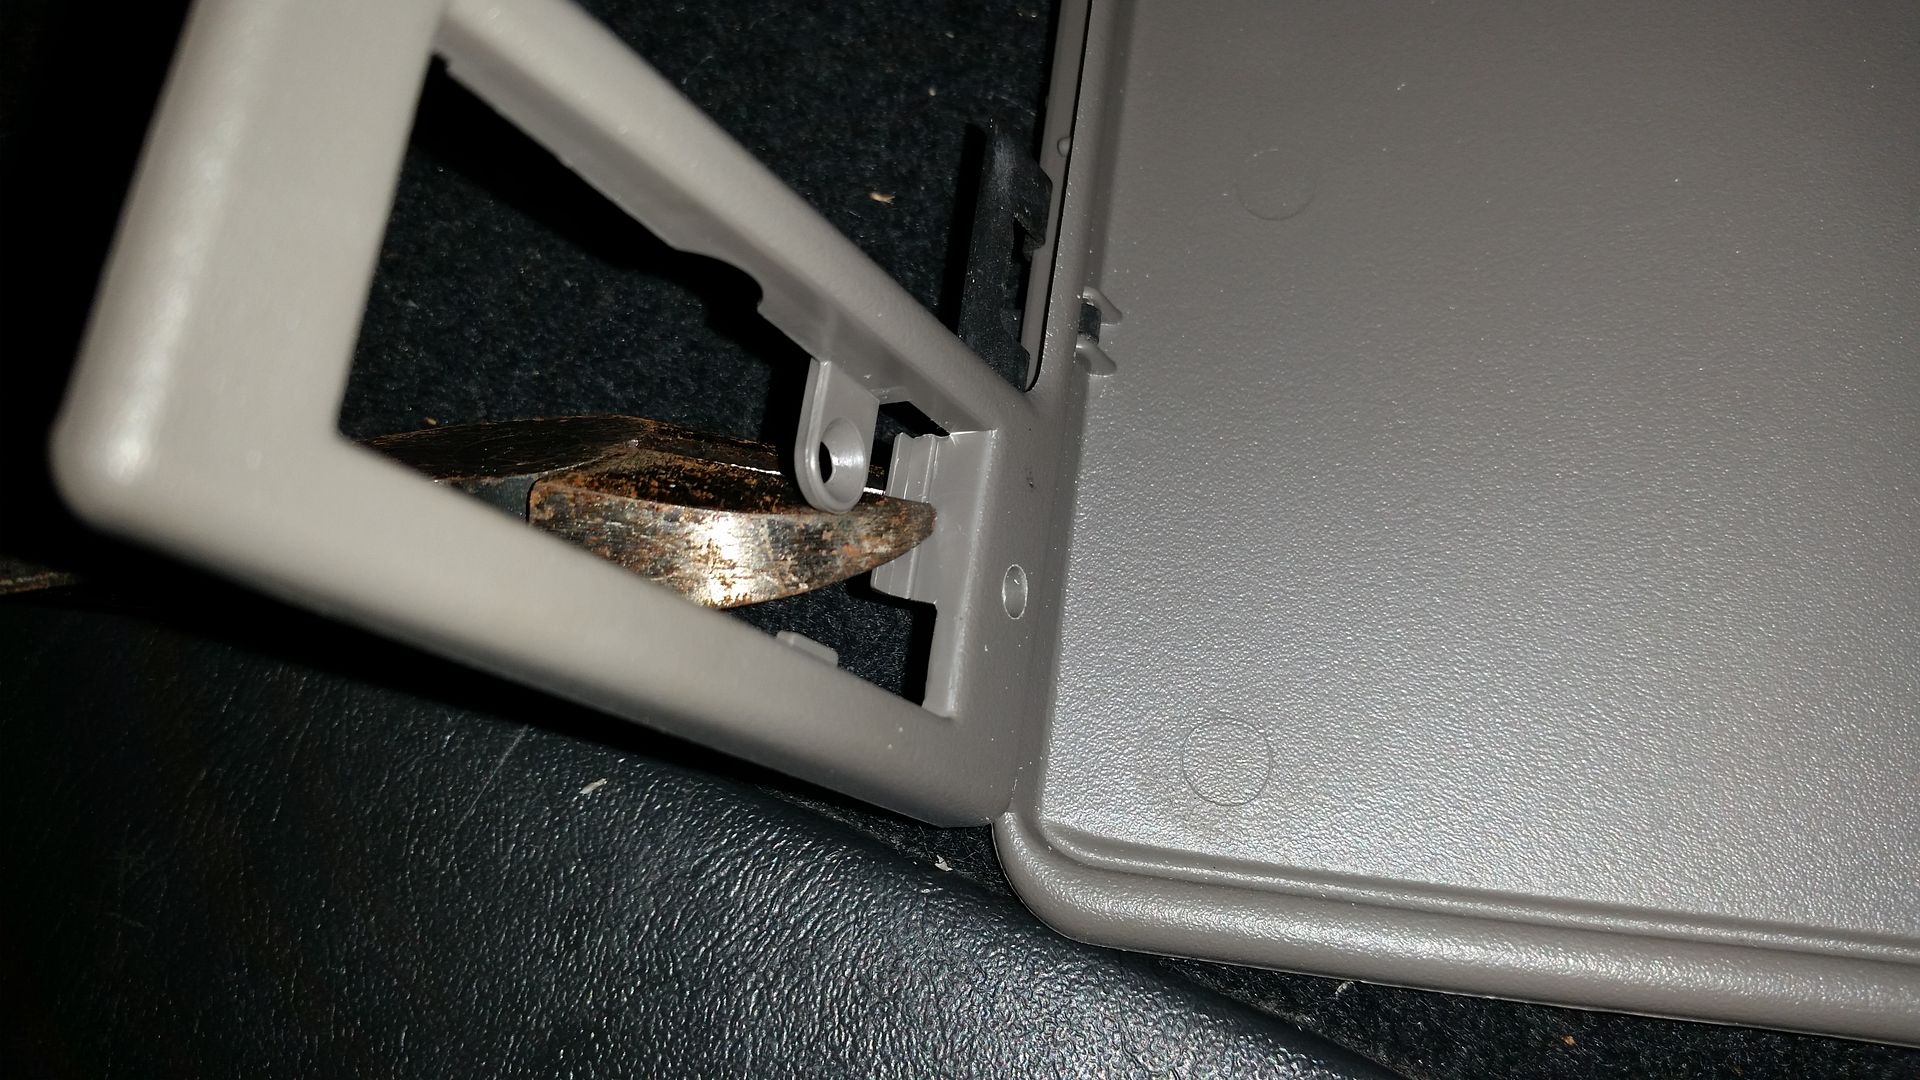
Then turn your cutters 90 degrees and trim off the sliver of plastic clip.
You can make a few more clean-up nips to true up the cut, and if you really want you can put a file on the edges and smooth them out a little more, but I've never went that far personally as the cuts are not visible once the assembly is installed anyhow...
Now you have what is essentially a universal left OR right assembly!
The extra original holes will hardly be noticeable once it's installed, as the visor cloth material will be directly behind it. If my OCD self doesn't notice it, than chances are it'll be fine for most people
All you'll need is a small drill bit (an 11/64 is the perfect size to duplicate the factory hole) and a pair of cuttures/wire cutters/nips, or whatever you want to call them.
Here I have a left and a right vanity assembly. The one on the left is a driver's side broken one, the one on the right is a passenger side one that is NOT broken. I need to convert it to work on the driver's side.
If you have a keen eye, you may have already noticed the differences. Notice the placement of the pin switch hole on the one for the pictured broken driver's size. It's on the top right side of the assembly.
The area in the top left is just blank
However on the passenger side assembly this is reversed. The hole for the pin switch is on the top left side.
And the top right is blank.
Luckily there's literally plenty of room to simply drill a new hole for the pin switch in the blank spot so that it can be used on the other side visor.
To do this, just line up the broken panel over the new one you plan on using.
This allows you to line up the new hole for the pin switch in the exact spot the original is. Use your drill and drill bit and make a small divot into the new vanity assembly straight down through the hole.
Then simply drill your hole the rest of the way through.
Now you have matching holes on both sides.
However if you refer back to these photos, you may notice another difference, the size of the clips that hold the assembly to the visor. The one directly under the pin switch hole is about half the size of the other 3 on the assembly. This is just so the clip will clear the pin switch itself when the assembly is installed.
To trim down the one by the hole we just make, just bust out a pair of cutters and nip the plastic away. Take TINY nips... Too much and you WILL split the assembly... But taking little nips at a time will get all the material off you need to.
Start by making the half width trim.
Then turn your cutters 90 degrees and trim off the sliver of plastic clip.
You can make a few more clean-up nips to true up the cut, and if you really want you can put a file on the edges and smooth them out a little more, but I've never went that far personally as the cuts are not visible once the assembly is installed anyhow...
Now you have what is essentially a universal left OR right assembly!
The extra original holes will hardly be noticeable once it's installed, as the visor cloth material will be directly behind it. If my OCD self doesn't notice it, than chances are it'll be fine for most people
Last edited by blazen_red_4x4; Aug 18, 2017 at 09:51 PM.

Thread Starter
|
Super Member
Joined: Apr 2014
Posts: 1,968
From: Lake City, Florida
Thank ya 
Figured I had a good opportunity to take some photos of the process as I had to replace one of mine for the 4th time... And might as well make use of my grandfathered plus 30 Photobucket account while I still can for the next year or so
Figured I had a good opportunity to take some photos of the process as I had to replace one of mine for the 4th time... And might as well make use of my grandfathered plus 30 Photobucket account while I still can for the next year or so

Starting Member
Joined: Dec 2017
Posts: 109
From: Chaparral, NM
My current set of sun visors are slowly falling apart, and I have a back up set standing by...but a set without the use of this crummy fabric and adhesive would be dynamite!
I was hoping there would be a better alternative to the visors located within this thread...possibly out of another car or such.
LMC and RockAuto don't even carry interior sun visors for 2nd gens...doh!
I was hoping there would be a better alternative to the visors located within this thread...possibly out of another car or such.
LMC and RockAuto don't even carry interior sun visors for 2nd gens...doh!
Thread Starter
|
Super Member
Joined: Apr 2014
Posts: 1,968
From: Lake City, Florida
Working in a salvage yard myself, I've been keeping my eyes out for just such a thing! But so far no luck; haven't seen any other GM vehicle or otherwise with a similarly sized vanity mirror yet...

Thread
Thread Starter
Forum
Replies
Last Post
kmartin
2nd Generation S-series (1995-2005) Tech
8
Jul 26, 2011 04:05 PM
68Datsun510
2nd Generation S-series (1995-2005) Tech
0
Sep 15, 2009 06:10 PM