
Water Pump Removal & Install - DISCUSSION THREAD

Thread Starter
|
Starting Member
Joined: Oct 2008
Posts: 144
From: Las Vegas, NV

We're going to cover removing a water pump from a 2000 Chevy Blazer, 4.3 6 Cyl Engine.
CAUTION: Working with coolant can be hazardous. Maintain a drip pan underneath the vehicle, and wear protective equipment. (Goggles/Gloves) Dispose of coolant in an appropriate manner in accordance with your state laws.
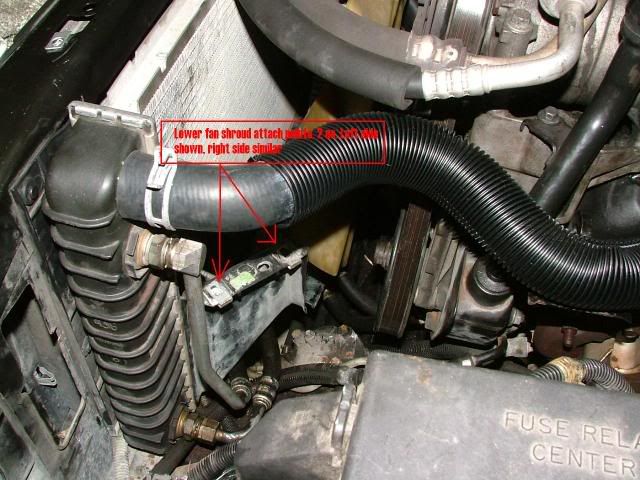
1. Remove the upper fan shroud. Remove the bolts along the forward frame, and the four bolts that mount to the lower fan shroud. They are low torque and come off easily. Optional: The AC compressor can be removed from its mount by removing the four bolts in each corner facing down. DO NOT DISCONNECT THE HOSES. Remove the electrical connectors (2 ea) and then put the entire compressor off to the passenger side of the vehicle, being careful not to kink or bend the hoses too much. (I do recommend this; it makes things a lot easier not having to fight with the AC hoses)
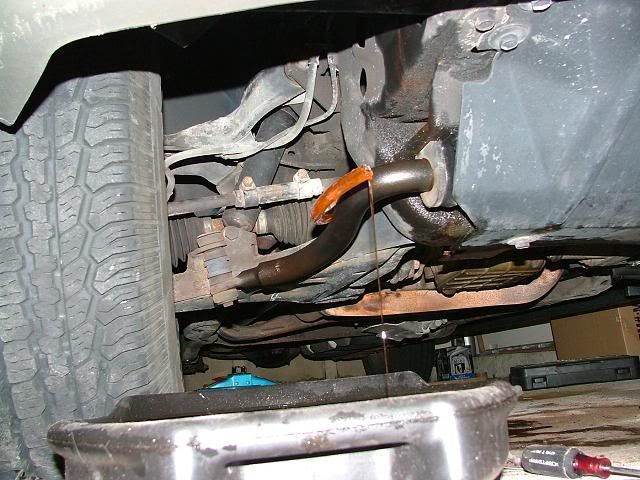
2. Drain the coolant. Remove the radiator fill cap. Before disconnecting any radiator/heater hoses, drain the radiator coolant by attaching a length of plastic tube to the drain **** on the bottom left side of the radiator. The plastic plug has an internal hex socket in the center; which fits 3/16" allen key perfectly. Turn it CCW until it stops. Do not force as you will break the fragile plastic. As you turn it, it will leak so be cautious.
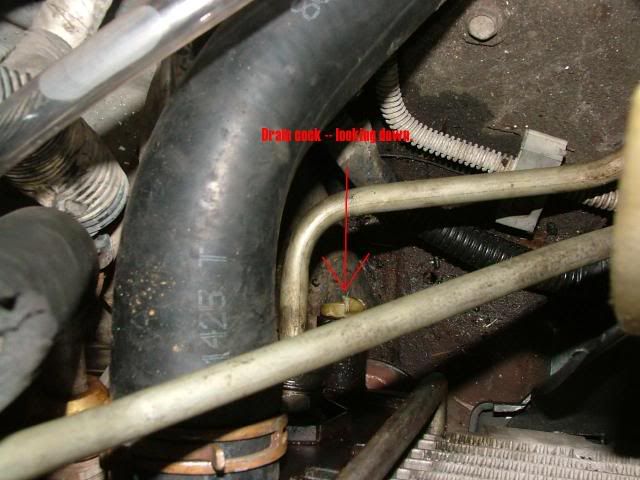
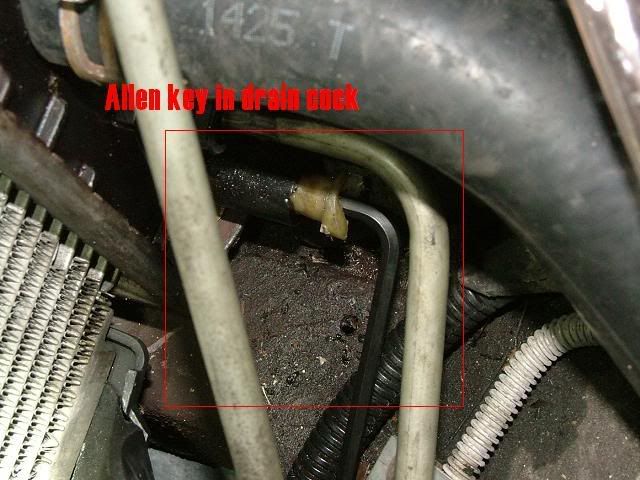
The photos above can't show the plastic tube that fits on the drain opening that bleeds off to the right side of the car. A length of about 3 feet, with 3/8" inner diameter clear plastic hose works perfect. Draining takes a little while, and it does not completely drain your cooling system. It is recommended that you drain your engine blocks, but I opted to skip this. (In not doing so will result in a liter or so of coolant to dump when you disconnect the radiator hose from the water pump)
3. Remove the serpentine belt. Insert a 3/8" drive long ratchet or breaker bar into the socket on the tensioner and rotate CCW to release tension on the belt. I also removed the tensioner and the extra pulley to give me more room. (1/2" size bolts)
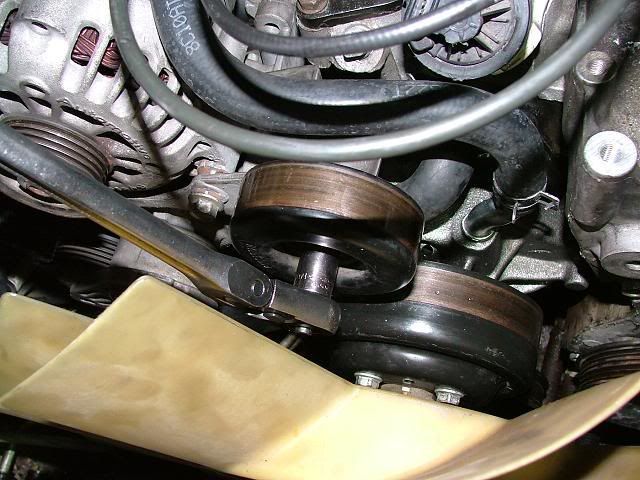
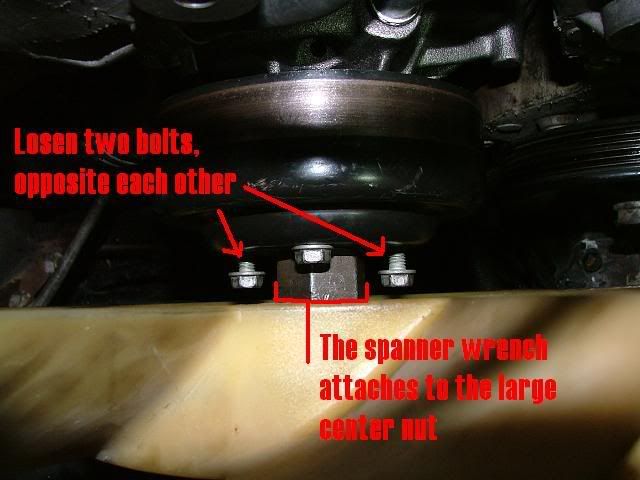
4. Remove the fan/clutch assembly. Not an easy task if you don't have the correct tools. I highly encourage going to your nearest parts store that rents out special tools and using this. It will make your life a lot easier disconnecting the fan/clutch assembly from the water pump. Loosen two bolts on the fan/clutch assembly pulley; that are opposite each other, but do not remove. (1/2" size bolt heads)
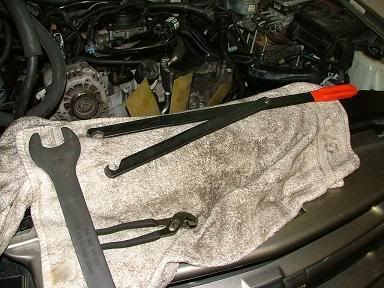
The kit includes a long and thin spanner wrench, and a lever with another tong hinged on.
The two claws will fit on the shanks of the two loosened bolts. They should be lose enough so that the claws of the lever fit snugly and do not easily slip out. Attach the spanner wrench to the center nut and losen. Remove the fan and clutch assembly.
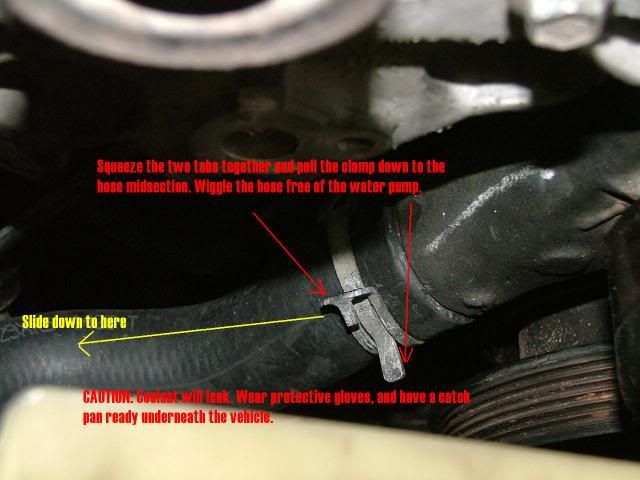
Step 5. Disconnect the radiator hose to the water pump. Many various clamps are used; mine are compression type. Using a pair of channel locks, squeeze the two tabs together and it will open the clamp. The hoses can be wiggled free if they arn't seized on. If they are, find an L shaped flat and thin piece of metal to insert the hose and try to free it up. If its been years or over 50,000 miles since last hose swap, I suggest just cutting them off and replacing the hoses.
Step 6. Remove the heater hoses from the water pump.
(make note of which one goes where)
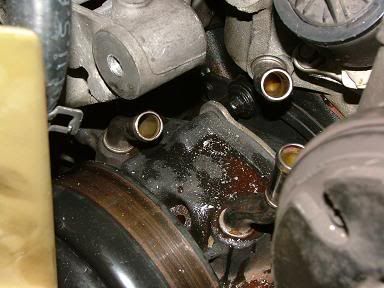
Step 7. Unbolt the water pump. 4 aluminum mounting bolts hold the pump onto the engine; remove all four, supporting the pump from the front to prevent it from ruining the threads of the bolts.
If you have removed all 4 bolts, and the pump will not come free, use a hammer and a wood block and gently tap the pump until it is free.
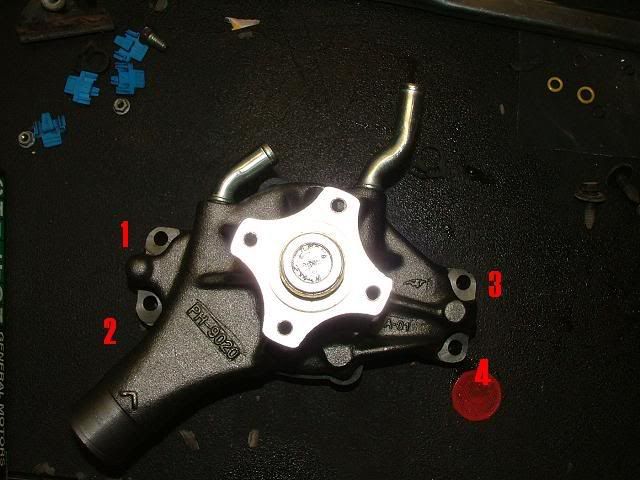
Remove the four bolts holding the pulley onto the pump if you are replacing the pump. If not, leave it alone. Do not tighten the two bolts yet, wait until after you have reinstalled the fan/clutch assembly.
Clean all gasket surfaces before remounting the water pump. Replace the water pump gaskets. You should also check the mating surfaces for smoothness and make sure they are flat.
Installation is reverse of removal.
CAUTION: Working with coolant can be hazardous. Maintain a drip pan underneath the vehicle, and wear protective equipment. (Goggles/Gloves) Dispose of coolant in an appropriate manner in accordance with your state laws.
1. Remove the upper fan shroud. Remove the bolts along the forward frame, and the four bolts that mount to the lower fan shroud. They are low torque and come off easily. Optional: The AC compressor can be removed from its mount by removing the four bolts in each corner facing down. DO NOT DISCONNECT THE HOSES. Remove the electrical connectors (2 ea) and then put the entire compressor off to the passenger side of the vehicle, being careful not to kink or bend the hoses too much. (I do recommend this; it makes things a lot easier not having to fight with the AC hoses)
2. Drain the coolant. Remove the radiator fill cap. Before disconnecting any radiator/heater hoses, drain the radiator coolant by attaching a length of plastic tube to the drain **** on the bottom left side of the radiator. The plastic plug has an internal hex socket in the center; which fits 3/16" allen key perfectly. Turn it CCW until it stops. Do not force as you will break the fragile plastic. As you turn it, it will leak so be cautious.
The photos above can't show the plastic tube that fits on the drain opening that bleeds off to the right side of the car. A length of about 3 feet, with 3/8" inner diameter clear plastic hose works perfect. Draining takes a little while, and it does not completely drain your cooling system. It is recommended that you drain your engine blocks, but I opted to skip this. (In not doing so will result in a liter or so of coolant to dump when you disconnect the radiator hose from the water pump)
3. Remove the serpentine belt. Insert a 3/8" drive long ratchet or breaker bar into the socket on the tensioner and rotate CCW to release tension on the belt. I also removed the tensioner and the extra pulley to give me more room. (1/2" size bolts)
4. Remove the fan/clutch assembly. Not an easy task if you don't have the correct tools. I highly encourage going to your nearest parts store that rents out special tools and using this. It will make your life a lot easier disconnecting the fan/clutch assembly from the water pump. Loosen two bolts on the fan/clutch assembly pulley; that are opposite each other, but do not remove. (1/2" size bolt heads)
The kit includes a long and thin spanner wrench, and a lever with another tong hinged on.
The two claws will fit on the shanks of the two loosened bolts. They should be lose enough so that the claws of the lever fit snugly and do not easily slip out. Attach the spanner wrench to the center nut and losen. Remove the fan and clutch assembly.
Step 5. Disconnect the radiator hose to the water pump. Many various clamps are used; mine are compression type. Using a pair of channel locks, squeeze the two tabs together and it will open the clamp. The hoses can be wiggled free if they arn't seized on. If they are, find an L shaped flat and thin piece of metal to insert the hose and try to free it up. If its been years or over 50,000 miles since last hose swap, I suggest just cutting them off and replacing the hoses.
Step 6. Remove the heater hoses from the water pump.
(make note of which one goes where)
Step 7. Unbolt the water pump. 4 aluminum mounting bolts hold the pump onto the engine; remove all four, supporting the pump from the front to prevent it from ruining the threads of the bolts.
If you have removed all 4 bolts, and the pump will not come free, use a hammer and a wood block and gently tap the pump until it is free.
Remove the four bolts holding the pulley onto the pump if you are replacing the pump. If not, leave it alone. Do not tighten the two bolts yet, wait until after you have reinstalled the fan/clutch assembly.
Clean all gasket surfaces before remounting the water pump. Replace the water pump gaskets. You should also check the mating surfaces for smoothness and make sure they are flat.
Installation is reverse of removal.

New Member
Joined: Dec 2008
Posts: 2
I just wanted to say thanks for this great post! I'm not changing my water pump - just the thermostat, but I've spent the last hour or so trying to figure out how to turn the drain **** on the radiator. A lot of people seem to be asking the same question, but your post was the first I've been able to findthat gives any details about how it's done. The pictures are perfect! Thanks!!!

Definitely a good post! I will get it moved over into the DIY section when I get a chance.
Just an FYI though, sometime in 2001 or 2002 (can not remember exactly), GM did away with the petcock drain in the radiator. The boss is still there, but it is sealed inside.
Also worth noting is that the socket in the drain valve itself is a 1/4" square drive. A 1/4" ratchet with a short extension works great!

Senior Member
Joined: Jan 2009
Posts: 643
From: Portland, OR

Ill go ahead and mention that putting a tiny dot of rtv on the gasket corners to hold them in place will make the reinstall WAY easyer! Very good post, wish I had known about BF back when I did mine, lol!

Thread Starter
|
Starting Member
Joined: Oct 2008
Posts: 144
From: Las Vegas, NV
Found it.
https://blazerforum.com/forum/showth...olant+bleeding
Read that for proper servicing technique of the coolant system.
https://blazerforum.com/forum/showth...olant+bleeding
Read that for proper servicing technique of the coolant system.