2001 Jimmy Double Din Conversion
#1
 01-06-2015, 11:07 PM


So I finally got to the project I've been wanting to do for some time now on my Jimmy and that is to install a double din touchscreen radio.
I figured since I was getting the touchscreen I might as well add a backup camera, GPS, and a few other goodies
So here's what happened on day one:
Started with bringing her inside out of the snow and wind. Thankfully I'm able to borrow the garage at my parents place these few days while I'm visiting.
Disconnected and pulled the battery. While I was there I replaced the missing bolt that holds the battery tray to the front fender so now it will sit right and drain through the drain hole again.
Next moved on to removing the plastic bezel, along with the button modules followed by the radio.
All of that was straight forward and easy to do. Now here comes the fun bit
Camera:
I purchased an Esky EC170-06 from amazon after seeing good reviews and a decent price. Upon opening it, she seems to fit the bill (I have experience when it comes to putting cameras into harsh environments) with a tough exterior, easy mounting brackets and waterproof design.
You will need to ignore the provided hardware and find yourself a set of self drilling screws from your local hardware store if you use this camera though. The designers assume you have a plastic bumper. I chose to mount mine suspended below the rear bumper just left of the hitch. So it is protected from road debris by the hitch bar and is recessed enough to not be affected by snow fall.
I picked the let side over the right for the simple reason of wiring. If you open the hatch up and remove the plastic trim on the floor entry you will find a nice sized hole in the metal. If you look into that hole you will find a plastic plug that can be punched through. The wires from the camera can be run up to this hole you've just cleared so both connections (DC12 and Video) will be protected inside. From here take the DC plug provided and run that under the carpet toward the sparetire jack box. There is a bundle in there for your taillight, you will need to splice the positive into the green wire (the reverse bulb's positive) so the camera will turn on when the car is put into reverse. The ground wire can be grounded to the frame via a frame bold in the same compartment.
The video cable also run through the same way is run through the paneling along the side of the car, through the foot well and behind the dash into the HU slot. The wire provided is sufficient for this run with plenty to spare. BE careful not to pinch it along the way. Note you do not have tor remove the seat belts, just loosen all the other screws or pull up the panel enough to tuck the cord under the trim.
Lastly I took a can of Great Stuff and filled the hole where the plastic plug used to be where the wires now come through to maintain the weather seal of the back compartment. While I was at it I used some of the left overs to fill the hole in the front of my car from the road damage last week. Its by no means a fix but I think its better than a gaping hole until I change the grill out this spring. Finally replace the interior covers and she's set.
Dash Prep:
So next was the dash. With this unit it comes with a butt load of cables you can use. To simplify the install I am choosing not to install the video and audio in or out cables (intended for gaming systems or extra screens) as I will not be installing things like that this time around. Some day I do intend to add those so when it comes time for that I will add that capability. So The rest of the things had to find homes.
The Mic for the Bluetooth system I came with 3M adhesive tape which will be mounted to the steering column net to the hazards button. Simple out of the way and the wire will tuck in behind the rubber skirt of the dash. That wire runs down the column and tucks through a hole towards the back of the dash cavity (same hole I ran the video wire for the camera through).
The GPS pod is magnetic and while it is intended to be roof mounted I feel it isn't necessary. I found a cozy piece of metal located behind the rear control box for it to stick to.
The antenna adapter I plugged in and wrapped in electric tape for good measure to assure it won't disconnect.
The iPod plug I ran through the ash tray. There is a small gap in the top of it where the cig lighter folds into the dash that the wire runs through unobstructed even when folded up with the cig lighter in place.
Unfortunately the ISO to GM plug I ordered hasn't come in yet so I decided to move on without it (more than happy to sell and send to someone who would like it when I do gain possession of it.). So I clipped the ISO plug off the HU cord and began crimping it to my GM harness (amazon saves the day again). On the unit I bought, you must tie the brake positive to the ignition positive if you want to bypass the parking break safety. You will also have two Key 5V wires and a small additional GRD wire. Those can be bundled and forgotten about unless you install a steering control wheel. This should leave you with just one lonely wire labled Reverse Input which is the Reverse positive trigger. More on this later.
Now you will need to custom fab a mounting bracket. I'm using parts from two GM mounting kits, but metal would work too (just don't have any handy)
Lastly for prep you will need to locate the plastic hump in the back and dremel the corner off. Make sure you don't cut anything but the plastic hump.
Also prepped the new bezel piece. Unfortunately it was advertised wrong and I ended up with a grey part instead of the tan one. But due to garage availability and other time constraints, I'm going ahead with the build. I will at some point change the grey bezel back to a tan one. I also had to make a minor repair to the vent mount which had popped its melted plastic beads. Bit of industrial hot glue reseated everything
This for me ended day 1. After a few interruptions, a few parts runs and careful considerations, 10 hours flew by.
Tomorrow will have me locating the reverse wire up front, and buttoning it all up so testing can begin
Pictures will come later too!
Last edited by tenorsaxdude; 01-06-2015 at 11:11 PM.

#3
01-08-2015, 11:27 AM
Ok so Day 2:
This day started with tracking down the reverse wire from the Engine bay fuse box tracking it and then making the ultimate decision to run a wire to the back where the wire is within the compartment. So off came the body panels again along the left side and ran a spool of wire to hook in with the reverse light.
Once wired up next came finalizing the fit of the radio as we had manufactured a bracket using two different install kits. Also had to dremel the hole in the new bezel a bit larger. Odd story though I ended up with the wrong color on the new bezel piece. I have a tan interior now withe a light grey dash, but because the buttons along the door are the same tone of grey, the two tone actually looks really good so I may just keep the dash as is instead of replacing at a later day as originally planned.
Next step was plug it all in, fit the wires cozily back into the dash and test it before buttoning up the dash.
With everything working good, all that was needed to do was put the dash back together, and clean up the work space.
The only other thing I want to get done is to custom fab a face plate to fill the slight gap around the edges caused by the lip on the devices. That won't be too hard to do, but I didn't have time to put one together this time around so it will likely be delayed until my next car working day or down time. However she is ready to go for my next road trip here in a few days as I return north for school.
Pictures to follow
Last edited by tenorsaxdude; 01-08-2015 at 11:30 AM.
#4
01-08-2015, 11:59 AM
Ok so I'll sort these pictures in order
Day 1:


Original unit and dash


Out comes the old


The reverse Camera is mounted just left of the hitch and pushed back enough to be out of the way of snow and gain protection from the hitch itself


The wires for the camera come up through a removed plug and run the length of the car behind the interior panels. The hole I filled with Great Stuff

And also band-aid patched the hole in my grille to prevent road grime getting in as it has been for the past week. At least until spring when I replace it
Day 2:

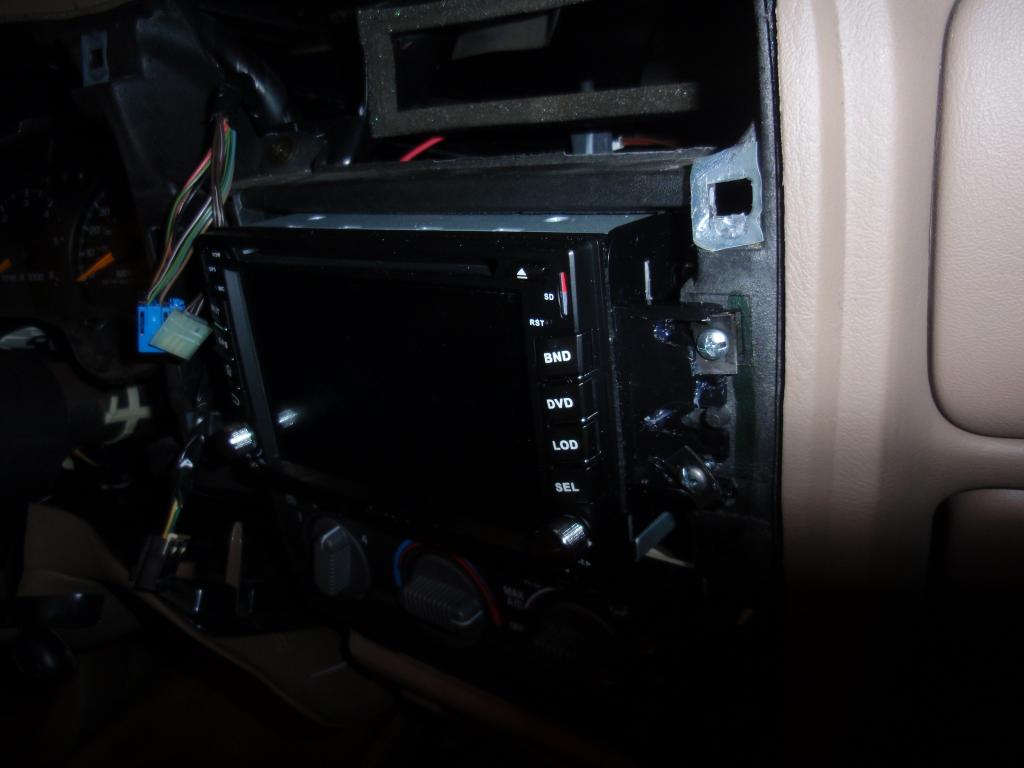
Getting it all lined up just so


Finished product. This is of course minus the faceplate trim around the unit. I didn't like the one provided and the kits were too small so I will be fabbing one up to fill the gaps around the edges which will clean the rest of it up

Home screen

Radio. She also has and SD slot for music, and a cable for the ipod

Navgation with iGo


And reverse Camera where the yellow area represents 2ft away. the side lines actually line up to just about the car edges too
#6
01-08-2015, 08:12 PM
The unit is a Pumpkin 6.2" running pure Android 4.4.4
The Camera is an Esky EC170-06. This one comes with the lines. You can also order the lineless version if you don't like them. While the lines are at the improper angle, I have already grown to love them for judging close distances which is really all I'll be using it for
The only minor complaint with the unit is the boot time is slightly longer than most, however because of the reverse camera, while I'm backing up out of my spot, the unit boots in the background so by the time I've switched to drive, the unit has booted up and is ready for use. Also does not come with a paper manual, just a wiring diagram for install
Last edited by tenorsaxdude; 01-08-2015 at 08:17 PM.
#7
01-08-2015, 11:21 PM
Finally have the timelapse compiled
These are both days mashed into one video. The camera stopped about 2/3 of the way through day one because some fool forgot to plug it in oops
The important things from day one however made it on before hand.
The "crew" as you can see wasn't 100% efficient with this go, but we wanted to things right, do it right the first time, and stay warm
Enjoy!
https://www.youtube.com/watch?v=m3yt...ature=youtu.be
#9
04-22-2015, 05:04 PM
What did you end up doing for a rear camera? and where did you mount it? *edit* I just saw your post in my build thread about the camera
Last edited by tenorsaxdude; 04-22-2015 at 05:07 PM.