
Operation Wicker Basket

Thread Starter
|
Starting Member
Joined: Oct 2008
Posts: 144
From: Las Vegas, NV

Well I've been sitting on this project for awhile, and since none of these posts really motivated me to do it, I finally just got fed up and did it! Of course since I'm doing something thats of high interest here, I brought my camera!
This post augments this one: https://blazerforum.com/forum/article-submissions-discussions-47/how-fix-rear-window-actuator-i-e-rear-window-wont-open-12396/
The other post has information as to where to order the part, and other helpful tips on how to get this done. This particular Blazer is a 2000 Chevy Blazer LT, with lift open window, drop down tailgate.
Step One:
Get inside the vehicle, and prepare to get warm and sweaty. Remove the tailgate pull handle. Sorry I don't have pics but it was already removed when I started this project. Its held on by two screws.
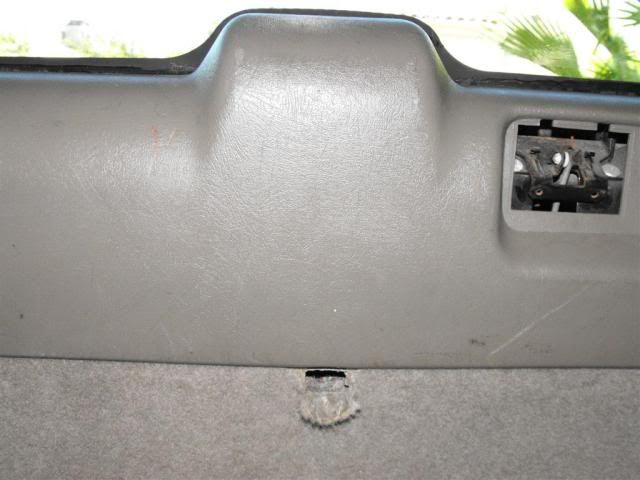
Locate the hole.


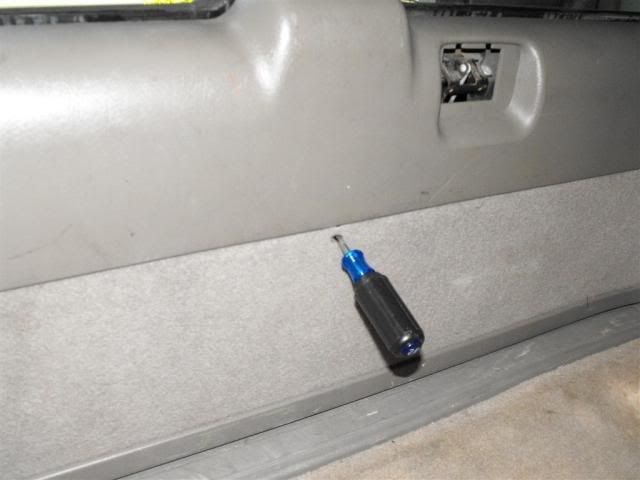
You can widen the hole to a rectangle shape if you have difficulty.
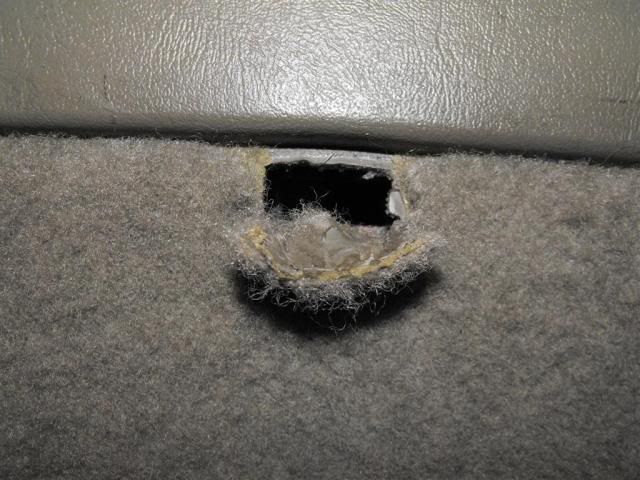
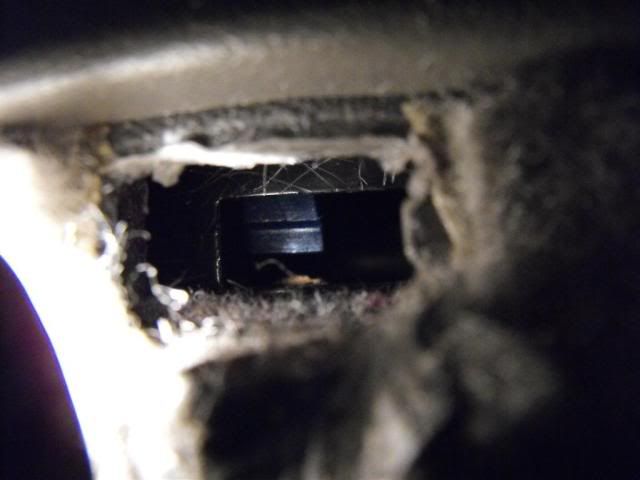
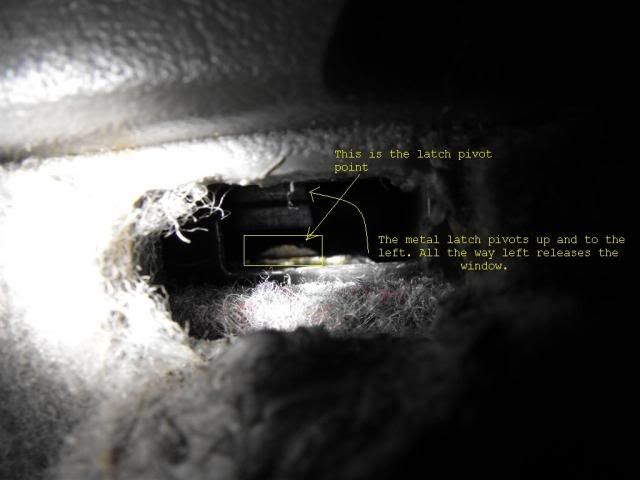
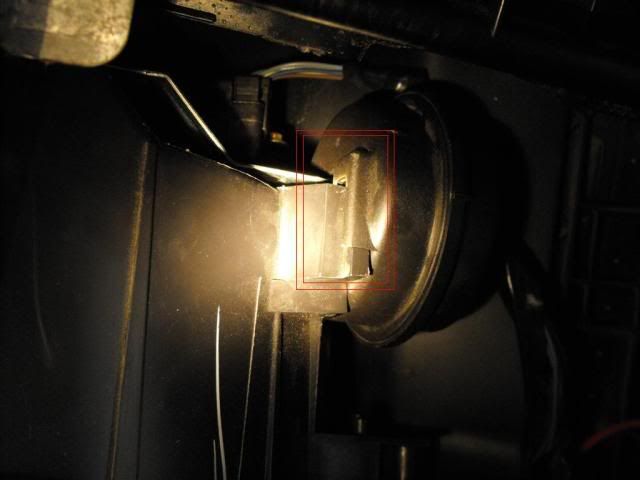
A view on the inside. You can see the blue arm, the end snapped off.
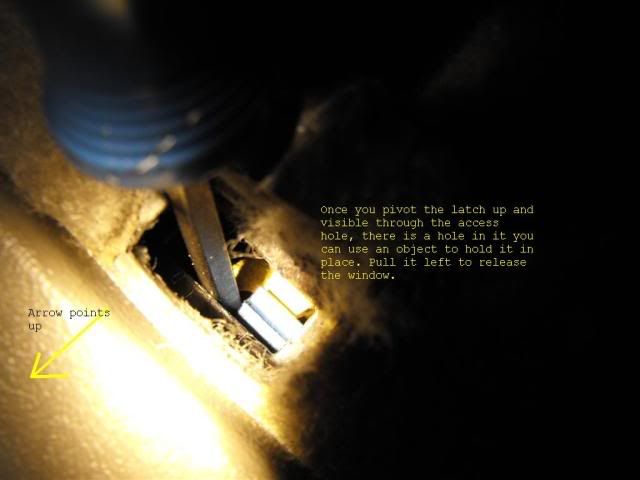
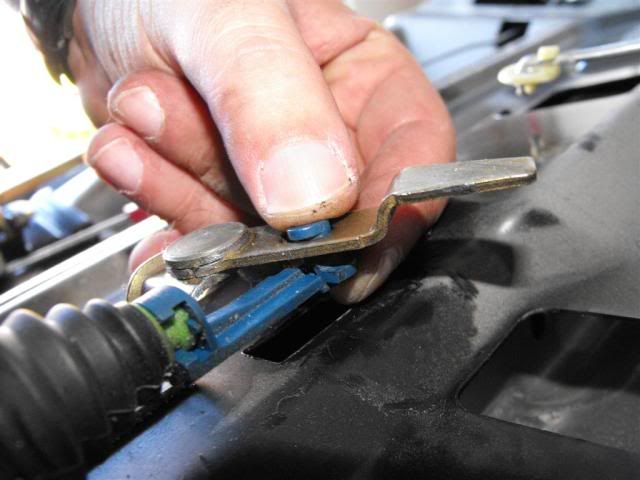
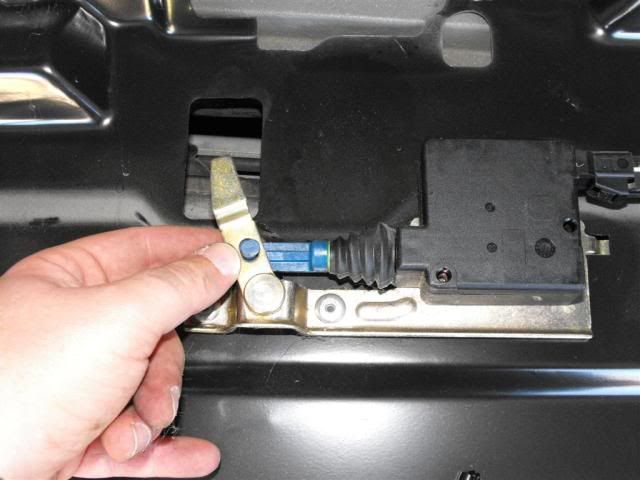
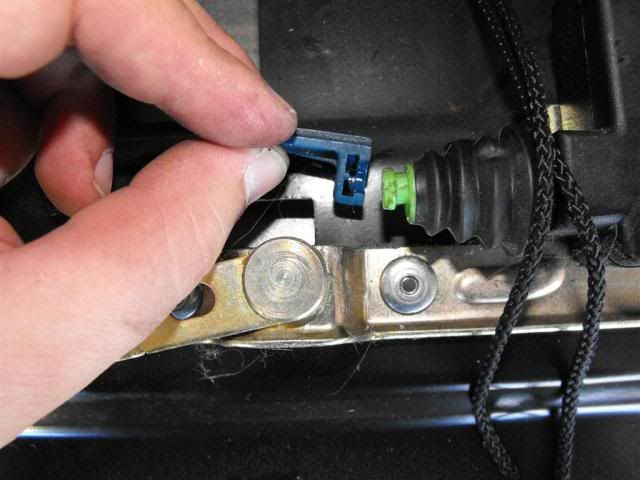
In the picture below, the actual metal lever that is pulled left (relative to facing aft) to release the window is hanging by the pivot point, pointing down. (unable to see) However, you can see the rounded pivot point peeking over the top of the mounting spot; I used a scribe to grab hold of it and rotate it up and to the left. Once you get it rotated, there's a hole in the tab that the end of the blue arm "should" be in. You can insert another tool into this hole to keep it upright, and push it left to release the window.
Now that the window is open, we can remove the inner molding.
Once all three screws are removed, pull up on the upper molding. DO NOT PULL UP on the bottom. In the below picture, you'll see the resistance clips that slide into their respective slots. This is whats keeping the molding in place. Once the clips are free, the bottom tabs/slots come out freely.
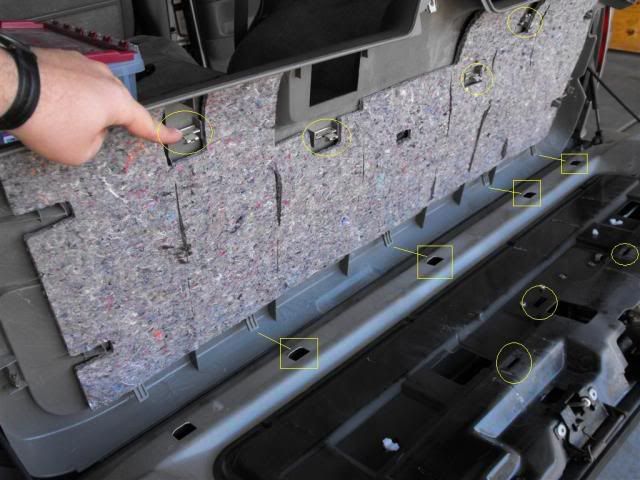
Next, remove the 12 screws holding on the black metal aluminum cover. Be careful, the edges are sharp.
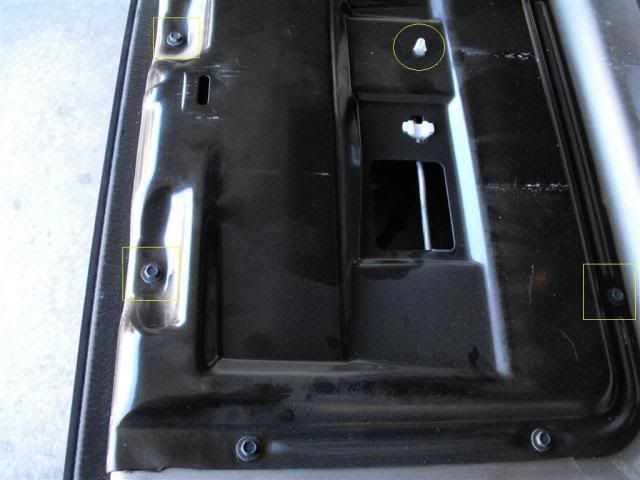
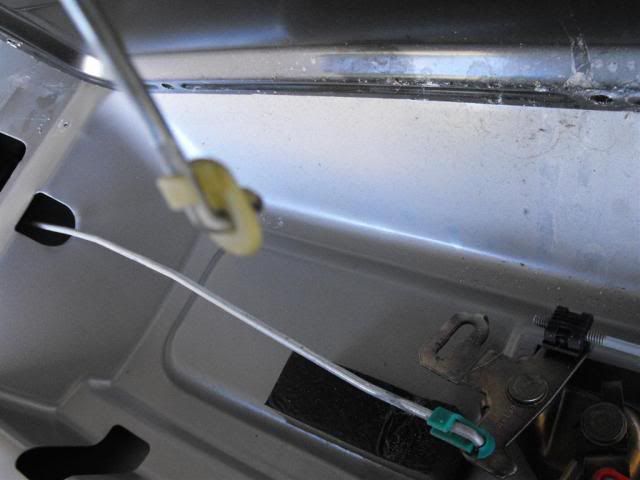
Now before you remove the cover, find the metal connecting rods that attach the handle to the latches on either side of the door. You'll see these rods in plastic carriers. All you have to do is push down on the rods to release them. I used a screwdriver and a light tap. Also, you will see a plastic compression clamp. Use a pair of needle nose to release this. (Its far left in the below pic) This allows extra slack on the wires that are attached to the black plate.
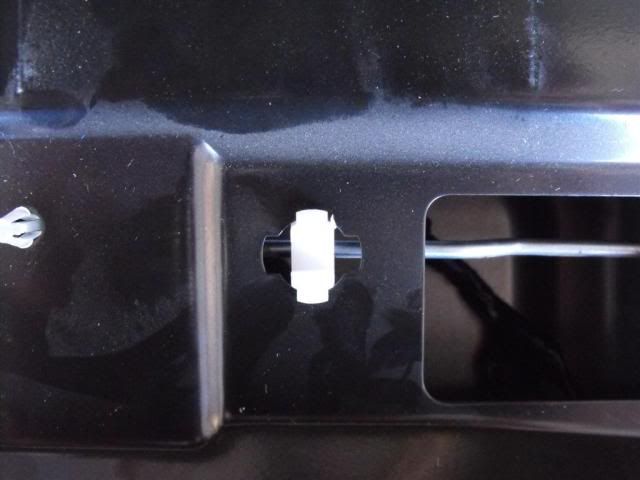

The rod that connects to the tailgate release handle is a little tricky. Rotate the plastic grommet that attaches the end of the rod to the release mechanism. Once you rotate it, the rod will come free of the grommet and mechanism. Do not lose this grommet!
Here are a few pics of the culprit:
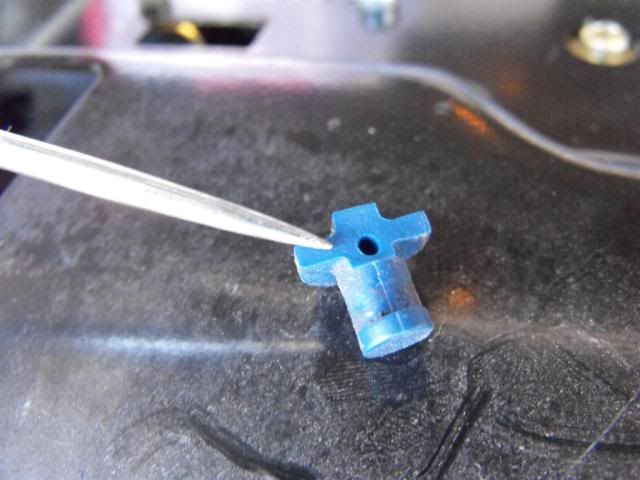
To remove the blue arm, simply rotate it until you can slide it off of the actuator.
Replace the arm. Installation is reverse of removal.
This post augments this one: https://blazerforum.com/forum/article-submissions-discussions-47/how-fix-rear-window-actuator-i-e-rear-window-wont-open-12396/
The other post has information as to where to order the part, and other helpful tips on how to get this done. This particular Blazer is a 2000 Chevy Blazer LT, with lift open window, drop down tailgate.
Step One:
Get inside the vehicle, and prepare to get warm and sweaty. Remove the tailgate pull handle. Sorry I don't have pics but it was already removed when I started this project. Its held on by two screws.
Locate the hole.
You can widen the hole to a rectangle shape if you have difficulty.
A view on the inside. You can see the blue arm, the end snapped off.
In the picture below, the actual metal lever that is pulled left (relative to facing aft) to release the window is hanging by the pivot point, pointing down. (unable to see) However, you can see the rounded pivot point peeking over the top of the mounting spot; I used a scribe to grab hold of it and rotate it up and to the left. Once you get it rotated, there's a hole in the tab that the end of the blue arm "should" be in. You can insert another tool into this hole to keep it upright, and push it left to release the window.
Now that the window is open, we can remove the inner molding.
Once all three screws are removed, pull up on the upper molding. DO NOT PULL UP on the bottom. In the below picture, you'll see the resistance clips that slide into their respective slots. This is whats keeping the molding in place. Once the clips are free, the bottom tabs/slots come out freely.
Next, remove the 12 screws holding on the black metal aluminum cover. Be careful, the edges are sharp.
Now before you remove the cover, find the metal connecting rods that attach the handle to the latches on either side of the door. You'll see these rods in plastic carriers. All you have to do is push down on the rods to release them. I used a screwdriver and a light tap. Also, you will see a plastic compression clamp. Use a pair of needle nose to release this. (Its far left in the below pic) This allows extra slack on the wires that are attached to the black plate.
The rod that connects to the tailgate release handle is a little tricky. Rotate the plastic grommet that attaches the end of the rod to the release mechanism. Once you rotate it, the rod will come free of the grommet and mechanism. Do not lose this grommet!
Here are a few pics of the culprit:
To remove the blue arm, simply rotate it until you can slide it off of the actuator.
Replace the arm. Installation is reverse of removal.
Thread Starter
|
Starting Member
Joined: Oct 2008
Posts: 144
From: Las Vegas, NV
I decided to troubleshoot my third brake light today, and I brought my camera. Here's the steps so far. The following pertains to a 2000 Chevy Blazer LT, 4x4
1. Pull fuse from fuseblock under hood. The one that is labeled VEHSTPL (I think) is the one you want to pull and check. Replace fuse if bad. If not, continue.
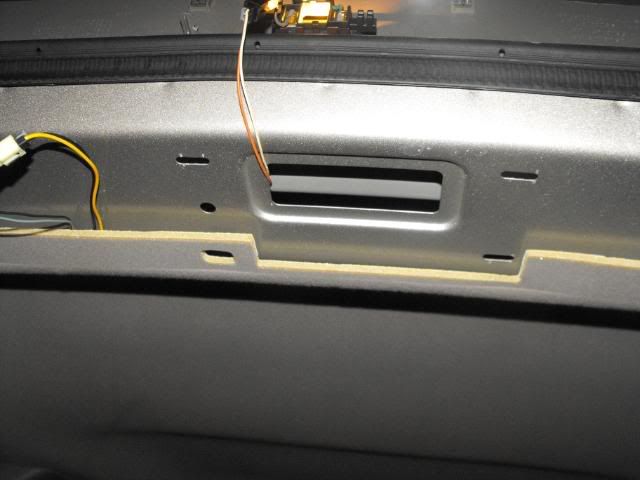
2. Open up your rear hatch, and pull the center piece of the plastic molding down that holds your cargo bay flood light. It may take a bit of force to remove it, but its only held on by compression clips. Take care once it does come off, the flood light wire will be attached to your cabin frame. Once the molding is off, disconnect the wire connected to it by using a small blade tip screwdriver. Set the molding aside.
2a. Find the yellow and black wires that come from the wire harness inside your frame. There will be two areas to view in; one is where the floodlight housing is recessed into. If you look up and to the left, you'll see the wire bundle. One is for the floodlight and the other is for the brake light. The other way to find the wires is to gently pull down on your roof cloth inside the cabin. There will be a slight access to the left just offset from center. If you find the wires, feed them through the access hole so the wires are in plain view, coming out of the floodlights recessed hole.
(Before moving wires to middle rectangle hole)
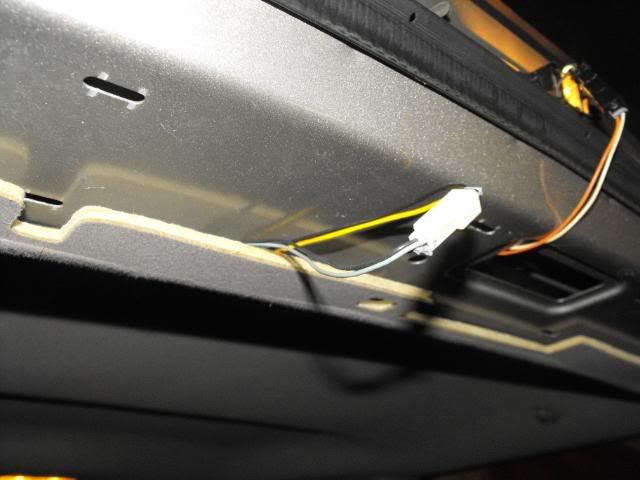
(I accessed them by reaching my fingers into the cloth ceiling and pulling the connector out. Eventually I moved it to the hole for easier access.)
2b. Use a small blade tip screwdriver and disconnect the plug to the brake light.
2c. Use something (or someone) to push your brake pedal down to keep the brake lights on.
2d. I used a multimeter with alligator clips and tested for VDC at the brake light wire connector. (Gray and Black) You can use a test lamp also. When I first connected the clips I got a spike of around 12VDC. One of the clips fell off, and when I went to reconnect, I completed the circuit at the connector and it sparked, shorted, and blew the fuse. Good enough for me, I was certain power was being applied to the light correctly. Continue to step 3. If your not getting power, check your wires for breakage. If there is no obvious breakage, there is a relay in the system you can check; continue below. Release the brake pedal.
2e. Most models have the relay in the under the hood fuse block. It sits in the bottom right, and is the same relay as the horn. It will be labeled CHMSL. Pull the CHMSL relay and the HORN relay and swap them. After the swap ops check the horn and brake light. Is the horn inop? Replace relay. If it works, troubleshoot wiring between fuse block and battery connection, and fuse block to rear light connector. Repair wiring when found.
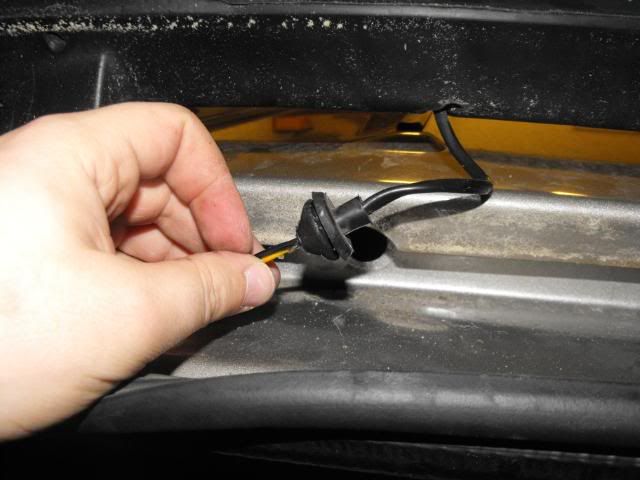
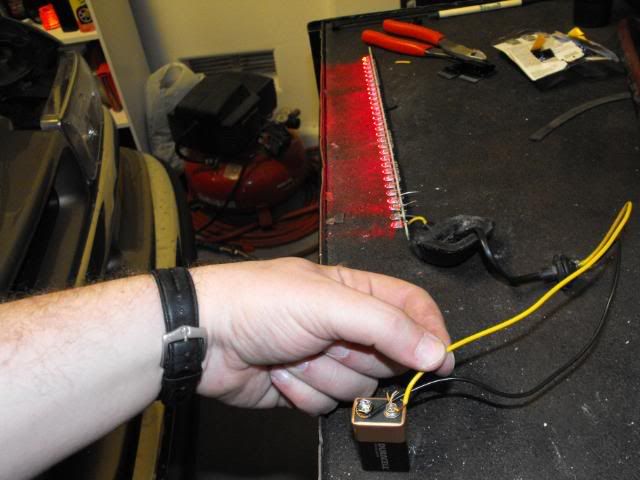
3. If you're getting power at connector, remove the LED light. Once removed, you can pull it open and if your careful, not damage the rubber seal underneath it. Remove rubber grommet holding wires that pass through vehicle frame to the outside hatch. Carefully pull out one side of the LED lights that contain the circuit board. Once out, look at the board for any broken wires, resistors, or diodes. Check wiring. Obvious damage indicates that you will need a new light. If you want to ops check the LEDs, plug the connector to a 9V battery and it will illuminate. If it doesn't, the LED strip is broken and requires replacement.
(Removing the rubber grommet)
(LED Bar removed, LED Board removed from bar housing. Mine was cracked which allowed moisture to get in)
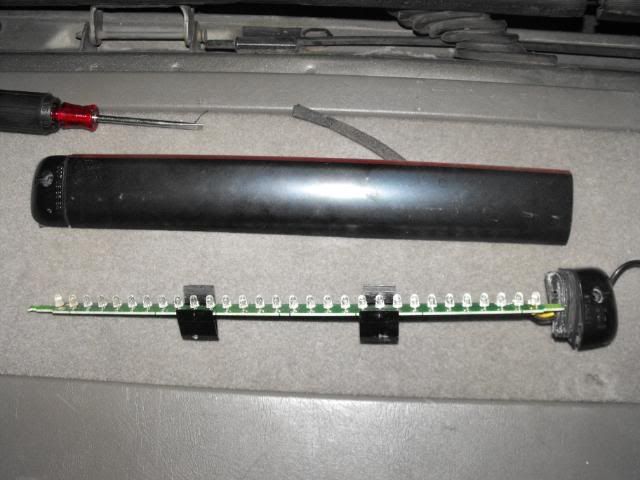
(The culprit... a blown resistor... or something.)
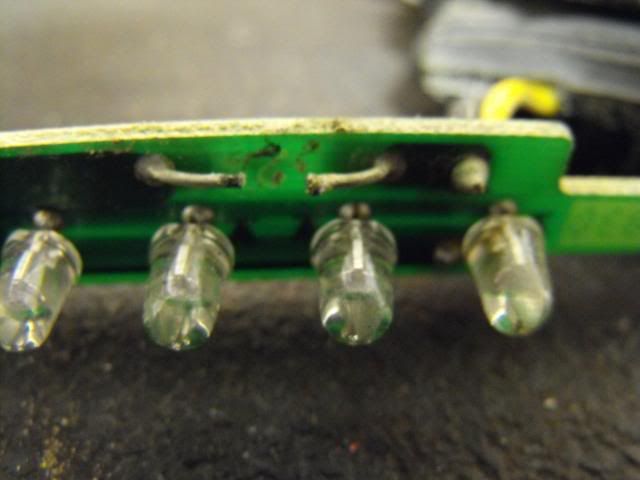
(I jammed a piece of safety wire where the resistor went, and cut off the connector, then pressed the wires on a 9V battery. Yay christmas. )
4. Replace LED strip and reconnect everything. Install molding. Enjoy your 3rd brake light.
Enjoy. I hope this helps some other people out. I'm sorry my info on the wires troubleshooting is pretty limited. If its not the relay, the light bar, fuse, or wires out in the open at the hatch, then I would just chalk up the loss of the 3rd brake light. For those without the relay in the engine compartment fuse block (Such as myself-even though the sticker says it should be there) I do not know the exact location of the relay to ops check it. Maybe someone can edit this and provide that information.
Thinking about this post; alternatively, you could just remove the rubber grommet, and if your lucky enough to have some slack in the black and gray wire, you could feasibly pull the connector through the hole where the grommet sits, and troubleshoot without having to pull the plastic molding. Choose your method!
1. Pull fuse from fuseblock under hood. The one that is labeled VEHSTPL (I think) is the one you want to pull and check. Replace fuse if bad. If not, continue.
2. Open up your rear hatch, and pull the center piece of the plastic molding down that holds your cargo bay flood light. It may take a bit of force to remove it, but its only held on by compression clips. Take care once it does come off, the flood light wire will be attached to your cabin frame. Once the molding is off, disconnect the wire connected to it by using a small blade tip screwdriver. Set the molding aside.
2a. Find the yellow and black wires that come from the wire harness inside your frame. There will be two areas to view in; one is where the floodlight housing is recessed into. If you look up and to the left, you'll see the wire bundle. One is for the floodlight and the other is for the brake light. The other way to find the wires is to gently pull down on your roof cloth inside the cabin. There will be a slight access to the left just offset from center. If you find the wires, feed them through the access hole so the wires are in plain view, coming out of the floodlights recessed hole.
(Before moving wires to middle rectangle hole)
(I accessed them by reaching my fingers into the cloth ceiling and pulling the connector out. Eventually I moved it to the hole for easier access.)
2b. Use a small blade tip screwdriver and disconnect the plug to the brake light.
2c. Use something (or someone) to push your brake pedal down to keep the brake lights on.
2d. I used a multimeter with alligator clips and tested for VDC at the brake light wire connector. (Gray and Black) You can use a test lamp also. When I first connected the clips I got a spike of around 12VDC. One of the clips fell off, and when I went to reconnect, I completed the circuit at the connector and it sparked, shorted, and blew the fuse. Good enough for me, I was certain power was being applied to the light correctly.
Continue to step 3. If your not getting power, check your wires for breakage. If there is no obvious breakage, there is a relay in the system you can check; continue below. Release the brake pedal.2e. Most models have the relay in the under the hood fuse block. It sits in the bottom right, and is the same relay as the horn. It will be labeled CHMSL. Pull the CHMSL relay and the HORN relay and swap them. After the swap ops check the horn and brake light. Is the horn inop? Replace relay. If it works, troubleshoot wiring between fuse block and battery connection, and fuse block to rear light connector. Repair wiring when found.
3. If you're getting power at connector, remove the LED light. Once removed, you can pull it open and if your careful, not damage the rubber seal underneath it. Remove rubber grommet holding wires that pass through vehicle frame to the outside hatch. Carefully pull out one side of the LED lights that contain the circuit board. Once out, look at the board for any broken wires, resistors, or diodes. Check wiring. Obvious damage indicates that you will need a new light. If you want to ops check the LEDs, plug the connector to a 9V battery and it will illuminate. If it doesn't, the LED strip is broken and requires replacement.
(Removing the rubber grommet)
(LED Bar removed, LED Board removed from bar housing. Mine was cracked which allowed moisture to get in)
(The culprit... a blown resistor... or something.)
(I jammed a piece of safety wire where the resistor went, and cut off the connector, then pressed the wires on a 9V battery. Yay christmas. )
4. Replace LED strip and reconnect everything. Install molding. Enjoy your 3rd brake light.
Enjoy. I hope this helps some other people out. I'm sorry my info on the wires troubleshooting is pretty limited. If its not the relay, the light bar, fuse, or wires out in the open at the hatch, then I would just chalk up the loss of the 3rd brake light.
For those without the relay in the engine compartment fuse block (Such as myself-even though the sticker says it should be there) I do not know the exact location of the relay to ops check it. Maybe someone can edit this and provide that information.Thinking about this post; alternatively, you could just remove the rubber grommet, and if your lucky enough to have some slack in the black and gray wire, you could feasibly pull the connector through the hole where the grommet sits, and troubleshoot without having to pull the plastic molding. Choose your method!
Thread Starter
|
Starting Member
Joined: Oct 2008
Posts: 144
From: Las Vegas, NV
We're going to cover removing a water pump from a 2000 Chevy Blazer, 4.3 6 Cyl Engine.
CAUTION: Working with coolant can be hazardous. Maintain a drip pan underneath the vehicle, and wear protective equipment. (Goggles/Gloves) Dispose of coolant in an appropriate manner in accordance with your state laws.
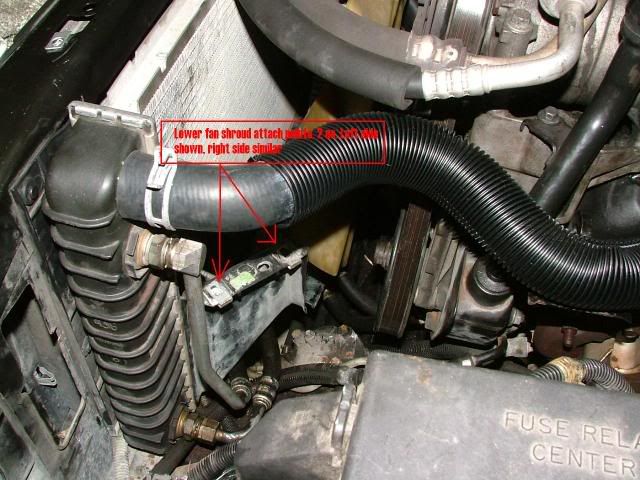
1. Remove the upper fan shroud. Remove the bolts along the forward frame, and the four bolts that mount to the lower fan shroud. They are low torque and come off easily. Optional: The AC compressor can be removed from its mount by removing the four bolts in each corner facing down. DO NOT DISCONNECT THE HOSES. Remove the electrical connectors (2 ea) and then put the entire compressor off to the passenger side of the vehicle, being careful not to kink or bend the hoses too much. (I do recommend this; it makes things a lot easier not having to fight with the AC hoses)
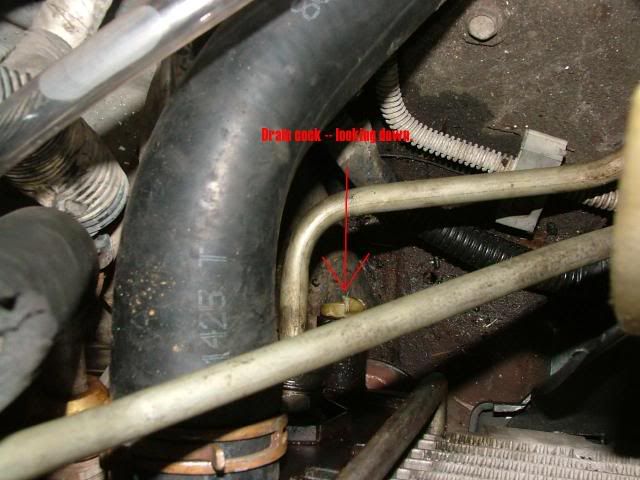
2. Drain the coolant. Remove the radiator fill cap. Before disconnecting any radiator/heater hoses, drain the radiator coolant by attaching a length of plastic tube to the drain **** on the bottom left side of the radiator. The plastic plug has an internal hex socket in the center; which fits 3/16" allen key perfectly. Turn it CCW until it stops. Do not force as you will break the fragile plastic. As you turn it, it will leak so be cautious.
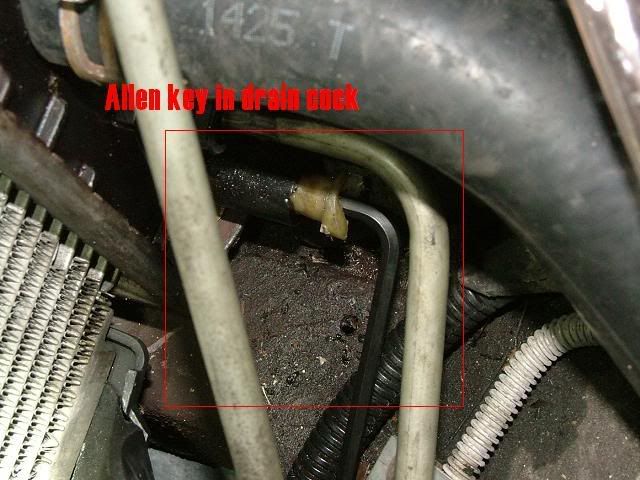
The photos above can't show the plastic tube that fits on the drain opening that bleeds off to the right side of the car. A length of about 3 feet, with 3/8" inner diameter clear plastic hose works perfect. Draining takes a little while, and it does not completely drain your cooling system. It is recommended that you drain your engine blocks, but I opted to skip this. (In not doing so will result in a liter or so of coolant to dump when you disconnect the radiator hose from the water pump)
3. Remove the serpentine belt. Insert a 3/8" drive long ratchet or breaker bar into the socket on the tensioner and rotate CCW to release tension on the belt. I also removed the tensioner and the extra pulley to give me more room. (1/2" size bolts)
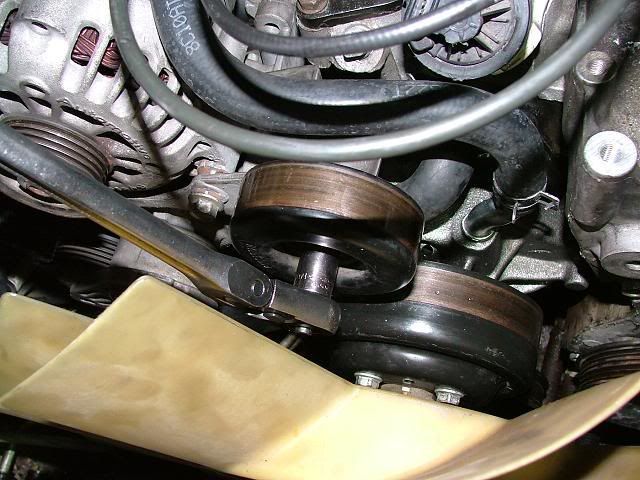
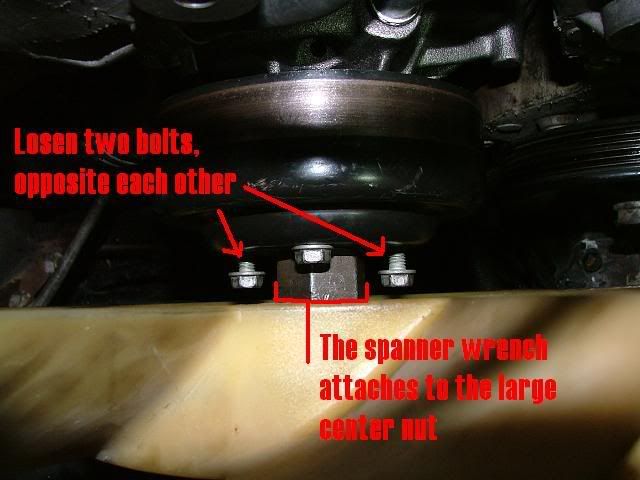
4. Remove the fan/clutch assembly. Not an easy task if you don't have the correct tools. I highly encourage going to your nearest parts store that rents out special tools and using this. It will make your life a lot easier disconnecting the fan/clutch assembly from the water pump. Loosen two bolts on the fan/clutch assembly pulley; that are opposite each other, but do not remove. (1/2" size bolt heads)
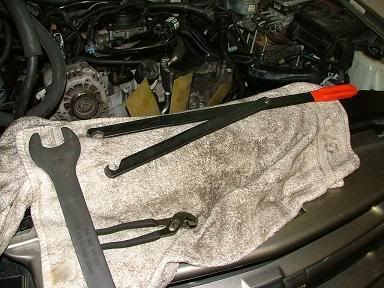
The kit includes a long and thin spanner wrench, and a lever with another tong hinged on.
The two claws will fit on the shanks of the two loosened bolts. They should be lose enough so that the claws of the lever fit snugly and do not easily slip out. Attach the spanner wrench to the center nut and losen. Remove the fan and clutch assembly.
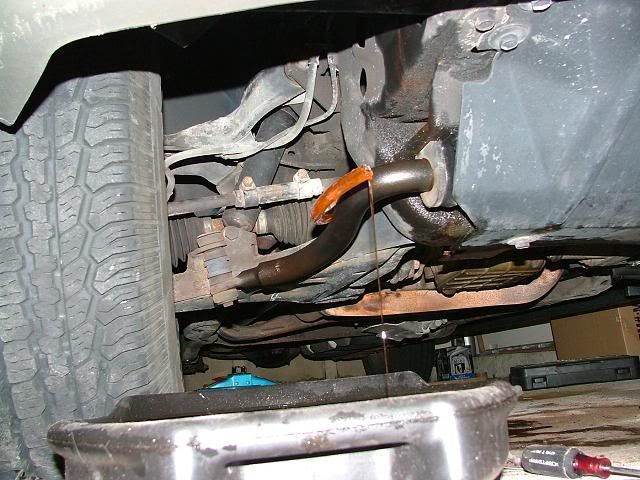
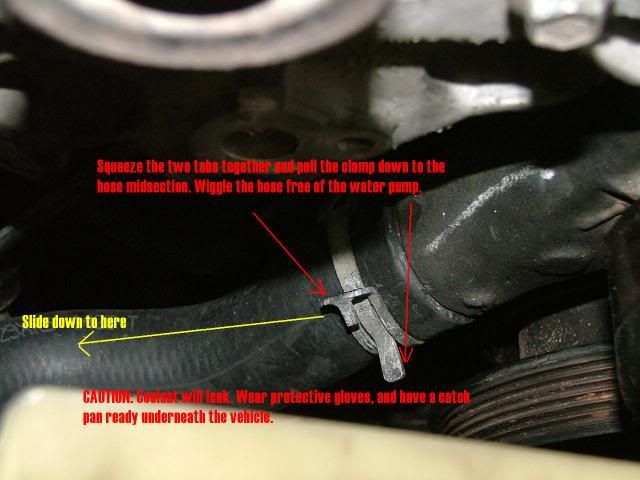
Step 5. Disconnect the radiator hose to the water pump. Many various clamps are used; mine are compression type. Using a pair of channel locks, squeeze the two tabs together and it will open the clamp. The hoses can be wiggled free if they arn't seized on. If they are, find an L shaped flat and thin piece of metal to insert the hose and try to free it up. If its been years or over 50,000 miles since last hose swap, I suggest just cutting them off and replacing the hoses.
Step 6. Remove the heater hoses from the water pump.
(make note of which one goes where)
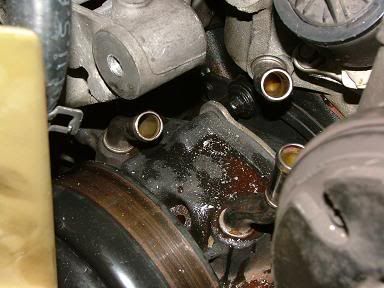
Step 7. Unbolt the water pump. 4 aluminum mounting bolts hold the pump onto the engine; remove all four, supporting the pump from the front to prevent it from ruining the threads of the bolts.
If you have removed all 4 bolts, and the pump will not come free, use a hammer and a wood block and gently tap the pump until it is free.
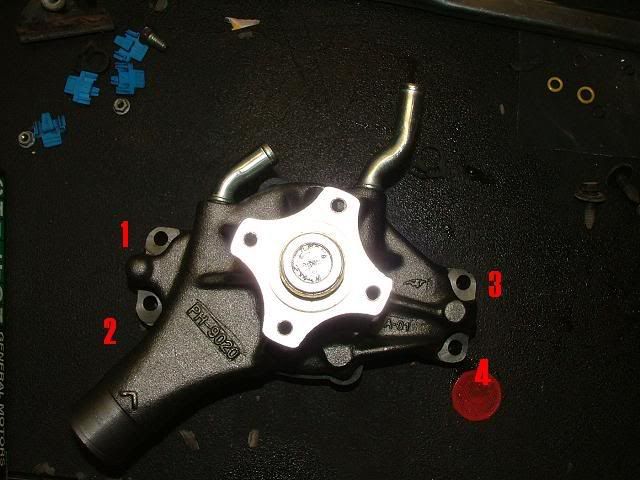
Remove the four bolts holding the pulley onto the pump if you are replacing the pump. If not, leave it alone. Do not tighten the two bolts yet, wait until after you have reinstalled the fan/clutch assembly.
Clean all gasket surfaces before remounting the water pump. Replace the water pump gaskets. You should also check the mating surfaces for smoothness and make sure they are flat.
Installation is reverse of removal.
CAUTION: Working with coolant can be hazardous. Maintain a drip pan underneath the vehicle, and wear protective equipment. (Goggles/Gloves) Dispose of coolant in an appropriate manner in accordance with your state laws.
1. Remove the upper fan shroud. Remove the bolts along the forward frame, and the four bolts that mount to the lower fan shroud. They are low torque and come off easily. Optional: The AC compressor can be removed from its mount by removing the four bolts in each corner facing down. DO NOT DISCONNECT THE HOSES. Remove the electrical connectors (2 ea) and then put the entire compressor off to the passenger side of the vehicle, being careful not to kink or bend the hoses too much. (I do recommend this; it makes things a lot easier not having to fight with the AC hoses)
2. Drain the coolant. Remove the radiator fill cap. Before disconnecting any radiator/heater hoses, drain the radiator coolant by attaching a length of plastic tube to the drain **** on the bottom left side of the radiator. The plastic plug has an internal hex socket in the center; which fits 3/16" allen key perfectly. Turn it CCW until it stops. Do not force as you will break the fragile plastic. As you turn it, it will leak so be cautious.
The photos above can't show the plastic tube that fits on the drain opening that bleeds off to the right side of the car. A length of about 3 feet, with 3/8" inner diameter clear plastic hose works perfect. Draining takes a little while, and it does not completely drain your cooling system. It is recommended that you drain your engine blocks, but I opted to skip this. (In not doing so will result in a liter or so of coolant to dump when you disconnect the radiator hose from the water pump)
3. Remove the serpentine belt. Insert a 3/8" drive long ratchet or breaker bar into the socket on the tensioner and rotate CCW to release tension on the belt. I also removed the tensioner and the extra pulley to give me more room. (1/2" size bolts)
4. Remove the fan/clutch assembly. Not an easy task if you don't have the correct tools. I highly encourage going to your nearest parts store that rents out special tools and using this. It will make your life a lot easier disconnecting the fan/clutch assembly from the water pump. Loosen two bolts on the fan/clutch assembly pulley; that are opposite each other, but do not remove. (1/2" size bolt heads)
The kit includes a long and thin spanner wrench, and a lever with another tong hinged on.
The two claws will fit on the shanks of the two loosened bolts. They should be lose enough so that the claws of the lever fit snugly and do not easily slip out. Attach the spanner wrench to the center nut and losen. Remove the fan and clutch assembly.
Step 5. Disconnect the radiator hose to the water pump. Many various clamps are used; mine are compression type. Using a pair of channel locks, squeeze the two tabs together and it will open the clamp. The hoses can be wiggled free if they arn't seized on. If they are, find an L shaped flat and thin piece of metal to insert the hose and try to free it up. If its been years or over 50,000 miles since last hose swap, I suggest just cutting them off and replacing the hoses.
Step 6. Remove the heater hoses from the water pump.
(make note of which one goes where)
Step 7. Unbolt the water pump. 4 aluminum mounting bolts hold the pump onto the engine; remove all four, supporting the pump from the front to prevent it from ruining the threads of the bolts.
If you have removed all 4 bolts, and the pump will not come free, use a hammer and a wood block and gently tap the pump until it is free.
Remove the four bolts holding the pulley onto the pump if you are replacing the pump. If not, leave it alone. Do not tighten the two bolts yet, wait until after you have reinstalled the fan/clutch assembly.
Clean all gasket surfaces before remounting the water pump. Replace the water pump gaskets. You should also check the mating surfaces for smoothness and make sure they are flat.
Installation is reverse of removal.
Thread Starter
|
Starting Member
Joined: Oct 2008
Posts: 144
From: Las Vegas, NV
Alright, I've seen a few articles on here that pertain to this, but here's a good one with pictures. A quick search here on these forums will show you alot of blend door problems, but below I hope will help others in finding an easy replacement; using the alternate method to removing the entire dash board carrier. (Who would want to do that!)
This "how-to" augments the following posts:
https://blazerforum.com/forum/tech-articles-diy-29/how-2nd-gen-blend-door-actuator-replacement-29981/ (The How-To primary method)
https://blazerforum.com/forum/showth...+door+actuator
http://www.automotiveforums.com/vbulletin/t574779.html (More good pics)
Please be aware that these blend door actuators fit multiple vehicle makes and models. The main difference is between the "Auto" climate control model and the "manual." Part numbers are listed above in the third link. If your dial for hot/cold air has numbers indicating set temperatures, you have to have the AUTO actuator. If you just have blue/red bars indicating temperature, you have the manual. Please be sure to order the correct part.
Pictures and procedure below are for a 2000 Chevy Blazer LT with AUTO Climate control. (Auto and Manual parts look identical) Left and Right are depicted from sitting in the vehicle facing forward.
Lets begin.
We're going to access the actuator through the glove box.
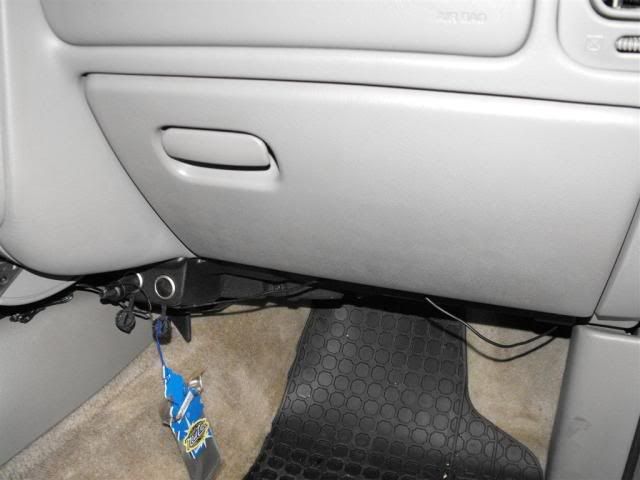
Clean out your glove box and locate the metal wire loop holding the glovebox from falling all the way to the floor. Lift up on the loop to release the glove box.
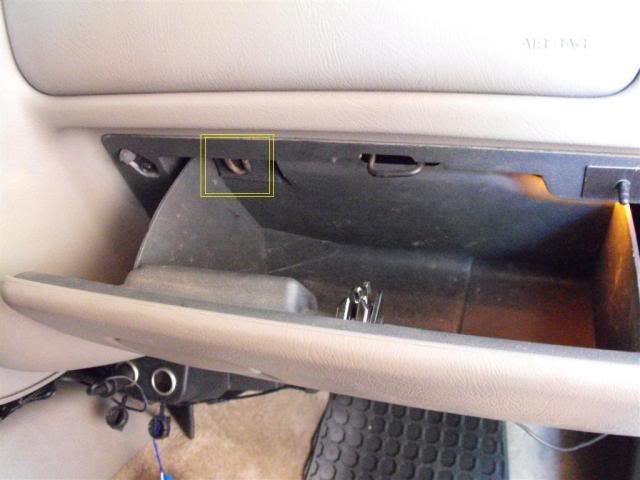
Here is a good view of where we will be working. Its awfully cramped but it took me about 20 minutes from start to finish.
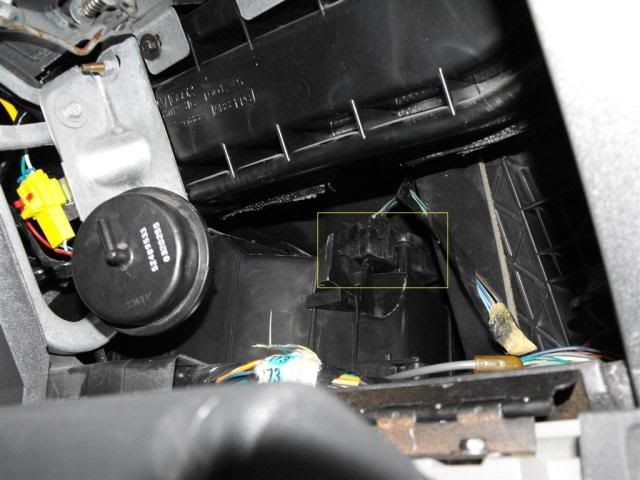
First carefully remove the vacuum hose connected to the vacuum actuator. (Big round thing in foreground)
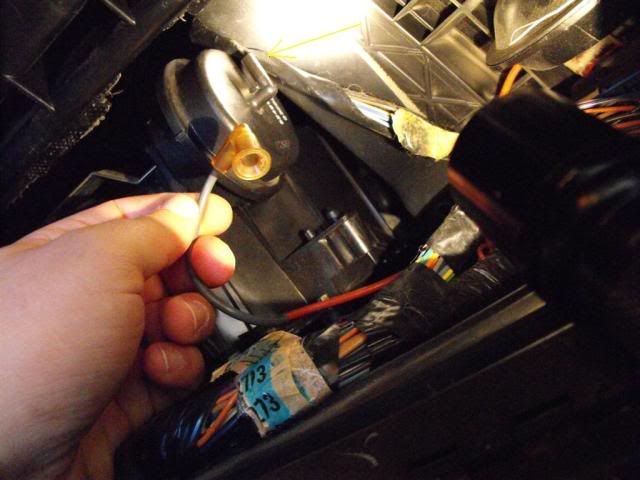
Grab the round vacuum actuator and wiggle it up. The pictures below show that it slides over a plastic bracket and easily comes up. Once you free it from the bracket, carefully swing it towards the left. It can get tricky, but do use some finesse when moving these parts around. They are fragile.
The below picture shows the blend door actuator "easily" accessible.
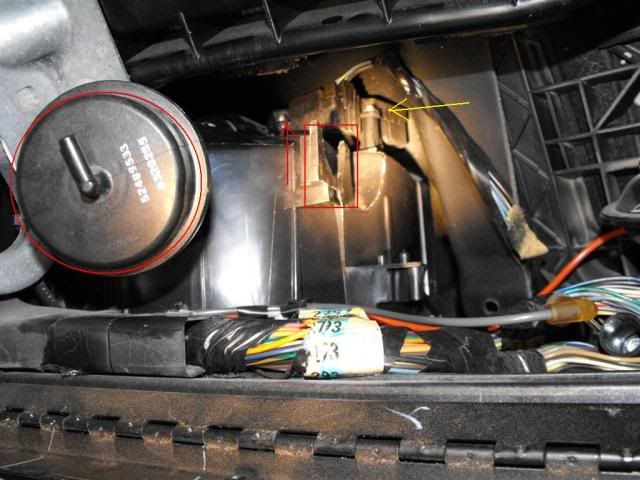
Disconnect the electrical connector from the blend door actuator.
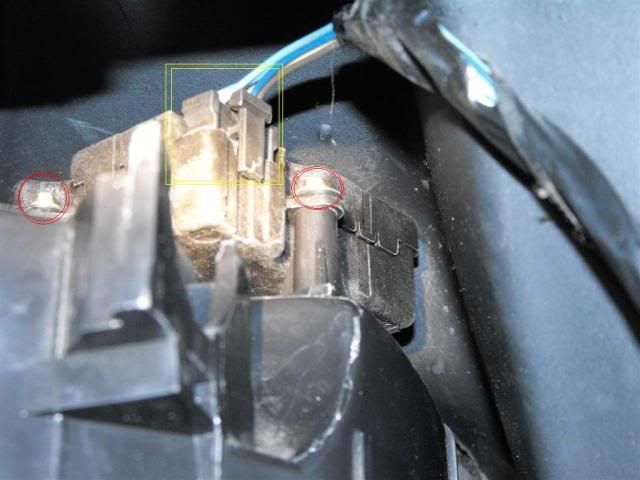
Using a 1/4" drive ratchet and a 7/32's socket with out an extension allows access to the mounting screws on the blend door actuator. Its very cramped so make sure you've had a few beers or are a patient person. Other articles in the links above show various techniques. Keeping the ratchet handle towards the left produced the best results, but be prepared to get "one click" per turn of the ratchet. This by far takes the most time out of all of this!
There are 2 screws that hold on the actuator. There is a post on the forward part that sticks up and just makes sure you align it properly when re-installing it. Once you remove the two screws, lift up on the actuator and it will easily come free of its mount.
Rest the new one on the forward post and slide down. As your pushing down, make sure the plastic stub that connects the actuator to the blend door in the air box lines up with the splines on the actuator gear itself. It can only fit one way. Again this is all plastic and teflon we're dealing with, so be gentle.
The rest of the installation is the reverse of removal.
Enjoy having control of your cabin air again!
This "how-to" augments the following posts:
https://blazerforum.com/forum/tech-articles-diy-29/how-2nd-gen-blend-door-actuator-replacement-29981/ (The How-To primary method)
https://blazerforum.com/forum/showth...+door+actuator
http://www.automotiveforums.com/vbulletin/t574779.html (More good pics)
Please be aware that these blend door actuators fit multiple vehicle makes and models. The main difference is between the "Auto" climate control model and the "manual." Part numbers are listed above in the third link. If your dial for hot/cold air has numbers indicating set temperatures, you have to have the AUTO actuator. If you just have blue/red bars indicating temperature, you have the manual. Please be sure to order the correct part.
Pictures and procedure below are for a 2000 Chevy Blazer LT with AUTO Climate control. (Auto and Manual parts look identical) Left and Right are depicted from sitting in the vehicle facing forward.
Lets begin.
We're going to access the actuator through the glove box.
Clean out your glove box and locate the metal wire loop holding the glovebox from falling all the way to the floor. Lift up on the loop to release the glove box.
Here is a good view of where we will be working. Its awfully cramped but it took me about 20 minutes from start to finish.
First carefully remove the vacuum hose connected to the vacuum actuator. (Big round thing in foreground)
Grab the round vacuum actuator and wiggle it up. The pictures below show that it slides over a plastic bracket and easily comes up. Once you free it from the bracket, carefully swing it towards the left. It can get tricky, but do use some finesse when moving these parts around. They are fragile.
The below picture shows the blend door actuator "easily" accessible.
Disconnect the electrical connector from the blend door actuator.
Using a 1/4" drive ratchet and a 7/32's socket with out an extension allows access to the mounting screws on the blend door actuator. Its very cramped so make sure you've had a few beers or are a patient person. Other articles in the links above show various techniques. Keeping the ratchet handle towards the left produced the best results, but be prepared to get "one click" per turn of the ratchet. This by far takes the most time out of all of this!
There are 2 screws that hold on the actuator. There is a post on the forward part that sticks up and just makes sure you align it properly when re-installing it. Once you remove the two screws, lift up on the actuator and it will easily come free of its mount.
Rest the new one on the forward post and slide down. As your pushing down, make sure the plastic stub that connects the actuator to the blend door in the air box lines up with the splines on the actuator gear itself. It can only fit one way. Again this is all plastic and teflon we're dealing with, so be gentle.
The rest of the installation is the reverse of removal.
Enjoy having control of your cabin air again!
Thread Starter
|
Starting Member
Joined: Oct 2008
Posts: 144
From: Las Vegas, NV
On Saturday 26 June 2010 I replaced the heater core, radiator, and overflow tank.
Followed instructions from fellow member AdamCrosier and the others in post https://blazerforum.com/forum/showth...t=36252&page=2. Amazing job guys. I made a word doc that was tailored to my truck. (2000 Chevy Blazer 4x4 LT)
Finished.

More pictures in my profile.
Followed instructions from fellow member AdamCrosier and the others in post https://blazerforum.com/forum/showth...t=36252&page=2. Amazing job guys. I made a word doc that was tailored to my truck. (2000 Chevy Blazer 4x4 LT)
1. Battery off - don't need airbags going off in your face!
1a. Drain coolant from radiator (optional... but controls the amount of fluid loss)
2. Lift passenger door threshold out, pull out kick panel
3. Remove two 7mm bolts holding passenger lower panel
4. Remove 4 7mm bolts for middle panel with 12v accessory receptacles
5. Disconnect harness from middle panel (not at the receptacles)
6. Remove two 7mm bolts from the OBDII connector on lower driver’s panel under dash.
7. Remove 4 7mm bolts from lower driver’s panel
8. Disconnect electrical harness from panel to remove (pinch blue connector)
9. Disconnect parking brake release cable under dash from the lever (push cable grommet out of the holder and disconnect end of cable.
10. Remove single 7mm holding courtesy light to driver’s panel
11. Remove 4 7mm bolts and remove panel - feed parking brake cable through the hole in the dash
12. Remove three 7mm bolts at instrument cluster (one in middle on top and two underneath)
13. Start to pull out the dash trim bezel, enough to push the back wiper/back hatch/4x4 controls button out of the bezel, allowing you to disconnect the harnesses.
13a. Disconnect electrical harness from int/ext lights control panel
13b. Remove dash trim bezel
13c. Disconnect electrical connector in line with the thick wires going to the interior fuse panel
14. Open glove box completely by pushing up the spring that keeps it from falling open.
15. Remove air bag harness (yellow wires) next to main harness, and remove main harness by unscrewing middle bolt. There are two blue clips that I pulled out, but can figure out if I needed to or not. Remove at your discretion.(not required)
16. Deleted
17. Remove radio (2 7mm bolts if stock). Disconnect two harnesses and antenna connector
17a. Remove center console – open arm rest cover and pull out black containers. Remove two 10mm bolts at bottom. Remove center console trim (black curvy panel) from front area of tape player by gently prying up. Remove two 10mm bolts underneath.
17b. Remove tape deck by pushing down on plastic tabs on either side – tape deck slides out. Disconnect electrical connector and set tape deck aside.
17c. Remove center console from truck (allows for easier access and going “upside down” to get some screws out
18. Remove speaker grills under windshield - 2 7mm bolts. On the passenger, if so equipped, twist the light sensor (a quarter turn) to remove and leave the sensor in the dash.
19. Remove defroster grill. Careful – VERY delicate. There are clips on the top (by windshield) and bottom (toward interior of car), four pairs. Remove light sensor as above.
20. Remove 6 upper bolts: one in each speaker bay and four in the defroster duct.
21. Remove 8 bolts and L brackets on either side of the steering column.
22. Remove 1 10mm bolt behind where brake release was, and one behind the glove box.
23. Check to see if the passenger door plunger is wired. If not, you'll know not freak out about it later.
24. Remove the box at the head of the center console. It has three harness connectors on the left, and they are labeled by color. Two clips and the box should come out.
25. Make sure the gear lever is down in 1st, and the steering column is lowered in the tilt function.
25a. Remove instrument panel by removing four screws holding it in and the one electrical connector at top
26. Pull dash away from windshield. It will fall against its own stop. Lift it up off the pins that it hinges on, and it will be free. If you are careful with it, you can take it out the passenger side as is. Help at this stage is awesome, though I put the dash back in myself. (I had to disconnect another small white electrical connector behind the auto air controls)
26b. additional step... make sure your antenna clip is disconnected…( took a minute to figure out what was holding it..
27. Pretty much anything in the middle that is black plastic is now coming out, but as one unit. The vacuum module in the front does not need to be disconnected. Let's start with the worst one: Inside the air box in the engine compartment is one of the bolts. There is a spot labeled "cut here for service." It's just to the left of the heater hoses. Cut that out with your utility knife. Not too deep, there is a plastic panel right below it.
28 Remove three 5.5 bolts and remove cover. Some earlier models had a blower resister here.
29. With a ratcheting wrench or a 3/8" ratchet and deep socket, remove the one bolt in there which will be shoved up against the filter on the left. Be calm, take your time, it will be a while.
29b. Alternate method: so after feeling around a bit and looking in the hole with a mirror.. I made a 2nd hole in line with the "worst bolt" … which I took pictures of... saving myself the aggravation.. and then sealed it with metal faced "duct tape" I'm willing to bet doing this saved me 20 minutes and ALOT of cursing.. I used a 3/8" ratchet 6" ext+3" ext + 3/8" universal + 10mm deep socket to reach into the box through the hole and straight onto the bolt head.
30. Over to the right and lower, there is one bolt holding this plastic box to the firewall. Remove it. Near the heater hoses is a stud that protrudes from the firewall roughly an inch. Remove the nut.
31. Pull the hoses. You'll lose maybe a cup of coolant here.
32. Inside, passenger floor. At the top of the carpet under the box are three legs. The outside ones are threaded, and you can see the bolt head in them. It is on the engine compartment side. In the middle is one bolt you can remove.
33. On the two outside legs, most people, it seems, just cut them. I did. After bolting it all back together, I shook the unit hard and couldn't find a reason for them. At any rate, I cut the plastic above the bolts and left them screwed into the plastic.
34. Now the box should shake pretty easily. Don't forget that it sits on a saddle that feeds the floor heater ducts for the back seat. There will be a tiny bit of resistance here, but not too much. If there is resistance pulling this out, double check for all the bolts.
35. As you start to pull the unit out, look for vacuum or electrical connectors that need to come out. Top right, there are two, I think. I had taken them all off, but found most could have stayed.
Now that the box is out, yank the two bolts on top of the heater core, and remove the core. If your foam is OK, reuse it. It holds the core nice and tight and keeps the warm air where it should be.
36. Rejoice! You are more than halfway done. I spent 6 hours removing and a little over 4 hours putting it back.
More pictures in my profile.
Starting Member
Joined: Jun 2010
Posts: 112
From: Medford,NY

Great thread with alot of great info! I like the step by step, bolt by bolt description.
Would it be too much trouble for a Mod to split these up in the How-to section?
What exactly does Operation Wicker Basket mean?
Are you a basket weaver by trade?
Would it be too much trouble for a Mod to split these up in the How-to section?
What exactly does Operation Wicker Basket mean?
Are you a basket weaver by trade?
BF Veteran
Joined: Jan 2010
Posts: 2,071
From: Northeast Metro Detroit
Holy Crap, you have fixed a bunch of stuff so far. i've only done the blue arm fix. although i wasn't as patient as you and broke the screw right by the glass latch... whoops.. great how to and will most likely help me in the future
Thread Starter
|
Starting Member
Joined: Oct 2008
Posts: 144
From: Las Vegas, NV
Most of these are already in the DIY section. I just post them here to keep a tight journal of everything I've done. The CHMSL is in a thread somewhere else too.
And the title comes from the fact that a wicker basket was holding all my old parts in the garage.