
need help transmission problem after rebuild


Senior Member
Joined: Apr 2010
Posts: 752
From: Nebraska

These are in order from back to front.
Low-Reverse pack should sit about 1.2-1.24" tall to the top of backing plate.
Forward clutch .030-.060"
3-4 clutch .060-.090"
Reverse Input .040-.075"
Input shaft endplay .005-.036"
To air test, you apply air to the holes in the input shaft. They will be separated by the nylon o-rings. One of them is the torque converter feed and another is a lubrication hole, so don't be surprised if you hear air out of two of them. Otherwise you should not have any leaks. Make sure you check your air pressure so you don't blow out an o-ring by putting 100+psi to it.

Thread Starter
|
Beginning Member
Joined: Mar 2011
Posts: 11
Ok so got the tranny out and the pump pulled tried to pull the torpedo out and it won't come come out???? Anyone have trouble with this?? Like I got the band and the upper half out but the bottom part won't come out... Tried pulling on it and turning it and pulling on it but nothing is working I dunno what the f is going on... Defiantly came out easy the first time.... This is rediciulous.... I will never get a s 10 again lol everything has been a pita on the hunk of junk
Thread Starter
|
Beginning Member
Joined: Mar 2011
Posts: 11
so i got my sealing problem fixed but now i am about to put the valve body on my 96 4l60e and i got my accumulator mismatched or something there is 2 springs for one side and one for the other??which goes where? plus which way do the pistons go? torwards the seperater plate or away from? i have a gm manual but does not show me either of what i am looking for....someone please help i am ready to be done with this horribile project.... and i want make sure it is right... i tried searching but it seems everyone is mismatched about it btw its a 96 chevy 4.3 auto blazer
thanks soo much for any input
Justin
p.s i know i shoulda kept track on this kind of project but had a lot going on and stuff going in and out of my garage and people grabbing and looking like kids in a toy store its pretty rediculous sometimes....
thanks soo much for any input
Justin
p.s i know i shoulda kept track on this kind of project but had a lot going on and stuff going in and out of my garage and people grabbing and looking like kids in a toy store its pretty rediculous sometimes....

Both of the accumulators should have their more flat side (possibly with small round protrusions on it) facing the separator plate and neither should spring out past the end of their bores. I can't remember if the springs are different lengths or not, but if they are, check to see which is longer and put that into one of the locations and see how the piston fits. If it rests level with the mating surface, then that is the proper spring for that area.
Here's a shot of the pistons & springs that I installed in my Tahoe:
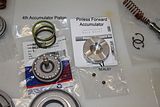
4th accumulator piston & pinless forward accumulator piston kit
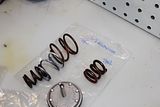
1-2 accumulator piston & springs (depending on which housing type is installed in the trans)
For the 1-2 accumulator, my transmission had the Type 2 kit so I used the kit spring inside of the stock spring instead of replacing it with the three spring set. I only used the kit spring in the 4th accumulator piston.

Senior Member
Joined: Aug 2009
Posts: 578
Both of the accumulators should have their more flat side (possibly with small round protrusions on it) facing the separator plate and neither should spring out past the end of their bores. I can't remember if the springs are different lengths or not, but if they are, check to see which is longer and put that into one of the locations and see how the piston fits. If it rests level with the mating surface, then that is the proper spring for that area.
Here's a shot of the pistons & springs that I installed in my Tahoe:
4th accumulator piston & pinless forward accumulator piston kit
1-2 accumulator piston & springs (depending on which housing type is installed in the trans)
For the 1-2 accumulator, my transmission had the Type 2 kit so I used the kit spring inside of the stock spring instead of replacing it with the three spring set. I only used the kit spring in the 4th accumulator piston.
Senior Member
Joined: Apr 2010
Posts: 752
From: Nebraska
But to the point, looking at my manual the piston goes in first. The side with the pocket accepts the spring. Both springs will push against the separator plate.
Somewhere I saw that if you flip the pistons over, it helps prevent them from wearing out in the pin bore(causes all sorts of problems). Don't quote me on that because I'm having a hard time sleeping.
Last edited by TZFBird; Apr 4, 2011 at 12:29 PM.