
Steering Column Disassembly Question


Thread Starter
|
Beginning Member
Joined: Feb 2011
Posts: 12

73 Blazer, with tilt steering.
My igintion actuator rack snapped in two, so I'm in the process of digging it out of the column. I've got the steering wheel pulled, lock plate pulled, and upper housing portion removed, and all the guts that goes with it. So I can access and remove the top half of the broken actuator rack, but I can't figure out how to get the lower portion of the housing removed. It's the portion that rotates with the column shifter, and is currently covering the lower half of the actuator rack and where the actuator rod connects to the rack.
Any steering column experts out there? Could really use the help, thanks.
Last edited by Useful Idiot; Apr 18, 2011 at 08:30 PM.

Here's the steps from my '74 service manual:

- Remove the four dash panel bracket-to-column screws and lay the bracket in a save place to prevent damage to the mounting capsules
- Place the column in a vice clamping down on two of the weld nuts.
- Remove the Directional Signal Switch, Lock Cylinder, & Ignition Switch as outlined previously in this section.
- Column Shift Models - Drive out the upper shift lever pivot pin and remove the shift lever.
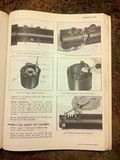
- Remove the upper bearing thrust washer. Remove the four screws attaching the turn signal and ignition lock housing to the jacket and remove the housing assembly. (Fig 66)
- Remove the thrust cap from the lower side of the housing
- Lift the ignition switch actuating rod and rack assembly, the rack preload spring and the shaft lock bolt and spring assembly out of the housing (Fig 67)
- Remove the shift lever detent plate (shift gate).
- Remove the ignition switch actuator sector through the lock cylinder hole by pushing firmly on the block tooth of the sector with a blunt punch of screwdriver (Fig 68)
- Remove the gear shift lever housing and shroud from the jacket assembly (transmission control lock tube housing and shroud on floor shift models)
- Remove the shift lever spring from the gearshift lever housing (lock tube spring on floor shift models)
- Pull the steering shaft from the lower end of the jacket assembly
- Remove the two screws holding the back-up switch or neutral-safety switch to the column and remove the switch
- Remove the lower bearing retainer clip (Fig 69)
- Automatic and Floorshift Columns - Remove the lower bearing retainer, bearing adapter assembly, shift tube thrust spring and washer. The lower bearing may be removed from the adapter by light pressure on the bearing outer race. Slide out the shift tube assembly.
- Manual Transmission - Column shift - Remove the lower bearing adapter, bearing and the first-reverse shift lever. The lower bearing may be removed from the adapter by light pressure on the bearing outer race. Remove the three screws from the bearing at the lower end and slide out the shift tube assembly.
- Remove the gearshift housing lower bearing from the upper end of the mast jacket.


Thread Starter
|
Beginning Member
Joined: Feb 2011
Posts: 12
Here's the steps from my '74 service manual:
- Remove the four dash panel bracket-to-column screws and lay the bracket in a save place to prevent damage to the mounting capsules
- Place the column in a vice clamping down on two of the weld nuts.
- Remove the Directional Signal Switch, Lock Cylinder, & Ignition Switch as outlined previously in this section.
- Column Shift Models - Drive out the upper shift lever pivot pin and remove the shift lever.
- Remove the upper bearing thrust washer. Remove the four screws attaching the turn signal and ignition lock housing to the jacket and remove the housing assembly. (Fig 66)
- Remove the thrust cap from the lower side of the housing
- Lift the ignition switch actuating rod and rack assembly, the rack preload spring and the shaft lock bolt and spring assembly out of the housing (Fig 67)
- Remove the shift lever detent plate (shift gate).
- Remove the ignition switch actuator sector through the lock cylinder hole by pushing firmly on the block tooth of the sector with a blunt punch of screwdriver (Fig 68)
- Remove the gear shift lever housing and shroud from the jacket assembly (transmission control lock tube housing and shroud on floor shift models)
- Remove the shift lever spring from the gearshift lever housing (lock tube spring on floor shift models)
- Pull the steering shaft from the lower end of the jacket assembly
- Remove the two screws holding the back-up switch or neutral-safety switch to the column and remove the switch
- Remove the lower bearing retainer clip (Fig 69)
- Automatic and Floorshift Columns - Remove the lower bearing retainer, bearing adapter assembly, shift tube thrust spring and washer. The lower bearing may be removed from the adapter by light pressure on the bearing outer race. Slide out the shift tube assembly.
- Manual Transmission - Column shift - Remove the lower bearing adapter, bearing and the first-reverse shift lever. The lower bearing may be removed from the adapter by light pressure on the bearing outer race. Remove the three screws from the bearing at the lower end and slide out the shift tube assembly.
- Remove the gearshift housing lower bearing from the upper end of the mast jacket.
The only thing I haven't done is remove the ignition switch. Would that allow me to push the actuator rod and connection to the rack up out of that gear shift housing to be able to access it? I'd have to look at it again, but it didn't seem like that would be the case.
Here's an image to show what I'm talking about.

I guess the "bowl plate" is what they call the "gear shift housing" in the manual. As you can see, the upper half of the rack can be accessed above that, once the turn signal housing is removed (and since my rack is split in half, I pulled that half out), but the lower half and connection to the rod is further down, within that gear shift housing.
Thread Starter
|
Beginning Member
Joined: Feb 2011
Posts: 12
I was able to track down this site that walks it through, step by step. It's a buick, but same column as chevy's.
Tilt Steering Column Wobble
I'll continue tomorrow and report my success (or failure), after I buy the third specialty tool for this project. Thought the link would help anybody else trying to tackle this PITA.
Tilt Steering Column Wobble
I'll continue tomorrow and report my success (or failure), after I buy the third specialty tool for this project.
Beginning Member
Joined: Jan 2011
Posts: 40
From: South Carolina
I had the exact same problem when I first bought my blazer. I figured out that you have to put the tilt handle back in and pull back on it to loosen the grip that levers have on lower housing. Then it should come right off and you can access that part easily.
For some reason last night when I typed out my reply I thought it was a non-tilt column.  Everything I posted was from the non-tilt column section. I'll see if I can just scan the tilt column sections if you need them. That link you found is straight to the point though.
Thread Starter
|
Beginning Member
Joined: Feb 2011
Posts: 12
For some reason last night when I typed out my reply I thought it was a non-tilt column. Everything I posted was from the non-tilt column section. I'll see if I can just scan the tilt column sections if you need them. That link you found is straight to the point though.
Thread Starter
|
Beginning Member
Joined: Feb 2011
Posts: 12
No luck at the dealer. Anybody have any idea where to find this part? LMC lists the part for 79-91 blazers, is that really the case or will it fit my 73? Tearing apart another steering column in a junkyard does not sound like a good time...