
Rear Window Rattle?


The rear window latch on the '96+ can be adjusted. Really need to know the year you're workin' with.
Anyway... You have to remove the trim panel on the hatch, then there's two nuts that you can loosen and then move the latch in. Becareful, a little move is alot of tightening. Ofcourse, if your pins are loose on the hinge for the window, you may have to either drill the hinge out and put custom bushings in or do as stated above (only temporarily).
Anyway... You have to remove the trim panel on the hatch, then there's two nuts that you can loosen and then move the latch in. Becareful, a little move is alot of tightening. Ofcourse, if your pins are loose on the hinge for the window, you may have to either drill the hinge out and put custom bushings in or do as stated above (only temporarily).
OK. I've gotta try to pull my hatch apart to help out some other members this weekend (hopefully), so I'll grab pictures of the adjustment for the rear window at the same time and post up.
OK here ya go...
How to adjust your rear glass:
Tools required:
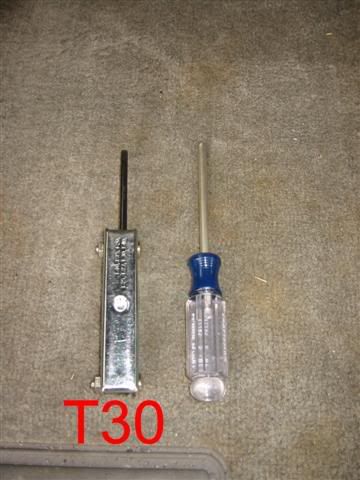
^^^^ Both of these - torx T30 & philips screw driver ^^^^
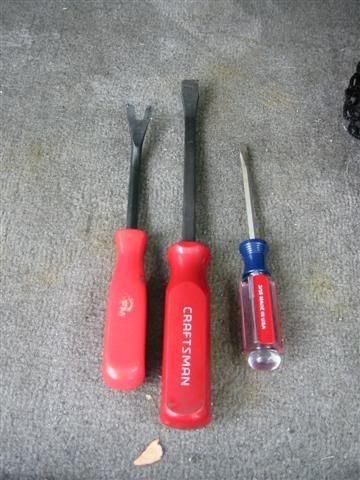
^^^^ Any one of these - trim panel prybar, regular prybar, flat blade screw driver^^^^
Step #1 - Remove the two screws holding the trim on to the liftgate
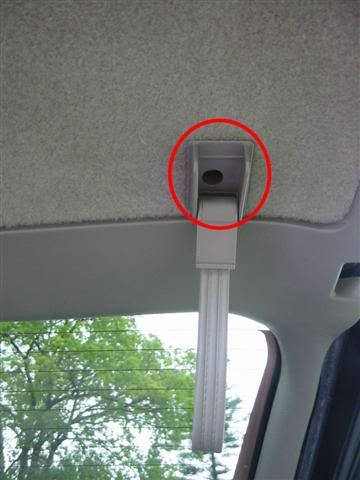
Screw #1 is a philips screw located at the window latch location (window must be opened to remove).
Screw #2 is a reinforcing screw for the pull loop on the door.
Step #2 - Removal of the liftgate trim panel... The trim panel is held in with spring clips around the bottom as well as a suedo C-clip type retaining around the window area. I start at either of the bottom corners of the trim panel where you can get ahold of it. The spring clips will come loose, but some may need a little more persuation. This is where you may need a prying tool. I have a specialized pry bar that is used for pulling trim panels with the push in style ribbed pins (left of second picture above). Anyway, if both of the screws are out, then the panel should just pop off.
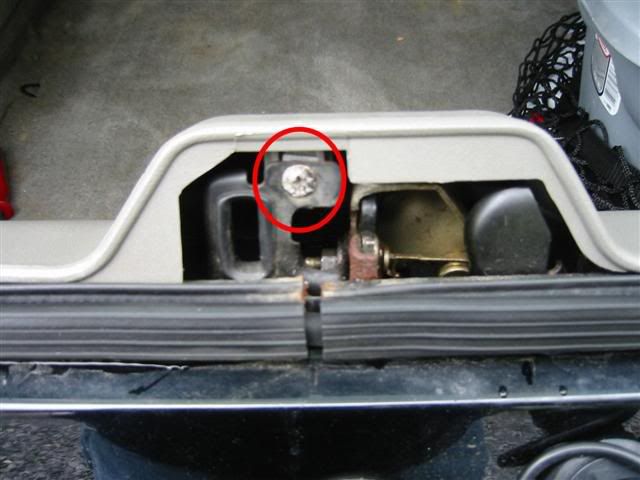
Step #3 - Adjust the latch for the glass.
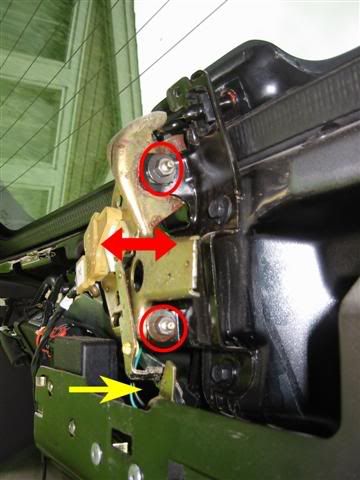
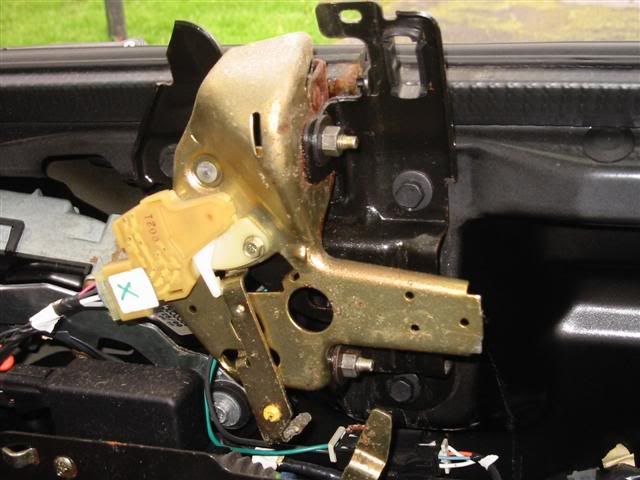
Loosen the nuts circled in red only enough to allow you to move the latch. Each time you make an adjustment, close the liftgate and carefully close the glass to see if the adjustment was correct or if it was too much. The yellow arrow denotes the electronic release striker. The actuator is just below this and can be seen in the picture below.
Step #4 - Reinstall the trim panel making sure that all of the clips are secured. The c-clip type things are a bit of a pain as you have to make sure that the trim panel is behind the plastic posts that stay in the liftgate frame. 1st time around for me was a pain to get put back together, but this last time wasn't too bad.
Good luck!
How to adjust your rear glass:
Tools required:
^^^^ Both of these - torx T30 & philips screw driver ^^^^
^^^^ Any one of these - trim panel prybar, regular prybar, flat blade screw driver^^^^
Step #1 - Remove the two screws holding the trim on to the liftgate
Screw #1 is a philips screw located at the window latch location (window must be opened to remove).
Screw #2 is a reinforcing screw for the pull loop on the door.
Step #2 - Removal of the liftgate trim panel... The trim panel is held in with spring clips around the bottom as well as a suedo C-clip type retaining around the window area. I start at either of the bottom corners of the trim panel where you can get ahold of it. The spring clips will come loose, but some may need a little more persuation. This is where you may need a prying tool. I have a specialized pry bar that is used for pulling trim panels with the push in style ribbed pins (left of second picture above). Anyway, if both of the screws are out, then the panel should just pop off.
Step #3 - Adjust the latch for the glass.
Loosen the nuts circled in red only enough to allow you to move the latch. Each time you make an adjustment, close the liftgate and carefully close the glass to see if the adjustment was correct or if it was too much. The yellow arrow denotes the electronic release striker. The actuator is just below this and can be seen in the picture below.
Step #4 - Reinstall the trim panel making sure that all of the clips are secured. The c-clip type things are a bit of a pain as you have to make sure that the trim panel is behind the plastic posts that stay in the liftgate frame. 1st time around for me was a pain to get put back together, but this last time wasn't too bad.
Good luck!

Joined: Jul 2006
Posts: 1

Does anyone know if I can make the same kind of adjustment on a 94 S10 Blazer? I just got one, and the Glass make a horrible squeeking when closed. It seems to have some play if I push down on it when it is latched shut. I sprayed the entire area with Lithium Grease, and the sound stopped for about 10 minutes, then came back, and if I pop the glass open, it stops. I am going to go out and take a look to see if I can find a way to get the back of the hatch/gate open, and see if I can find any way of adjusting, but thought I would ask here to see if others have been succesful with this.
thanks
thanks

Joined: Dec 2005
Posts: 78
From:
I sprayed the entire area with Lithium Grease, and the sound stopped for about 10 minutes, then came back

Thread
Thread Starter
Forum
Replies
Last Post
e602
Article Submissions/Discussions
91
Mar 8, 2015 04:53 PM
bowtie-72
1st Generation S-series (1983-1994) Tech
12
Aug 24, 2010 08:01 AM

