
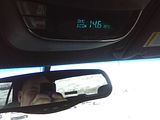
overhead console from temp/dir. to trip

ok,
bare with me...
***********disclaimer, i am no pro....follow at own risk********
ok first:
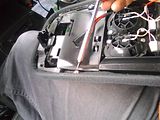
remove console unit from ceiling, there are (3) fillips screws holding it in place up there. (2) under main light lens and one in very front of console above rear view mirror.
second:
slowly drop console and disconnect the wire harnesses from the lights and the overhead unit. remove the smaller screws keeping the whole deal together and remove old unit. should slide out and the face plate is snapped on.
third:
clip the 6 pin head off the harness and leave enough material so that you are not short on the reconnection portion of this deal.
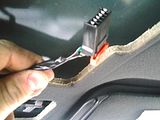
fourth:
now i am hoping you have clipped the harness from the scrapyard that you bought the "new and improved" unit from...if not stop here go back to the yard and beg for it or whatever you have to do to get it.
ok, lets continue on now that we all have our harnesses in hand.
these are the wires for both units (temp/dir.) and (trip..and all fancy stuff)
Compass/ Temp gauge (with trip computer) [has buttons labled as "Met/US" and "Mode" ]
(1)emerald green 7- RAP Fuse Supply Voltage
(2)black w/ white stripe 8- Ground
(3)dark green w/ white stripe 9-VSS (Vehicle Speed Signal)
(4)light green w/ black stripe 10- Ambient Air temp Sensor **
(5)grey 11- Instrument Panel Lamp Fuse Supply Voltage
(6)purple w/ white stripe 12- LED Dimming Signal
(7)(empty) 13- *empty*
(8)orange 14-Battery Positive Voltage
(9)yellow 15- Trip computer/nav class 2 serial data link
**BEWARE! the sensor has a polarity. You'll know if its wired backwards 'cause the temp reading will be WAY off.
Compass/ Temp gauge (without trip computer) [has buttons labled "Met/US" and "Off" ]
1) dark Green 5- RAP [x] fuse Supply Voltage
2) black/White 6- Ground
3) Dk Green/White 7- VSS Signal
4) Lt Green/Black 8- Ambient Air temp Sensor
5) gray 9- Instrument Panel Lamp Fuse Supply Voltage
6) purple/white 10- LED Dimming Signal
ok, now after looking at that your saying....well shoooot them first (6) wires are the same, well yes they are, soooo lets connect them from the harness to the "new" 9 pin connector you have there...go ahead ....
ok all set? I just used some electrical tape to secure the connections with a little twisting action to boot.
so now you say, "but what about the (2) left over wires?"
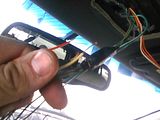
well glad you asked, what i did for the orange is take and tap into the orange power supply wire for the lights in the console. now when you look at that harness there are two orange wires. what i did was look that the female portion of the connection going to the lights and checked the difference, if you look there is only one orange on that side of the connection...so i looked at male portion of connection and tapped that one for power.
now the yellow wire is the one you need to extend down to the scanning port under dash, just tap into the purple wire and secure it .
(dash panel removal is all you)

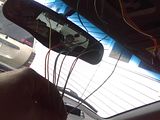
and ta da you have a "new" fandagled overhead unit installed.

if i am in need of correction feel free to set me straight, i am not a pro.
i am a backyard jack of all trades, master of none.
source:
http://www.hotrodders.com/forum/96-b...ion-10959.html
bare with me...
***********disclaimer, i am no pro....follow at own risk********
ok first:
remove console unit from ceiling, there are (3) fillips screws holding it in place up there. (2) under main light lens and one in very front of console above rear view mirror.
second:
slowly drop console and disconnect the wire harnesses from the lights and the overhead unit. remove the smaller screws keeping the whole deal together and remove old unit. should slide out and the face plate is snapped on.

third:
clip the 6 pin head off the harness and leave enough material so that you are not short on the reconnection portion of this deal.

fourth:
now i am hoping you have clipped the harness from the scrapyard that you bought the "new and improved" unit from...if not stop here go back to the yard and beg for it or whatever you have to do to get it.
ok, lets continue on now that we all have our harnesses in hand.

these are the wires for both units (temp/dir.) and (trip..and all fancy stuff)
Compass/ Temp gauge (with trip computer) [has buttons labled as "Met/US" and "Mode" ]
(1)emerald green 7- RAP Fuse Supply Voltage
(2)black w/ white stripe 8- Ground
(3)dark green w/ white stripe 9-VSS (Vehicle Speed Signal)
(4)light green w/ black stripe 10- Ambient Air temp Sensor **
(5)grey 11- Instrument Panel Lamp Fuse Supply Voltage
(6)purple w/ white stripe 12- LED Dimming Signal
(7)(empty) 13- *empty*
(8)orange 14-Battery Positive Voltage
(9)yellow 15- Trip computer/nav class 2 serial data link
**BEWARE! the sensor has a polarity. You'll know if its wired backwards 'cause the temp reading will be WAY off.
Compass/ Temp gauge (without trip computer) [has buttons labled "Met/US" and "Off" ]
1) dark Green 5- RAP [x] fuse Supply Voltage
2) black/White 6- Ground
3) Dk Green/White 7- VSS Signal
4) Lt Green/Black 8- Ambient Air temp Sensor
5) gray 9- Instrument Panel Lamp Fuse Supply Voltage
6) purple/white 10- LED Dimming Signal
ok, now after looking at that your saying....well shoooot them first (6) wires are the same, well yes they are, soooo lets connect them from the harness to the "new" 9 pin connector you have there...go ahead ....
ok all set? I just used some electrical tape to secure the connections with a little twisting action to boot.
so now you say, "but what about the (2) left over wires?"

well glad you asked, what i did for the orange is take and tap into the orange power supply wire for the lights in the console. now when you look at that harness there are two orange wires. what i did was look that the female portion of the connection going to the lights and checked the difference, if you look there is only one orange on that side of the connection...so i looked at male portion of connection and tapped that one for power.
now the yellow wire is the one you need to extend down to the scanning port under dash, just tap into the purple wire and secure it .
(dash panel removal is all you)

and ta da you have a "new" fandagled overhead unit installed.

if i am in need of correction feel free to set me straight, i am not a pro.
i am a backyard jack of all trades, master of none.
source:
http://www.hotrodders.com/forum/96-b...ion-10959.html

nope, sounds like a good idea though.
yeh, after i did all this i found out that the year of the unit i bought will not work with my 99...so back to the yard. i was hoping it was a calibration issue, but after looking...its not. the unit reads ( - -) after 30 seconds.
i will be putting the unit up for sale i guess. it works just not on 98 and up i guess.
oh well live and learn. surgery success...patient died.
Beginning Member
Joined: Feb 2010
Posts: 23
From: croatia

If you are sure this should work trucks until '98 (my blazer is '95) and you are willing to send it to Croatia  , I would be more then happy to buy it from you. Though i would need the whole package needed for the board comp upgrade - display, 9pin connector, wire harness and whatever else i need
, I would be more then happy to buy it from you. Though i would need the whole package needed for the board comp upgrade - display, 9pin connector, wire harness and whatever else i need
i can send you the display and connector...i only have the one wire harness.
*********************************
ok i need some help here, yes i know...write may have been a bit hasty.
can anyone confirm that the (- -) on the display for all info is related soley to year of donor blazer or am i missing something here?
the stupid thing turns on. holds data for 30 sec give take then blanks out, it is still on just no info. i cant believe that i got a second one that is bad.
this sucks.
sorry frustrated over this one.
going to have to go back over wiring i think.
thanks for any help.
************************************************** **************
ok, well now it all works. after checking all connections what i found was that the wire i ran from the overhead to the scanner port was nicked by the pillar trim piece and grounded out.
now i am fully funtional. i hope this helps someone out.

Last edited by warthogdriver; Feb 27, 2010 at 01:51 PM. Reason: fixed!!!!!!!!!!!!!!11
actually i found that you dont need the harness i think....check this site out.
http://www.s-seriesforum.com/forum/s...ad.php?t=69109
has wiring info for installs with no previous overhead unit.
oh, by the way both units work, wire was grounding out.
http://www.s-seriesforum.com/forum/s...ad.php?t=69109
has wiring info for installs with no previous overhead unit.
oh, by the way both units work, wire was grounding out.


headliner stayed in place..i just snaked the wire thru at the rearview mirror and across the top of windshield and tucked it in...the pillar trim i did have to pull back some and feed it thru...watch the trim clips thats what nailed me the first time. cut the wire and grounded it out.