
Cadillac ATS front seat swap

Thread Starter
|
Super Member
Joined: Apr 2014
Posts: 1,968
From: Lake City, Florida

I've posted some photos in some other threads, but I wanted to make a dedicated thread about this swap to keep all the info in one spot, just for ease if someone else is looking for the info.
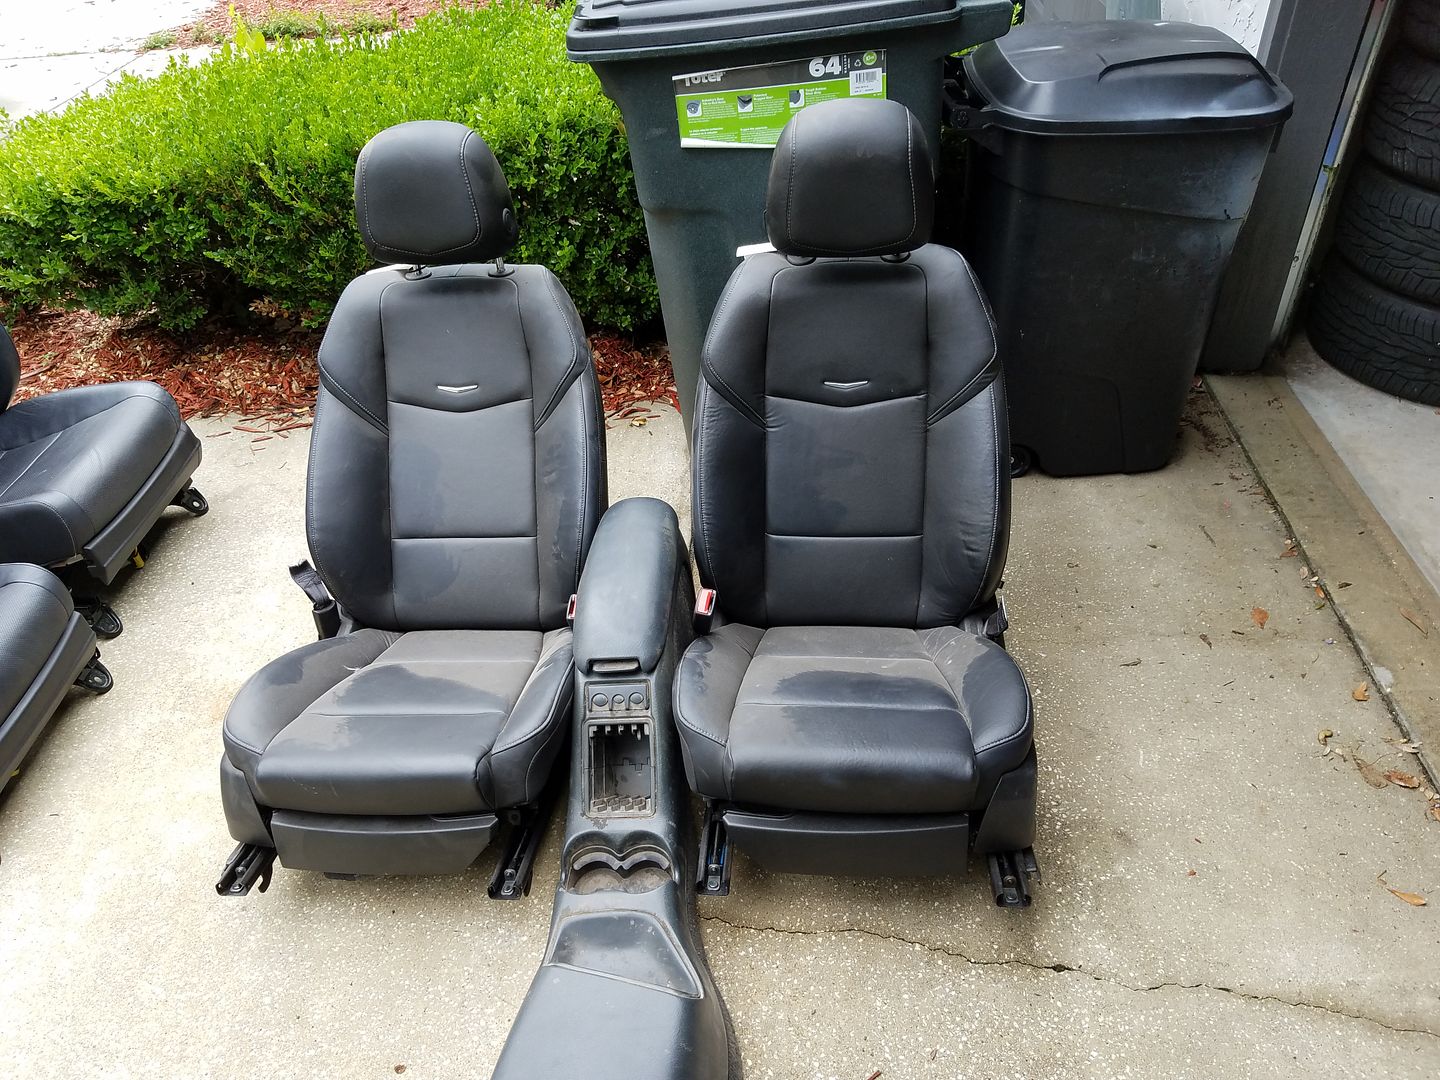
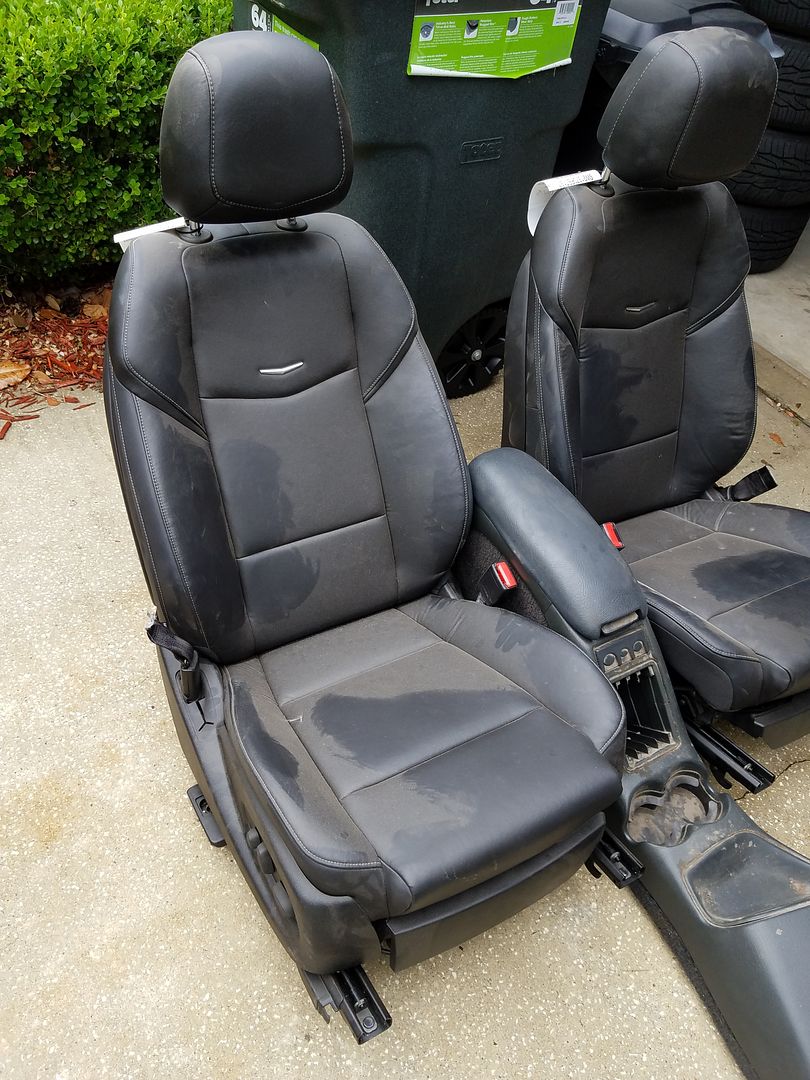
I used black leather 6 way power seats from a 2013 Cadillac ATS for this swap, but really most any small car or SUV bucket seats will do the trick. The S series chassis really has a small seat footprint, so don't expect to fit an F150 or Suburban seat into the cab. The bottom section has to be fairly low profile too. These ATS seats were pushing that thickness on the bottom to be honest, but I'll account that to the fact that they're height adjustable so they have some more mechanisms in the base that allow for the movement and electronics under them. If you find a manual seat that's sized about right, you might be able to get a lower sitting seat. I'm not a tall person, so the extra height (even at the seat's lowest setting adjustment) is good to me, and the height adjustment up works out great for my wife as she's a lot shorter than me But a tall person may have issues comfortably driving my Blazer now lol
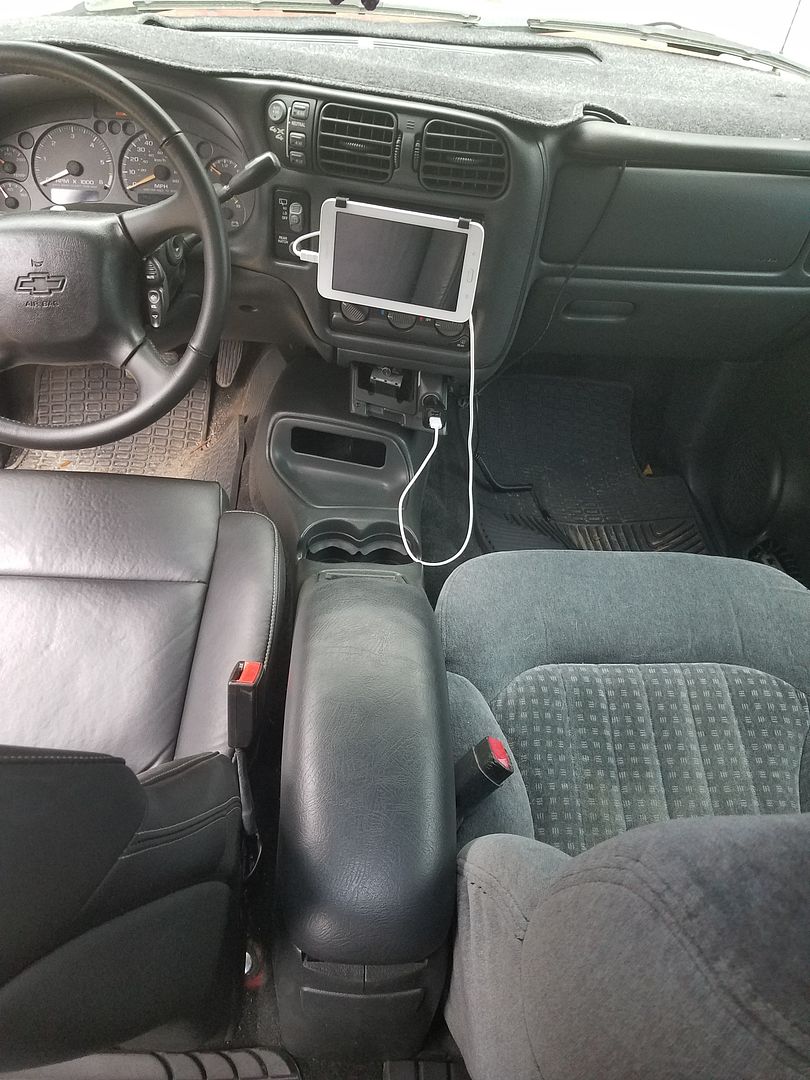
Being that I'm coming from a cloth bench seat setup, I also grabbed a center console to install along with the bucket seats.

I had a few goals for the seat swap. 1) NOTHING on the truck was to be modified, so at any point I can go back to a factory S series seat by just bolting and plugging it in. 2) I wanted a factory look, I didn't want it to appear "custom", thus the reason for the Cadillac seats with just the subtle chrome "V" in the back (in other words, I didn't want to put in Covette seats with "Z06" embroidered into them or anything like that... but by all means it's definitely possible, so if that's what you're after than go for it!). 3) I wanted them to just drop in, plug in, and bolt down, but I guess that sort of ties into #1...
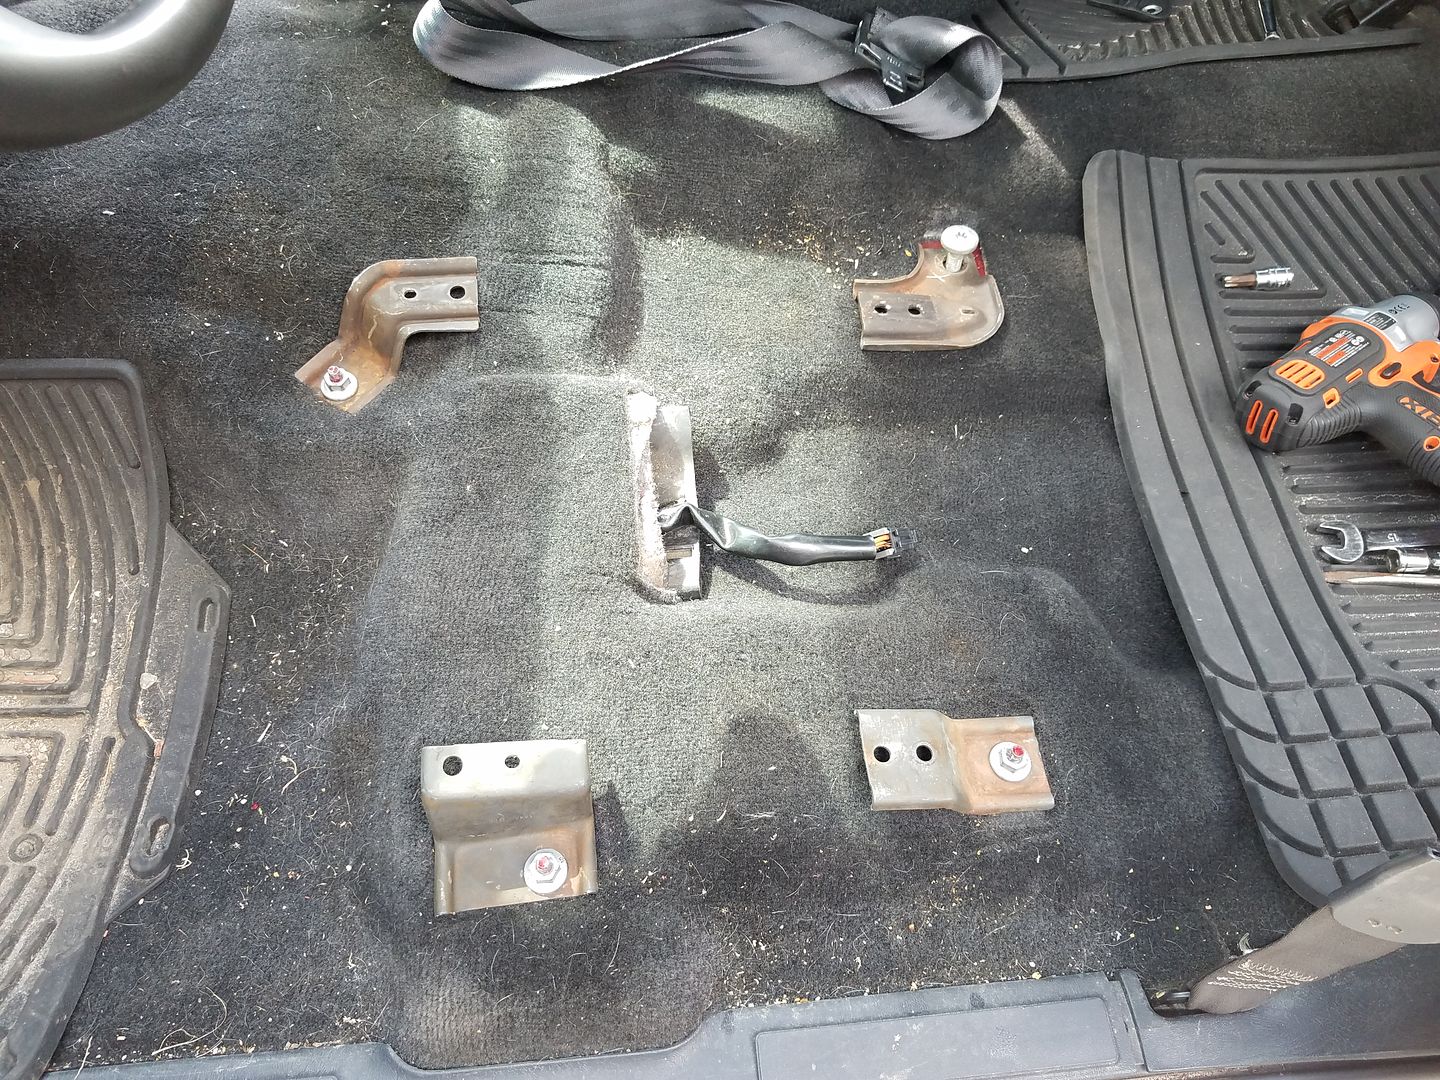
Aside from the seats, the other parts I used were some power seat tracks scavenged from some ruined full power seats from a Bravada (be easiest to find some in a Blazer/Jimmy/Bravada that have power driver AND passenger, that way you have roughly the same brackets on the driver and passenger side to work with), as well as the plug that is on the bottom of the seat that connects to the harness in the floor of the vehicle. Do yourself a favor and get some of the body harness that plugs into the seat harness too, then you can apply power to the seat at any time and move things around while you're building the brackets
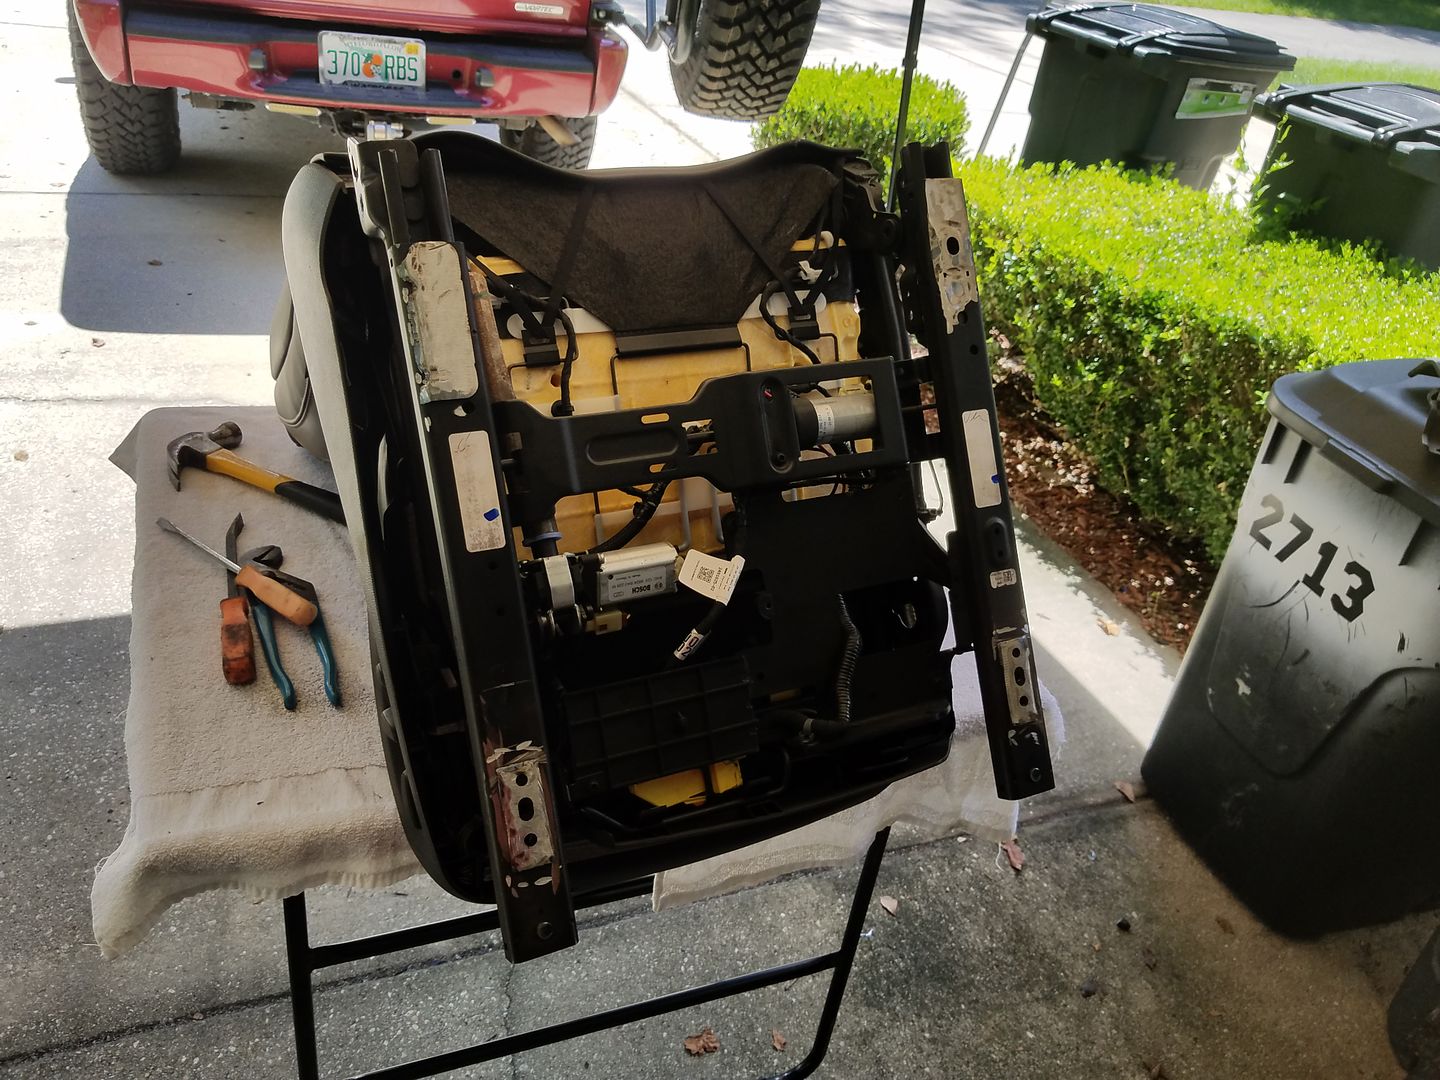
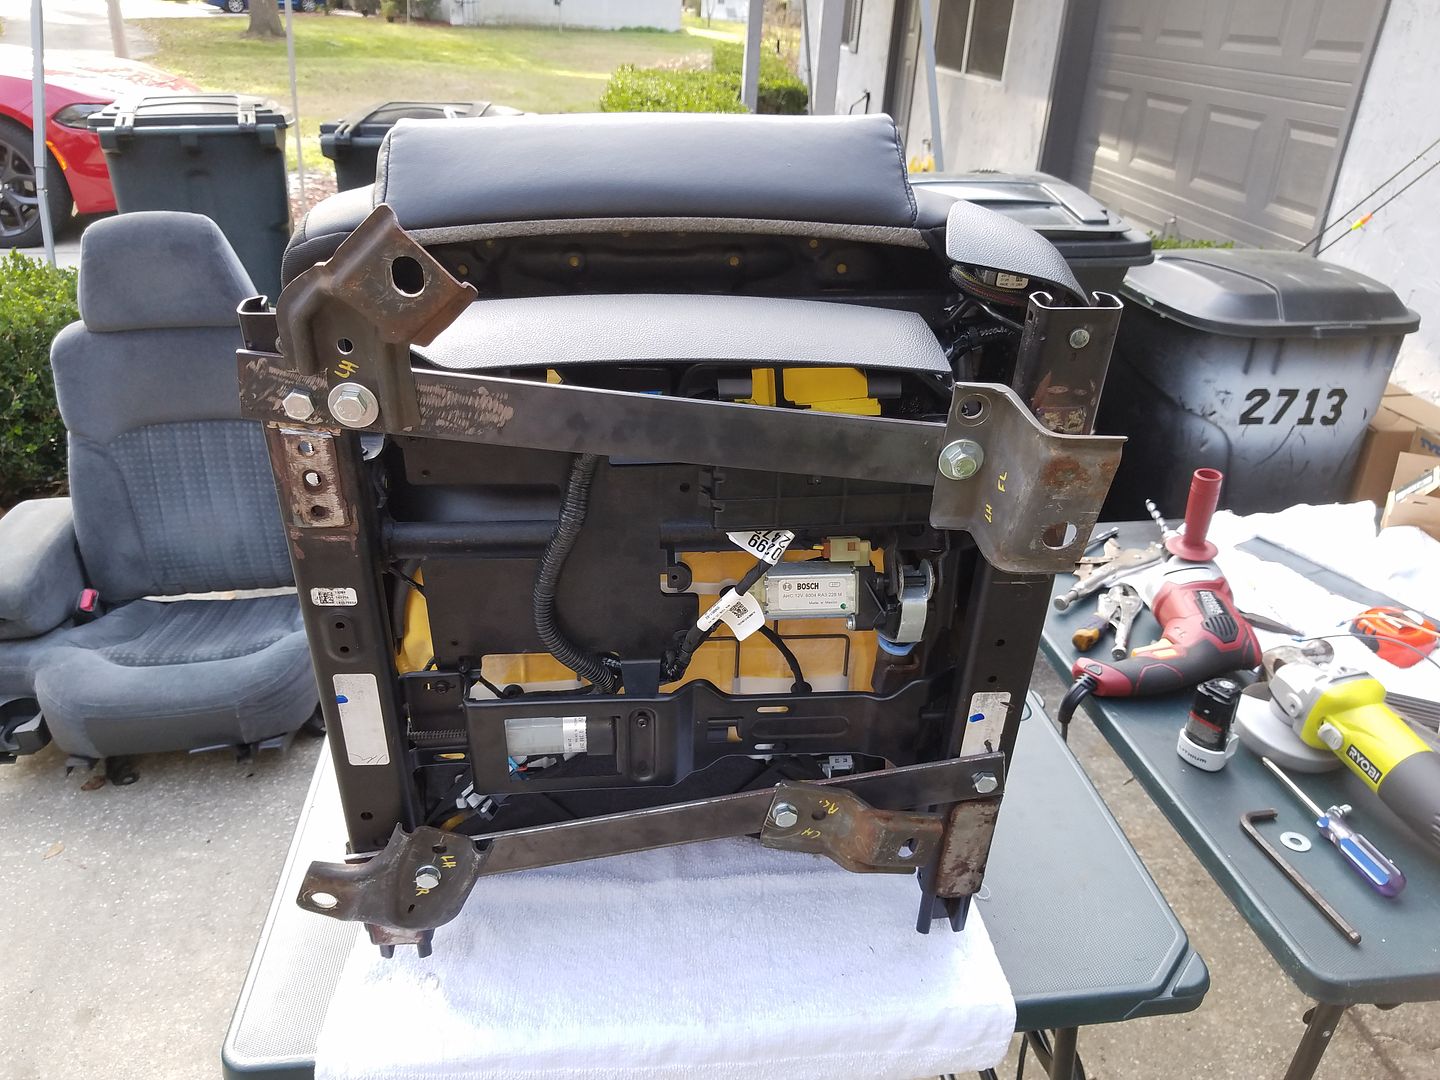
The first two things I did was 1) partially pull the back cover of the seat off and gut the airbag from it... no connections for it in the Blazer, and if I don't need it in there, I didn't really want to have it in there... After removing it I stuffed some clean shop towels into the void and closed the seat back up to keep that side "full". and 2) remove any and all original mounting bracetry from the Cadillac seats. Took a lot of cutting and grinding, but the end goal was bare flat bottom seat tracks.
Here we can see the modified seat harness and how it matches the body side harness on the floor. This is on the bottom of the Cadillac seat. I spliced in the power Bravada seat plug so that it plugs right into the body harness on the Blazer. Only 4 wires are used in most swaps; two for power and ground, and two for the seat belt buckle (turns the light off in the cluster when the seat belt is clipped in). If you're grafting in manual seats then the only 2 wires you'll have to worry about are the two for the seat belt buckle. And quite honestly that can be "bypassed", for for safety reason I'm not going to go over that step... Let's just say that all the buckle does to turn off the light when you fasten the seat belt is complete a circuit On that note, the original Blazer seat belt clasp actually clips into the Cadillac ATS bucket, takes a little wiggling, but it does latch in solidly and shuts the light off on the dash. But I have some clasps that I cut from locked up seat belts from a Cadillac that I plan on installing on some Blazer seat belt assemblies once I get some to tare apart.

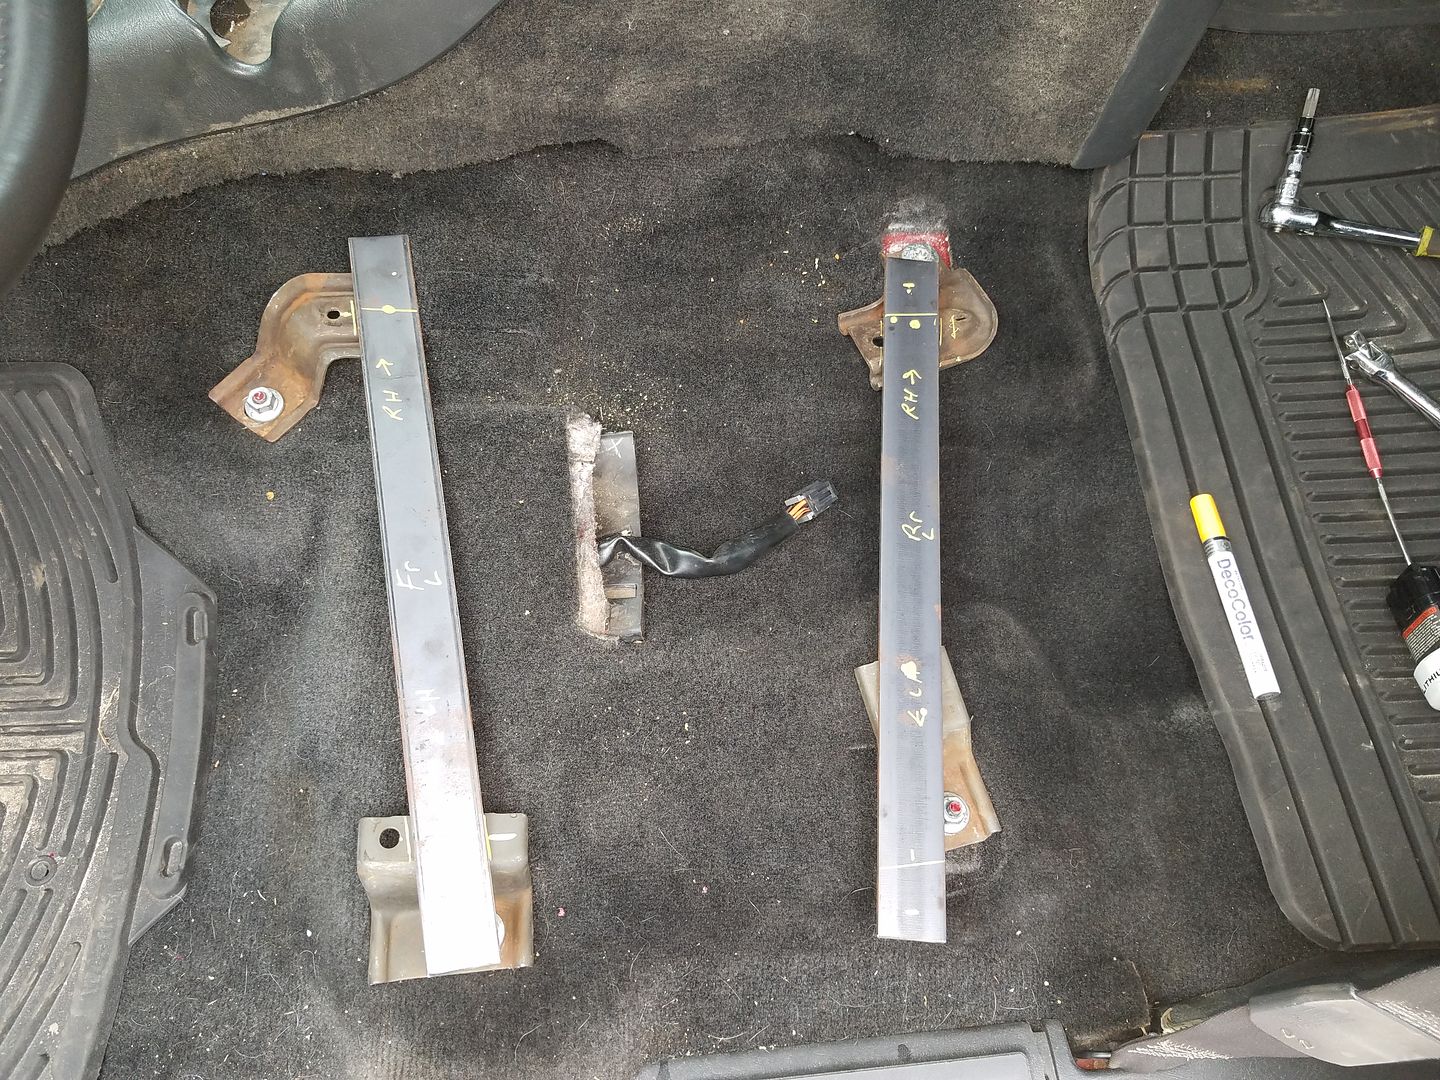
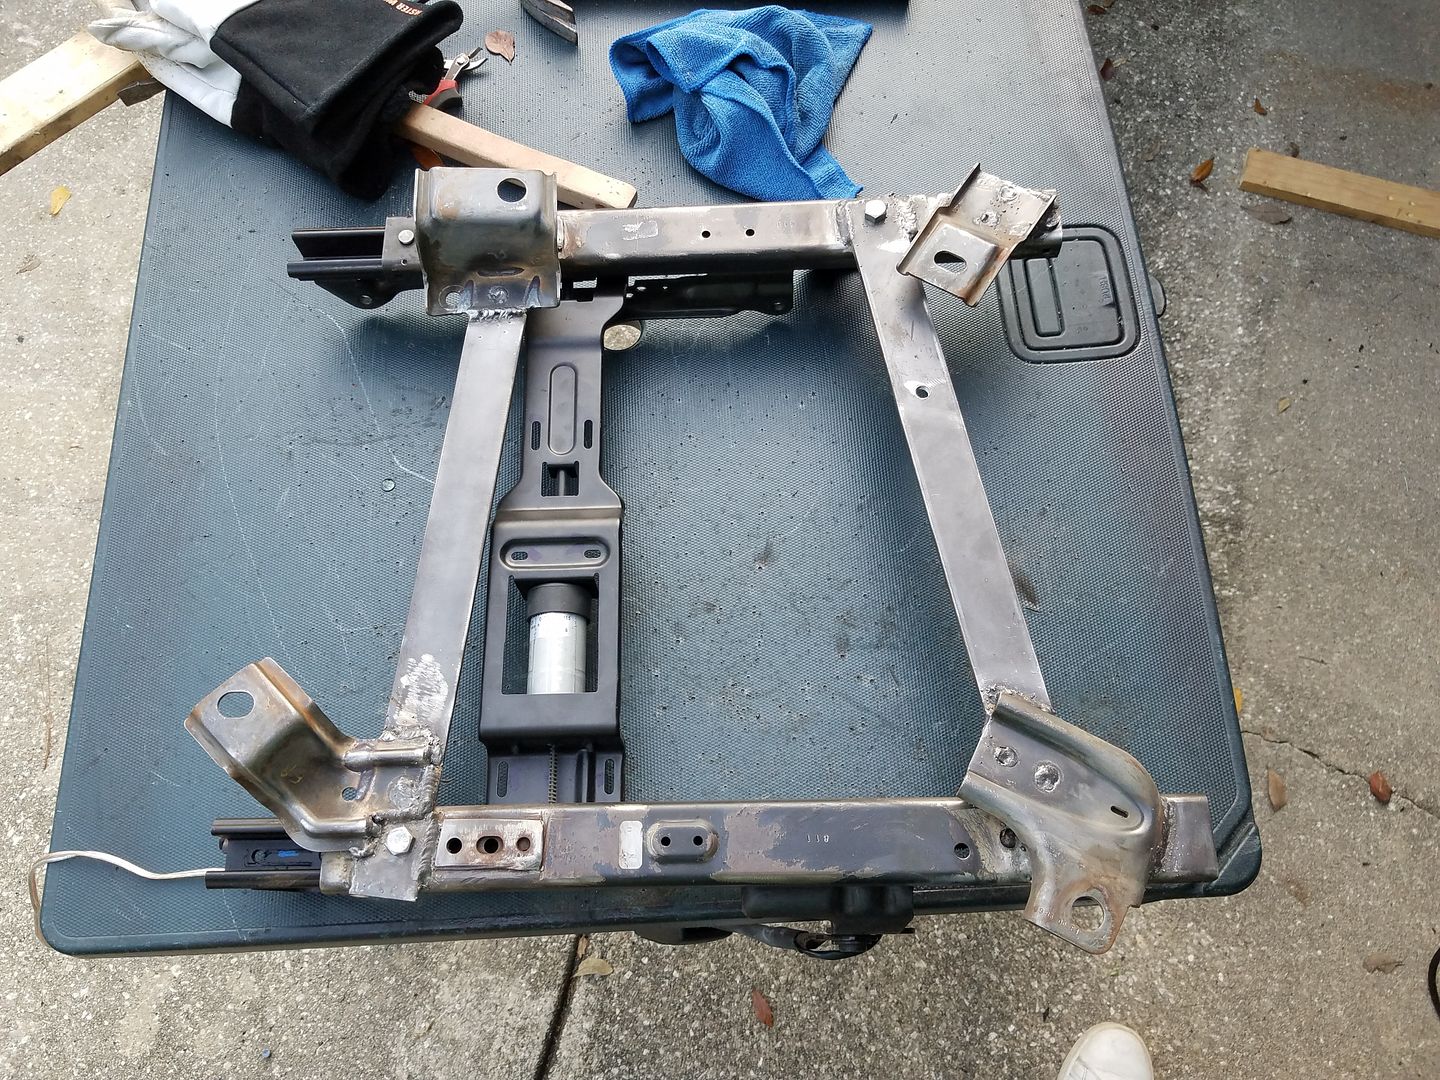
After stripping the power Bravada seat tracks down to basically nothing but the feet that bolt to the floor, your left with some good places to make some new bracketry to mount the new seat too.
I used basic flat-stock steel for the brackets. I don't recall the thickness, but you obviously don't want anything too thin. In the end, the brackets completely bolted together, both to the feet and the seat. Absolutely no welded was done on these, all bolt together. If you go the bolt together route, I highly recommend sticking to grade 8 or higher bolts, for the safety aspect.
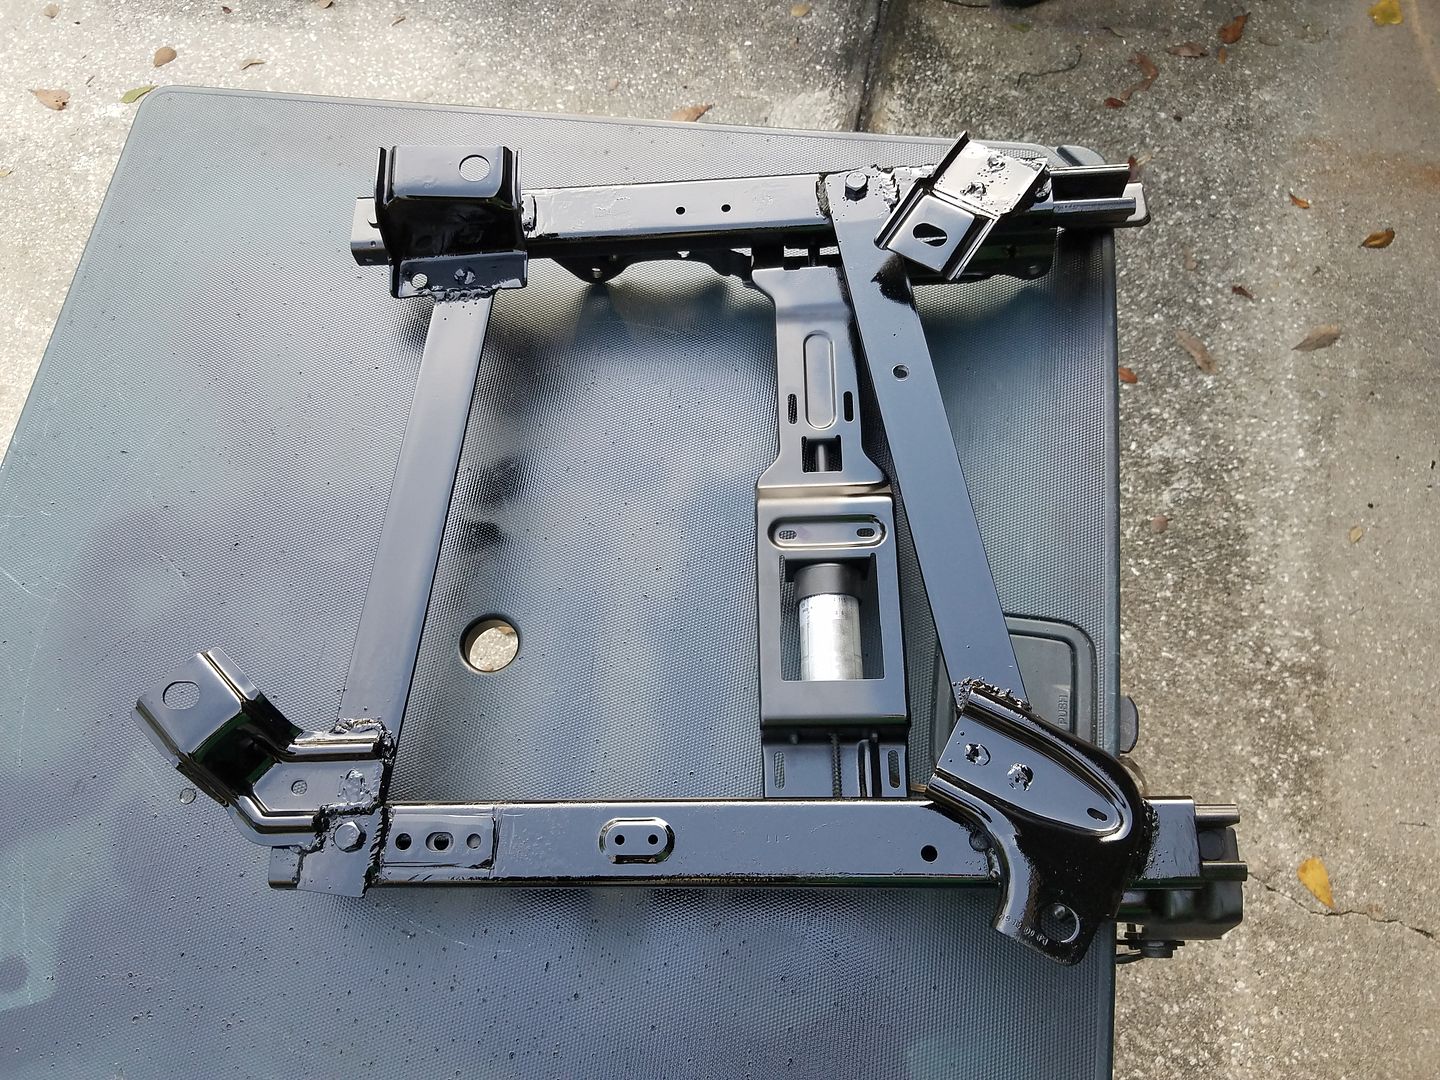
This step took a LOT of measuring, cutting, measuring again, drilling, bolting, finagling, fitting, and repeating, over and over again, a lot, in order to get everything lined up and placed just right.
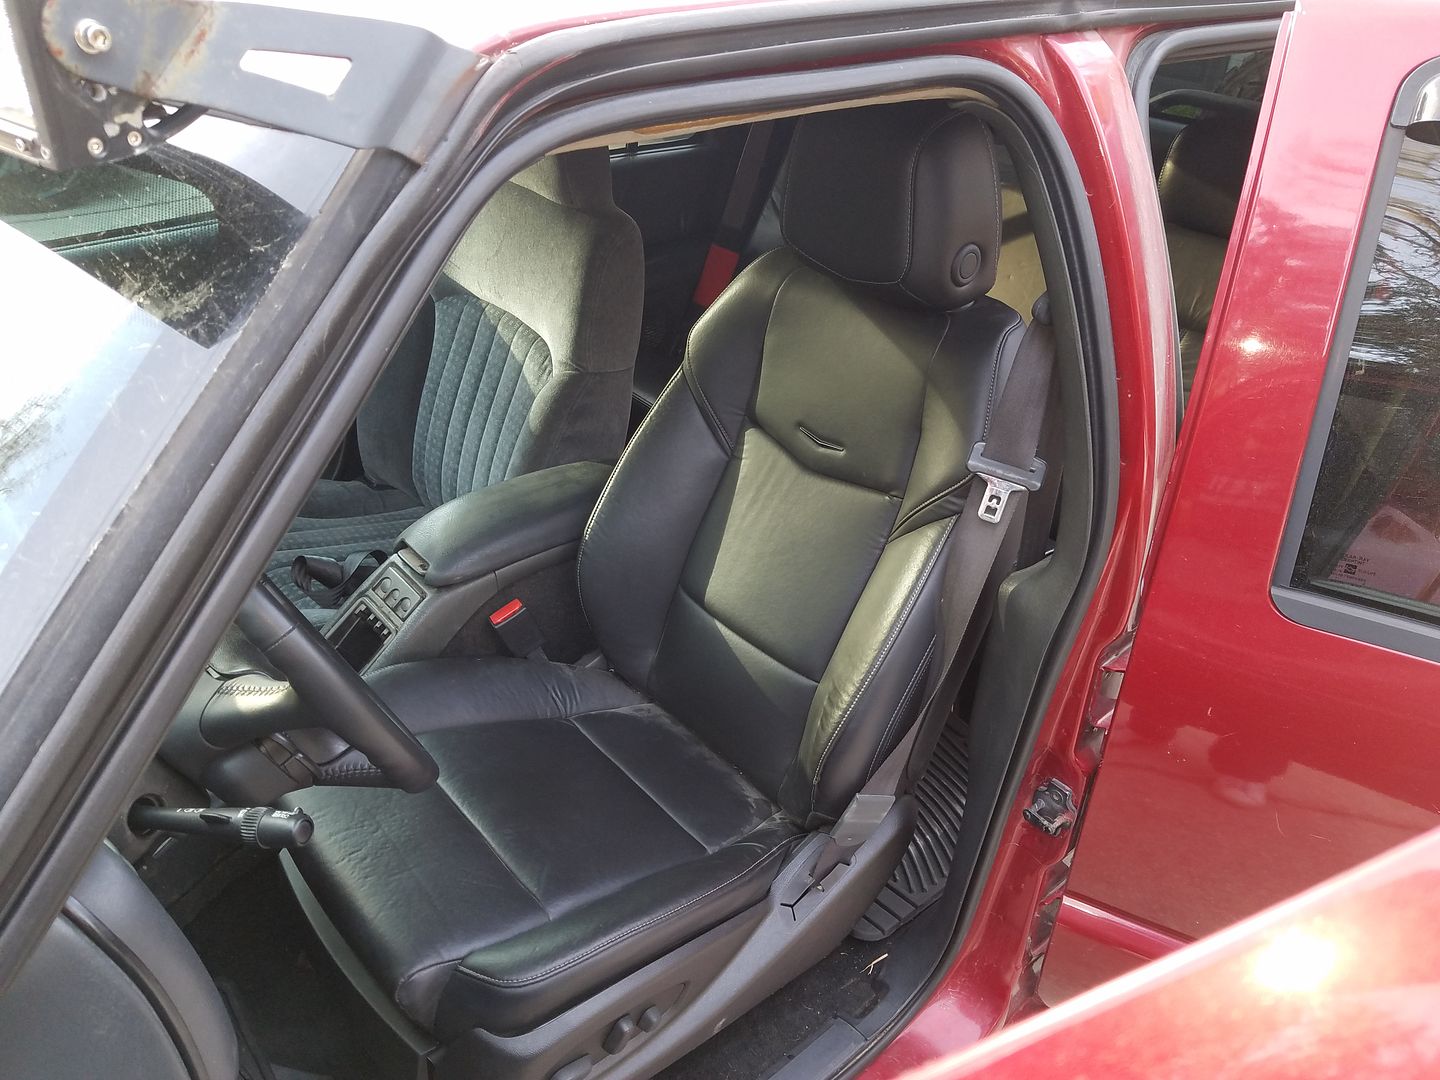
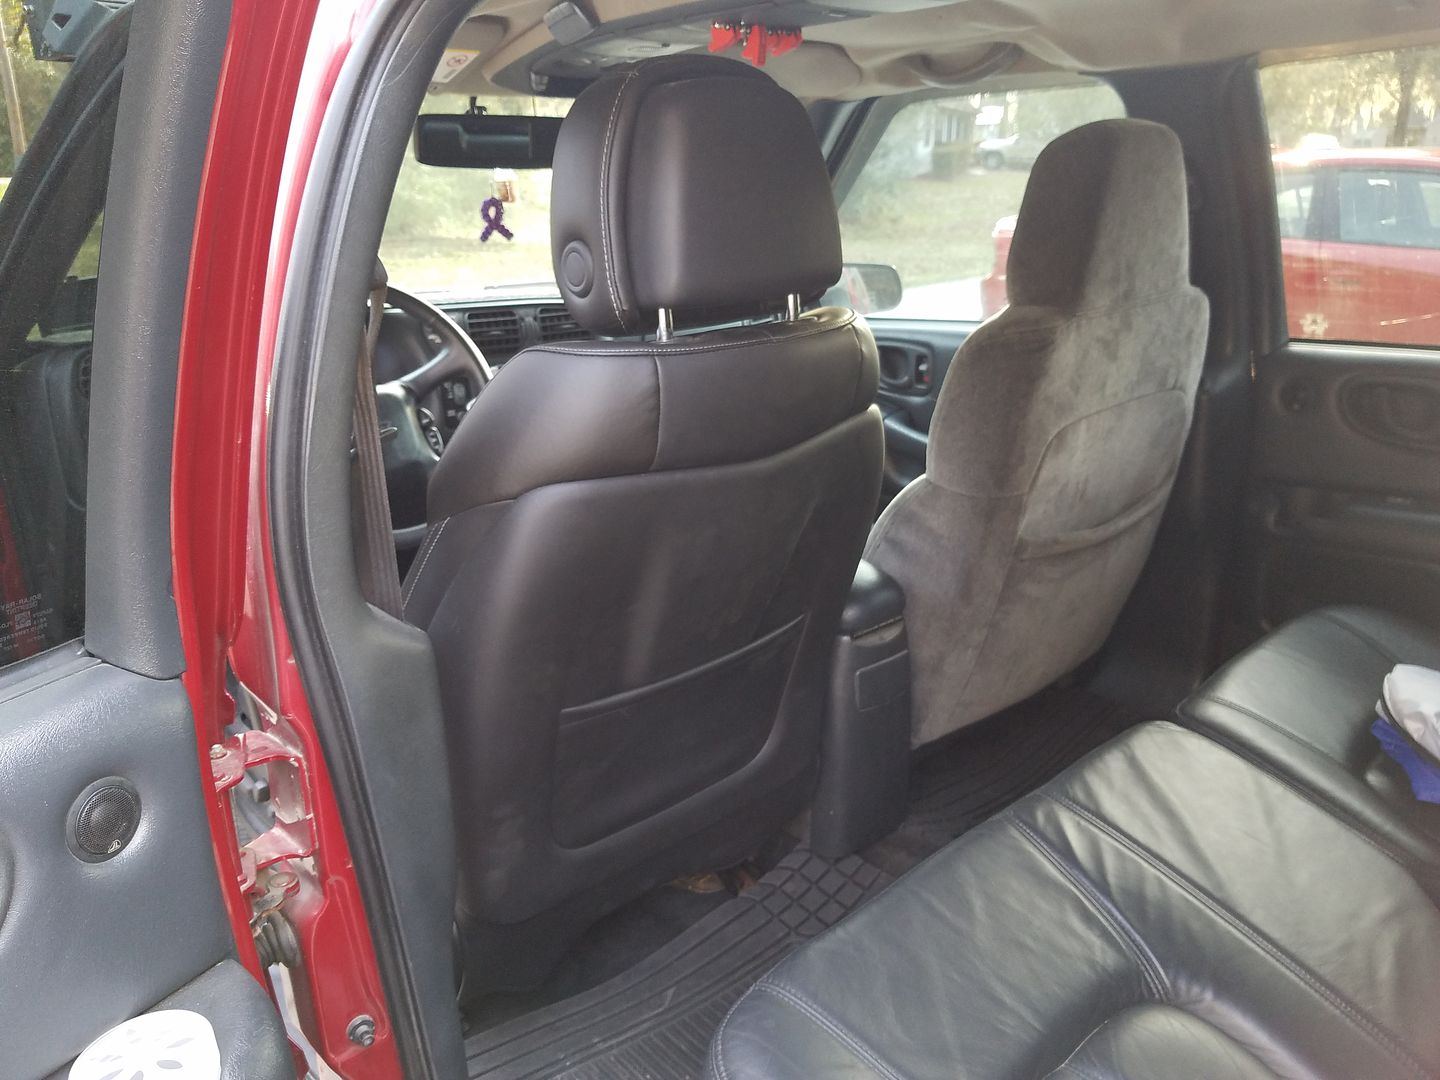
Then it's just a matter of dropping in, bolting in, and plugging in the new seats, and enjoying!
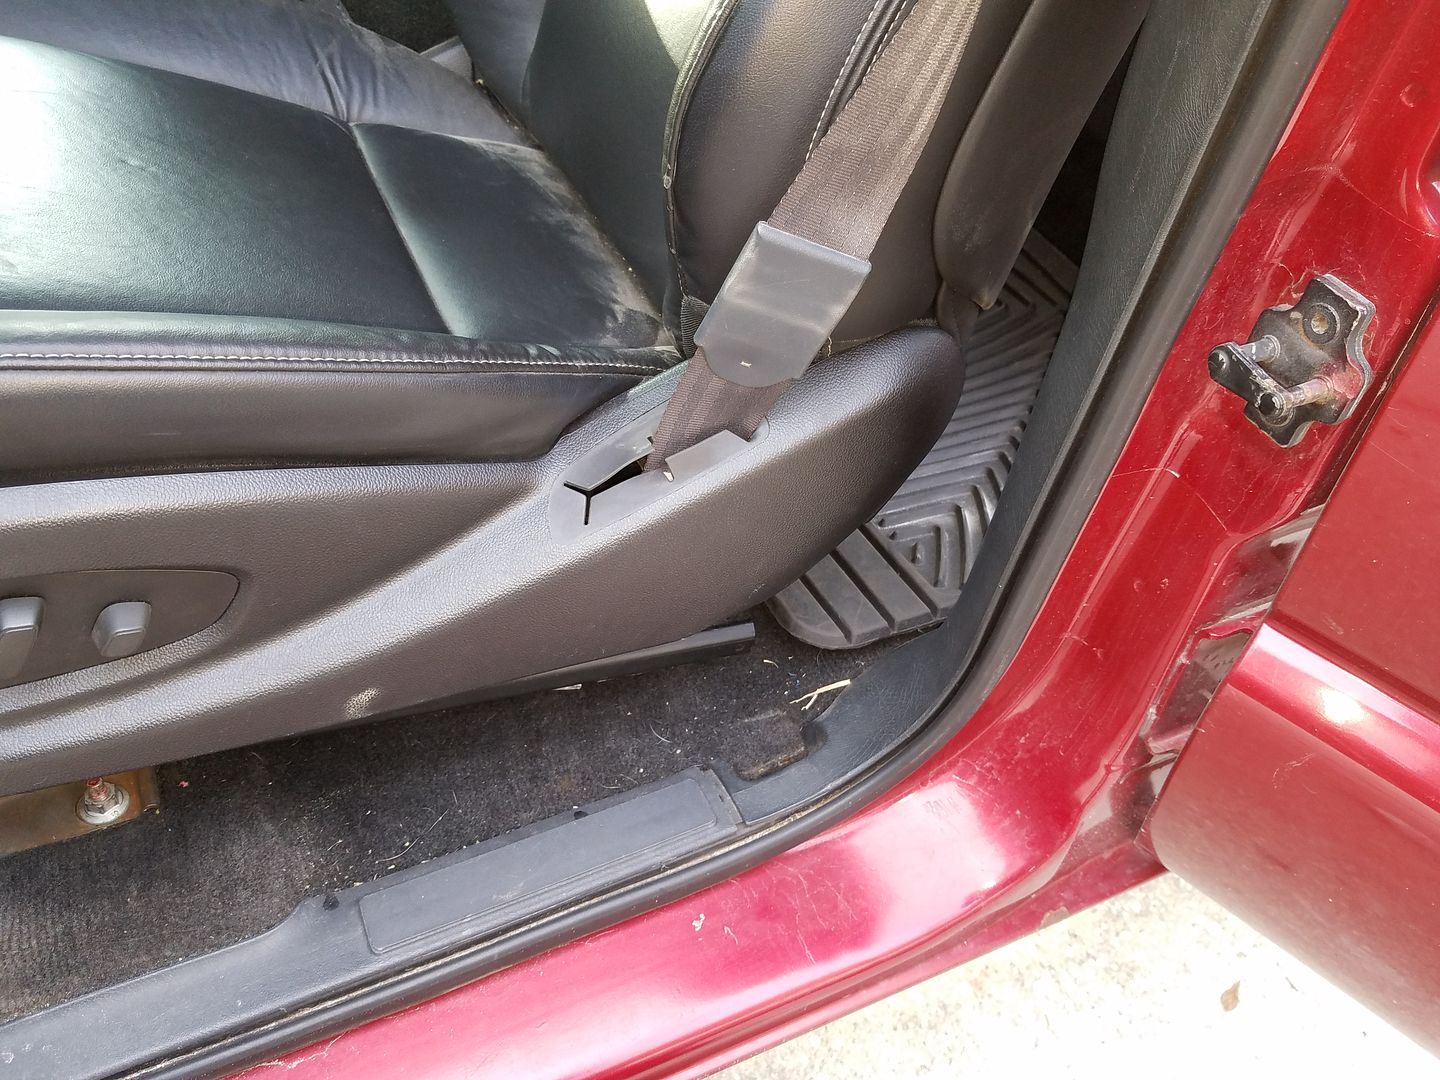
To take it one step further, I moved the floor mounted placement of the seat belt to being mounted to the seat as the Cadillac originally had it mounted. Not a necessary step, but made use of the belt hole in the seat, and actually made the seat belt more comfortable.
I still have yet to install the passenger side, that will hopefully happen next weekend. I'll get some photos of the airbag removal, and some more detailed ones of the bracketry construction. For now, the only other step I've taken was to mount the new console to the floor.
I used black leather 6 way power seats from a 2013 Cadillac ATS for this swap, but really most any small car or SUV bucket seats will do the trick. The S series chassis really has a small seat footprint, so don't expect to fit an F150 or Suburban seat into the cab. The bottom section has to be fairly low profile too. These ATS seats were pushing that thickness on the bottom to be honest, but I'll account that to the fact that they're height adjustable so they have some more mechanisms in the base that allow for the movement and electronics under them. If you find a manual seat that's sized about right, you might be able to get a lower sitting seat. I'm not a tall person, so the extra height (even at the seat's lowest setting adjustment) is good to me, and the height adjustment up works out great for my wife as she's a lot shorter than me
But a tall person may have issues comfortably driving my Blazer now lolBeing that I'm coming from a cloth bench seat setup, I also grabbed a center console to install along with the bucket seats.
I had a few goals for the seat swap. 1) NOTHING on the truck was to be modified, so at any point I can go back to a factory S series seat by just bolting and plugging it in. 2) I wanted a factory look, I didn't want it to appear "custom", thus the reason for the Cadillac seats with just the subtle chrome "V" in the back (in other words, I didn't want to put in Covette seats with "Z06" embroidered into them or anything like that... but by all means it's definitely possible, so if that's what you're after than go for it!). 3) I wanted them to just drop in, plug in, and bolt down, but I guess that sort of ties into #1...
Aside from the seats, the other parts I used were some power seat tracks scavenged from some ruined full power seats from a Bravada (be easiest to find some in a Blazer/Jimmy/Bravada that have power driver AND passenger, that way you have roughly the same brackets on the driver and passenger side to work with), as well as the plug that is on the bottom of the seat that connects to the harness in the floor of the vehicle. Do yourself a favor and get some of the body harness that plugs into the seat harness too, then you can apply power to the seat at any time and move things around while you're building the brackets
The first two things I did was 1) partially pull the back cover of the seat off and gut the airbag from it... no connections for it in the Blazer, and if I don't need it in there, I didn't really want to have it in there... After removing it I stuffed some clean shop towels into the void and closed the seat back up to keep that side "full". and 2) remove any and all original mounting bracetry from the Cadillac seats. Took a lot of cutting and grinding, but the end goal was bare flat bottom seat tracks.
Here we can see the modified seat harness and how it matches the body side harness on the floor. This is on the bottom of the Cadillac seat. I spliced in the power Bravada seat plug so that it plugs right into the body harness on the Blazer. Only 4 wires are used in most swaps; two for power and ground, and two for the seat belt buckle (turns the light off in the cluster when the seat belt is clipped in). If you're grafting in manual seats then the only 2 wires you'll have to worry about are the two for the seat belt buckle. And quite honestly that can be "bypassed", for for safety reason I'm not going to go over that step... Let's just say that all the buckle does to turn off the light when you fasten the seat belt is complete a circuit
On that note, the original Blazer seat belt clasp actually clips into the Cadillac ATS bucket, takes a little wiggling, but it does latch in solidly and shuts the light off on the dash. But I have some clasps that I cut from locked up seat belts from a Cadillac that I plan on installing on some Blazer seat belt assemblies once I get some to tare apart.After stripping the power Bravada seat tracks down to basically nothing but the feet that bolt to the floor, your left with some good places to make some new bracketry to mount the new seat too.
I used basic flat-stock steel for the brackets. I don't recall the thickness, but you obviously don't want anything too thin. In the end, the brackets completely bolted together, both to the feet and the seat. Absolutely no welded was done on these, all bolt together. If you go the bolt together route, I highly recommend sticking to grade 8 or higher bolts, for the safety aspect.
This step took a LOT of measuring, cutting, measuring again, drilling, bolting, finagling, fitting, and repeating, over and over again, a lot, in order to get everything lined up and placed just right.
Then it's just a matter of dropping in, bolting in, and plugging in the new seats, and enjoying!
To take it one step further, I moved the floor mounted placement of the seat belt to being mounted to the seat as the Cadillac originally had it mounted. Not a necessary step, but made use of the belt hole in the seat, and actually made the seat belt more comfortable.
I still have yet to install the passenger side, that will hopefully happen next weekend. I'll get some photos of the airbag removal, and some more detailed ones of the bracketry construction. For now, the only other step I've taken was to mount the new console to the floor.


Thread Starter
|
Super Member
Joined: Apr 2014
Posts: 1,968
From: Lake City, Florida
May start on it tomorrow if there's daylight left after getting the driver's seat back together and in. I'm also going to pull the seat cover off and slip in some aftermarket seat heaters in while the seat is out
Thread Starter
|
Super Member
Joined: Apr 2014
Posts: 1,968
From: Lake City, Florida
Went ahead and brought the seat inside tonight and ripped the covers off and installed heaters in the butt and back  Aftermarket since somehow these Caddy seats did have heaters in them... but they do now!
That was a chore though... should have taken photos :P
Aftermarket since somehow these Caddy seats did have heaters in them... but they do now!That was a chore though... should have taken photos :P