Blazer Forum - Chevy Blazer Forums
  • LOG IN
  • REGISTER
  • Forums
    • Announcements
      • Forum Notice
      • New Member Area
    • General
      • General Chat
      • The Lounge
      • Builds
      • Off Roading
      • Sights N Sounds
      • Street N Strip
      • The Chop Shop
      • Shows & Clubs
    • Mechanical & Maintenance
      • General Tech Help
      • Engine & Transmission
      • Lighting & Electrical
      • Steering, Suspension & Drivetrain
    • Modifications
      • Performance & Brainstorming
      • Tires and Wheels
      • Audio/Video Electronics
      • Paint, Body, & Interior
      • Suspension Tech
      • Detailing
    • Chevy Blazer Classifieds
      • Member Group And Special Buys
      • Absolutely Free!!!
      • PRIVATE For Sale / Trade Classifieds
      • Private 'Wanted' Classifieds
      • Online Auctions & Listings
    • The Site
      • Website Problems and Suggestions
  • Marketplace
    • Vendor Directory
    • Become a Vendor
  • New Posts
  • Tools
    • Car Payment Calculator
    • Tire Rim Calculator
    • Recalls
    • Technical Service Bulletins (TSBs)
    • Members List
    • Live Feed
  • Gallery
  • View Dark Mode
    • Please register or login to enable Dark Mode.
  • Log In
  • Register
Blazer Forum - Chevy Blazer Forums
    • Threads
      • Advanced
Dark Mode

Please register or login to enable Dark Mode.

Log In

Forgot your Password?

By logging into your account, you agree to our Terms of Use and Privacy Policy, and to the use of cookies as described therein.
  • Recent
  • Commented
  • Albums
  • My Pictures

My Post Pictures

christine_208
October 15, 2017
 756
 3
Sort:
Most Recent
  • Default
  • Most Recent
A rasp was used to grind away some of the ribs on the side of the air filter box that were touching the upper radiator hose.
0 2019/07/02 20:17:57 christine_
Because of extra thickness of radiator, about an inch of the upper radiator hose had to replaced.
0 2019/07/02 20:17:31 christine_
Left side view of installed radiator.
0 2019/07/02 20:16:57 christine_
View showing how arm that holds one of the fittings for the AC condenser had to be bent so to not touch the new radiator.
0 2019/07/02 20:16:31 christine_
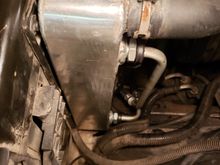
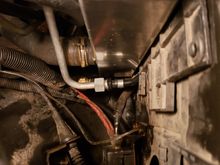
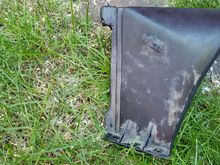
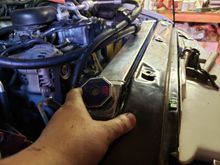
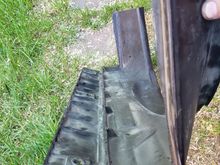
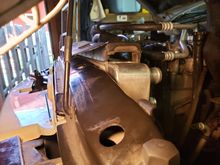
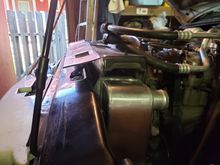
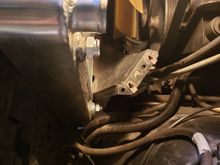
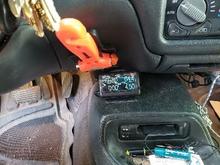
Strap added to hold lower shroud forward so that there is no interference between fan and lower shroud. This is required because the clips that held the lower shroud in place were removed to fit the radiator on the lower shelf.
0 2019/07/02 20:16:02 christine_
Test fit with top shroud in place
0 2019/07/02 20:12:58 christine_
Test fit with top shroud in place
0 2019/07/02 20:12:32 christine_
Bottom of lower shroud looking up showing how new radiator is wider than shelf on which it rests.
0 2019/07/02 20:12:01 christine_
Trimming of left side of upper shroud.
0 2019/07/02 20:11:38 christine_
Trimming of right side of upper shroud.
0 2019/07/02 20:10:49 christine_
Test fit of radiator after trimming lower shroud.
0 2019/07/02 20:10:08 christine_
0 2019/07/02 20:09:45 christine_
After picture of top shroud.
0 2019/07/02 20:04:24 christine_
Before image of top shroud.
0 2019/07/02 20:03:33 christine_
Lower shroud showing the trimming done to accommodate the larger radiator.
0 2019/07/02 20:00:09 christine_
Trial fitting of top shroud showing how it must be trimmed (front to back) for it to fit and secure the radiator in place.
0 2019/07/02 19:59:23 christine_
0 2019/07/02 19:58:57 christine_
Bottom lip of lower shroud trimmed.
0 2019/07/02 19:53:46 christine_
0 2019/07/02 19:53:22 christine_
Another picture showing how the lower shroud mounting is too narrow for the base of the new radiator.
0 2019/07/02 19:52:55 christine_
Initial fitting showing how new radiator is too thick for original mounting in bottom shroud.
0 2019/07/02 19:52:25 christine_
New and OEM radiators showing difference in thickness. (Note radiator cap with a built-in zinc sacrificial electrode)
0 2019/07/02 19:51:51 christine_
New and OEM radiators.
0 2019/07/02 19:51:15 christine_
New (above) and OEM (below) in-tank engine oil coolers.
0 2019/07/02 19:41:27 christine_
side view of removed panel and patch.
0 2019/07/02 19:40:06 christine_
After modification
After modification
0 2019/07/02 19:40:00 christine_
0 2019/06/12 10:37:14 christine_
0 2019/06/12 10:37:00 christine_
0 2019/06/12 10:36:28 christine_
Close up of new axle bearing seal with identification markings.
0 2019/06/03 19:34:02 christine_
New (top) and OEM (bottom) in-tank oil coolers
0 2019/05/31 16:36:00 christine_
0 2019/05/25 17:59:07 christine_
The front-facing side of the radiator. The top of the radiator is to the left. I used my Dremel tool to cut away the plastic.
0 2019/05/17 14:33:24 christine_
Side view showing the feed-through. There is an o-ring on the inside that mates with a smooth flat surface on the inside of the radiator.
0 2019/05/17 14:33:08 christine_
The cooler removed from the radiator.
0 2019/05/17 14:32:49 christine_
Me sailing in Canada.
0 2019/05/13 20:08:53 christine_
The large version of this "Bruce" anchor is used to hold oil rigs in place.
0 2019/05/13 20:07:04 christine_
0 2019/04/26 21:49:21 christine_
0 2019/04/26 21:49:14 christine_
0 2019/04/25 14:21:33 christine_
First
Page
13 of 19
Last
Go To
Page
  • 1
  • ...
  • 11
  • 12
  • 13
  • 14
  • 15
  • ...
  • 19
13 of 19
Go To GO
Go to page of 19 pages
  • 1
  • ...
  • 11
  • 12
  • 13
  • 14
  • 15
  • ...
  • 19

Top
Blazer Forum - Chevy Blazer Forums
  • Contact Us
  • FAQ
  • Archive
  • Advertising
  • Cookie Policy
  • Privacy Statement
  • Terms of Service
  • Your Privacy Choices
  • Manage Preferences

© 2026 MH Sub I, LLC dba Internet Brands


When you click on links to various merchants on this site and make a purchase, this can result in this site earning a commission. Affiliate programs and affiliations include, but are not limited to, the eBay Partner Network.