Blazer Forum - Chevy Blazer Forums
  • LOG IN
  • REGISTER
  • Forums
    • Announcements
      • Forum Notice
      • New Member Area
    • General
      • General Chat
      • The Lounge
      • Builds
      • Off Roading
      • Sights N Sounds
      • Street N Strip
      • The Chop Shop
      • Shows & Clubs
    • Mechanical & Maintenance
      • General Tech Help
      • Engine & Transmission
      • Lighting & Electrical
      • Steering, Suspension & Drivetrain
    • Modifications
      • Performance & Brainstorming
      • Tires and Wheels
      • Audio/Video Electronics
      • Paint, Body, & Interior
      • Suspension Tech
      • Detailing
    • Chevy Blazer Classifieds
      • Member Group And Special Buys
      • Absolutely Free!!!
      • PRIVATE For Sale / Trade Classifieds
      • Private 'Wanted' Classifieds
      • Online Auctions & Listings
    • The Site
      • Website Problems and Suggestions
  • Marketplace
    • Vendor Directory
    • Become a Vendor
  • New Posts
  • Tools
    • Car Payment Calculator
    • Tire Rim Calculator
    • Recalls
    • Technical Service Bulletins (TSBs)
    • Members List
    • Live Feed
  • Gallery
  • View Dark Mode
    • Please register or login to enable Dark Mode.
  • Log In
  • Register
Blazer Forum - Chevy Blazer Forums
    • Threads
      • Advanced
Dark Mode

Please register or login to enable Dark Mode.

Log In

Forgot your Password?

By logging into your account, you agree to our Terms of Use and Privacy Policy, and to the use of cookies as described therein.
  • Recent
  • Commented
  • Albums
  • My Pictures

My Post Pictures

christine_208
October 15, 2017
 756
 3
Sort:
Most Recent
  • Default
  • Most Recent
Bubble from a leak I found after an initial repair.
0 2022/06/24 13:46:18 christine_
Repair of the back/passenger side.
0 2022/06/24 13:25:48 christine_
Repair of the back/driver side.
0 2022/06/24 13:25:15 christine_
Front/driver side repair. Not all of these leaked but most did so I just uniformly coated all well. I also made sure the JB weld covered the whole area where the tubes intersected the side tank even if the leak was only located at the front face.
0 2022/06/24 13:24:37 christine_
With the acetone thinned JB Weld, I used a heat lamp to help along the curing. This worked great.
0 2022/06/24 13:24:15 christine_
This is looking at the coolant slowing coming out of the original fix from December while the radiator was still installed in the truck.
0 2022/06/24 13:23:50 christine_
The passenger side leak area. I had to expand the area a bit later. This is an example of how I had to prep area for the JB Weld.
0 2022/06/24 13:23:31 christine_
0 2022/06/23 23:32:10 christine_
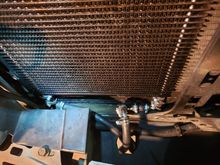
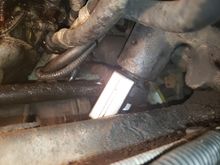
The installed new cooler. It is a Hayden 699. One of their largest. It has a thermal bypass valve in the bottom row so that it won't overcool when it is cold. I also think the fin design will provide better air flow. The Hayden people recommend that it be mounted with the exit and entrance pointed down if possible.
0 2022/06/13 14:58:58 christine_
The connections I made to the new cooler. It was so much taller that I had to use them to be able to connect the long hoses without kinking them.
0 2022/06/13 14:58:36 christine_
Another view of the original extra cooler showing the hose routing. This was plumbed in series with the one built into the radiator.
0 2022/06/13 14:58:13 christine_
The original supplemental cooler I had installed when I had my transmission rebuilt several years ago.
0 2022/06/13 14:57:45 christine_
0 2022/06/12 21:10:24 christine_
0 2022/06/12 21:09:54 christine_
0 2022/06/11 11:11:21 christine_
The new pitman arm installed on the steering gear and in the centerlink.
0 2022/06/11 11:10:55 christine_
The 33 mm socket for the steering gear nut.
0 2022/06/11 11:07:41 christine_
Using the tie-rod puller on the steering gear shaft.
0 2022/06/11 11:07:30 christine_
The tie-rod removal tool (J 24319-B equivalent) shown for size and installed orientation. It is a quite substantially build tool.
0 2022/06/11 11:07:26 christine_
It broke free!
It broke free!
0 2022/06/11 11:06:50 christine_
View looking over lower control arm showing the new position of the steering gear with the removal tool installed.
0 2022/06/11 11:06:36 christine_
Picture of old pitman arm with tie-rod tool installed with steering gear centered. This did not work so well so I rotated the steering gear to the left.
0 2022/06/11 11:06:09 christine_
0 2022/06/06 21:03:14 christine_
0 2022/05/24 09:45:05 christine_
0 2022/05/22 16:33:25 christine_
0 2022/04/08 01:10:33 christine_
0 2022/04/08 01:08:09 christine_
0 2022/04/02 14:56:44 christine_
0 2022/04/02 14:56:43 christine_
0 2022/04/02 14:56:21 christine_
0 2022/04/02 14:56:18 christine_
0 2022/04/02 14:55:47 christine_
0 2022/04/02 14:55:29 christine_
0 2022/04/02 14:55:11 christine_
0 2022/04/02 14:54:53 christine_
0 2022/04/02 14:54:36 christine_
0 2022/04/02 14:54:15 christine_
0 2022/04/02 14:53:55 christine_
0 2022/04/02 14:53:36 christine_
0 2022/03/13 16:26:38 christine_
First
Page
6 of 19
Last
Go To
Page
  • 1
  • ...
  • 4
  • 5
  • 6
  • 7
  • 8
  • ...
  • 19
6 of 19
Go To GO
Go to page of 19 pages
  • 1
  • ...
  • 4
  • 5
  • 6
  • 7
  • 8
  • ...
  • 19

Top
Blazer Forum - Chevy Blazer Forums
  • Contact Us
  • FAQ
  • Archive
  • Advertising
  • Cookie Policy
  • Privacy Statement
  • Terms of Service
  • Your Privacy Choices
  • Manage Preferences

© 2026 MH Sub I, LLC dba Internet Brands


When you click on links to various merchants on this site and make a purchase, this can result in this site earning a commission. Affiliate programs and affiliations include, but are not limited to, the eBay Partner Network.