
How to remove upgraded spider injector plastic lugs from intake ports?


Thread Starter
|
Beginning Member
Joined: Jul 2011
Posts: 23
From: Akron, Ohio

I read everything I could and reviewed countless diagrams, and all I could find out is to, basically, make sure the middle injector tube is routed UNDERNEATH the front injector tube...and then if you install the tubes in the correct order, you can't mess up (so they say). Well, the middle injector tube plugs into the middle intake port, so I couldn't figure out why it was so important to route the middle tube to the front if it still had to plug into the middle port anyway. I assumed it was just to insure the tube bent out from under the front tube. Well, I discovered AFTERWARD that the tube was supposed to be routed under, ahead of, AND BACK AROUND OVER TOP OF, the front injector tube and plug back into the center port. So...
By that point, I installed all the remaining injectors. As you know, the plastic injector lugs are not designed to be removed, and I cannot find anything on how to replace the upgraded spider injectors, only how to upgrade from the old-style spider injector with the easy to remove poppets. FORTUNATELY I happen to have a second, "backup," upgraded spider injector. So I started violently yanking out the misrouted injector till it finally pulled out, but the plastic lug is still in there. I then (instead of trying to re-route the injector and try forcing it back into the lug...which is super hard, if even possible) removed the neighboring injector, which also pulled out leaving the plastic lug still in the intake port. That is how things stand now, and I've been avoiding handling the situation further, hoping to find advice on how to quickly and safely remove the lugs. I can only think to use a pick and needlenose pliers, but I don't want to risk scratching the ports.
Is there a quick and/or easy way to remove the plastic lugs so that I can replace everything with the second upgraded spider assembly that I have? Surely there must be some way to remove them without brute force destruction. Also, any other advice on the procedure?
Thank you so much!
Starting Member
Joined: Dec 2012
Posts: 136
From: Southern California
"plastic lug"?
When I did mine I yanked on each injector / attached tube with a pretty good amount of force to pop each one out and had no "plastic lug" left behind. Here's a couple pics I just took of my old one so that you could see what it looks like after removal. I'm assuming if yours doesn't look like this when removed then you've got the tips of the injectors still inside of the manifold? Ya might need to pull the intake manifold to remove the remaining injector tips that might possibly be burnt and disfigured from heat. That's my guess.


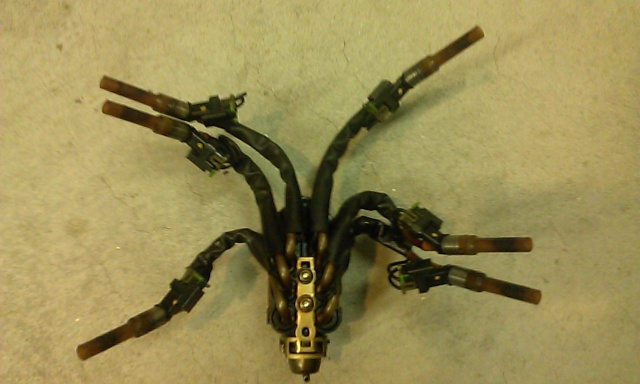
When I did mine I yanked on each injector / attached tube with a pretty good amount of force to pop each one out and had no "plastic lug" left behind. Here's a couple pics I just took of my old one so that you could see what it looks like after removal. I'm assuming if yours doesn't look like this when removed then you've got the tips of the injectors still inside of the manifold? Ya might need to pull the intake manifold to remove the remaining injector tips that might possibly be burnt and disfigured from heat. That's my guess.
Thread Starter
|
Beginning Member
Joined: Jul 2011
Posts: 23
From: Akron, Ohio
Thank you for your time, and for the pictures. The spider assembly in your pictures is the spider assembly that my post is in reference to. The ends of the injectors in your pictures are the plastic lugs that I'm specifically referring to. The information sheet shipped with the upgraded AC Delco/Delphi spider assemblies refers to the 2" plastic ends on the injectors as "lugs" and states that they are not designed to be removed (this is apparent when you examine the barbs thereon).
Mine are certainly not melted in, as the vehicle has never been started with the new injectors installed. I even used WD-40 when trying to remove the lugs, and was still unsuccessful. Perhaps the heat/wear/etc. is the reason yours may have (apparently) been easier to remove.
What procedure did you use to remove your injector lugs? It seems you had no trouble pulling them straight out.
Removing the complete intake manifold would not help with removal of the lugs, due to the lugs not being able to be pulled the rest of the way through. I'm trying to figure out if there is some procedure to remove the locked in lugs without using a pick and pliers and just destroying them. Yours look like they just pulled right out. Puzzling.
I'll take pictures of my situation later tonight. Thanks.

Junior Member
Joined: Sep 2010
Posts: 329
Thank you for your time, and for the pictures. The spider assembly in your pictures is the spider assembly that my post is in reference to. The ends of the injectors in your pictures are the plastic lugs that I'm specifically referring to. The information sheet shipped with the upgraded AC Delco/Delphi spider assemblies refers to the 2" plastic ends on the injectors as "lugs" and states that they are not designed to be removed (this is apparent when you examine the barbs thereon).
Mine are certainly not melted in, as the vehicle has never been started with the new injectors installed. I even used WD-40 when trying to remove the lugs, and was still unsuccessful. Perhaps the heat/wear/etc. is the reason yours may have (apparently) been easier to remove.
What procedure did you use to remove your injector lugs? It seems you had no trouble pulling them straight out.
Removing the complete intake manifold would not help with removal of the lugs, due to the lugs not being able to be pulled the rest of the way through. I'm trying to figure out if there is some procedure to remove the locked in lugs without using a pick and pliers and just destroying them. Yours look like they just pulled right out. Puzzling.
I'll take pictures of my situation later tonight. Thanks.
Mine are certainly not melted in, as the vehicle has never been started with the new injectors installed. I even used WD-40 when trying to remove the lugs, and was still unsuccessful. Perhaps the heat/wear/etc. is the reason yours may have (apparently) been easier to remove.
What procedure did you use to remove your injector lugs? It seems you had no trouble pulling them straight out.
Removing the complete intake manifold would not help with removal of the lugs, due to the lugs not being able to be pulled the rest of the way through. I'm trying to figure out if there is some procedure to remove the locked in lugs without using a pick and pliers and just destroying them. Yours look like they just pulled right out. Puzzling.
I'll take pictures of my situation later tonight. Thanks.
Starting Member
Joined: Dec 2012
Posts: 136
From: Southern California
If you remove the lower manifold and turn it over, then you should be able to knock the pintle tip "tube" out as a last resort.
btw... Which year is the 4.3L that you're working on? I believe the SCPI to MPFI upgrade kit for 4.3L V6 was designed to fit 1996 and newer manifolds.
Super Member
Joined: Apr 2014
Posts: 1,968
From: Lake City, Florida

Thread Starter
|
Beginning Member
Joined: Jul 2011
Posts: 23
From: Akron, Ohio
Watch at 7:00, 8:25, and 8:50.
The above video exemplifies another problem I'm facing...
The instruction sheet with the spider assembly includes a diagram showing a certain injector tube routed behind another one. The instructions say the same thing, about routing the tube behind another tube. The problem is, nothing says what to do after routing the one tube ahead of the other tube.
The middle tube on the right side is supposed to route "behind" and in front of the tube on the right side closest to the front of the car -- but then the tube that is routed from the middle to the front then still plugs into the middle port, so I don't understand the intention of routing that tube to the front to begin with. Maybe it is just intended for the tube to bubble out in that direction, or maybe it is supposed to loop around (over top of) the front tube then plug back into the middle port.
The above video is well explained/simplified, although he erroneously demonstrates routing the tubes both ways in different cuts of the video. So apparently I'm not the only person confused.
Also, I'm sorry for not uploading the promised pictures already. I have them on my phone, but it is proving very difficult uploading them directly to the site. I'm still trying.
Thread Starter
|
Beginning Member
Joined: Jul 2011
Posts: 23
From: Akron, Ohio
2001 Jimmy.
Sorry, I had to text the pictures to myself then save them so they would be small enough to upload here. Finally figured it out.
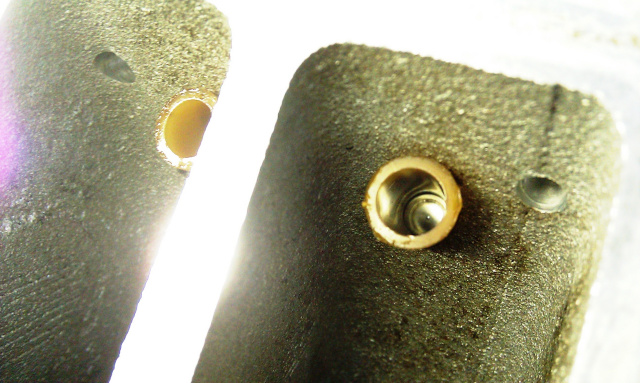
You can see from the pictures what I was describing in my OP. From the sound of things, maybe an angled pick to pull the lug out while using a straight pick to pluck the prongs loose? I was just figuring there had to be an easier way. I'm surprised B_4x4's apparently came right out. Again, maybe that is because mine are still new/unused. I figured there would be a removal procedure since the injectors aren't permanent, as the instructions state of the installation. Maybe there is no official removal procedure. Hmmm...
Sorry, I had to text the pictures to myself then save them so they would be small enough to upload here. Finally figured it out.
You can see from the pictures what I was describing in my OP. From the sound of things, maybe an angled pick to pull the lug out while using a straight pick to pluck the prongs loose? I was just figuring there had to be an easier way. I'm surprised B_4x4's apparently came right out. Again, maybe that is because mine are still new/unused. I figured there would be a removal procedure since the injectors aren't permanent, as the instructions state of the installation. Maybe there is no official removal procedure. Hmmm...
Thread Starter
|
Beginning Member
Joined: Jul 2011
Posts: 23
From: Akron, Ohio
Sorry, again...
Just noticed your post (it was hard to view everything on my phone), blazen_red_4x4.
Thank you very much for the link. That answers the first half of my question by suggesting there is no formal method, confirming other people have the same problem, and giving me a tip for safe removal.
Now if I could only get some reliable confirmation on the routing, I'll be golden.
I'll post an update on how my removal of the lugs comes along. I'll try picks first, in case that works easily; I may then be able to offer that (or a similar successful method) as an alternative "tip" for removal. Thanks again.