
Intake gasket replace thread?
#1
 01-10-2015, 04:59 PM


Well the 2001 Blazer we bought recently needs a new intake gasket. Is there a thread showing the full procedure with pics? If not I may try to find time to do one for you all if I can. Looks like it will have to wait till at least next weekend so I can see about borrowing a scan tool to do a cam retard adjust. I replaced the one on my first 2001 and knew nothing about needing to do a cam retard check and adjust. I ran great for years after and still does. Must have got lucky I guess from what I have learned since then. I did mark it and install it to the exact place it came from. I am sure it must be off a little but it worked and I didn't know better.
Blazeme
Blazeme
#2
01-10-2015, 09:08 PM
There are a few threads in the "How-to" section that are helpful. Here are a few tips:
Before removing the distributor, remove the cap. Then, using a socket and ratchet, slowly rotate the crankshaft clockwise until the rotor segment is aligned with the "6" on the distributor housing:
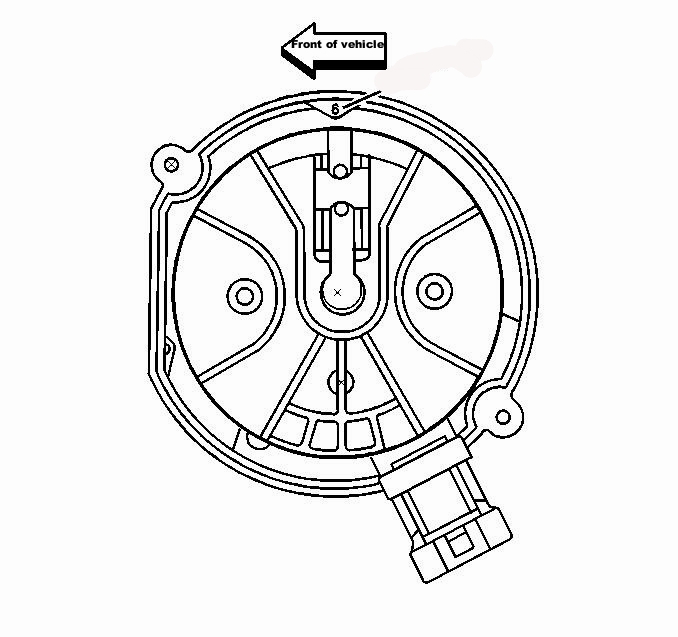
DO NOT move the crankshaft while the distributor is removed. When reinstalling, the rotor must point at the "6" when the distributor is fully seated against the manifold.
Use Felpro MS98002T gasket set. Clean all gasket surfaces thoroughly. Chase the threads on all intake bolts, and in the heads, with a tap & die. Pretty sure they are 5/16 x 18. Use thread sealer on the bolts before installing them, (very important due to the low torque on the bolts, and to prevent oil leaks). Intake manifold bolt tightening sequence and torque specs are critical. Here is a warning straight from the GM shop manual:
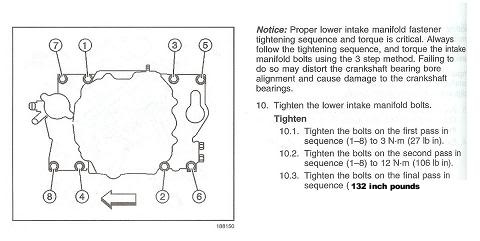
Any questions? Please ask if you're not sure about something. It's easier to help you out, than it is to bail you out
Before removing the distributor, remove the cap. Then, using a socket and ratchet, slowly rotate the crankshaft clockwise until the rotor segment is aligned with the "6" on the distributor housing:
DO NOT move the crankshaft while the distributor is removed. When reinstalling, the rotor must point at the "6" when the distributor is fully seated against the manifold.
Use Felpro MS98002T gasket set. Clean all gasket surfaces thoroughly. Chase the threads on all intake bolts, and in the heads, with a tap & die. Pretty sure they are 5/16 x 18. Use thread sealer on the bolts before installing them, (very important due to the low torque on the bolts, and to prevent oil leaks). Intake manifold bolt tightening sequence and torque specs are critical. Here is a warning straight from the GM shop manual:
Any questions? Please ask if you're not sure about something. It's easier to help you out, than it is to bail you out
#3
01-10-2015, 09:27 PM
Thanks Captain Hook.
So are you saying if I don't move the engine and mark/locate the distributor & rotor exact I might get lucky as long as the same distributor goes back in?
I will chase threads and already have new bolts with sealer and the Felpro set you recommended. Will be careful with torque down also. This will be my 3rd GM intake job as my first Blazer and my 5.7 in my 2000 step van both got done in the past. Didn't do a cam retard adjust on either one as I was ignorant of how it all worked at the time.
#4
01-11-2015, 07:39 AM

When I did this on my '02 Blazer, the most difficult part was getting the cable end off at the throttle body....what a PITA connector!
Everything else is making notes, taking pictures, etc as to where hoses, wiring harness connections, bolts, etc come from. And be sure that nothing goes into the lifter valley.
Remove every bit of old gasket from the heads and wipe the lifter valley clean....and wipe the lifter valley clean,....and wipe the lifte valley clean.....get the point?
Silicon spray on the O ring will help in getting the air plenum back into place.
Good luck.
#5
01-11-2015, 09:23 AM
Blazeme, The distributor hold down is designed to position the distributor housing where it needs to be. Before removing the distributor: when you align the rotor segment with the "6" on the housing, it positions the camshaft where it needs to be. These two things assures that the housing is installed in the correct position, and the gear is correctly timed with the cam gear when you put it back together. No need to mark the housing position, the bolt takes care of that. When you pull the housing up, the rotor will rotate counter clockwise a few degrees as it disengages with the camshaft gear. Make note where the rotor is pointing when the two gears disengage as you remove the distributor, (rotor will stop rotating). This is where the rotor needs to point when you start to reinstall the distributor. As the distributor gear engages the camshaft gear, the rotor will turn clockwise. When the housing is fully seated against the intake manifold, the hold down bolt must thread into the manifold, and the rotor must be aligned with the "6". Before the hold down bolt is tightened, the housing will rotate a very small amount. The ID of the intake manifold is larger than the distributor OD, this is what allows the housing to rotate for the camshaft retard adjustment. The odds of getting the distributor exactly where it needs to be, are about as likely as winning the lottery.
On older engines with distributors, ignition timing was adjusted by rotating the distributor, (it changed when the spark was generated). Rotating it on this engine has nothing to do with ignition timing, (spark is generated at the crankshaft position sensor). Rotating the distributor on this engine aligns the camshaft position sensor with the camshaft, (camshaft retard) hence the name of the sensor Bottom line: adjusting camshaft retard on this engine is required, just as adjusting ignition timing is on older engines.
EDIT: Replacing the intake bolts is not necessary if you chase the threads and apply thread sealer, (not thread locker). The threads in the heads need to be chased regardless.
On older engines with distributors, ignition timing was adjusted by rotating the distributor, (it changed when the spark was generated). Rotating it on this engine has nothing to do with ignition timing, (spark is generated at the crankshaft position sensor). Rotating the distributor on this engine aligns the camshaft position sensor with the camshaft, (camshaft retard) hence the name of the sensor
Bottom line: adjusting camshaft retard on this engine is required, just as adjusting ignition timing is on older engines.EDIT: Replacing the intake bolts is not necessary if you chase the threads and apply thread sealer, (not thread locker). The threads in the heads need to be chased regardless.
Last edited by Captain Hook; 01-11-2015 at 09:33 AM.
#6
01-25-2015, 12:19 AM
I was lucky and was able to borrow a Genisys SPX scan tool today. Not being familiar with the cam retard adjustment it took me awhile to figure out that the cam retard offset if simply one of the things you can read in the live data stream if your scan tool is capable. Nothing I read anywhere up to this point told me just look at the live data. Once I got that far I found that right now the blazer is at -19 degrees. Must of been messed with before? Or wear?
I also see what you mean about the distributor being smaller that the hole it fits into.Should be able to get it right now. I think I have everything tore down and ready to remove the intake itself tomorrow.
Thanks for the help.
I also see what you mean about the distributor being smaller that the hole it fits into.Should be able to get it right now. I think I have everything tore down and ready to remove the intake itself tomorrow.
Thanks for the help.
#7
01-25-2015, 06:56 AM
Camshaft retard being 19 degrees will require removing the hold down bracket and either modifying it, or get a SBC distributor hold down. There is not enough adjustment to get 19 degrees without doing one of those.
#9
01-25-2015, 07:12 PM
Well crude. The trusty Haynes did not say anything about thread sealer on the intake bolts as was mentioned in post #2.
Will the gaskets & RTV be ruined if I take the bolts back out to install thread sealer on them?
Use Felpro MS98002T gasket set. Clean all gasket surfaces thoroughly. Chase the threads on all intake bolts, and in the heads, with a tap & die. Pretty sure they are 5/16 x 18. Use thread sealer on the bolts before installing them, (very important due to the low torque on the bolts, and to prevent oil leaks). Intake manifold bolt tightening sequence and torque specs are critical. Here is a warning straight from the GM shop manual:
#10
01-25-2015, 09:08 PM
Blazeme, The distributor hold down needs to be removed from the distributor and modified, to make the distributor fully adjustable. You'll need to cut the OEM hold down "arms" so the distributor will turn with the hold down installed, (before you tighten it down). The "arms" on the hold down fit around the square part of the distributor housing so the distributor can't turn, making it non-adjustable. The distributor needs to be able to turn to adjust camshaft retard. You can test fit it before you install it. The hold down must still be able to tighten down against the base of the distributor to keep it from turning after you adjust camshaft retard. When you're done, the bracket will look similar to this: Mr. Gasket Distributor Hold-Down Clamp 1009: Advance Auto Parts If you cut too much off, this is the part you'll need
Possum, Lose the Haynes manual, it's worthless. If you remove the bolts one at a time, chase the threads on the bolts, and in the heads, then apply sealer and torque them to 132 inch pounds, it should be fine.
Possum, Lose the Haynes manual, it's worthless. If you remove the bolts one at a time, chase the threads on the bolts, and in the heads, then apply sealer and torque them to 132 inch pounds, it should be fine.