
so you want gauge pods....
#1
 08-10-2011 | 06:45 PM
******EDIT**************
apparently i am not as original as i thought...d'ohhhhh
2nd gen dual gauge pod build - S-10 Forum
***********************
brought to you by the
"so you want" labs - poor mans division
i bring you .....
gauge pods!!!!
i know what your thinking...gauge pods???
flares, wheel carrier...and now this??
oh well...
so lets begin...
tools:
hacksaw..(or your preferred method of cutting plastic plumbing pipe.)
measuring tape
drill
3/8" bit (for gauge equip to fit thru)
1/4" bit (will depend on your choice of hardware)
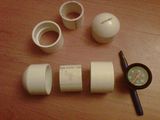
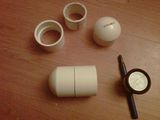
materials:
all pipe parts are base on 2" dia.
(quantities varies on how many gauges you apply)
(2) rounded caps
(2) unions
(2) 2 1/2" lengths of pipe
(2) gauges...i used the 2" dia. hence the pipe dia.
(1) 6" x 1/4" fully threaded bolt
(3) 1/4" dia rubber washers
(1) 1" x 7" x 1/8" piece of metal (i used aluminum because i had it.)
(1) can of plastic paint..color is up to you
sand paper...i used 400 for finish sanding and 60 for rough sanding
and here we go.
ok so lets lay out our materials and see what we are doing.
pod assembly:
what the goal is.....
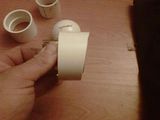
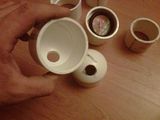
first some trimming.
now i wanted a sloped look on the front so i cut an angled section off to do just that....
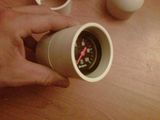
now we need to notch the middle piece to fit around the gauges retaining bracket...
there nice and snug.
next we need to drill holes in the caps to let the wires and measurement lines get out of the pods.
so far so good....
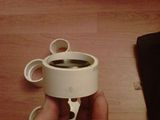
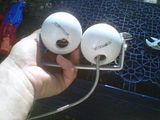
now we can test fit the pod and adjust as needed...
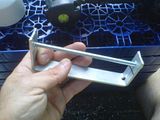
bracket portion of the pod assembly:
now i plan on mounting this on the dash using the holes for the speaker grill on the drivers side of the dash... i know local audiophiles, this is heresy to block a speaker but thats ok with me.
the plan is to just place this directly over the grill and there by save the dash from being hacked up.
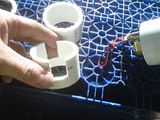
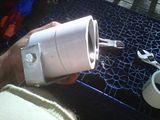
so first the metal bracket gets some holes drilled in it for the grill screw locations and the bolt that will hinge the pods.
to get the grill screw locations i just removed it from the dash and placed it over the metal and marked the holes.
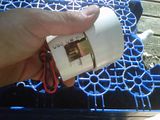
shot of the bolt
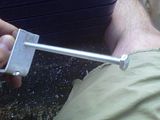
with the pods themselves i wanted an offset look and honestly i know there is no way i was going to drill them perfectly so i went "offset"
one thing to think of is that you have to clear all the goodies inside the pod..keep that in mind when placing the hinge point holes in the caps.
like so.
and now a test fit to see what we have so far....
see that is the stuff you have to clear by that bolt...
final assembly:
not to shabby....
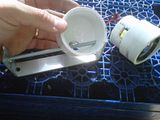
applying the finish:
now one thing we have to deal with is the seam between the caps and the unions.
this could be handled one of two ways.
1. try to hide it
2. paint the parts 2 different colors/textures.
the choice is yours.
i will be finishing them both in all black plastic paint by dupont with a spray on bedliner on the cap, the union will be left smooth.
so of course this part you know....sand...prep and paint.
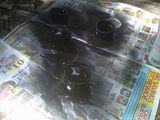
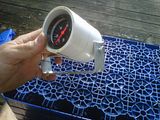
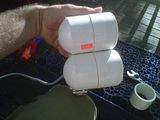
paint dried and gauge in.
no to throw it all together:
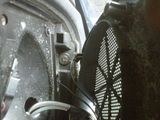
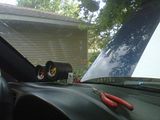
now i mounted these bad boys right on the speaker grill.
i had to put a hole in the grill of course and you guessed it one in that mighty tweeter in the front...
from there i ran the lines behind the stock gauge cluster and out to the bay.
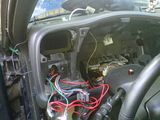
to get to the bay i went out the hole where the rear wiper fluid line goes out...and then siliconed it back up
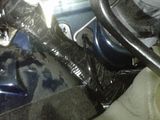
and from there went to the oil cooler lines...(ran out of time) for the oil.
then to the front of lower intake for the temp line....like so.
(engine bay details https://blazerforum.com/forum/articl...33/#post452396 )

now for power i ran line to fuse #5 which ties you to the ahl/parking lights.
and grounded it to the dash screw under the speaker grill.
finishing touch:
ok this part is all you....reassemble the dash and lets jump from there.
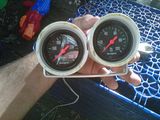
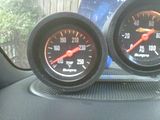
side shot.
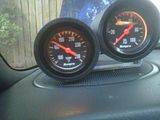
full frontal!!!
and in action
finishing notes:
also i will not be gluing the parts together with pipe cement...i will need to change bulbs someday.
besides there is enough tension that i dont think i will have to worry about it.
so there you have it.
poor mans gauge pods for a total cost of:
pipe material....3.00
metal bracket...varies
gauges............20.00 a piece
hardware.........3.00
paint and finish..varies
all in all i think this can be done for 20.00 or less, for just the pods.
in my case it was 5.00 for materials...i used what i have lying around.
hope you enjoy.
apparently i am not as original as i thought...d'ohhhhh
2nd gen dual gauge pod build - S-10 Forum
***********************
brought to you by the
"so you want" labs - poor mans division
i bring you .....
gauge pods!!!!
i know what your thinking...gauge pods???
flares, wheel carrier...and now this??
oh well...
so lets begin...
tools:
hacksaw..(or your preferred method of cutting plastic plumbing pipe.)
measuring tape
drill
3/8" bit (for gauge equip to fit thru)
1/4" bit (will depend on your choice of hardware)
materials:
all pipe parts are base on 2" dia.
(quantities varies on how many gauges you apply)
(2) rounded caps
(2) unions
(2) 2 1/2" lengths of pipe
(2) gauges...i used the 2" dia. hence the pipe dia.
(1) 6" x 1/4" fully threaded bolt
(3) 1/4" dia rubber washers
(1) 1" x 7" x 1/8" piece of metal (i used aluminum because i had it.)
(1) can of plastic paint..color is up to you
sand paper...i used 400 for finish sanding and 60 for rough sanding
and here we go.
ok so lets lay out our materials and see what we are doing.
pod assembly:

what the goal is.....


first some trimming.
now i wanted a sloped look on the front so i cut an angled section off to do just that....


now we need to notch the middle piece to fit around the gauges retaining bracket...


there nice and snug.
next we need to drill holes in the caps to let the wires and measurement lines get out of the pods.

so far so good....
now we can test fit the pod and adjust as needed...
bracket portion of the pod assembly:
now i plan on mounting this on the dash using the holes for the speaker grill on the drivers side of the dash... i know local audiophiles, this is heresy to block a speaker but thats ok with me.
the plan is to just place this directly over the grill and there by save the dash from being hacked up.
so first the metal bracket gets some holes drilled in it for the grill screw locations and the bolt that will hinge the pods.
to get the grill screw locations i just removed it from the dash and placed it over the metal and marked the holes.

shot of the bolt

with the pods themselves i wanted an offset look and honestly i know there is no way i was going to drill them perfectly so i went "offset"
one thing to think of is that you have to clear all the goodies inside the pod..keep that in mind when placing the hinge point holes in the caps.

like so.
and now a test fit to see what we have so far....


see that is the stuff you have to clear by that bolt...
final assembly:


not to shabby....
applying the finish:
now one thing we have to deal with is the seam between the caps and the unions.
this could be handled one of two ways.
1. try to hide it
2. paint the parts 2 different colors/textures.
the choice is yours.
i will be finishing them both in all black plastic paint by dupont with a spray on bedliner on the cap, the union will be left smooth.
so of course this part you know....sand...prep and paint.


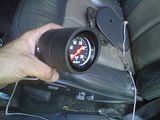
paint dried and gauge in.
no to throw it all together:
now i mounted these bad boys right on the speaker grill.
i had to put a hole in the grill of course and you guessed it one in that mighty tweeter in the front...

from there i ran the lines behind the stock gauge cluster and out to the bay.

to get to the bay i went out the hole where the rear wiper fluid line goes out...and then siliconed it back up

and from there went to the oil cooler lines...(ran out of time) for the oil.
then to the front of lower intake for the temp line....like so.
(engine bay details https://blazerforum.com/forum/articl...33/#post452396 )

now for power i ran line to fuse #5 which ties you to the ahl/parking lights.
and grounded it to the dash screw under the speaker grill.
finishing touch:
ok this part is all you....reassemble the dash and lets jump from there.
side shot.

full frontal!!!

and in action

finishing notes:
also i will not be gluing the parts together with pipe cement...i will need to change bulbs someday.
besides there is enough tension that i dont think i will have to worry about it.
so there you have it.
poor mans gauge pods for a total cost of:
pipe material....3.00
metal bracket...varies
gauges............20.00 a piece
hardware.........3.00
paint and finish..varies
all in all i think this can be done for 20.00 or less, for just the pods.
in my case it was 5.00 for materials...i used what i have lying around.
hope you enjoy.
Last edited by warthogdriver; 08-11-2011 at 07:35 PM. Reason: added finished pics
#2
08-11-2011 | 08:16 AM

Starting Member
Joined: Jun 2010
Posts: 133
From: Washington State

Nice project...way to think outside the box. 
#3
08-11-2011 | 07:16 PM
i would do this but i think wiring up the gauges would be way more work than just making the pods.. i have no clue where i would hook the wires up to.
#4
08-11-2011 | 07:18 PM
you must have posted as i was editing...the wires are covered in there too.
its a piece of cake...pods were way worse.
its a piece of cake...pods were way worse.
#5
08-11-2011 | 09:12 PM
Beginning Member
Joined: Jul 2011
Posts: 41
From: Batchtown IL.
great little project thanks for sharing!
#6
08-13-2011 | 07:11 AM
#7
08-13-2011 | 11:41 AM
i know i am on a budget so i look for practical ways to do things.
some projects work...some dont.
i will keep the development dept. open
enjoy, post up some pics when you do them...always like to see what gets done around here with how to's..everyones take is a little diff.
#8
08-14-2011 | 12:16 PM
BF Veteran
Joined: Aug 2008
Posts: 3,209
From: Sudbury, ON, Canada

+1 rep. 
Nice job.
Nice job.
#9
08-14-2011 | 07:10 PM
Junior Member
Joined: Sep 2010
Posts: 371
From: indiana
PRETTY NICE FABRICATING SLICK i wonder if i could mount those in my window pillar not to crazy bout stuff on my dash i need to add a boost gauge and air fuel ratio gauges to my ride the duel pod pillar is like 50 bucks and 30a piece for the gauges = ouch to the wallet
#10
08-14-2011 | 08:46 PM
here is the "ricer" take on pillar pods....have to admit nice work.
How-To: custom fiberglass pillar gauge pods - evolutionm.net
not my style though..i like old school look....not gonna say steampunk...more like 60's - 70's
i would have to say nothing motivates me to DIY more then a pain in the wallet
also i save alot of leftovers from odd jobs i do...so sometimes the parts stare me in the face long enough and i will find a use for them.
hopefully poor man labs will have further projects....enough junk may collect in my basement/sheds....never know.