
so you want a tire carrier on your 4 door?? - DISCUSSION THREAD

BF Veteran
Joined: Sep 2011
Posts: 2,278
From: Texas

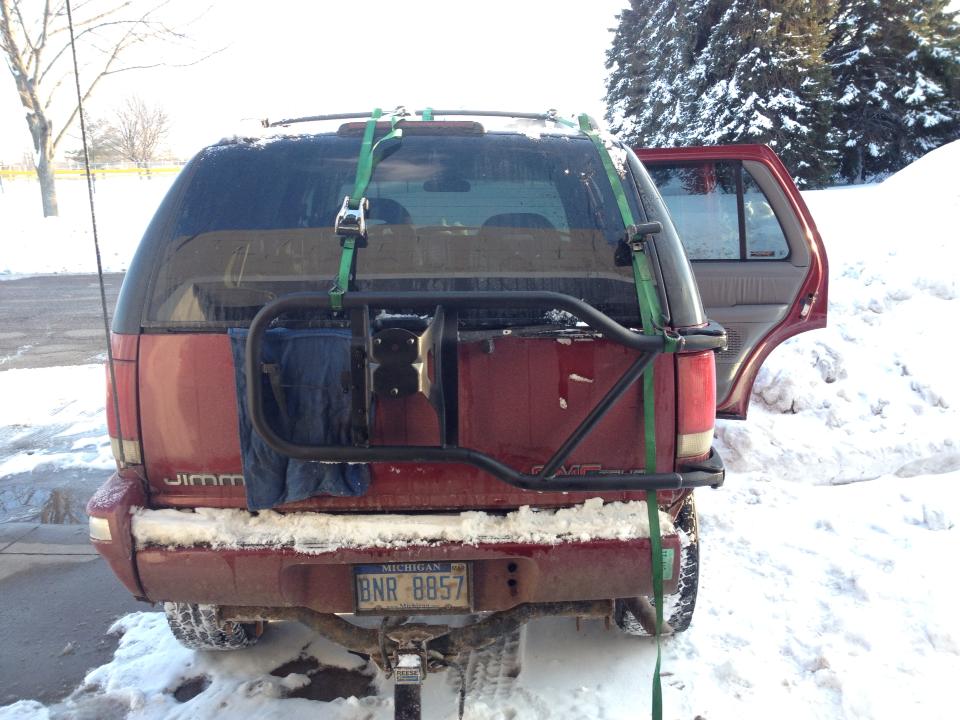
I just have a lil old 235 on my carrier, but I haven't had any issues with it warping the metal. Mine is a HACK JOB, also!! No support bar, just some lock washers at either end of the bolts. They aren't even drilled through anything that solid. I should have taken more time, and used some sharper drill bits, but it is what it is.
I did get the striker plate bolted down pretty good, I figure that takes the most of the weight when it's closed, anyway.
Heck, I've even used the carrier as a step to get on the roof, before. While it was closed, of course.
I did get the striker plate bolted down pretty good, I figure that takes the most of the weight when it's closed, anyway.
Heck, I've even used the carrier as a step to get on the roof, before. While it was closed, of course.


Well yeah, better stick with the tried and true method! Didn't get very far today though, the cold weather kills the batteries in my drill haha. More progress tomorrow hopefully
BF Veteran
Joined: Jan 2008
Posts: 2,753
From: Southern, Alberta
Good luck! Working on your truck outside in cold weather kinda sucks, but I think you'll love the tire carrier once you're done.
I just finished mine yesterday also. I did things fairly similar to Warthog, but with a few differences. I traded madden '12 and a controller for xbox 360 for the rear tire carrier and all zr2 skid plates. WIN! The tire carrier had a bunch of nasty rust on it. I sanded it down with light-grit sandpaper, then filled up my HVLP sprayer with flat black rustoleum and did two coats before starting installation. Looked much better afterward. I actually tried making an install video that people could use along with Warthog's write-up as a guide, but I couldn't get the Canon T3i that I got my dad to focus right. I'll give myself some points for trying though.
My biggest problem with this installation was breaking drill bits and buying the wrong size bolts. I guess another problem is that although it's easy to drill through the outside sheet metal, the inside stuff often goes at an angle so the drill bit point keeps slipping. I actually ended up hammering the bolts until it broke a 1/2 hole in the sheet metal a few times. I didn't have small enough hands to get a nut around the 1/2 bolt on the middle lower hole, so that one remains unsecured. It's in there pretty good though, just from being hammered into the sheet metal.
The lower 3/8 bolt going through the rear was done different than Warthog. I actually got a 6 or 7" 3/8" bolt which was able to go through the carrier, sheet metal, and come all the way through the access hole. Then I cut about a 2.5x2.5" piece of stock steel, cut a spot for the bolt to come through, then put a washer over it and bolted it. Much easier than struggling to get my fingers into that access hole. I probably lost about $7 in good steel washers and nuts before I defaulted to that method. Another difference is my piece of stock steel I used for the 2 middle bolts was about twice as wide as Warthog's. I tightened it down PRETTY tight, but not to the point that I couldn't tighten anymore. This is so if anything flexes, hopefully it will flex that piece of steel, because it's tensioned and has flex in it.
I screwed up when drilling for the latch, and ended up doing it like 3 times and leaving a bunch of vacant holes, which are thankfully covered by the latch itself. This is because I sized it for drilling before I ended up putting that 3/8" bolt through to the inside, reinforcing it, and tightening it down. Doing that changed ever so slightly where the carrier closed, so I had to totally redrill the holes.
Another thing I did that I didn't see Warthog mention is that after tightening down that big piece of tensioned steel reinforcement, the bolts stuck out too far to put the carpet and paneling around the wheelwell area back the way they were. I ended up cutting a small hole in the paneling. I also made a 6 inch cut in the carpeting which let me put the cut sections above and below the bolt ends.
I still don't have the tire on because I need to pick up three lug nuts and put the RTV on. I want to get a cheap, vinyl tire cover for the spare. Does anyone know if you can get iron-ons for vinyl like you can for t-shirts? I want to customize my tire cover but I don't want to spend $198234.
I'll take pictures if they are requested. Another thing I did is the part on left side where the grocery cover thing used to be has been broken since I bought the car. What was left was a little area where the gloves and instructions for tire replacement were kept. I purposely broke the covering for this "storage area" off which gives me a little more trunk space. I can take a picture to show you what I mean.
My next project will be buying a bunch of bolts and washers so I can put those carbon fiber skid plates on. Also looking into doing the rear shackles. I would like to do shackles (budget is under $50 for shackles, whether bought or built) and some new rear shocks. I want to add either 2 or 3" with the shackles and then get rear shocks that are stock+the added height. I.e., if I raise it 2" with shackles, I want new rear shocks that are 2" higher than stock. Monroe LTs are only like $25/each. How do I figure out which ones I'd need if I want the stock mounts but want 2" higher?
Last edited by iamchevyman5; Mar 16, 2013 at 02:49 PM.
sounds like a solid install. those bolts behind the panel didnt cause me any problems..most likely just a length issue between what we used. good idea on make the bolt longer and adding a plate. i was stubborn when i did mine, but your way does save washers and jamming your hand in there.
for the tire cover in my area there are custom t-shirt shops...they may be able to hook you up if you have any around.
as far as shocks...i just used stockers till i put on the suspension lift.
for the tire cover in my area there are custom t-shirt shops...they may be able to hook you up if you have any around.
as far as shocks...i just used stockers till i put on the suspension lift.
then I searched for ZR2 in the auto parts section and started texting the numbers I found.
You're in flint so you can try the flint craigslist.
I found this...
SPARE TIRE carrier BLAZER ETC