
My small drift trike build!!

Thread Starter
|
Super Moderator
Joined: Sep 2011
Posts: 4,459
From: Northern VA

Figured with everyone being stuck at home I would throw up a thread on my newest build just because why not!
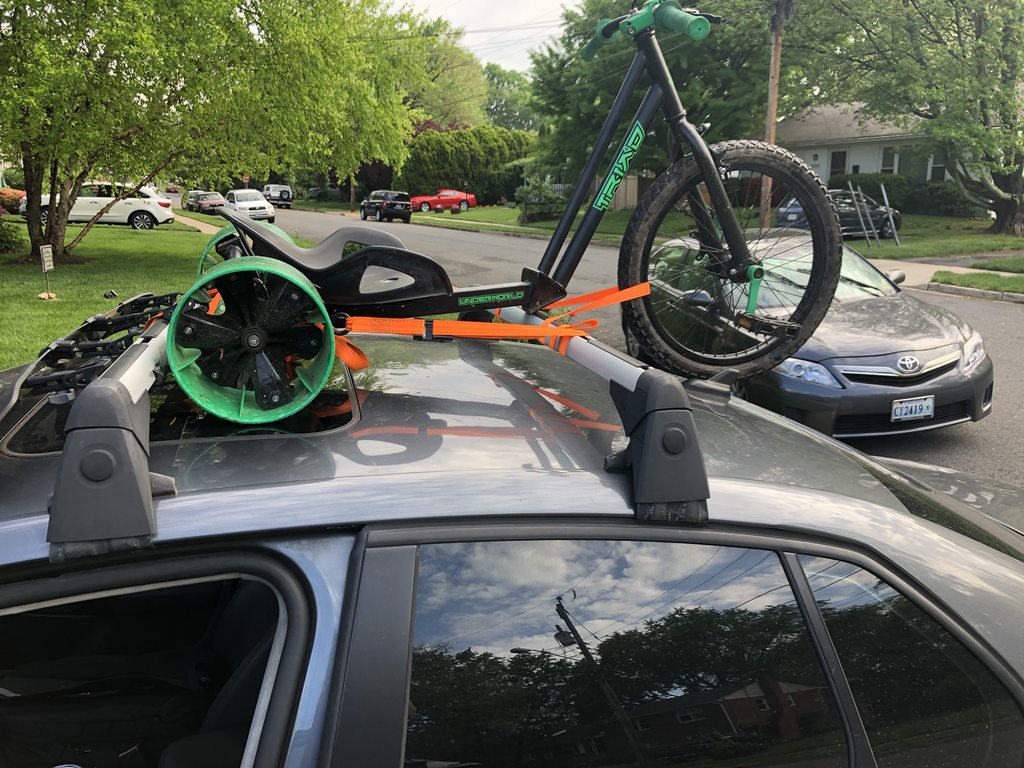
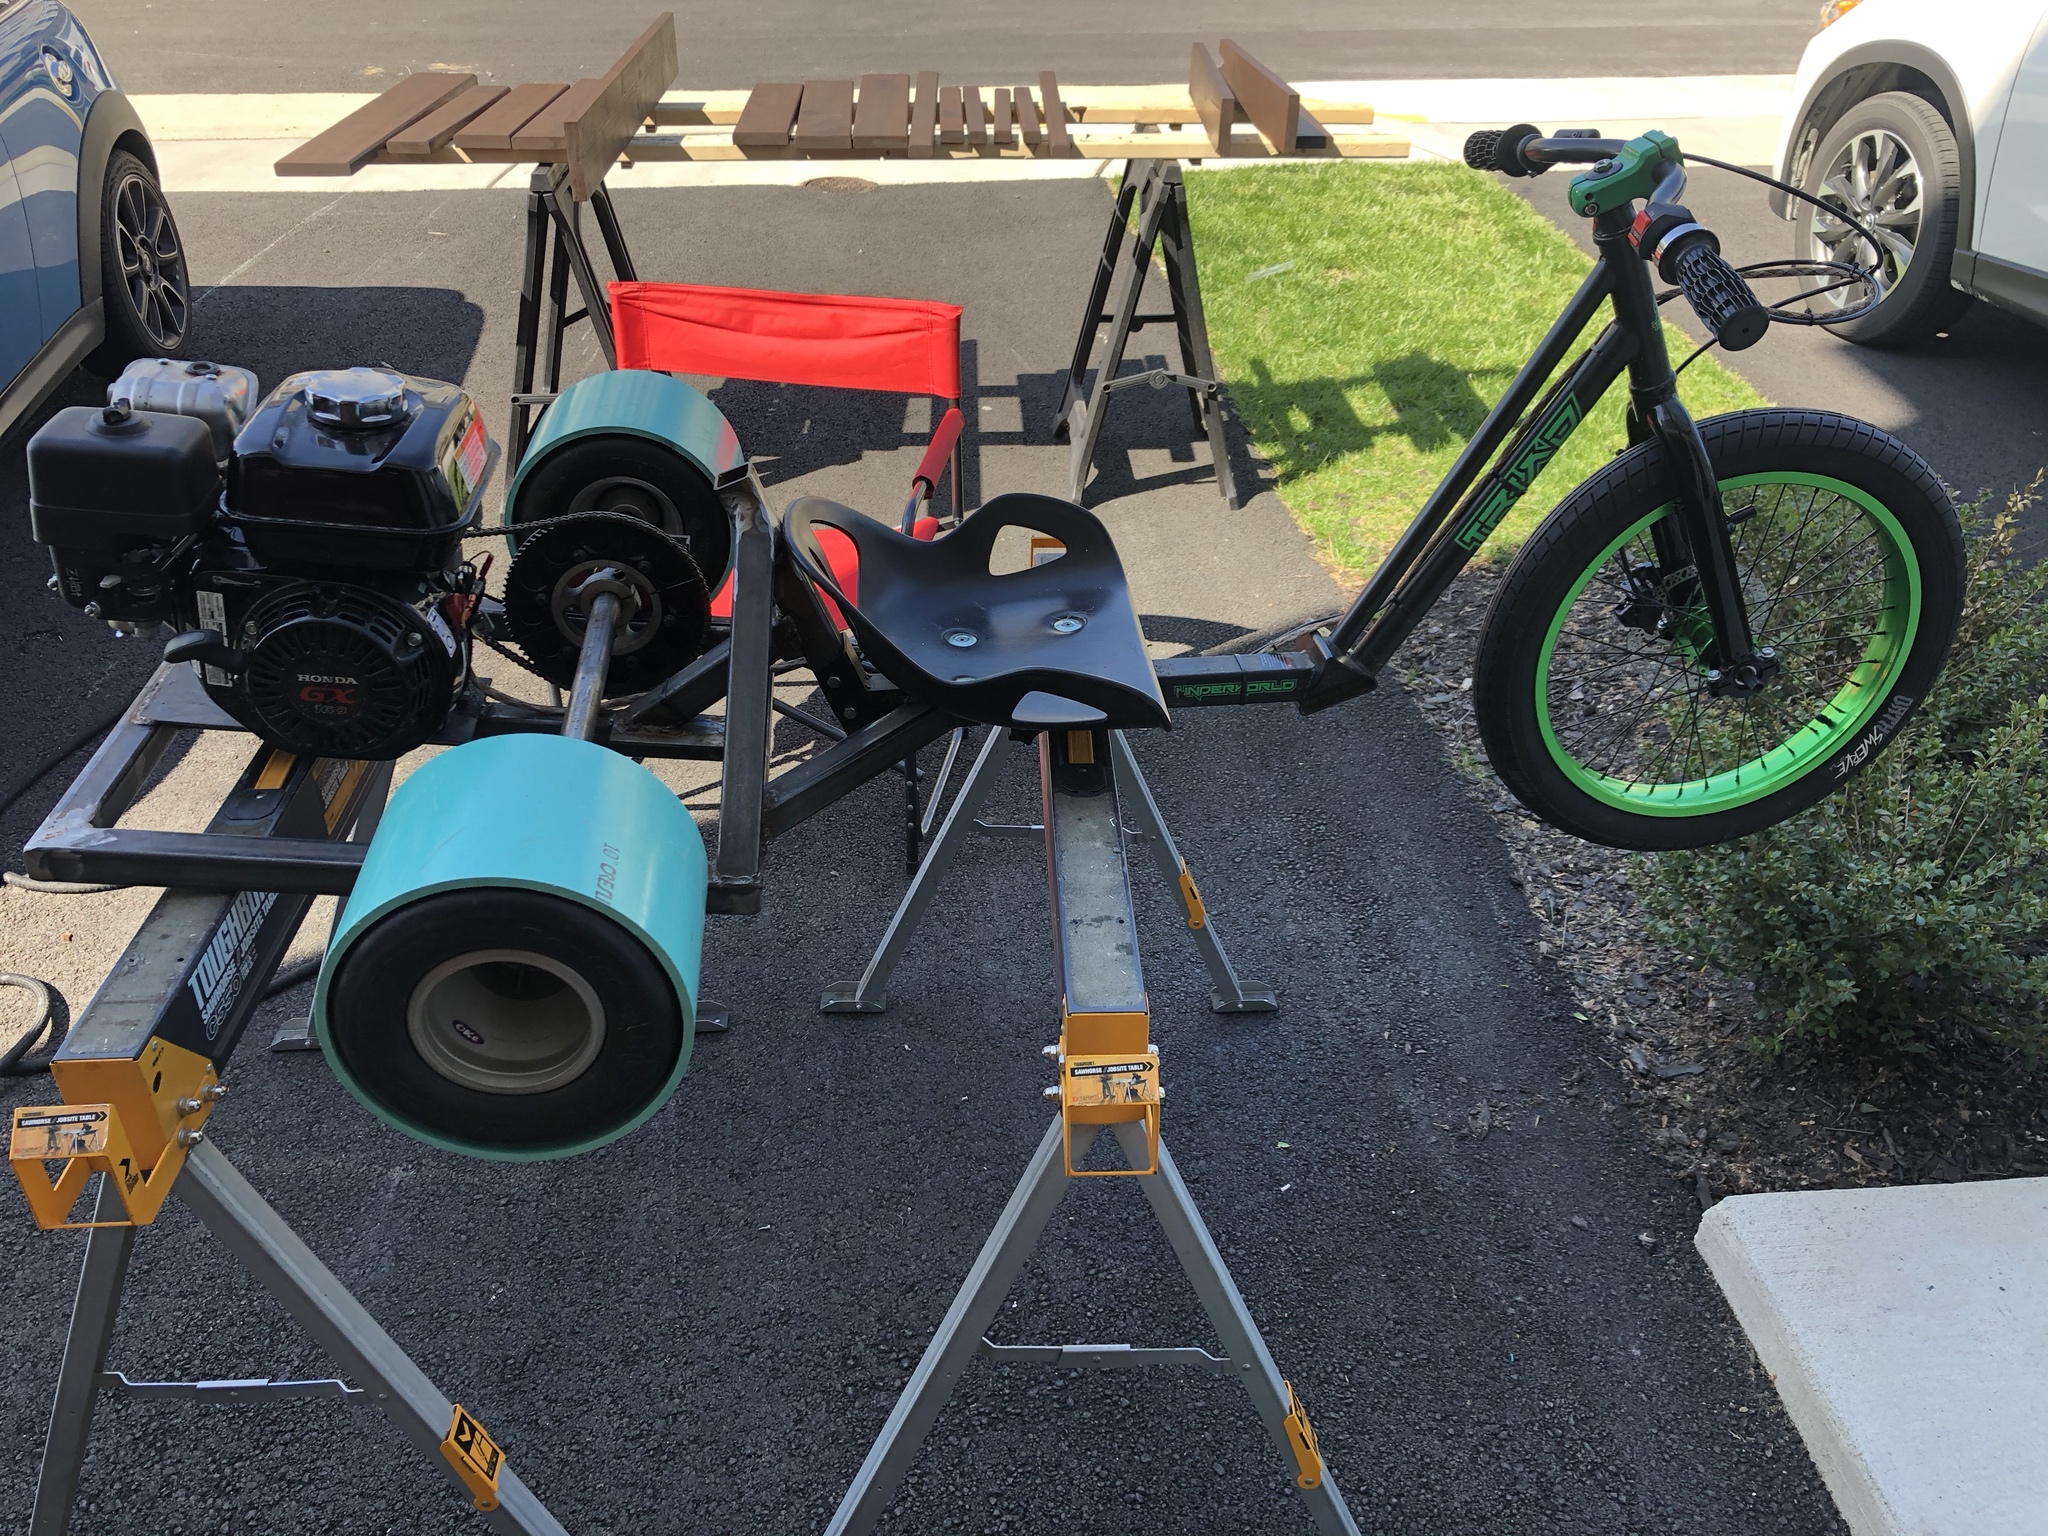
This started about a year ago when I picked up the frame I will be using. It's a Triad pedal frame with removable rear axle so the plan is to build the motorized portion a bolt on addition.
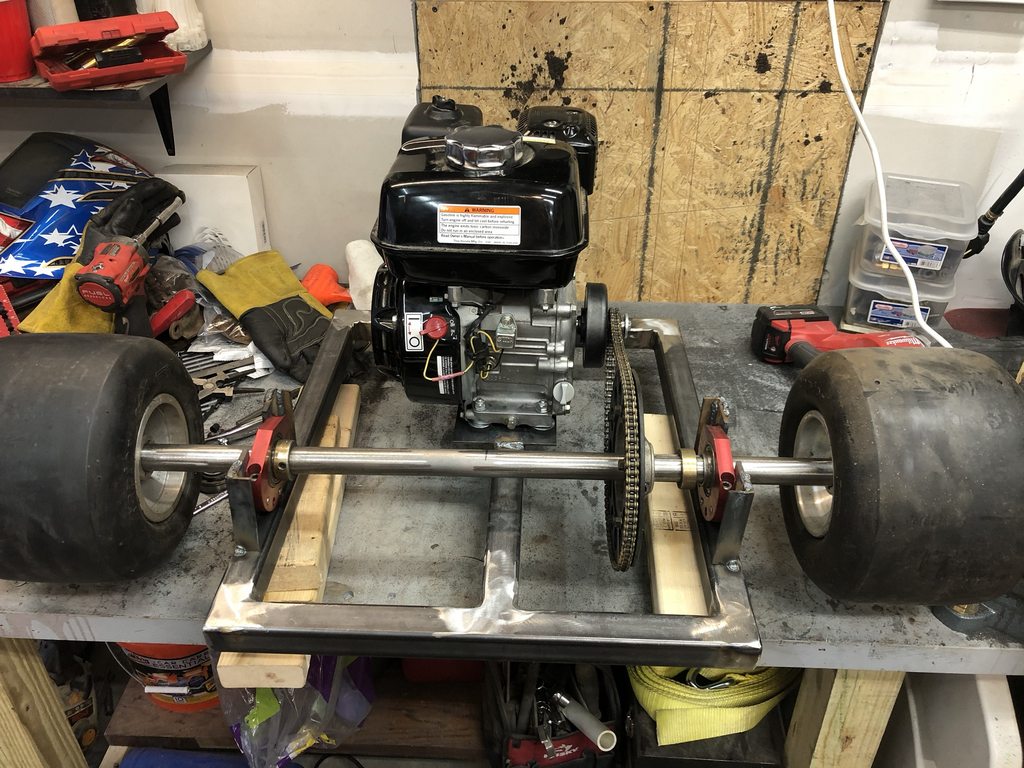
Somewhere along the way I was offered a brand new but FREE Honda GX200 from a member of another forum I am on so that will be used for the power plant. I don't have a pic of that and it is currently buried in the garage but there will be pics of it at some point soon I promise.
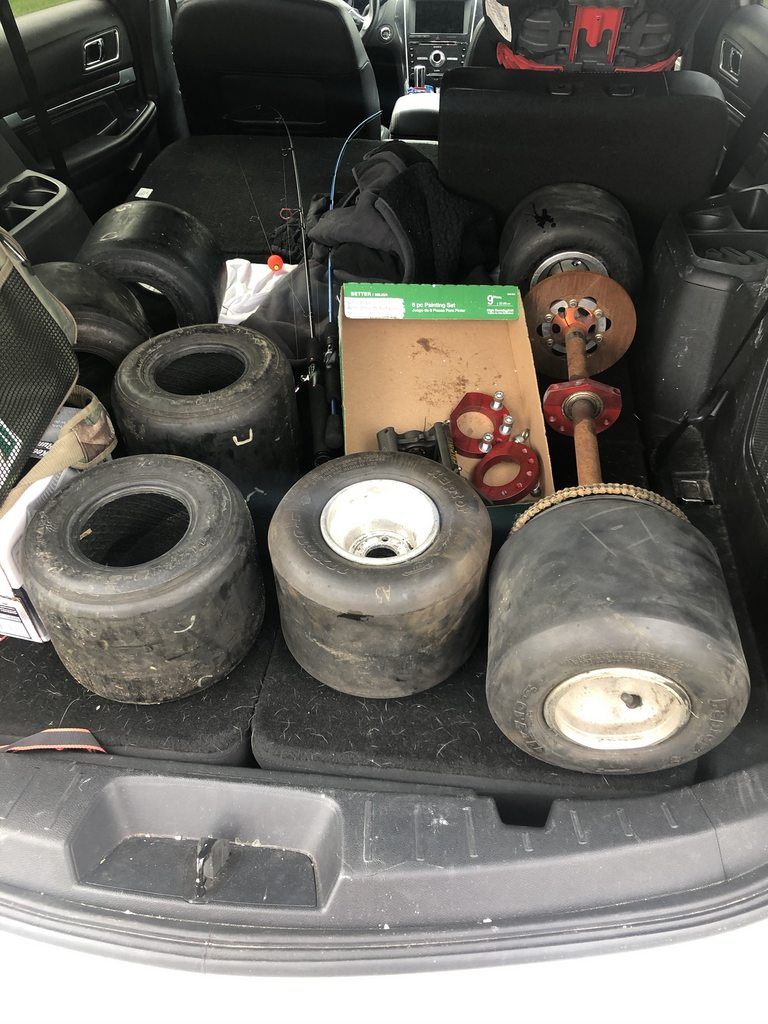
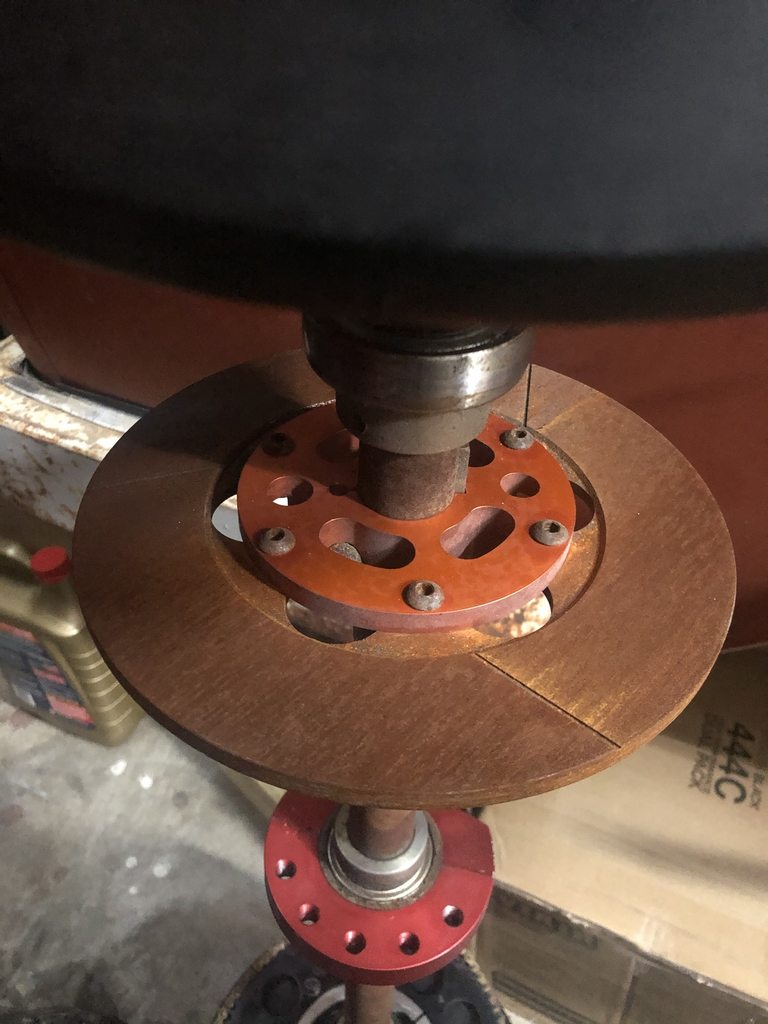
Then the other day I found a guy on CL selling off his collection of carts and parts from his now closed rental business and went to check out his stash. I think I did pretty good with my haul and I am happy with it. I got the axle with all the bearings and bearing cassettes, sprocket, chain, wheels, 6 tires and a disk brake setup for $225.
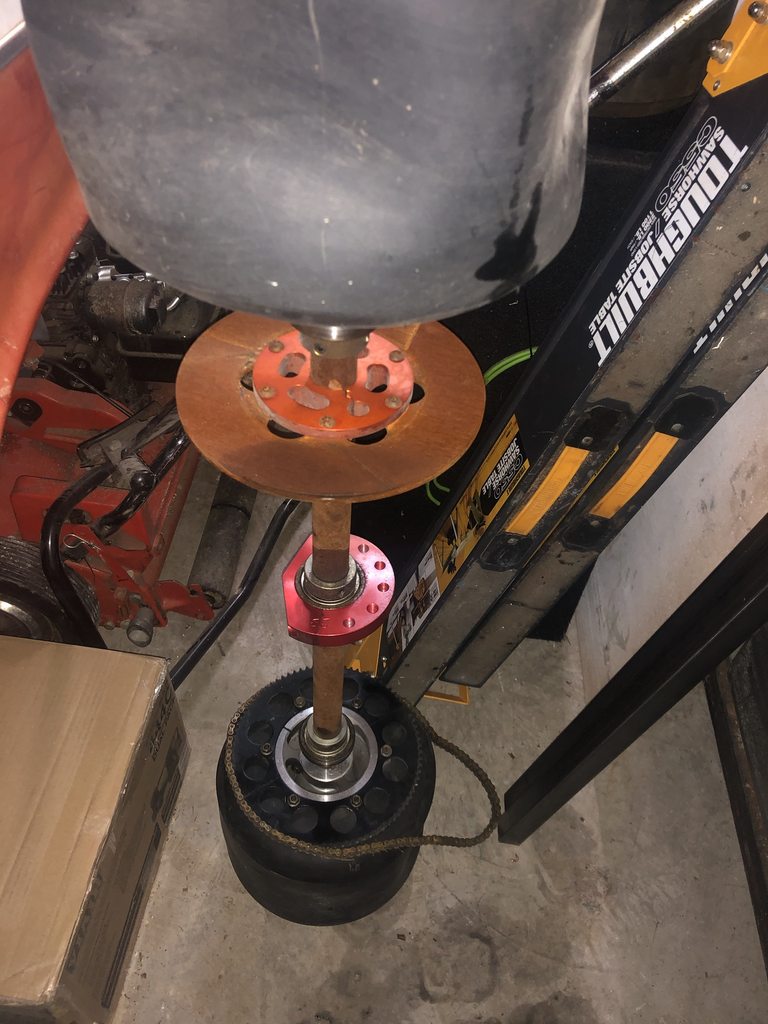
The disk brake and axle shaft have some surface rust so they will be going in a bucket of Evaporust this weekend if I get some free time to tear everything down
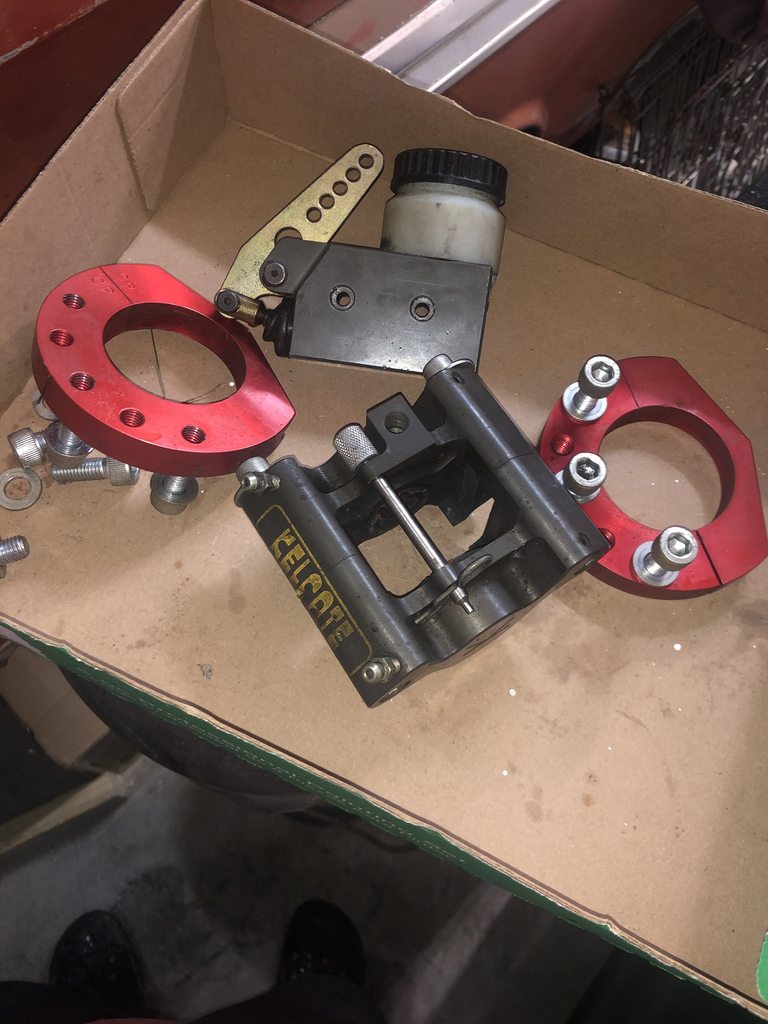
The brake setup is Kelgate which is apparently not cheap new from my searching for brake pads for it.
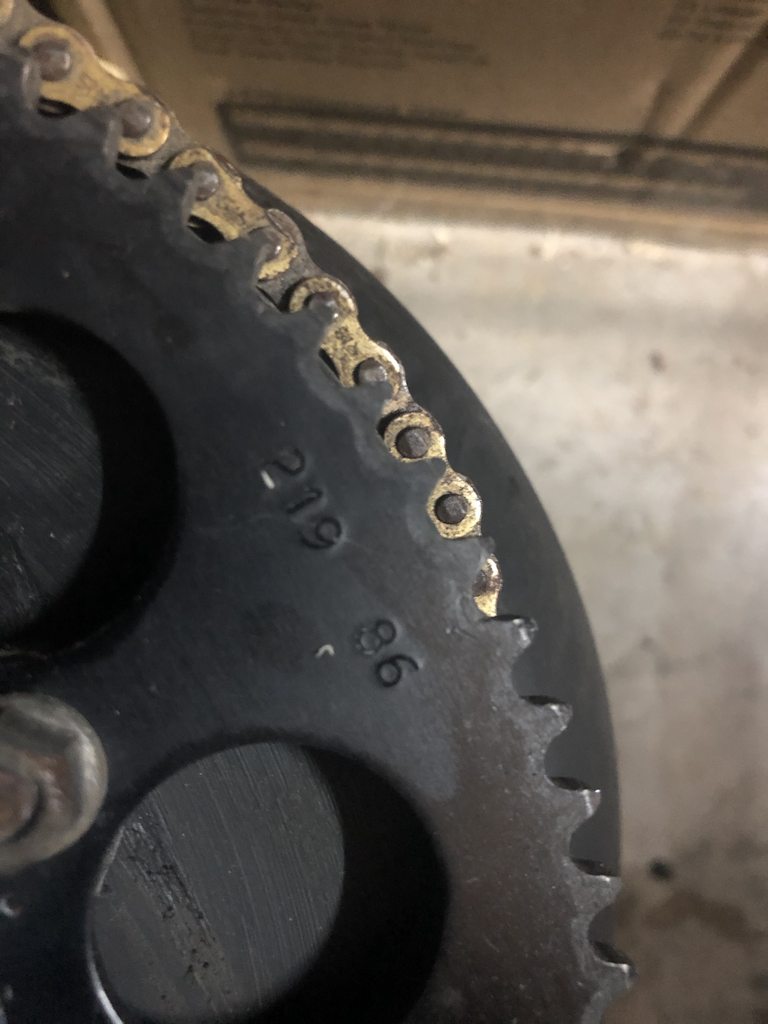
The chain is a 219 pitch and it came with an 86 tooth sprocket so I ordered a 16 tooth clutch which gives me like a 5.3 to 1 ratio which from all my reading should be sufficient for a drift trike.
Other than some steel thats about all I have to show for now until some of the other parts I just ordered show up.
This started about a year ago when I picked up the frame I will be using. It's a Triad pedal frame with removable rear axle so the plan is to build the motorized portion a bolt on addition.
Somewhere along the way I was offered a brand new but FREE Honda GX200 from a member of another forum I am on so that will be used for the power plant. I don't have a pic of that and it is currently buried in the garage but there will be pics of it at some point soon I promise.
Then the other day I found a guy on CL selling off his collection of carts and parts from his now closed rental business and went to check out his stash. I think I did pretty good with my haul and I am happy with it. I got the axle with all the bearings and bearing cassettes, sprocket, chain, wheels, 6 tires and a disk brake setup for $225.
The disk brake and axle shaft have some surface rust so they will be going in a bucket of Evaporust this weekend if I get some free time to tear everything down
The brake setup is Kelgate which is apparently not cheap new from my searching for brake pads for it.
The chain is a 219 pitch and it came with an 86 tooth sprocket so I ordered a 16 tooth clutch which gives me like a 5.3 to 1 ratio which from all my reading should be sufficient for a drift trike.
Other than some steel thats about all I have to show for now until some of the other parts I just ordered show up.

Thread Starter
|
Super Moderator
Joined: Sep 2011
Posts: 4,459
From: Northern VA
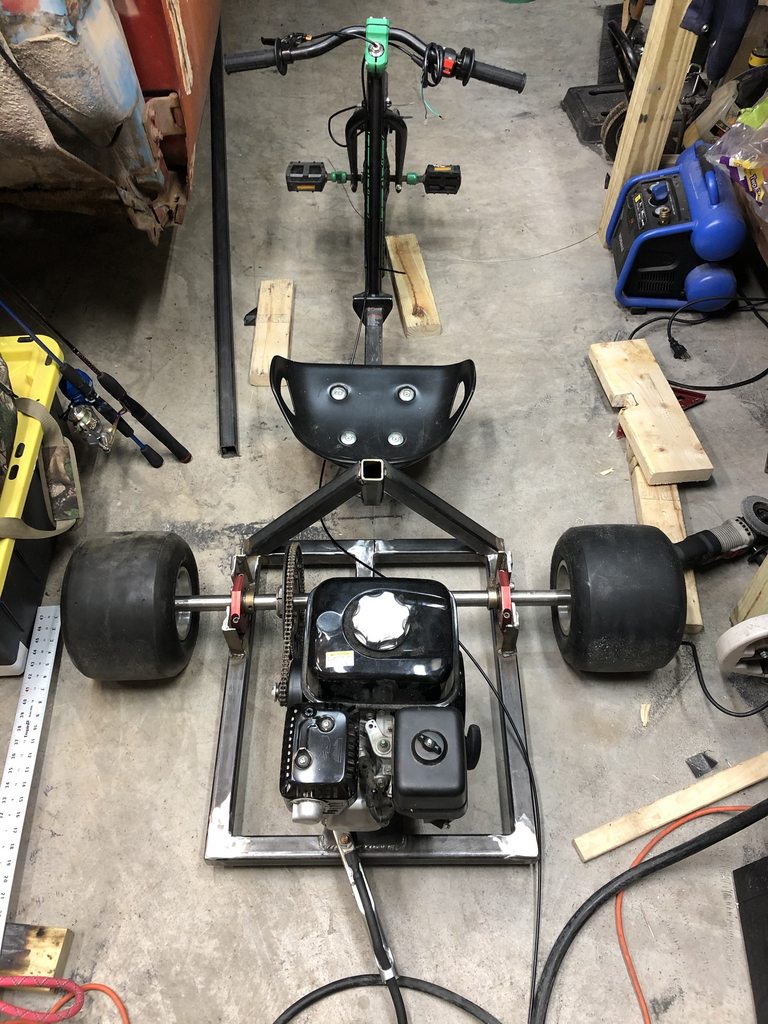
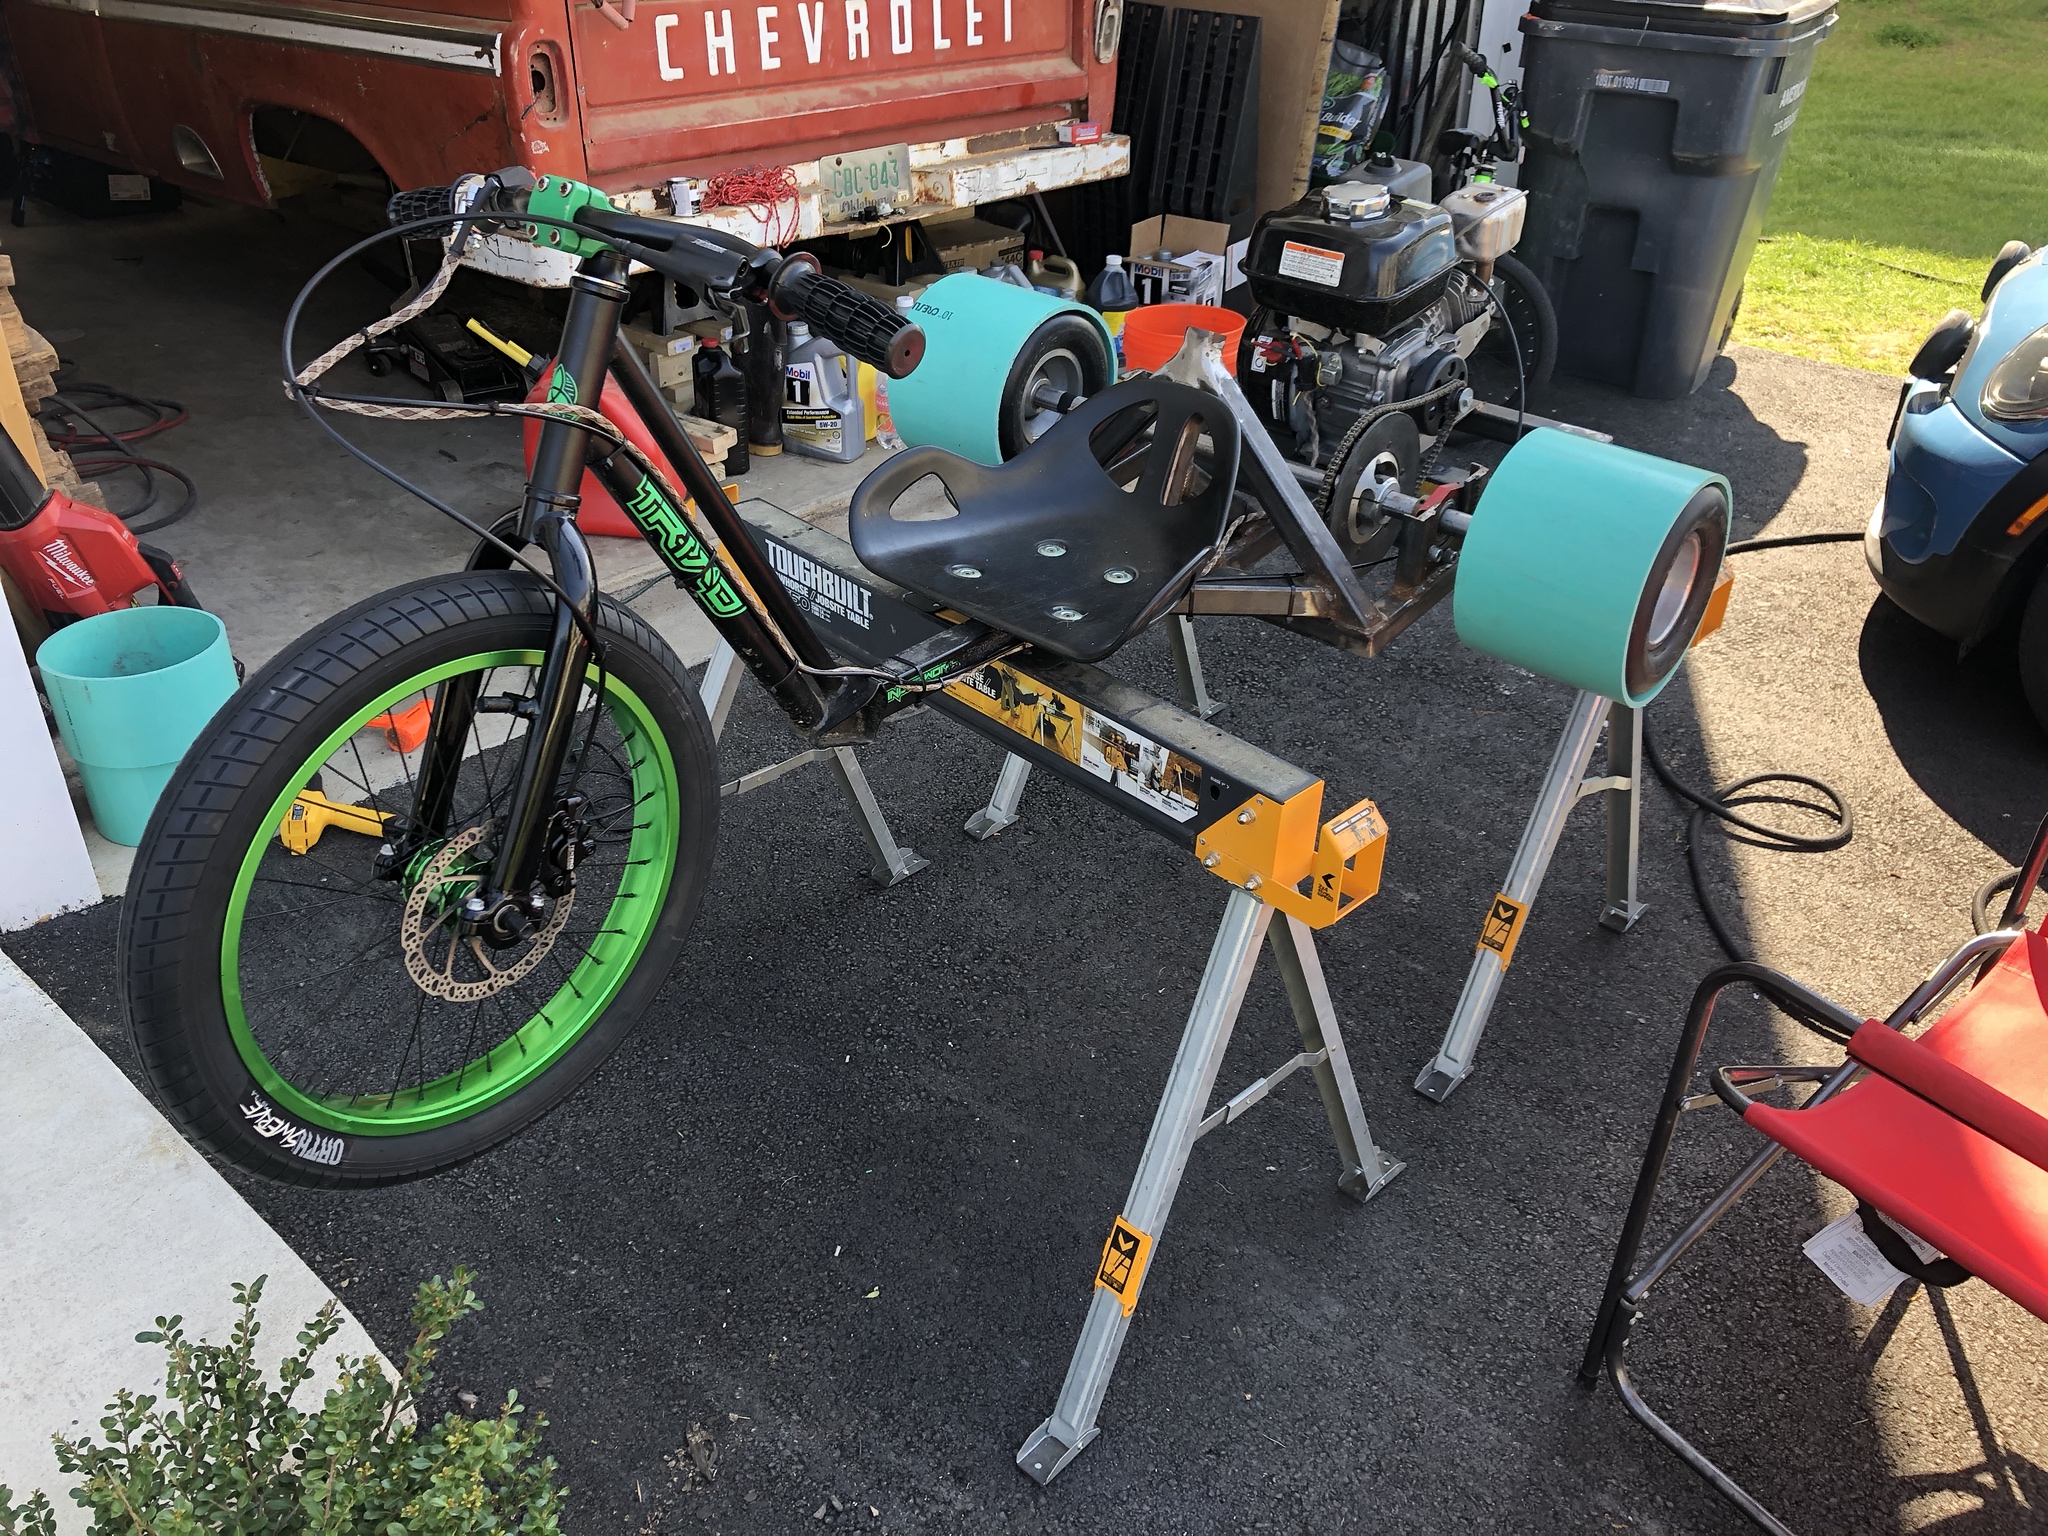
Well its running and driving! I've got some small adjustments to make like removing the rubber washers on the motor mount so the motor stops sliding forward and I ordered a new longer throttle cable. The cable I have "works" but it has a tight bend and just doesn't have enough slack for my liking. I really need the pvc sleeves to show up because it doesn't steer at all currently without them but it sure is fun to rip up and down the street!
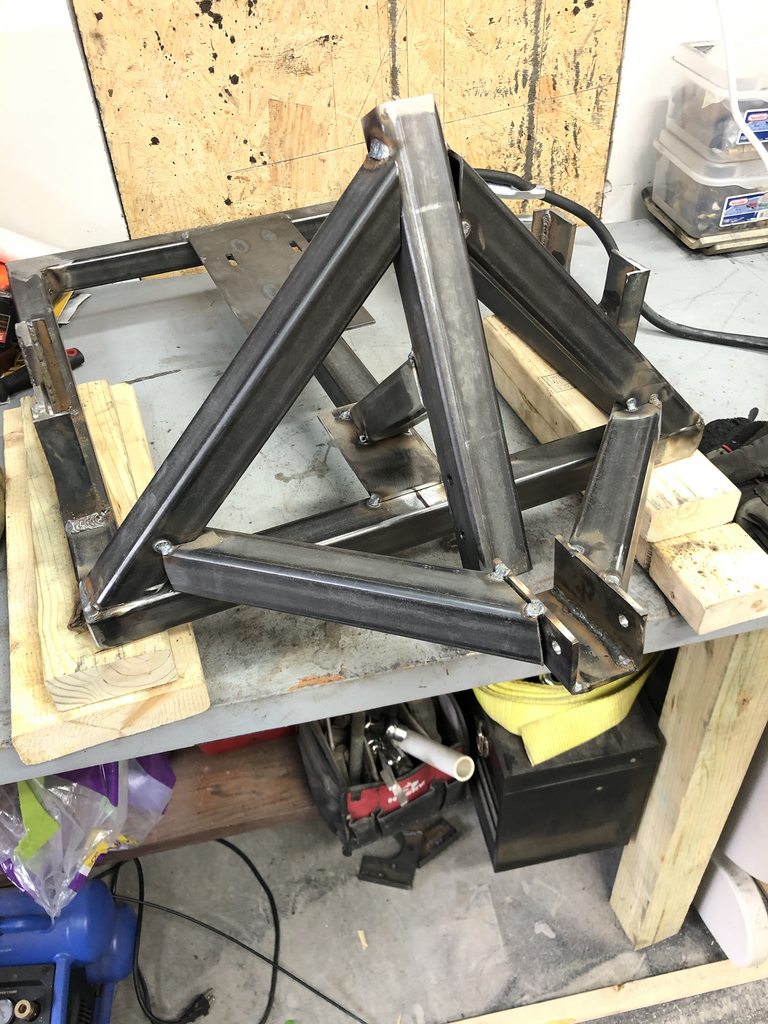
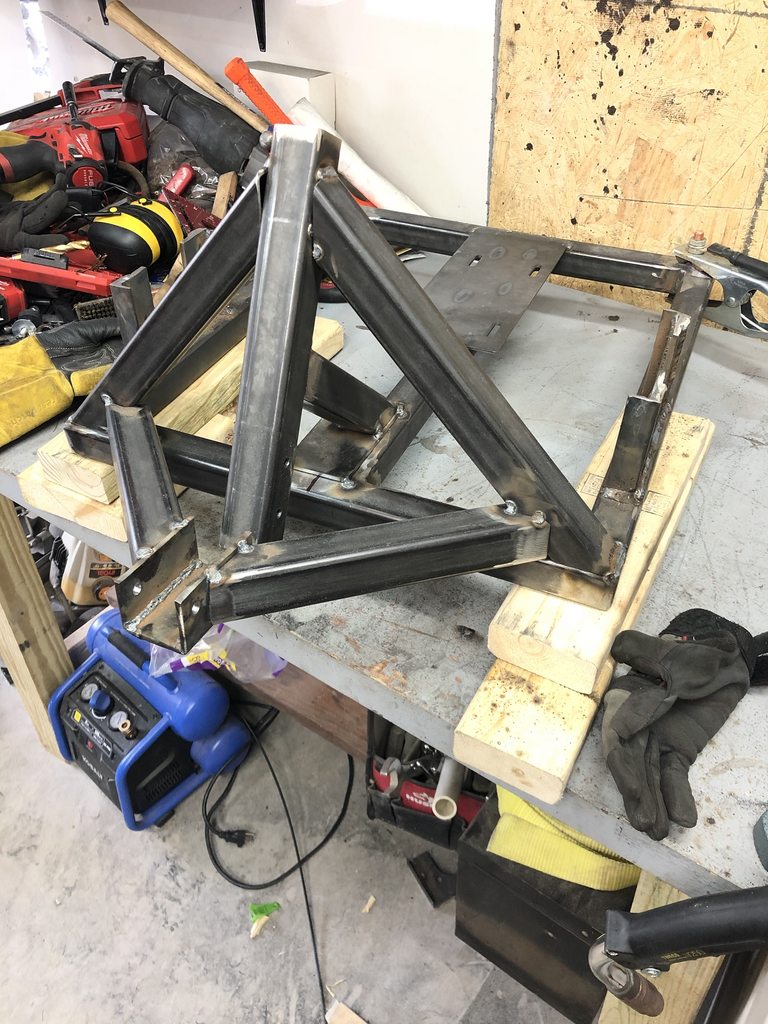
Getting an idea of the layout and a few measurements. The frame is all 1.5" .120 wall square tubing so I think it should be plenty strong.
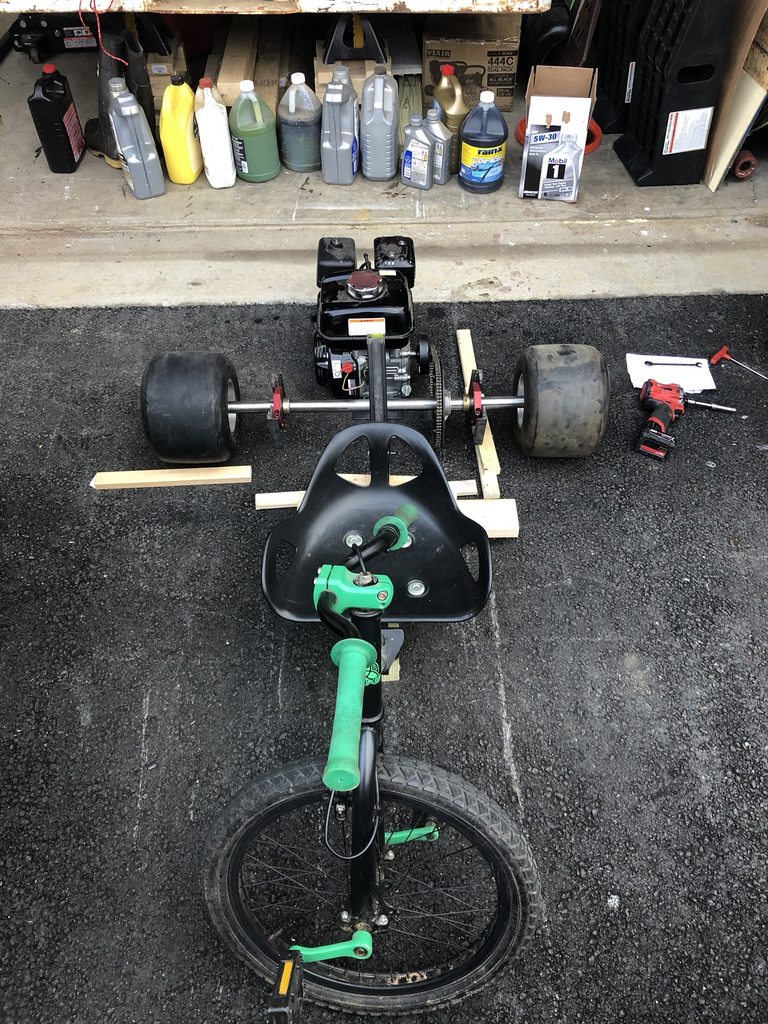
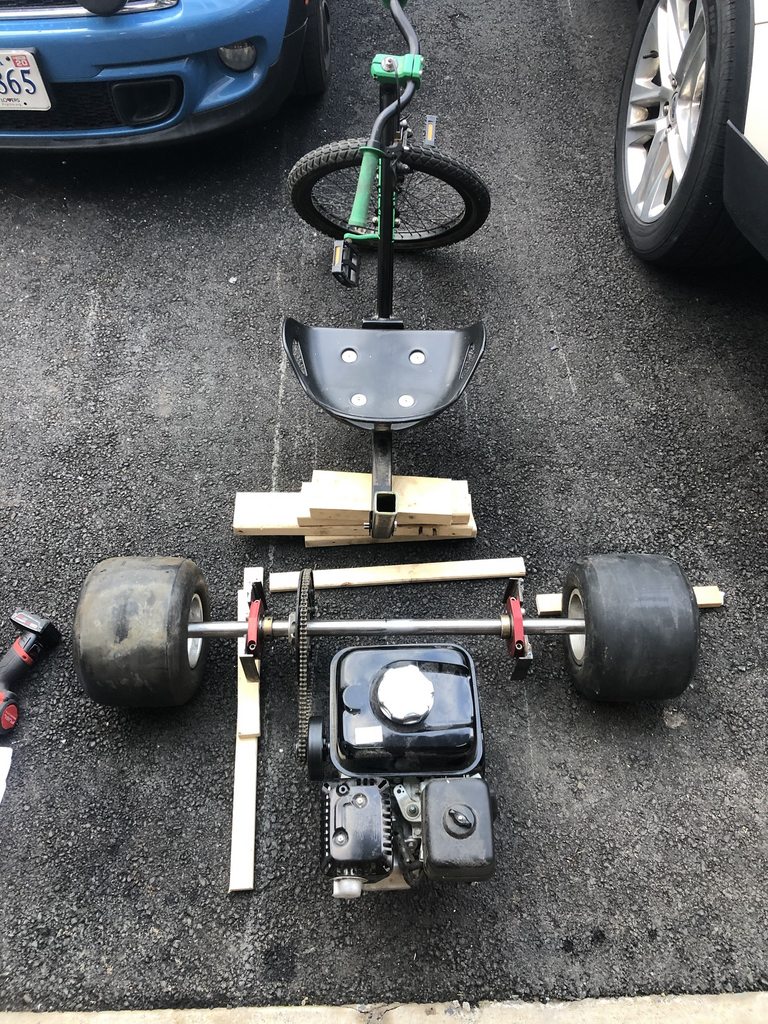
I had to slightly offset the center bar because my shaft isn't keyed the entire length and this was as close to center as I could get the sprocket on the axle. It works out ok though because the motor is nice and centered.
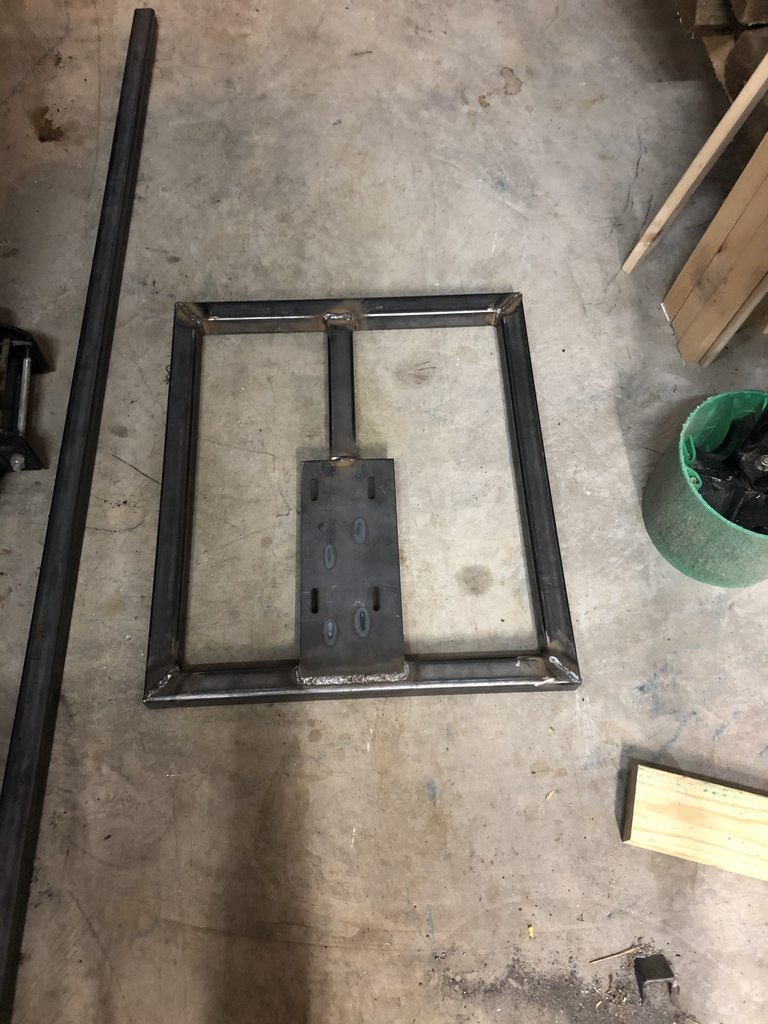
I made the bearing hangers out of some 1/4x4" flat bar and and used 1"x3/16 angle on the ends for rigidity.

On the bench tacking on the bearing hangers
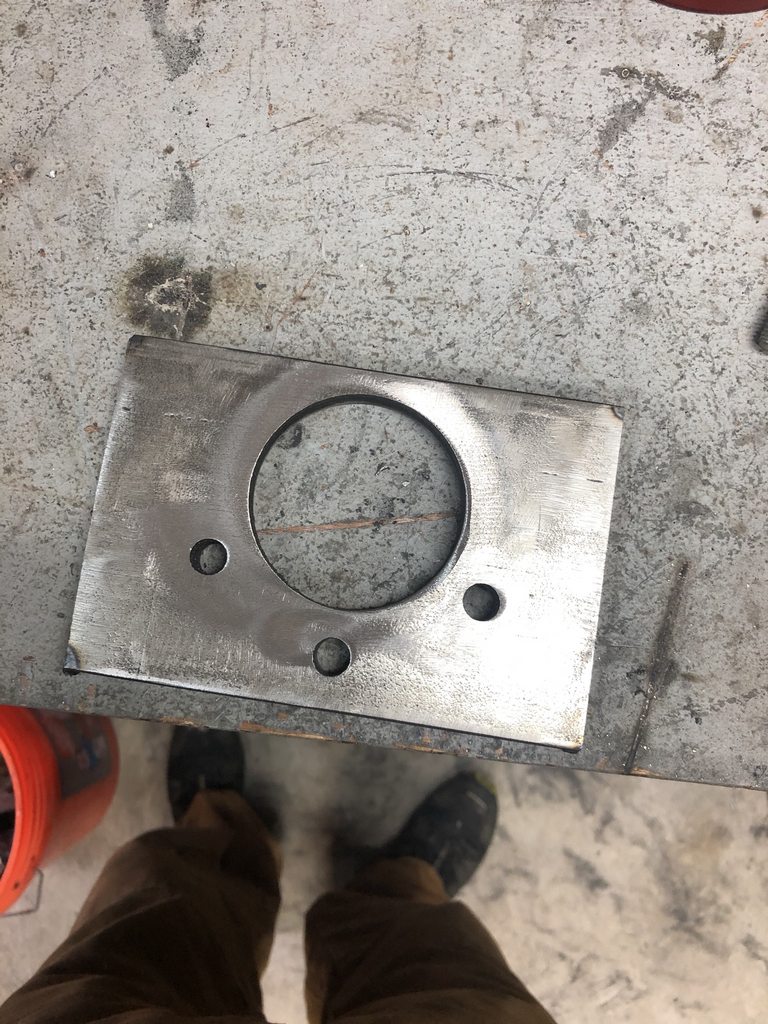
I made it to be bolt on using the same holes that the factory rear uses so I can switch it out in a matter of minutes.
Here it is all tacked and ready for final welding.
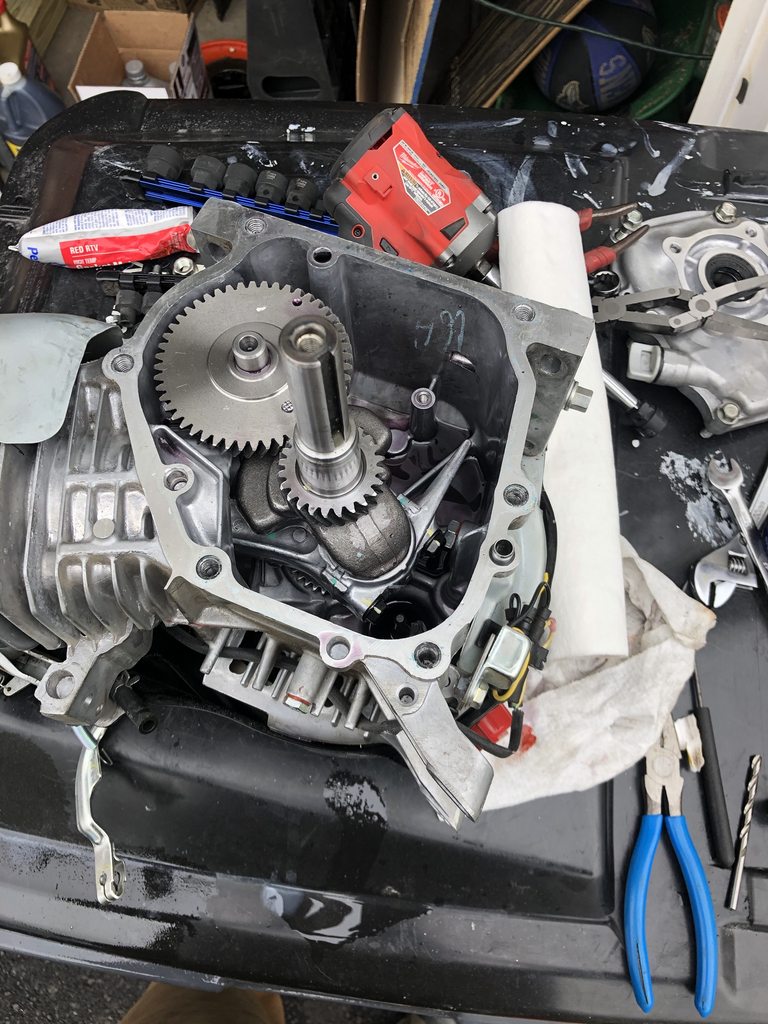
Then I tore into my motor to remove the governor and oil level sensor. My bench was covered in metal dust so I did this on the lid of my trash can in the driveway lol.
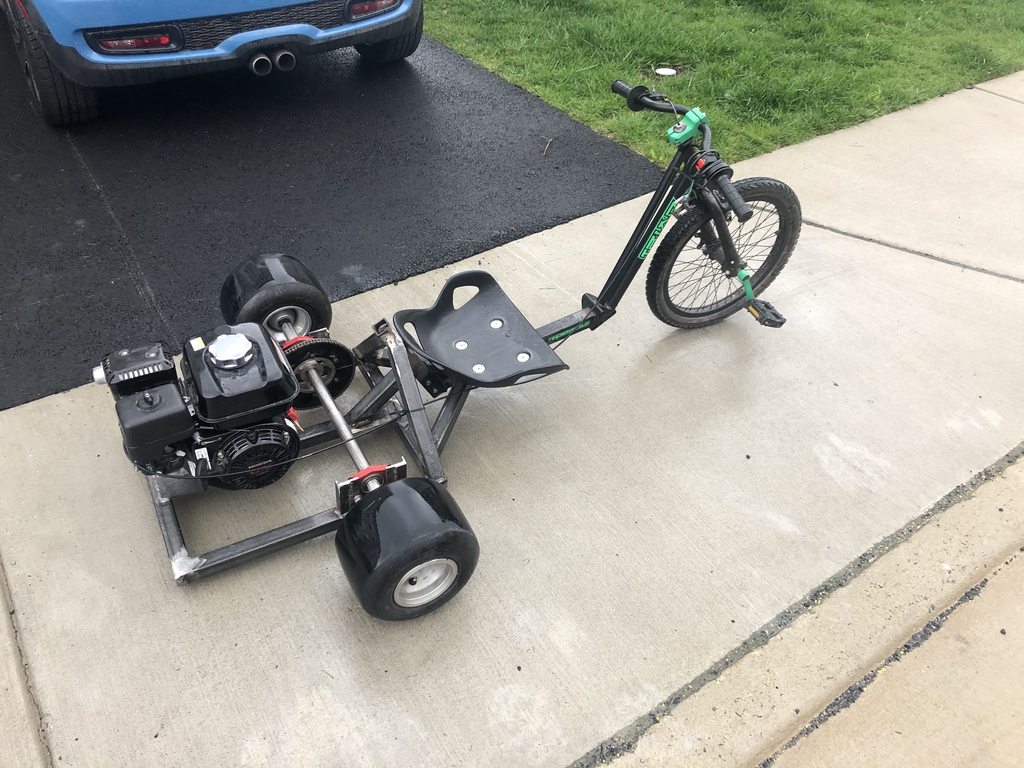
Here is the end result. I plan to remove the pedals and put some proper foot rests on it at some point in the future as well as get the rear disk brake on there somehow and then paint the frame but for now it's a fricken blast!

Getting an idea of the layout and a few measurements. The frame is all 1.5" .120 wall square tubing so I think it should be plenty strong.
I had to slightly offset the center bar because my shaft isn't keyed the entire length and this was as close to center as I could get the sprocket on the axle. It works out ok though because the motor is nice and centered.
I made the bearing hangers out of some 1/4x4" flat bar and and used 1"x3/16 angle on the ends for rigidity.
On the bench tacking on the bearing hangers
I made it to be bolt on using the same holes that the factory rear uses so I can switch it out in a matter of minutes.
Here it is all tacked and ready for final welding.
Then I tore into my motor to remove the governor and oil level sensor. My bench was covered in metal dust so I did this on the lid of my trash can in the driveway lol.
Here is the end result. I plan to remove the pedals and put some proper foot rests on it at some point in the future as well as get the rear disk brake on there somehow and then paint the frame but for now it's a fricken blast!
Last edited by rexmburns; Apr 27, 2020 at 08:38 AM.
Thread Starter
|
Super Moderator
Joined: Sep 2011
Posts: 4,459
From: Northern VA
Thanks!!
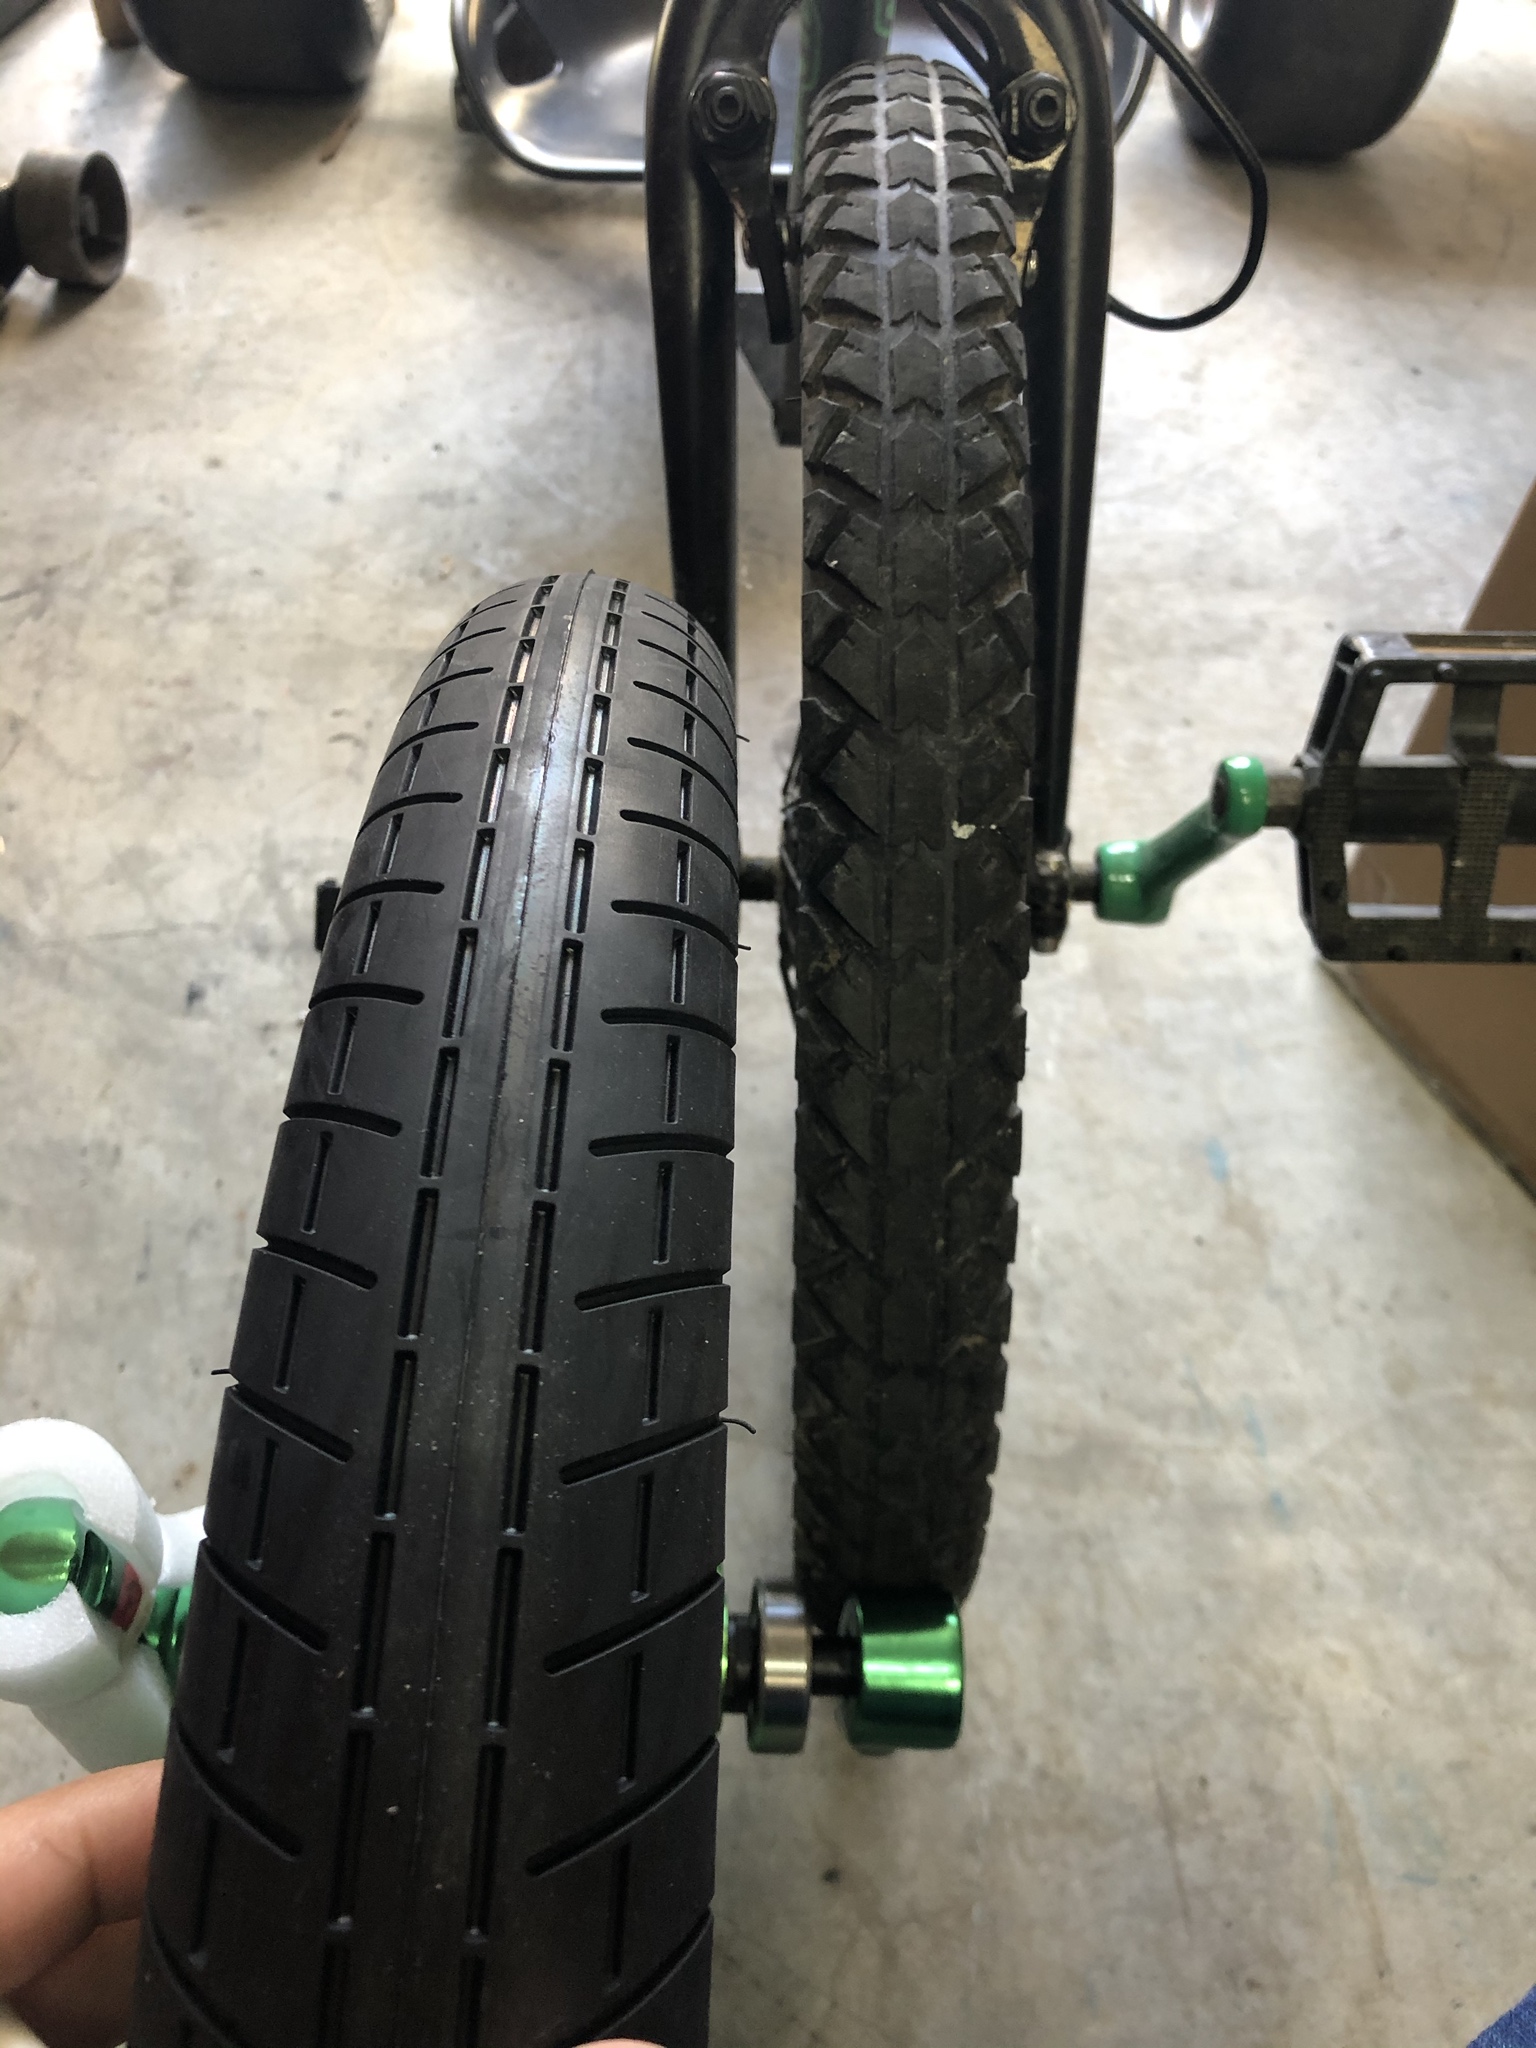
So on Saturday I had a mishap when starting it lol. I knew my throttle cable was to short and and to tight for my liking so I had already ordered a longer one on Friday night but I was always careful to check and make sure everything was in order before starting it. Well this time I got in a bit of a rush and forgot to confirm that the throttle was closed and gave it a half pull and it took off on me lol! It hit my kids friends car (a beater so no worries there) and then did a couple donuts in the yard before hitting the side of my house before I could get to the kill switch. It seemed like everything was ok until I went to ride it and realized that it had bent the fork and rim upon impact. After pondering how to move forward with either a BMX frame or a fat tire frame I got on Triad's website and found that I could get a new fork for $46 and the new wheel for $120. I was already planning on adding a disc brake wheel up front anyway so it really only cost me about $50 that I wasn't already planning to spend so not to bad. I found the same disc brake setup on Amazon for about $30 less than what Triad sells it for so I ordered that as well as a new throttle linkage kit that will allow me to route the throttle cable to the side of the motor instead of around to the back. I also got tired of waiting for my pvc sleeves to ship that were ordered on the 15th of April so I ordered some schedule 80 pipe from Ebay and of course the yesterday I got the shipping confirmation for my other two sets that I ordered back on the 15th! Oh well now I will have 3 sets which I will need at some point anyway. Everything has shipped and all of the tracking shows that everything will be arriving over the next 3 days so I should be able to get it back together on Saturday.
In the meantime I am going to add some foot rests instead of using the pedals and then tear it all apart and put some paint on it to make it look better while waiting for parts for final assembly. I'll get some pics up as I make progress!

Thread Starter
|
Super Moderator
Joined: Sep 2011
Posts: 4,459
From: Northern VA
Got all my new parts installed today!
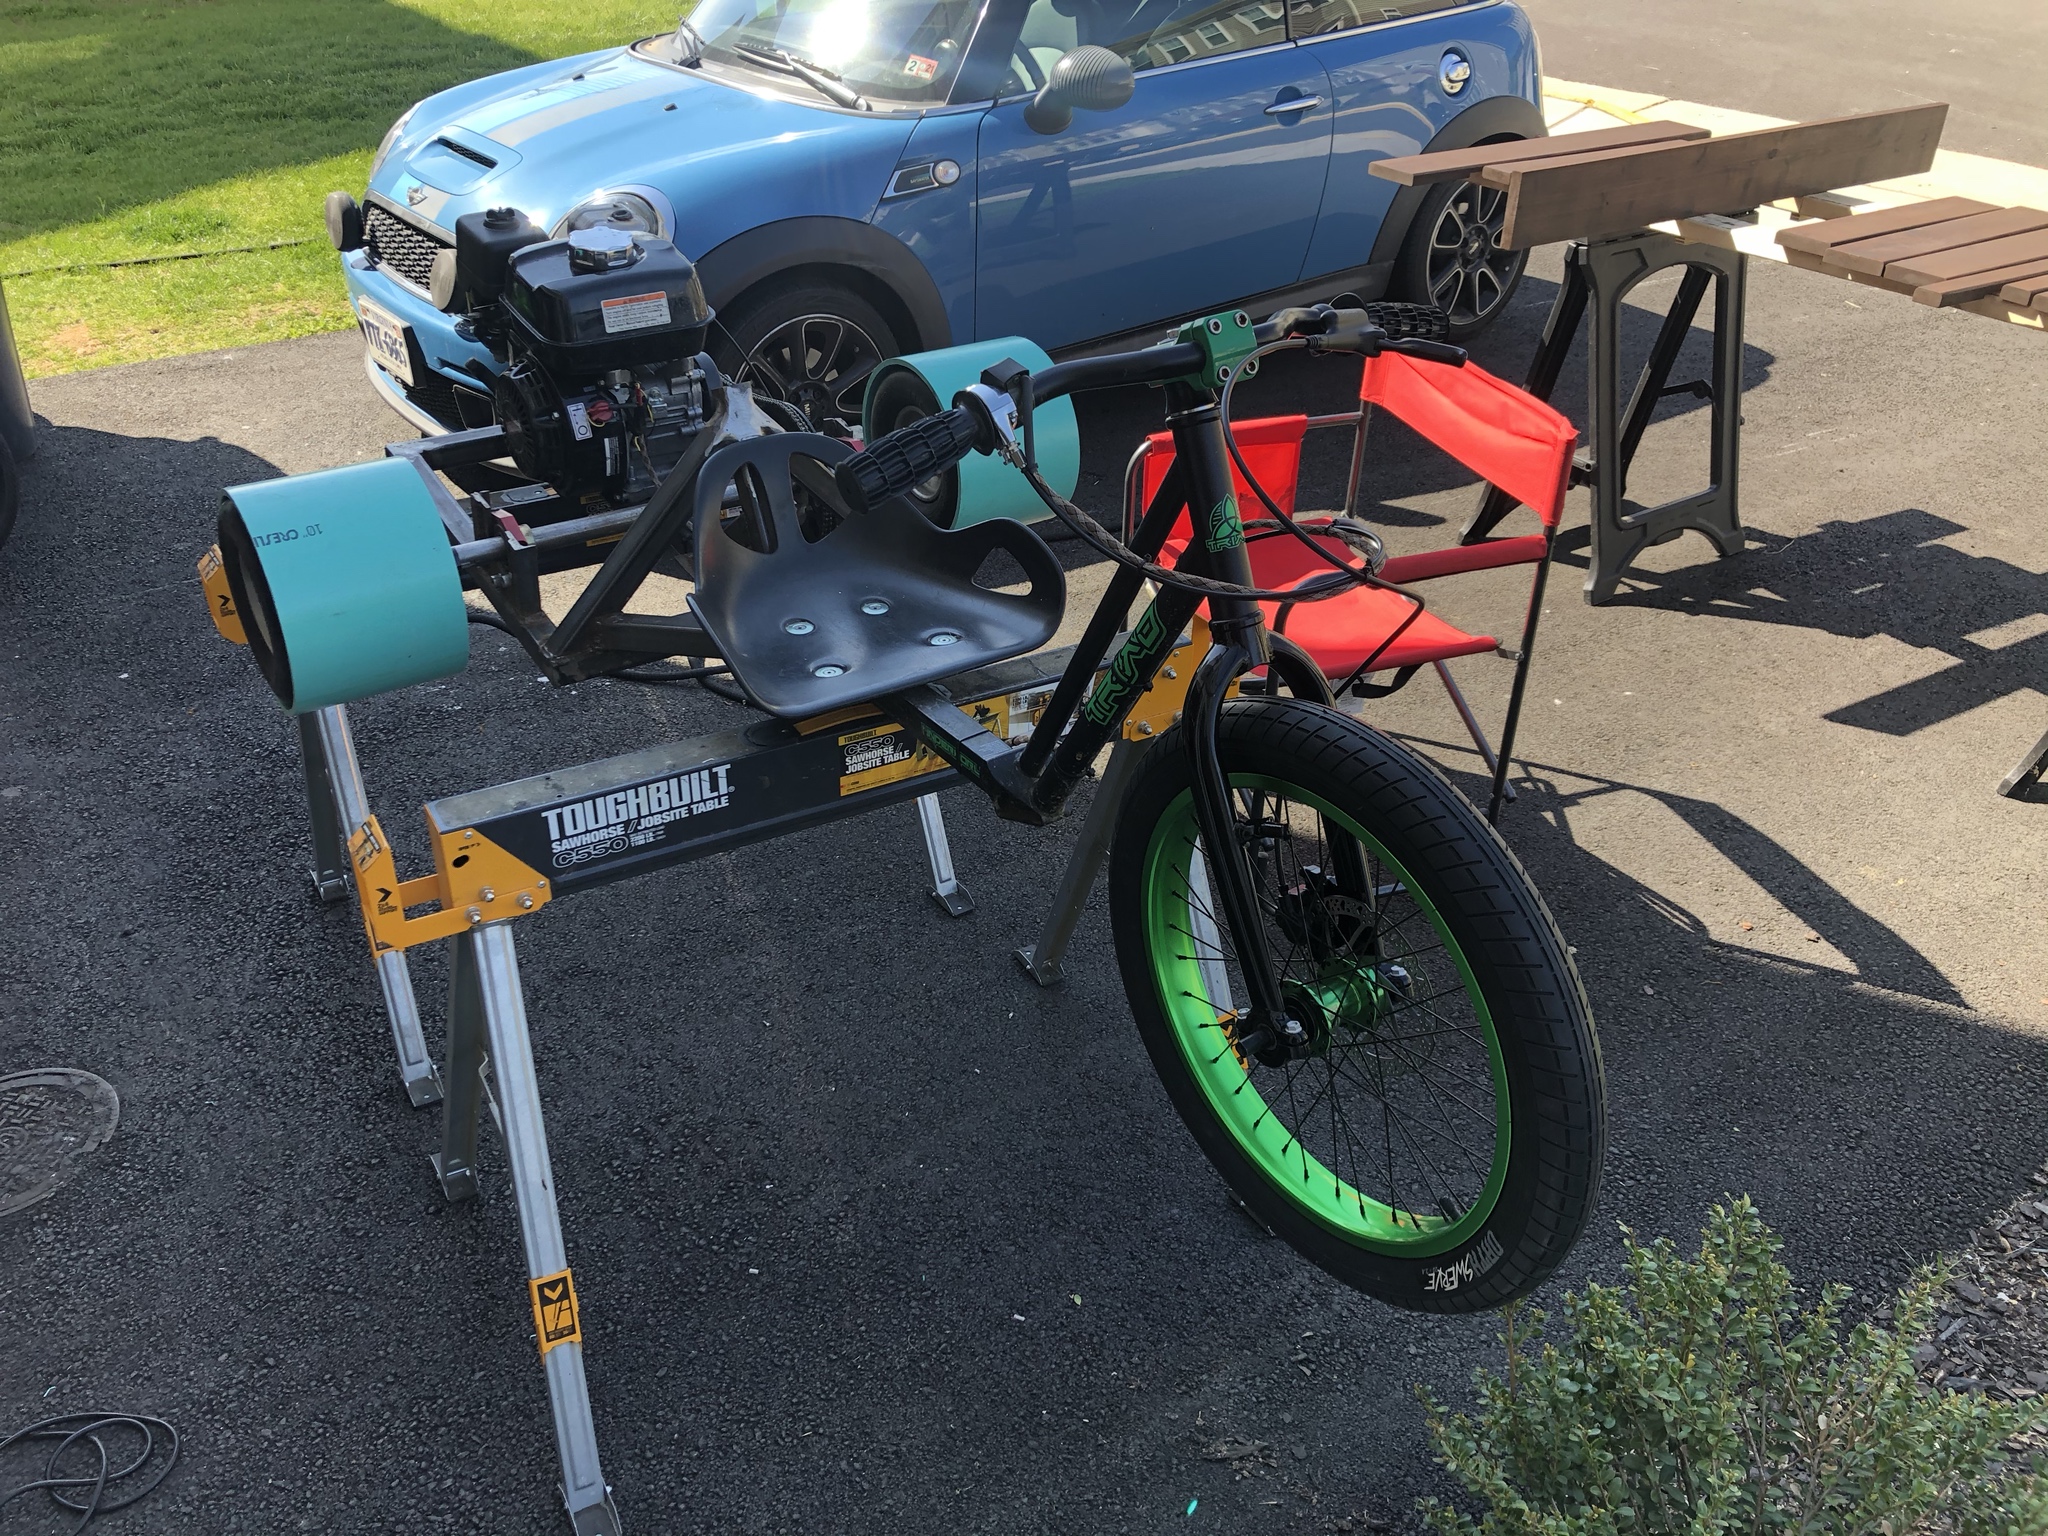
I was happy to see that the new front tire is a good bit larger and a more street friendly tread. Having the disk brake is a huge improvement.
I installed the new throttle linkage and I am not at all happy with it so I will be looking for a better option for that still. I went with the style in the picture and I had to modify it to make it even work at all and I also had to trim the carb linkage to install it so it kinda ****es me off that it doesn't work all that great but I've got a spare motor in the garage to scavenge parts from so it is what it is. I also think I will be switching to a thumb throttle instead of the twist for better control when having to turn the bars so sharp in a drift.

All thats left is to build some foot rests and take the pedals off then I can paint it. Either way I had a blast riding it around this afternoon!
I was happy to see that the new front tire is a good bit larger and a more street friendly tread. Having the disk brake is a huge improvement.
I installed the new throttle linkage and I am not at all happy with it so I will be looking for a better option for that still. I went with the style in the picture and I had to modify it to make it even work at all and I also had to trim the carb linkage to install it so it kinda ****es me off that it doesn't work all that great but I've got a spare motor in the garage to scavenge parts from so it is what it is. I also think I will be switching to a thumb throttle instead of the twist for better control when having to turn the bars so sharp in a drift.
All thats left is to build some foot rests and take the pedals off then I can paint it. Either way I had a blast riding it around this afternoon!

Thread
Thread Starter
Forum
Replies
Last Post