
Project: Broken Driveline begins


Thread Starter
|
New Member
Joined: Dec 2009
Posts: 91

Put a new starter on her today. She starts in the blink of an eye, its awesome. The p1345 crank correlation error hasn't come back yet. I might have got it closer by replacing the timing set but it still has some oddness about it.
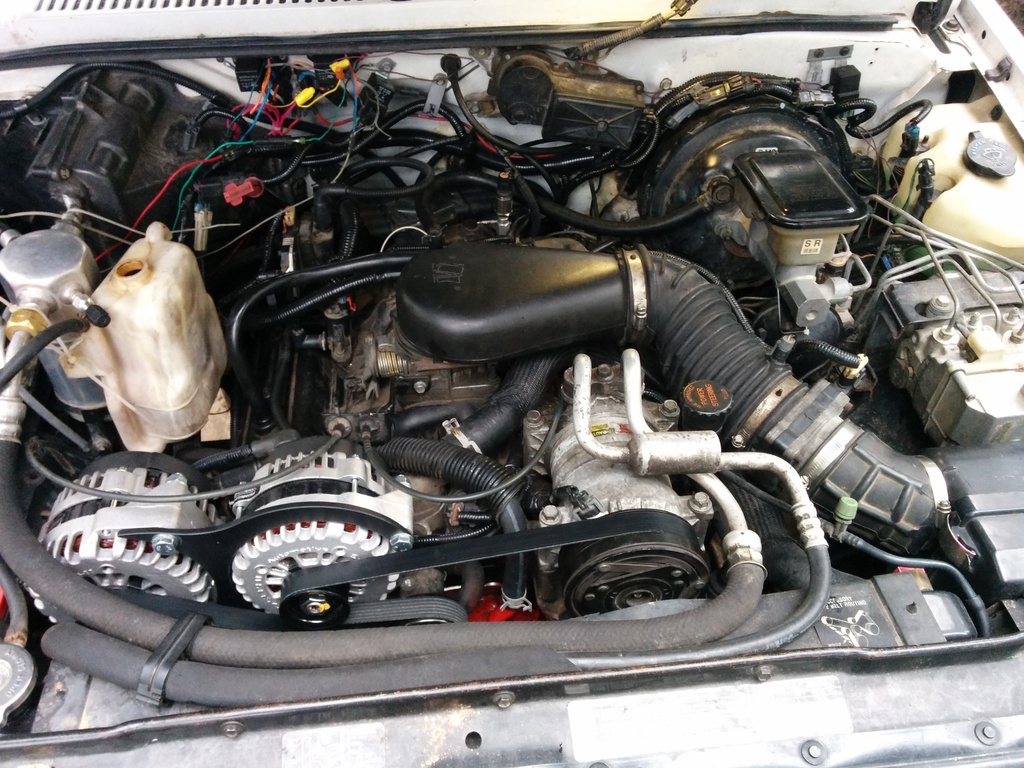
Working on the main power distribution now. Got the winch, efans, alt, accomodations for alt 2, in-cab distribution block (amps and stuff), and some rediculous grounds:
4ga from batt to the alt bracket
4ga from the left side of the block to the left side of the frame
4ga from the right side of the block to the right side of the frame
4ga from the battery to the left side of the frame
4ga from the battery to the core support/efans.
Running 2 ga from the battery to the primary alt distribution block (175a megafuse holder alt fused on one side)
2ga from the dist block to the starter (unfused)
4 ga from the alt to the 175a megafuse/dist block
Secondary 175a megafuse/dist block. Nothing on the fused side, its setup for the 2nd alt when I can afford the kit.
Having some major trans issues with slip. I'm fingers crossed it just needs a good test drive but realistically it's probably fubar. Will take her around the block and try and get it through all 4 gears. Can't do that until I get the steering box replaced so I'm scheduled to be knocking that out tomorrow. Gonna be a real pain in the *** with that huge beautiful engine in the way!
Ooh and doing some research on my reverse issue. It might be occuring because I used the wrong valve body gaskets. That will be my first test.
Thread Starter
|
New Member
Joined: Dec 2009
Posts: 91
Updating halfway into the day. Enroute to advance to rewarranty my gearbox out. Hopefully this one will work. At least I buy my fluids by the gallons now. Sold a 2 bolt main bare 1997 vortec block for 50 bucks and the guy gave me this as well: wtf is it?

Totally awesome changing the tach dip switch to v8!
Then attacking the gearbox:

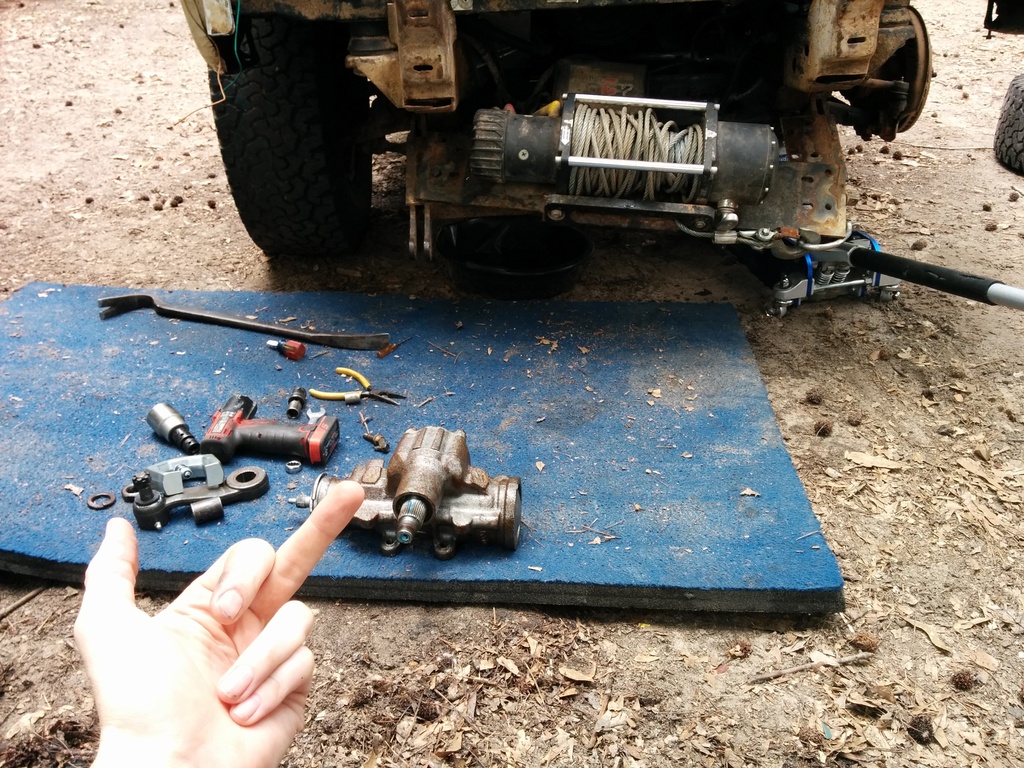
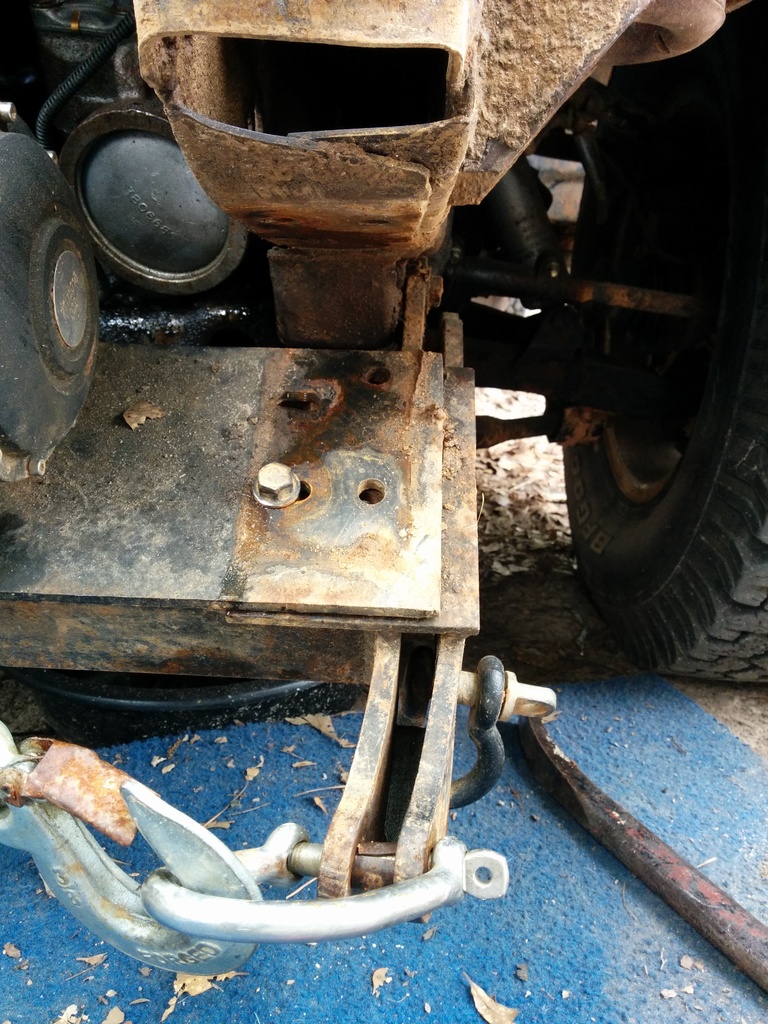
When I ripped my winch controls in half the winch put the whoopass down on my towbar and shackle.
Totally awesome changing the tach dip switch to v8!
Then attacking the gearbox:
When I ripped my winch controls in half the winch put the whoopass down on my towbar and shackle.
Thread Starter
|
New Member
Joined: Dec 2009
Posts: 91
It felt awesome to crank her up today. Have an obvious misfire issue. No idea what it is but I'm working on getting some realtime misfire monitoring program to get that narrowed down. She won't give me any codes despite having 0 o2 sensors plugged in however the miss is only evident at idle and if you blip the throttle it responds fantastic.
I can't test the truck under load because the transmission is broken. I went through the gears and noticed that manual 2 works perfect. but 1/3/4/R slip.
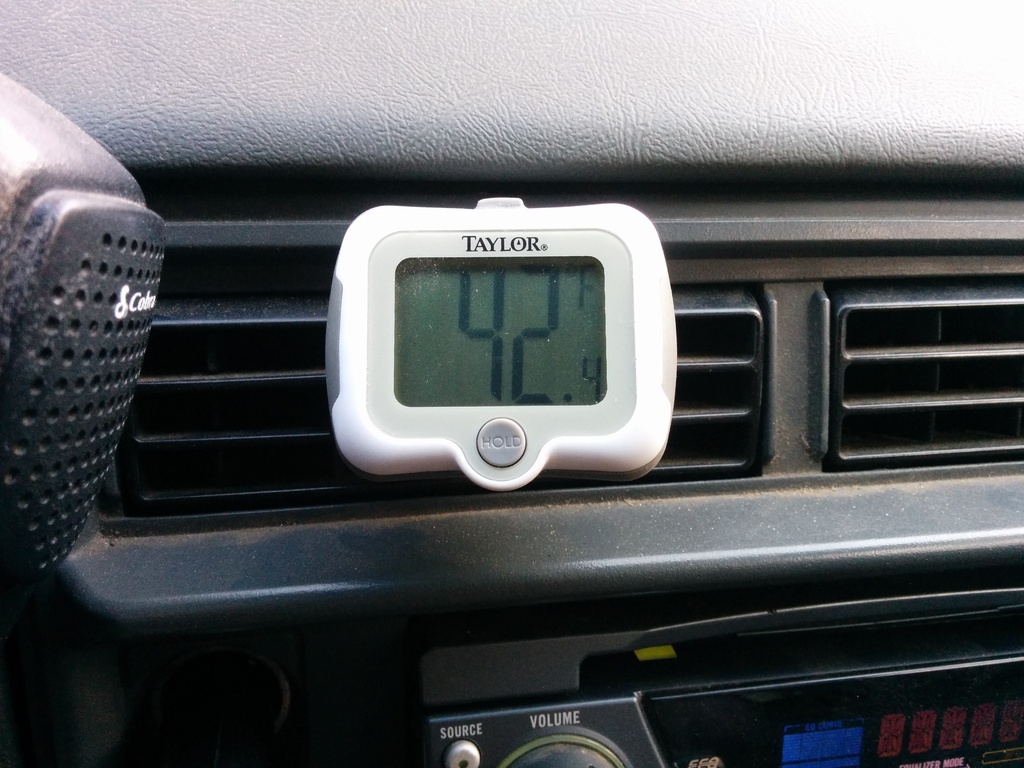
The newest power steering gearbox feels tight. I can feel the misfire when turning too. It all seems to come back to that. If reverse didn't slip I'd say the trans is in safe mode. Wired the antitheft thing where the old under dash pcm was. Working on the obd 2 port right next to the obd1 port. I still need that for my keyless entry and abs. (both broken) The alternator holds up to both fans like a champ. The motor doesn't bog down either. Pulling over 20 inches of vac in park at idle with both fans on coolant temp at 210.
I can't test the truck under load because the transmission is broken. I went through the gears and noticed that manual 2 works perfect. but 1/3/4/R slip.
The newest power steering gearbox feels tight. I can feel the misfire when turning too. It all seems to come back to that. If reverse didn't slip I'd say the trans is in safe mode. Wired the antitheft thing where the old under dash pcm was. Working on the obd 2 port right next to the obd1 port. I still need that for my keyless entry and abs. (both broken) The alternator holds up to both fans like a champ. The motor doesn't bog down either. Pulling over 20 inches of vac in park at idle with both fans on coolant temp at 210.
Thread Starter
|
New Member
Joined: Dec 2009
Posts: 91
Going to get inspection TOMORROW!!!
I hope they don't lose their **** when they pop the hood!
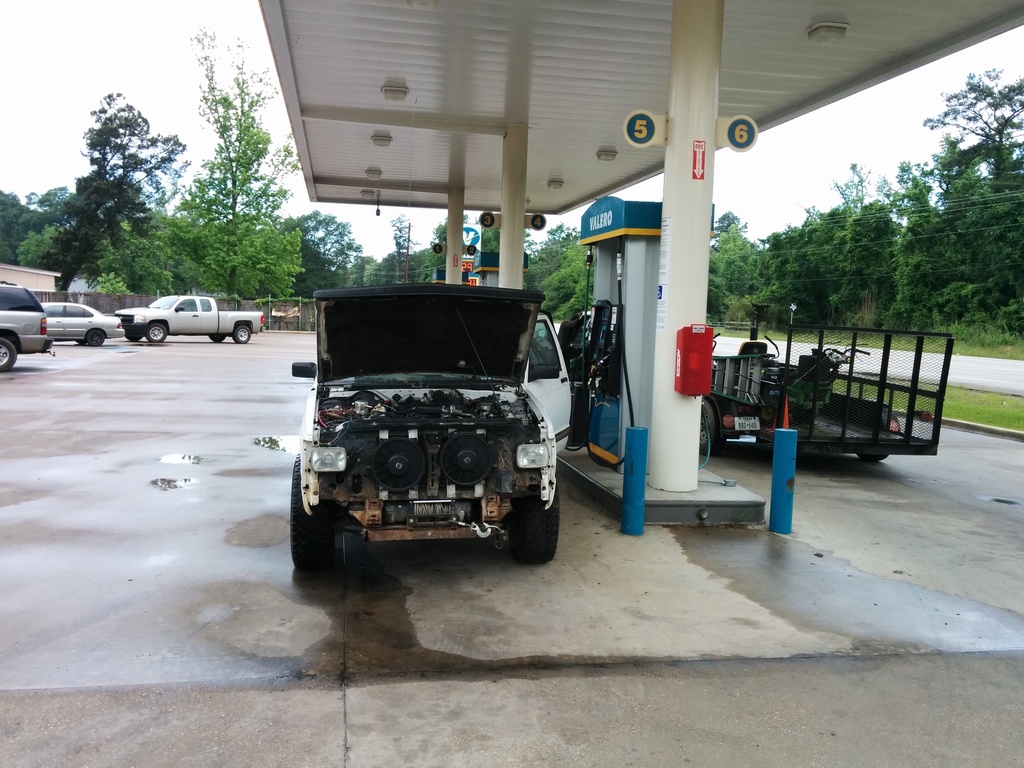
Went to the gas station yesterday in safemode. She ran well got her up to about 65 in manual 2 and 3rd. Asked my buddy to come over and help me with the transmission. Nearby trans shop gave me the "c" and "v" valve body gaskets. Went to pull the trans pan drain plug and it was hand tight (no leaks still though, I'm impressed) Dropped the pan and only about 2 quarts of fluid came out and immediately saw the pwm solenoid out of the vb (I forgot the damned clippie) and 2 of the 5 bolts that hold the pressure manifold on were loose. (the 8mm ones)
Replaced the gaskets, bolted the pressure manifold on, clippied the pwm solenoid, tightened the drain plug and cranked her up. No dice but reverse was perfect now. It engaged instantly but still in safe mode. I traced the power wire to the harness at the computer not plugged into anything. Ran a 10a circuit from my relay center and wirenutted it. (can't be wasting crimp connectors until the final connections are made) Tested power everything was great. Cranked the truck up, still safe mode I'm like WTF. Check the scanner, new code saying the force motor had an issue. I go "well **** I must have missed plugging it in". drained the fluid, had the pan off in about 10 minutes. (getting faster) and the force motor was plugged in. 3 seconds later DOH I had not plugged the trans connector back into the trans.
Button the trans back up, plug the damn connector in and we have R/1/2/3/4 and lockup @ 75mph tested and confirmed on a 4 mile run. The 1/2 shift at part throttle is perfect, 2/3 is fantastic but at WOT 1/2 is crap and never were able to test 2/3. Not bad with an incompetent trans builder and only using spare parts. I did however use new vb gaskets and fluid. I had to.
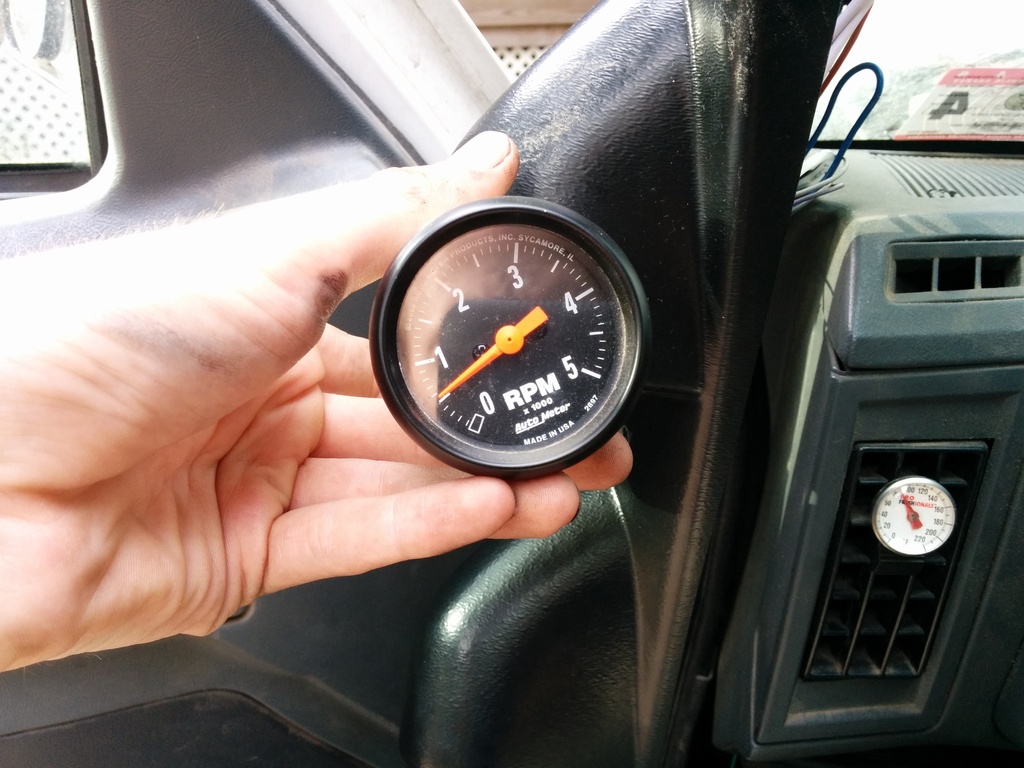
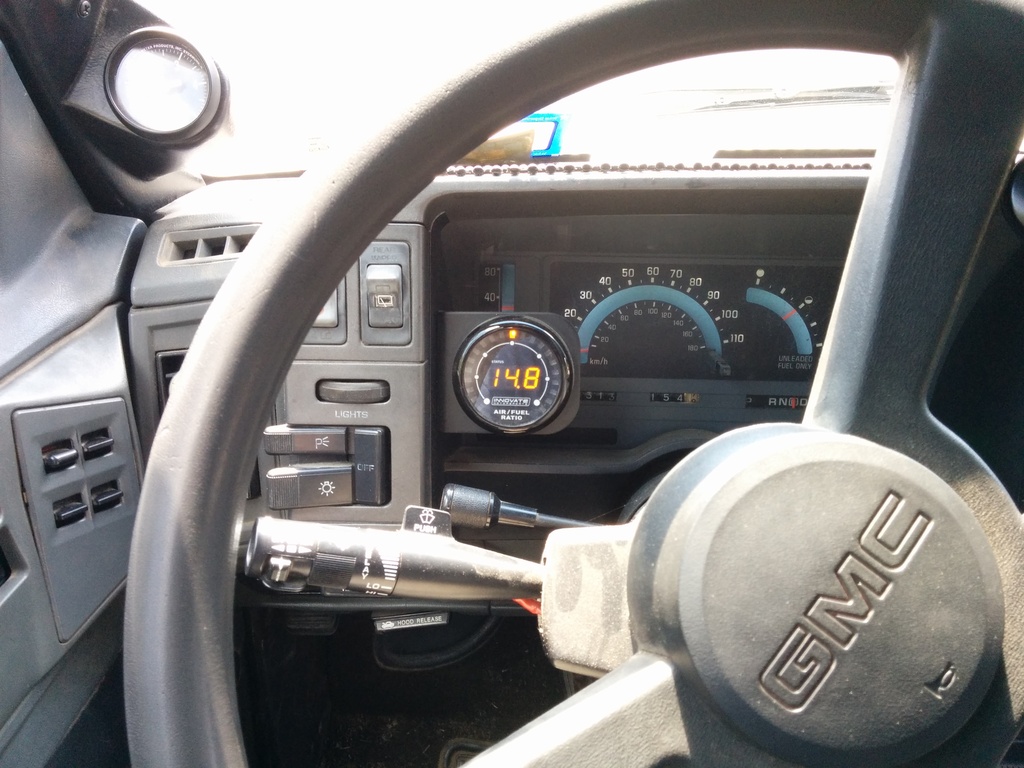
SO I've spent the rest of the day getting the gauges working, speedo, wideband, and trans temp. Got the running lights wiring fed but no bumper or grille installed yet. I still need to build the headlight harness before inspection as well so that will be a rush job tomorrow. The efan wires are just 2 ground wires that connect the solenoids hanging in front of the vehicle. Going to be rocking manual efans until I figure out how to make my spare garbage into a fan controller.
I hope they don't lose their **** when they pop the hood!
Went to the gas station yesterday in safemode. She ran well got her up to about 65 in manual 2 and 3rd. Asked my buddy to come over and help me with the transmission. Nearby trans shop gave me the "c" and "v" valve body gaskets. Went to pull the trans pan drain plug and it was hand tight (no leaks still though, I'm impressed) Dropped the pan and only about 2 quarts of fluid came out and immediately saw the pwm solenoid out of the vb (I forgot the damned clippie) and 2 of the 5 bolts that hold the pressure manifold on were loose. (the 8mm ones)
Replaced the gaskets, bolted the pressure manifold on, clippied the pwm solenoid, tightened the drain plug and cranked her up. No dice but reverse was perfect now. It engaged instantly but still in safe mode. I traced the power wire to the harness at the computer not plugged into anything. Ran a 10a circuit from my relay center and wirenutted it. (can't be wasting crimp connectors until the final connections are made) Tested power everything was great. Cranked the truck up, still safe mode I'm like WTF. Check the scanner, new code saying the force motor had an issue. I go "well **** I must have missed plugging it in". drained the fluid, had the pan off in about 10 minutes. (getting faster) and the force motor was plugged in. 3 seconds later DOH I had not plugged the trans connector back into the trans.
Button the trans back up, plug the damn connector in and we have R/1/2/3/4 and lockup @ 75mph tested and confirmed on a 4 mile run. The 1/2 shift at part throttle is perfect, 2/3 is fantastic but at WOT 1/2 is crap and never were able to test 2/3. Not bad with an incompetent trans builder and only using spare parts. I did however use new vb gaskets and fluid. I had to.
SO I've spent the rest of the day getting the gauges working, speedo, wideband, and trans temp. Got the running lights wiring fed but no bumper or grille installed yet. I still need to build the headlight harness before inspection as well so that will be a rush job tomorrow. The efan wires are just 2 ground wires that connect the solenoids hanging in front of the vehicle. Going to be rocking manual efans until I figure out how to make my spare garbage into a fan controller.
Thread Starter
|
New Member
Joined: Dec 2009
Posts: 91
I'm DRIVING!!!!!
The first 2 days were brutal. NO AIR CONDITIONING. When I went to have her inspected I still had no o2 sensors connected. Surprisingly with no egr and no o2 sensors plugged in, and timing off I passed the low speed test and failed 1 out of the 3 high speed tests.
Went home, stabbed in and wired up the o2 sensors. Attempted to simulate Bank 1 Sensor 1 with my widebands narrowband simulation but the pcm monitors both signal and ground of the o2 and refused to recognize the simulated input keeping both banks in open loop (for some strange reason bank 2 was affected)
Drove over to It's Muffler Time and spent another 50 bucks to have 2 more o2 bungs welded on bank 1 sensor 1. Turns out the wideband has to be at least 24 inches down stream instead of 2 inches before the manifold collector. So I installed bank 1 sensor 1 and wideband a few inches apart 30 inches downstream of the manifold in the only feasable place accomodating enough.
Got them wired up and sat in the driveway breathing 12.5-1 ratio until BAM 14.7! The engine sounded differently and settled down. Took her for a test drive, trans feels like a stock 99 suburban trans during 1/2 and 2/3 at both part throttle and WOT shifting.
I then went to Marks Automotive off of 242 in Conroe and he set my CKP retard from the 13* I guess stabbed it to 0*.
I noticed no difference in how the truck ran @ 0* CKP Retard however I'm sure it matters, 13* is a lot more rotation than I thought it would be.

The chickens wiped out a copperhead in the yard which was pretty awesome to find. Poor thing didn't stand a chance against 5 hens in half an acre of dirt and sand.

Made my way over to my buddies house for her true maiden voyage. 40 miles 1 way in traffic: He has one of the cleanest 2wd 94's I've ever seen.
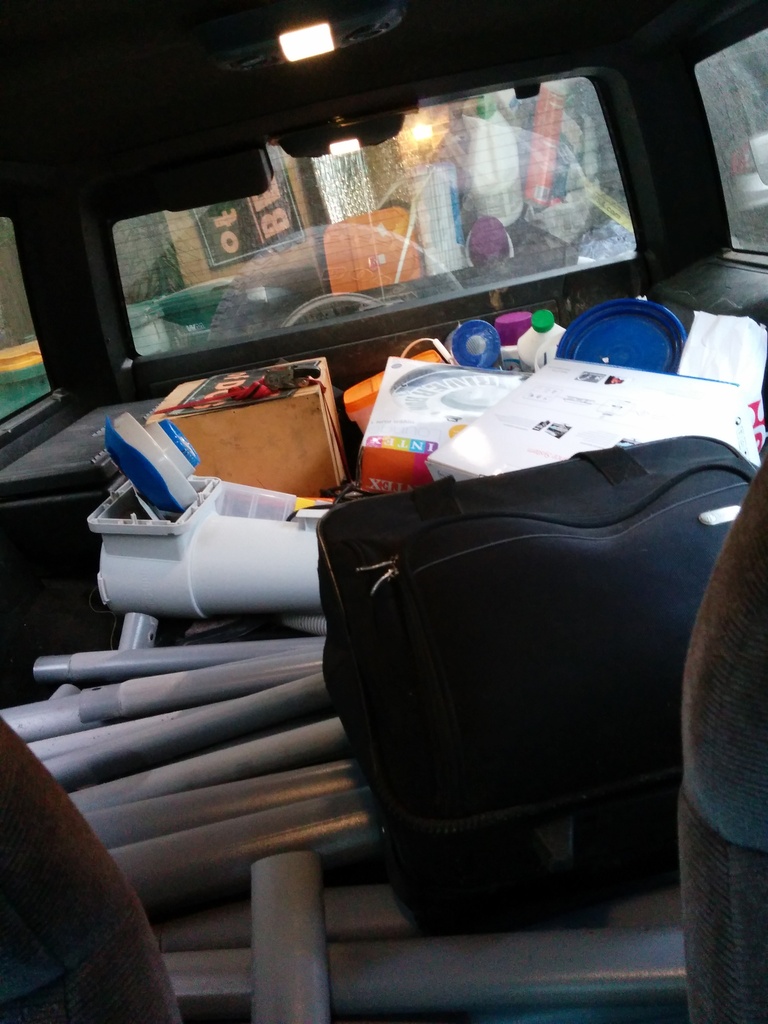
Confident from the Titanic voyage I drove another 60 miles 1 way with my trailer to pickup an above ground pool (and a grill) a customer gave me:

Noticed my LTFT are looking pretty high. Thinking (hoping) it's my FPR:

It got hot, so I started working on my ac. There are 2 ways I could have attacked this: 1: Run the stock wiring assy and just tap into the low/high/clutch electrical parts and be on my way. 2: use the stock burban electrical system so that the pcm knows wtf is going on and bypass the factory ac controls.
Well I think I can get the best of both worlds. I'm going to use my stock high/low/clutch harness but still feed the pcm intel on the condition of the ac. The way I understand it, the pcm needs to know that the ac is on to compensate for a few things: Higher idle, maintain engine speed without spikes in load, and some other such nonsense. (I'm hoping to someday disable the clutch if at for example 90% or higher throttle)
So far I have the clutch and low side pressure switch wired up. I have not connected the high side switch or the pcm output. I don't have any $$ for ac right now but I had a working ac system before the swap. I installed the 96 Jimmy's ac lines that go from the compressor to the condenser and to the accumulator. They are broken at the compressor mount so I just put some new seals on em and let it rip. The system wouldn't hold a vacuum, the compressor I had installed was leaking like mad out of the seals. I removed, poured out it's oil into the other compressor (I refuse to buy oil for a junkyard ac fix) and spiked it like a touchdown. I then apologized to the high side switch lurking in the rear and removed that for spare parts.
Once the compressor was swapped I put a vacuum back on the system and it was STILL LEAKING! Damnit so using a bottle of soapy water I pulled a vac then dropped half a can into the system. Found the leak on the low switch attached to the accumulator. Pulled it off, threw it across the yard. Replaced the seal and installed the suburbans low pressure switch. Put a vacuum and it held! Tossed in a can of 134 Dupont "for mobile applications" and wondered when the clutch would cycle.
The damn suburban switch was bad! I went and found the switch I threw into the yard, cleaned it back up and reinstalled it BAM no leaks!
I can't believe that this doesn't leak:
[img]https://i1382.photobucket.com/albums/ah258/uhlhazard/T15%20Jimmy%20v8%20swap/IMG_20150501_175827_zpso9njmb9c.jpg
[/img]
Cold ac!

Using my newfound ICE Cold ac I run up to a customers and knock out a few hours of work then drive up to firestone for an alignment about 2 miles out I noticed the tach rise about 300rpms from where it was. I thought "damnit, the trans broke". Drove like normal and when i exited at abot 20mph the engine was quite upset with misfiring.
Fired up the ol scanner to confirm my suspicions. #5 wire had died. My shielding attempts were in vein.
Bought a new ac delco wireset at oreilly tossed a longer wire on #5 to avoid routing near the manifold and shes back to running like a champ.

The v8 idles at 500-550rpm and thats taking its toll on my alternator. Definitely going back with dual alts when I can afford to! What might help though is if the ac is on the engine running at 650 instead of 500-550 would help tremendously as tested via manual throttle override.
The first 2 days were brutal. NO AIR CONDITIONING. When I went to have her inspected I still had no o2 sensors connected. Surprisingly with no egr and no o2 sensors plugged in, and timing off I passed the low speed test and failed 1 out of the 3 high speed tests.
Went home, stabbed in and wired up the o2 sensors. Attempted to simulate Bank 1 Sensor 1 with my widebands narrowband simulation but the pcm monitors both signal and ground of the o2 and refused to recognize the simulated input keeping both banks in open loop (for some strange reason bank 2 was affected)
Drove over to It's Muffler Time and spent another 50 bucks to have 2 more o2 bungs welded on bank 1 sensor 1. Turns out the wideband has to be at least 24 inches down stream instead of 2 inches before the manifold collector. So I installed bank 1 sensor 1 and wideband a few inches apart 30 inches downstream of the manifold in the only feasable place accomodating enough.
Got them wired up and sat in the driveway breathing 12.5-1 ratio until BAM 14.7! The engine sounded differently and settled down. Took her for a test drive, trans feels like a stock 99 suburban trans during 1/2 and 2/3 at both part throttle and WOT shifting.
I then went to Marks Automotive off of 242 in Conroe and he set my CKP retard from the 13* I guess stabbed it to 0*.
I noticed no difference in how the truck ran @ 0* CKP Retard however I'm sure it matters, 13* is a lot more rotation than I thought it would be.
The chickens wiped out a copperhead in the yard which was pretty awesome to find. Poor thing didn't stand a chance against 5 hens in half an acre of dirt and sand.
Made my way over to my buddies house for her true maiden voyage. 40 miles 1 way in traffic: He has one of the cleanest 2wd 94's I've ever seen.
Confident from the Titanic voyage I drove another 60 miles 1 way with my trailer to pickup an above ground pool (and a grill) a customer gave me:
Noticed my LTFT are looking pretty high. Thinking (hoping) it's my FPR:
It got hot, so I started working on my ac. There are 2 ways I could have attacked this: 1: Run the stock wiring assy and just tap into the low/high/clutch electrical parts and be on my way. 2: use the stock burban electrical system so that the pcm knows wtf is going on and bypass the factory ac controls.
Well I think I can get the best of both worlds. I'm going to use my stock high/low/clutch harness but still feed the pcm intel on the condition of the ac. The way I understand it, the pcm needs to know that the ac is on to compensate for a few things: Higher idle, maintain engine speed without spikes in load, and some other such nonsense. (I'm hoping to someday disable the clutch if at for example 90% or higher throttle)
So far I have the clutch and low side pressure switch wired up. I have not connected the high side switch or the pcm output. I don't have any $$ for ac right now but I had a working ac system before the swap. I installed the 96 Jimmy's ac lines that go from the compressor to the condenser and to the accumulator. They are broken at the compressor mount so I just put some new seals on em and let it rip. The system wouldn't hold a vacuum, the compressor I had installed was leaking like mad out of the seals. I removed, poured out it's oil into the other compressor (I refuse to buy oil for a junkyard ac fix) and spiked it like a touchdown. I then apologized to the high side switch lurking in the rear and removed that for spare parts.
Once the compressor was swapped I put a vacuum back on the system and it was STILL LEAKING! Damnit so using a bottle of soapy water I pulled a vac then dropped half a can into the system. Found the leak on the low switch attached to the accumulator. Pulled it off, threw it across the yard. Replaced the seal and installed the suburbans low pressure switch. Put a vacuum and it held! Tossed in a can of 134 Dupont "for mobile applications" and wondered when the clutch would cycle.
The damn suburban switch was bad! I went and found the switch I threw into the yard, cleaned it back up and reinstalled it BAM no leaks!
I can't believe that this doesn't leak:
[img]https://i1382.photobucket.com/albums/ah258/uhlhazard/T15%20Jimmy%20v8%20swap/IMG_20150501_175827_zpso9njmb9c.jpg
[/img]
Cold ac!
Using my newfound ICE Cold ac I run up to a customers and knock out a few hours of work then drive up to firestone for an alignment about 2 miles out I noticed the tach rise about 300rpms from where it was. I thought "damnit, the trans broke". Drove like normal and when i exited at abot 20mph the engine was quite upset with misfiring.
Fired up the ol scanner to confirm my suspicions. #5 wire had died. My shielding attempts were in vein.
Bought a new ac delco wireset at oreilly tossed a longer wire on #5 to avoid routing near the manifold and shes back to running like a champ.
The v8 idles at 500-550rpm and thats taking its toll on my alternator. Definitely going back with dual alts when I can afford to! What might help though is if the ac is on the engine running at 650 instead of 500-550 would help tremendously as tested via manual throttle override.
Thread Starter
|
New Member
Joined: Dec 2009
Posts: 91
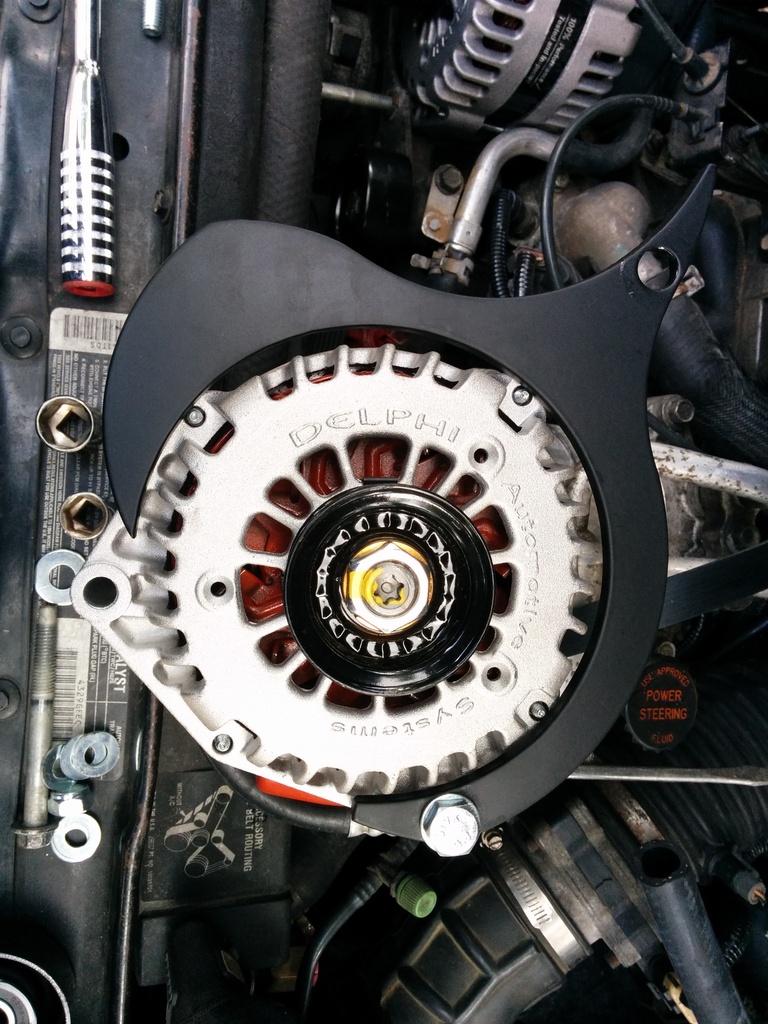
Ordered the dual alternator kit on ebay:
GM 5 7L Dual Alternator Bracket 1996 2000 | eBay
Ordered a 2nd advance auto 145A alternator to match my first one that I warranted out a few days ago.
Blew out my metering rod seal on my combo valve across town today and limped home with engine braking and gm disk rear parking brake setup (nearly completely worthless) Had it replaced with a spare I have on hand in about 15 minutes.
Efan controllers are working alright. I need to run some more wiring so the 2nd controller can read it's own dedicated temp sender for now it's just ac only.
Looks like my passenger cv shaft is leaking at the boot. 273K miles isn't bad. Have some clunking noise when braking softly, thinking balljoints but they are both new.
Thread Starter
|
New Member
Joined: Dec 2009
Posts: 91
Completed pics first:
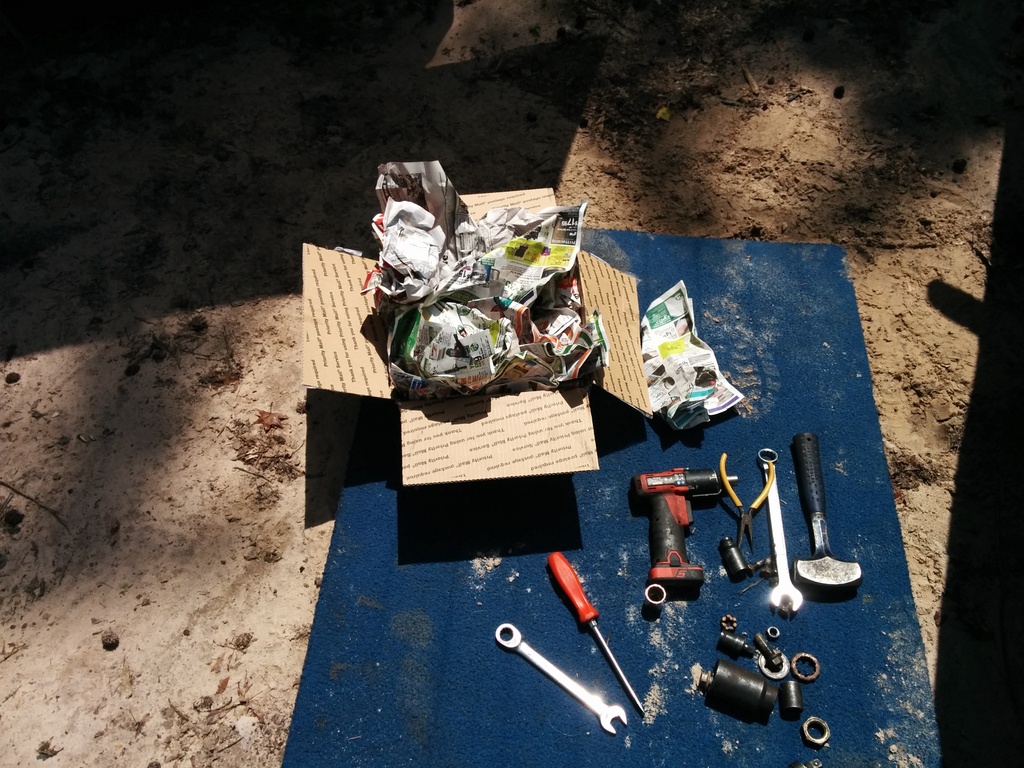
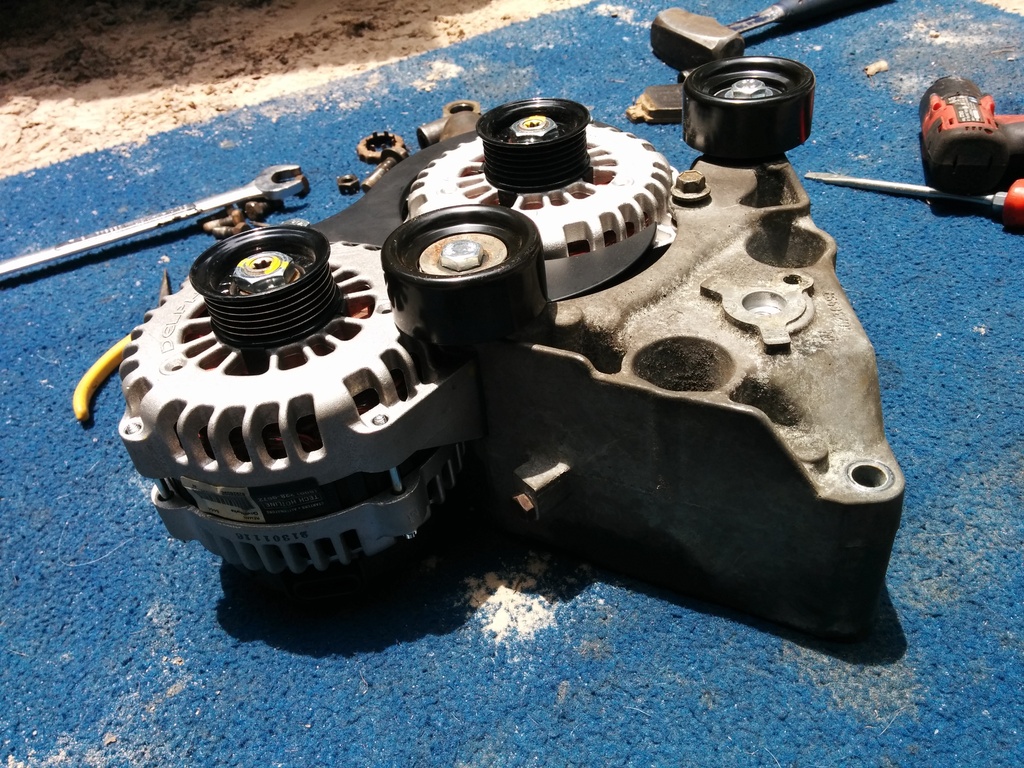
Got my dual alternator kit in from a guy named zukaujam000 for $235 shipped.
GM 5 7L Dual Alternator Bracket 1996 2000 | eBay
The kit is about as minimal as it gets. Zero instructions, and just haphazardly thrown into a box:
I ordered the 2nd alternator and kit the same day. When the alternator arrived I messaged the seller for tracking to which he did not respond. 2 days later he shipped it. After some careful observation I was able to comprehend how the bracket locates the auxiliary alternator.
So basically you get 2 steel idler pulleys (china bearings). A quality gates belt at the correct length. The bracket which is said to be powder-coated, (if so it was done poorly as I chipped it in a few spots locating the bracket with light pressure), and some quality gates heater hose.


One pulley has a short bolt that you replace your stock idler with. I removed the dust shield from my old pully and installed it onto the new one, probably hard for someone to source those fancy washers but I feel the extra touch is worth charging more $ for to get a complete quality build. Pictured, the kits washer on the left, my old washer in the middle.

The second pulley has a long bolt, it replaces your left hand stock alternator mounting bolt. The stock alternator pivots left on the stock mount until it's sideways. The other alternator bolts on it's left mount on the right hand side of the bracket. Now both alternators have one bolt into the vehicles mounting bracket. Then the bracket that holds the 2 together goes on.
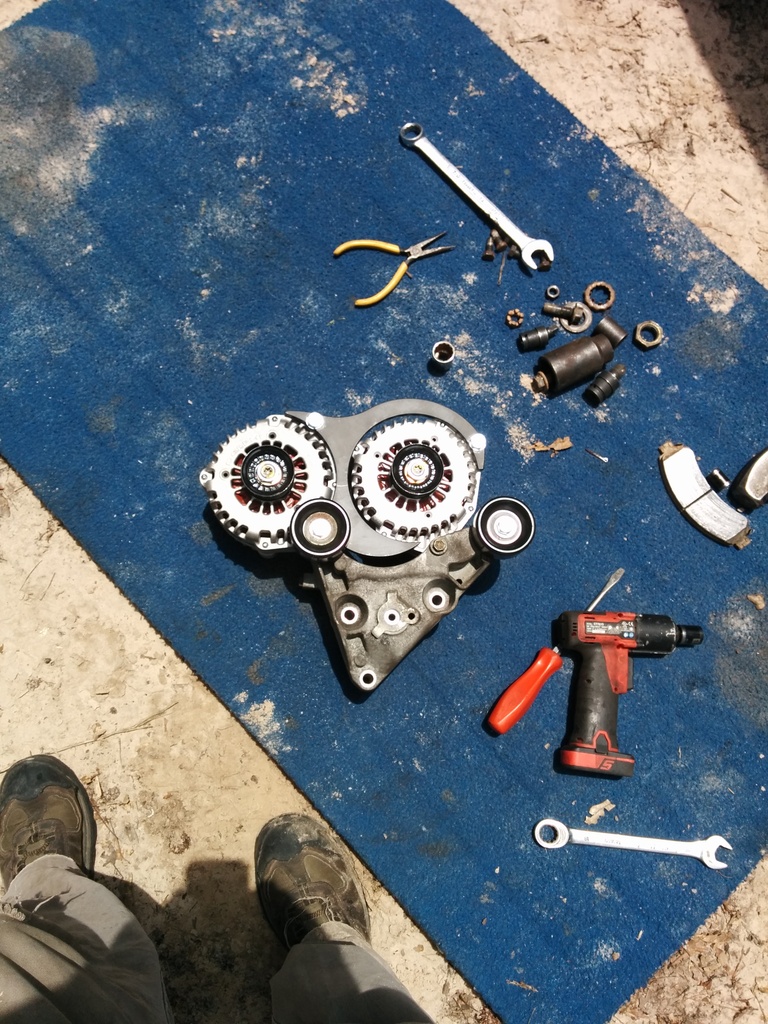
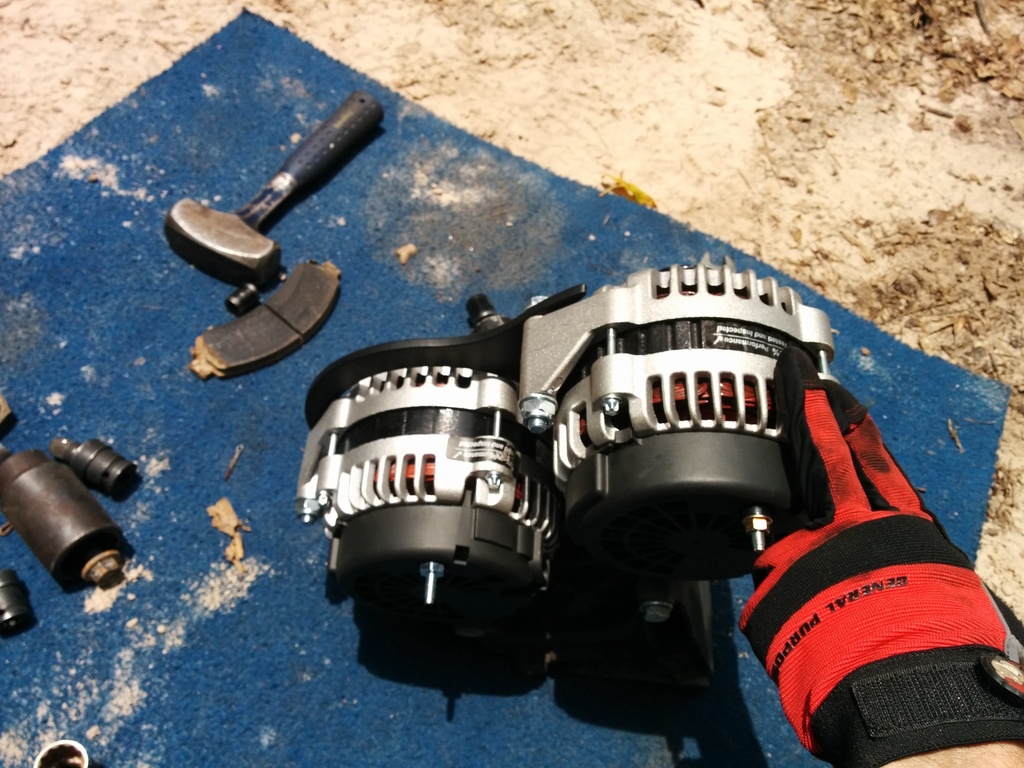
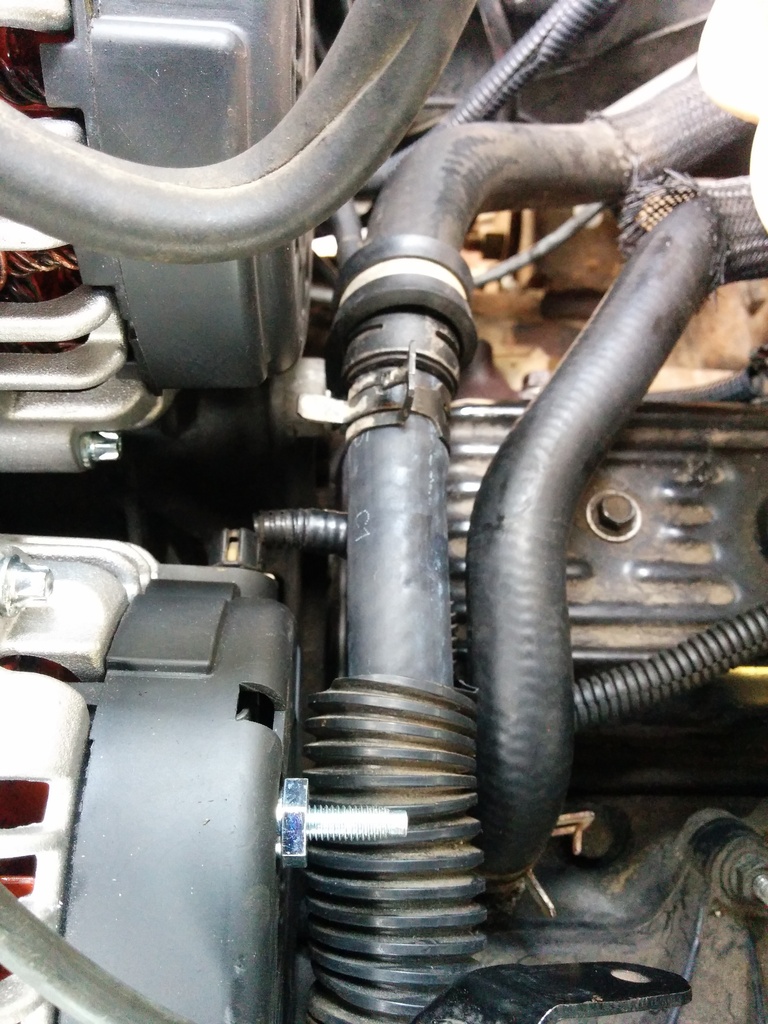
Because I have a v8 in an s-series engine bay I have to build the entire assembly on my "hoofed animal mat" (My buddy got it for me when he worked at the zoo. It's like 2 inch thick rubber and rolls up.) Stuffs awesome.
This picture shows how you must align the tips of the alternator case bolts against the edges of the bracket. This keeps the alternators from twisting left or right.
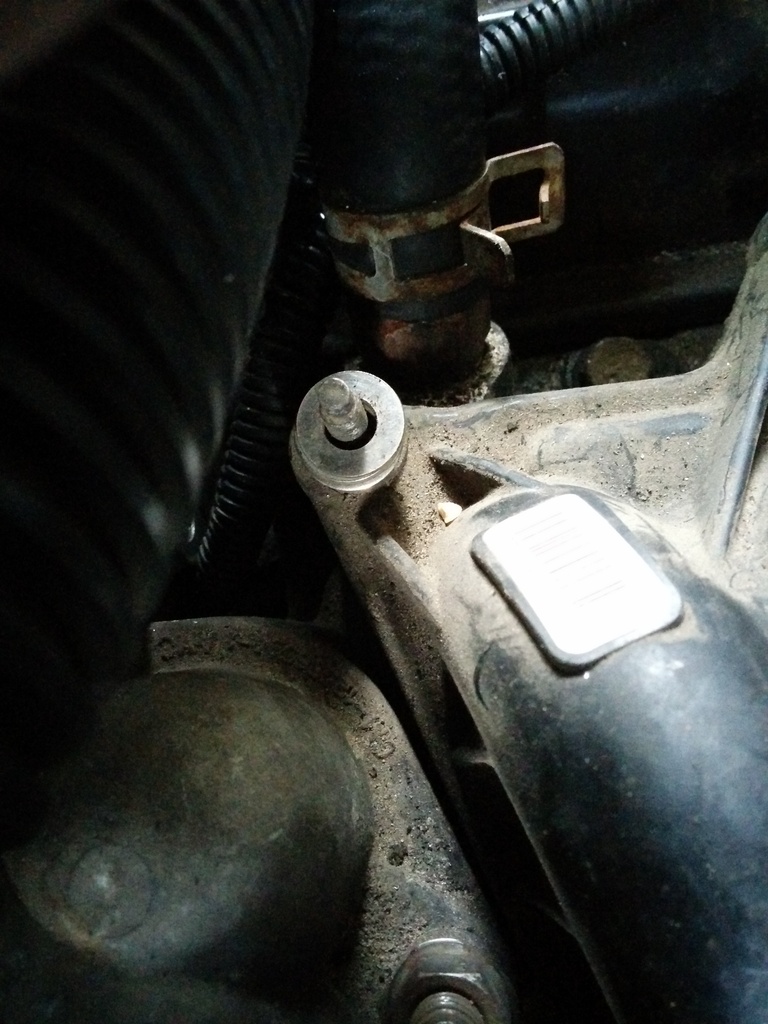
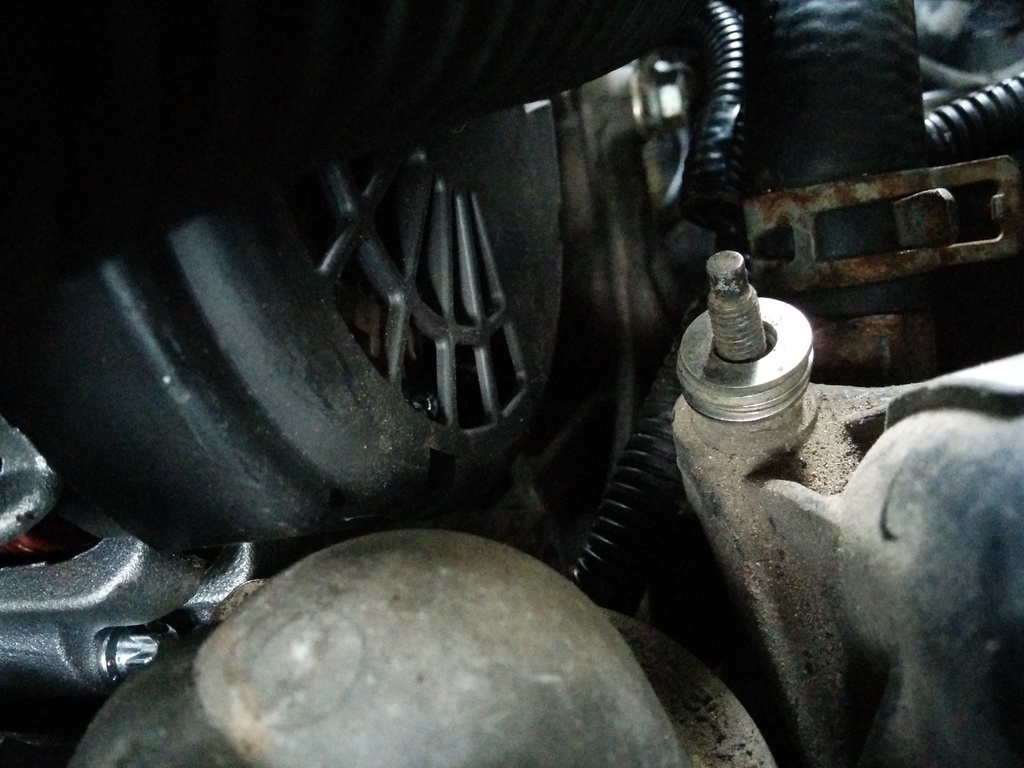
Some shots from different angles to understand clearances:

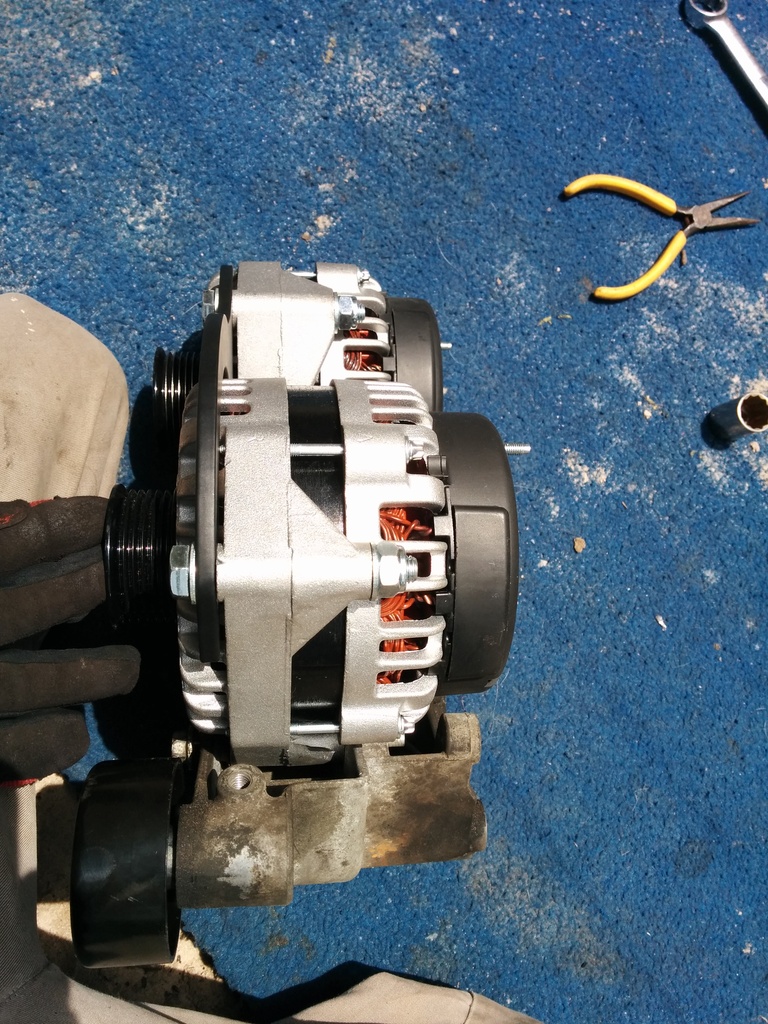
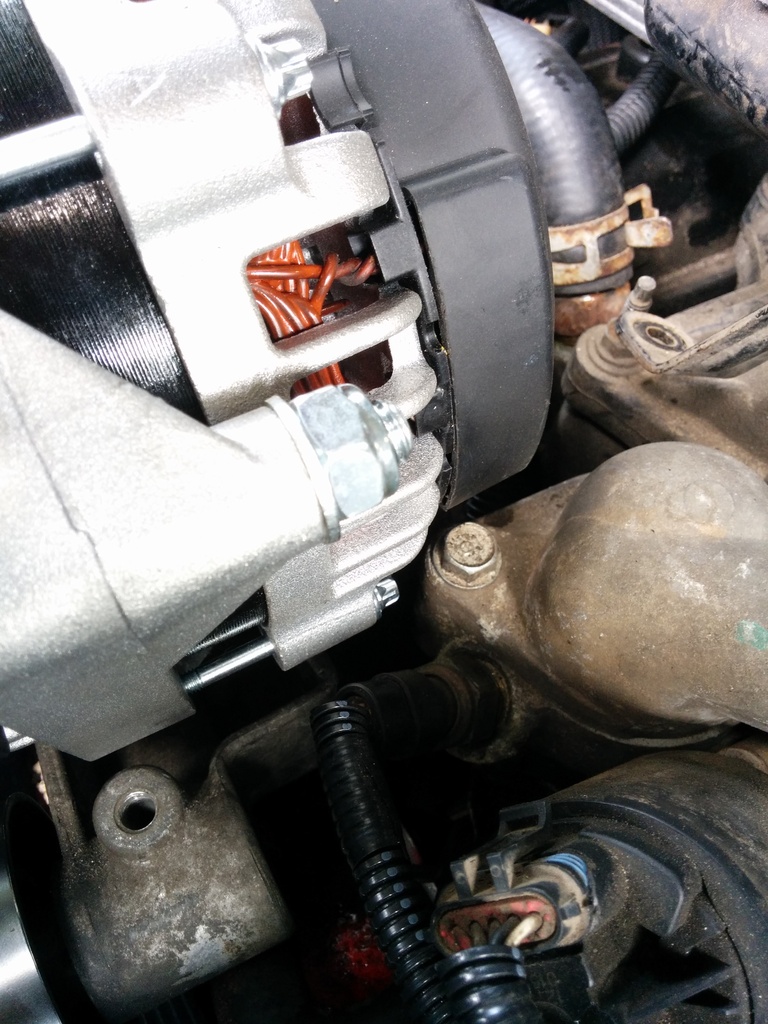
The kit comes with heater hose because you MUST remove your heater hose hardline from the vehicle. There is simply no clearance anymore with the alternator pivoted up. It will need to be pulled to remove the left hand thermostat housing bolt which sucks.

Lots of hose persuasion to clear everything:

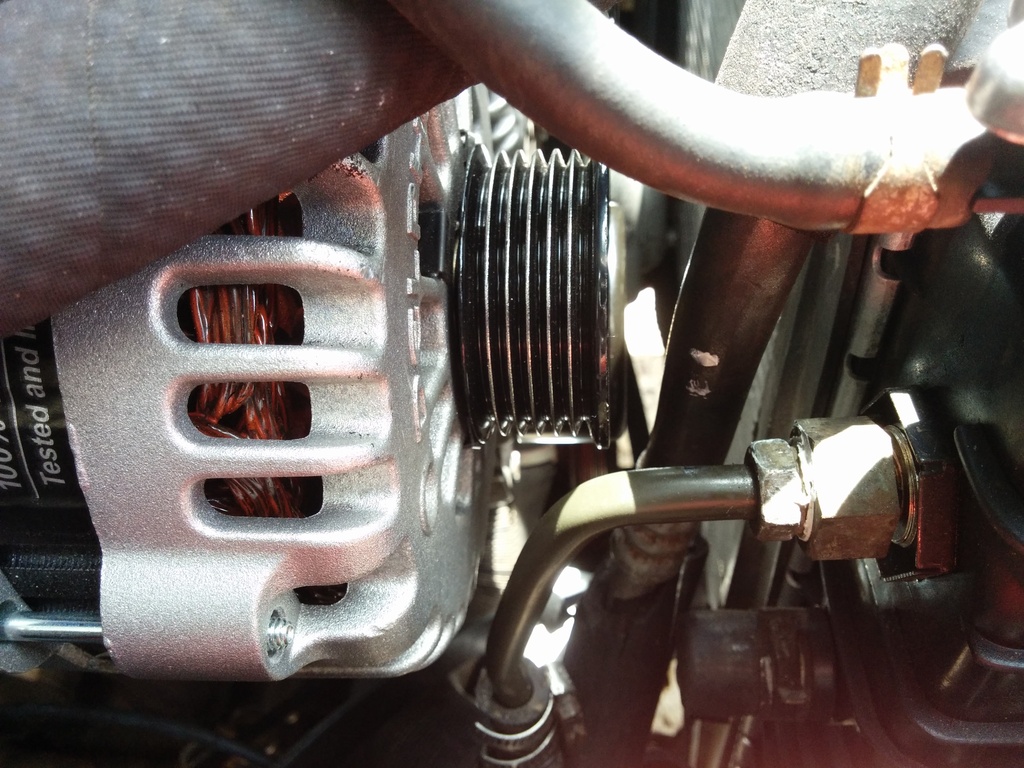
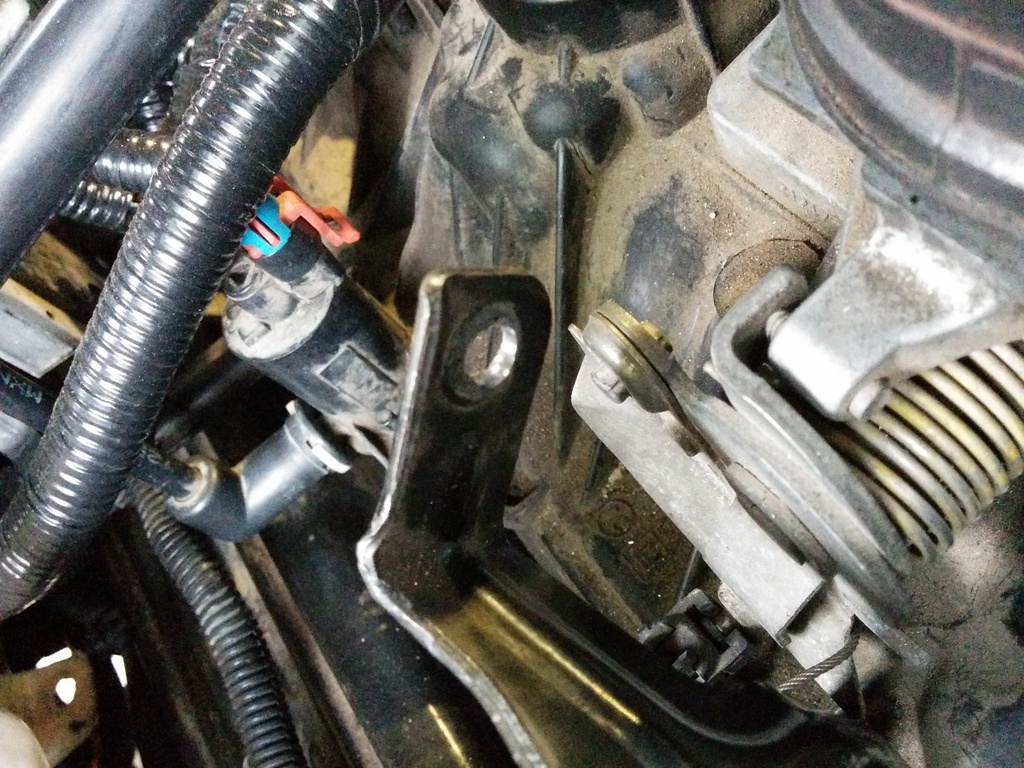
Used a clamp to securely locate the heater hose to the alternator bracket on the backside. I also used some old electrical loom and fed the hose between the throttle bracket and alternator. Ideally I'd use some of the nylon mesh but I'm fresh out.
http://i1382.photobucket.com/albums/...ps6d1vcz9f.jpg
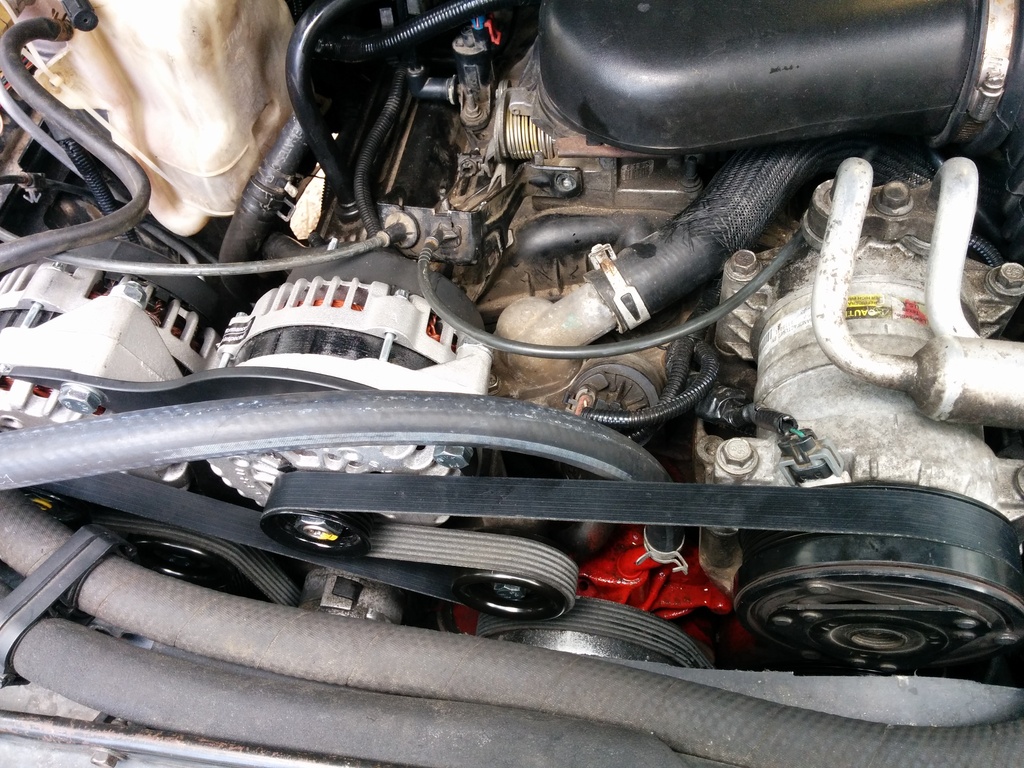
Once everythings bolted up I noticed that the cruise control cable interferes with the alternator. I used 4 stainless 1mm ish thick washers to raise the bracket up, then use a rat tail file and file down and to the left the throttle body bolt hole 3-5mm.

I had to scoot my battery over to the farthest to the left. This will probably only be an issue for the 3 of you with a v8 in an s series and want 2+ alternators.
It's a snug fit. I did some power braking and the alts don't seem to bother with anything clearance wise. So there ya have it!
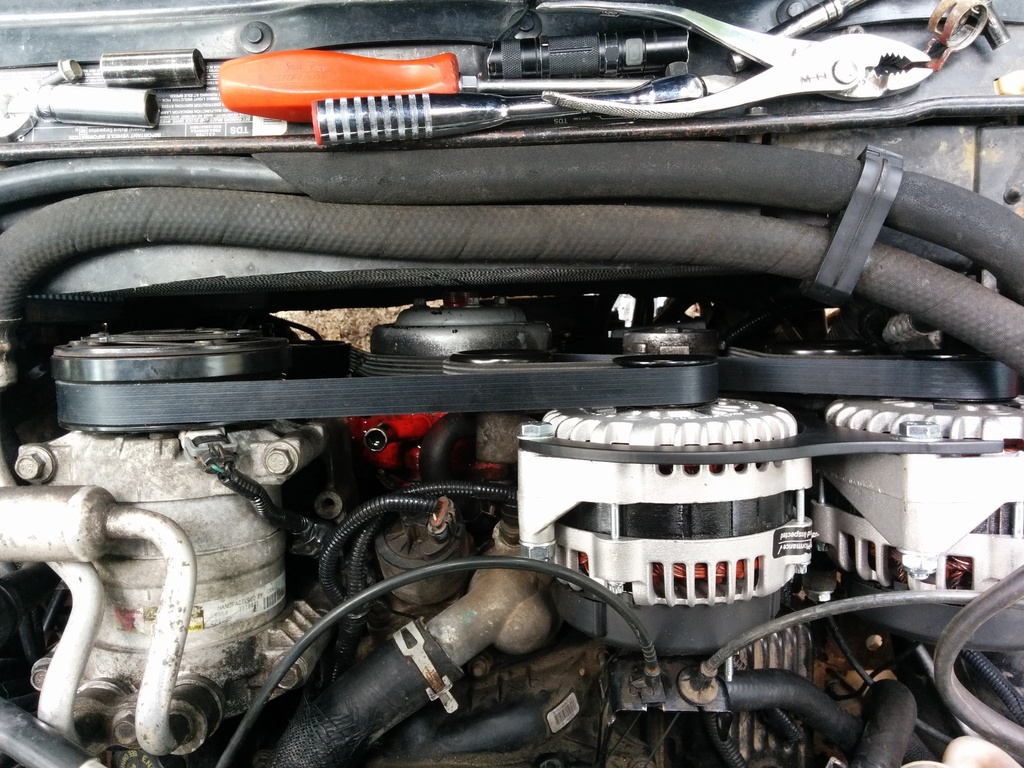
As far as the electrical side of things. I'm just going to tap the single wire from the primary alternator into another plug. That should energize the auxiliary alt however this creates a single point of failure. I'll eventually wire up individual controls for both alternators and remote voltage wires. For now, K.I.S.S.
I'm replacing my passenger CV shaft today. Not fun. Spindles off, brake caliper fell twice, pretty sure I've ruined my brake hose on that side. The rain is kicking my ***. Got one of the donors cv shafts bolted onto the diff flange, just waiting on the rain to quit.
Also the rough country 2.5" lift upper ball joints are total ****. The way the control arm is designed, the rubber sleeve doesn't seal up against the joint. I know I'll be replacing them soon.
Got my dual alternator kit in from a guy named zukaujam000 for $235 shipped.
GM 5 7L Dual Alternator Bracket 1996 2000 | eBay
The kit is about as minimal as it gets. Zero instructions, and just haphazardly thrown into a box:
I ordered the 2nd alternator and kit the same day. When the alternator arrived I messaged the seller for tracking to which he did not respond. 2 days later he shipped it. After some careful observation I was able to comprehend how the bracket locates the auxiliary alternator.
So basically you get 2 steel idler pulleys (china bearings). A quality gates belt at the correct length. The bracket which is said to be powder-coated, (if so it was done poorly as I chipped it in a few spots locating the bracket with light pressure), and some quality gates heater hose.
One pulley has a short bolt that you replace your stock idler with. I removed the dust shield from my old pully and installed it onto the new one, probably hard for someone to source those fancy washers but I feel the extra touch is worth charging more $ for to get a complete quality build. Pictured, the kits washer on the left, my old washer in the middle.
The second pulley has a long bolt, it replaces your left hand stock alternator mounting bolt. The stock alternator pivots left on the stock mount until it's sideways. The other alternator bolts on it's left mount on the right hand side of the bracket. Now both alternators have one bolt into the vehicles mounting bracket. Then the bracket that holds the 2 together goes on.
Because I have a v8 in an s-series engine bay I have to build the entire assembly on my "hoofed animal mat" (My buddy got it for me when he worked at the zoo. It's like 2 inch thick rubber and rolls up.) Stuffs awesome.
This picture shows how you must align the tips of the alternator case bolts against the edges of the bracket. This keeps the alternators from twisting left or right.
Some shots from different angles to understand clearances:
The kit comes with heater hose because you MUST remove your heater hose hardline from the vehicle. There is simply no clearance anymore with the alternator pivoted up. It will need to be pulled to remove the left hand thermostat housing bolt which sucks.
they don't think it be like it is, but it do
Lots of hose persuasion to clear everything:
Used a clamp to securely locate the heater hose to the alternator bracket on the backside. I also used some old electrical loom and fed the hose between the throttle bracket and alternator. Ideally I'd use some of the nylon mesh but I'm fresh out.
http://i1382.photobucket.com/albums/...ps6d1vcz9f.jpg
Once everythings bolted up I noticed that the cruise control cable interferes with the alternator. I used 4 stainless 1mm ish thick washers to raise the bracket up, then use a rat tail file and file down and to the left the throttle body bolt hole 3-5mm.
I had to scoot my battery over to the farthest to the left. This will probably only be an issue for the 3 of you with a v8 in an s series and want 2+ alternators.
It's a snug fit. I did some power braking and the alts don't seem to bother with anything clearance wise. So there ya have it!
As far as the electrical side of things. I'm just going to tap the single wire from the primary alternator into another plug. That should energize the auxiliary alt however this creates a single point of failure. I'll eventually wire up individual controls for both alternators and remote voltage wires. For now, K.I.S.S.
I'm replacing my passenger CV shaft today. Not fun. Spindles off, brake caliper fell twice, pretty sure I've ruined my brake hose on that side. The rain is kicking my ***. Got one of the donors cv shafts bolted onto the diff flange, just waiting on the rain to quit.
Also the rough country 2.5" lift upper ball joints are total ****. The way the control arm is designed, the rubber sleeve doesn't seal up against the joint. I know I'll be replacing them soon.

Thread
Thread Starter
Forum
Replies
Last Post
Smitty Smithsonite
General Chat
37
Apr 5, 2014 10:14 AM
pacojimenez
Engine & Transmission
0
Jul 28, 2011 05:07 PM