
Air temperature oscillating from blower...


First try "temp+door+actuator+removal" second thread in the search results...:
How to: R2 a Blend Door Actuator (Alternate Method)
I haven't had the time to move a copy into the How-To Article section.

How to: R2 a Blend Door Actuator (Alternate Method)
I haven't had the time to move a copy into the How-To Article section.
Thread Starter
|
Starting Member
Joined: Mar 2010
Posts: 113

After diggin' so deep  that I heard people talking Chinese, I found this:
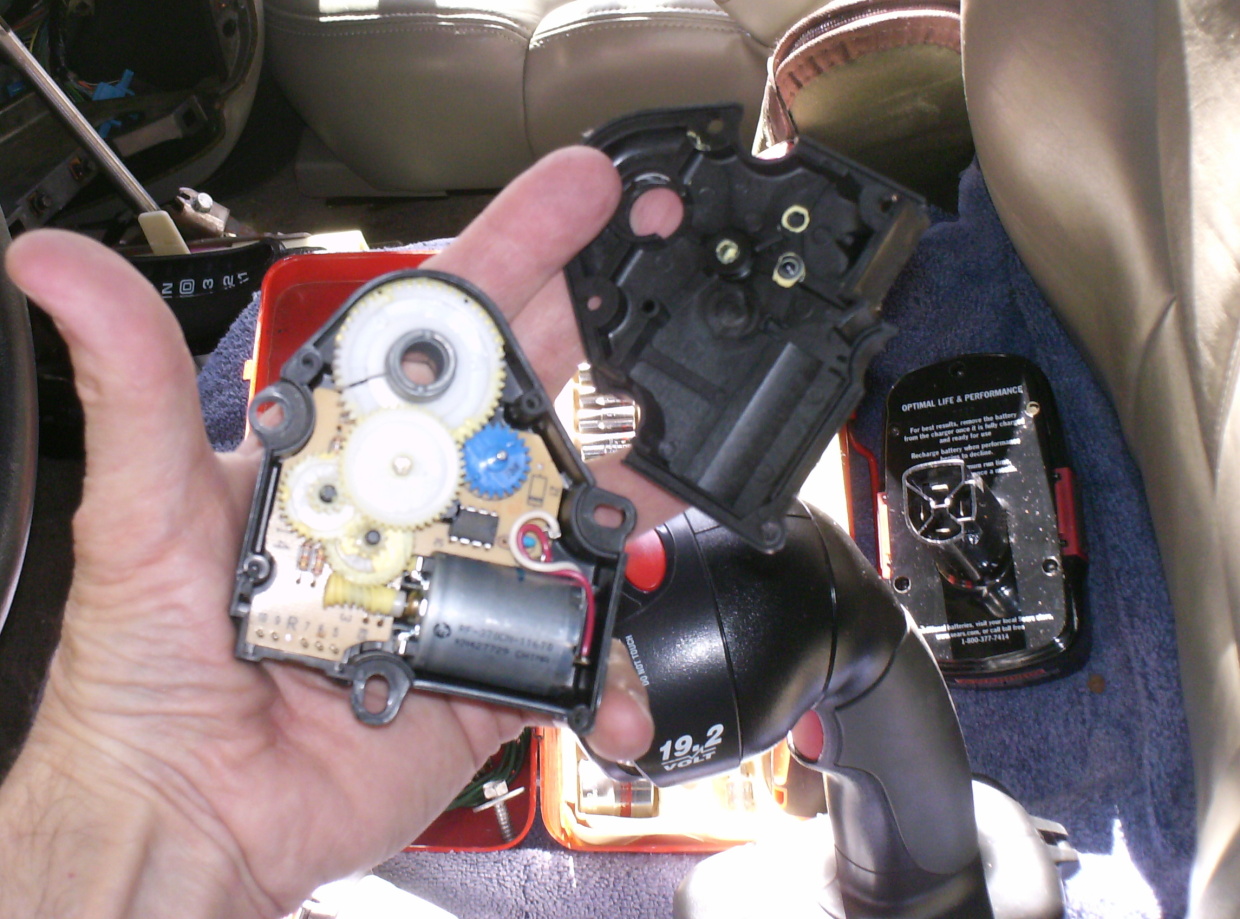
Then off to Advance / Zone, and after uploading $167.xx ouch yikes, I came home with the new one. But before plug n pray put in the new one, I'm scopin' the old one here...
  , let's see what we can do with the old one.
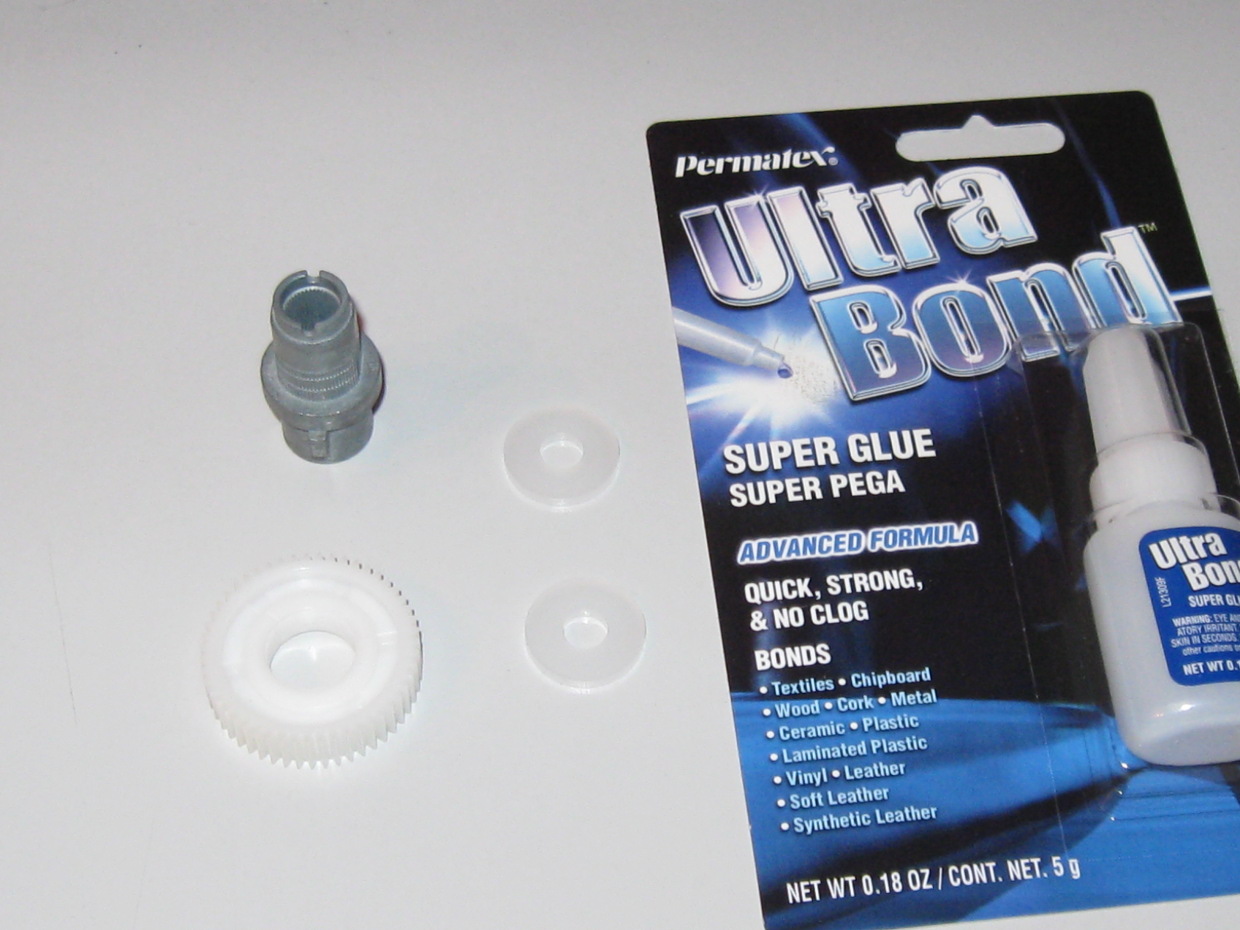
So I went fishin' into the jars of nuts and bolts, and found a couple of nylon washers. They need drilling, to match the size of the shaft.
Then, it looks MAYBE like the big gear does not actually do a 360, like the smaller gears do. Looks like less than half a turn more like. So, pull the gear, CLEAN it, and the shaft well, and spin it 180' on the shaft. Then the cracked spot is away from meshing with the other gear.
Then, give the gear re-inforcement, with a nylon washer on each side, and superglue each one.
Allow to dry, re-install, and take a deep breath...
Post back on it tomorrow here.
Then off to Advance / Zone, and after uploading $167.xx ouch
So I went fishin' into the jars of nuts and bolts, and found a couple of nylon washers. They need drilling, to match the size of the shaft.
Then, it looks MAYBE like the big gear does not actually do a 360, like the smaller gears do. Looks like less than half a turn more like. So, pull the gear, CLEAN it, and the shaft well, and spin it 180' on the shaft. Then the cracked spot is away from meshing with the other gear.
Then, give the gear re-inforcement, with a nylon washer on each side, and superglue each one.
Allow to dry, re-install, and take a deep breath...
Post back on it tomorrow here.
Last edited by Schrade; Feb 19, 2011 at 07:22 PM. Reason: smaller pic
Thread Starter
|
Starting Member
Joined: Mar 2010
Posts: 113
Ok - we let the shaft/gear/nylon washer assembly sit overnight superglue/washer 'fix' (this isn't a daily driver, so we have time to work it here).
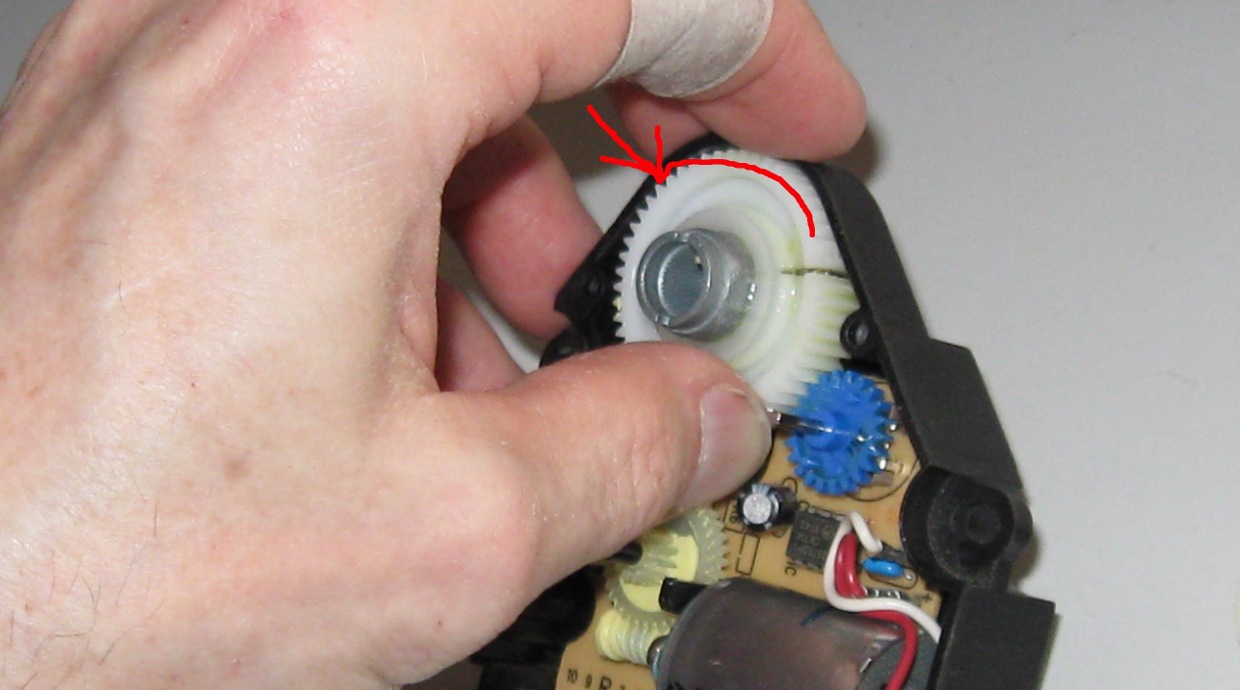
The cracked spot in the gear is still 'open' with the fix. To try to close the gap, and fix it that way would have been futile, because even with the crack 'opened', it fits tightly on the shaft. It would break open as soon as I tried to re-install the gear on the shaft (or break in another spot - WORSE). Gear slippage is not the problem anyway, I don't believe; rather the other gear hitting the 'open' spot in the cogs.
So since the cracked gear does not move 360', but less than 180', the 'fix' MIGHT work by spinning the gear halfway around on the shaft. For $167, you bet there's some room for ghetto-engineering .
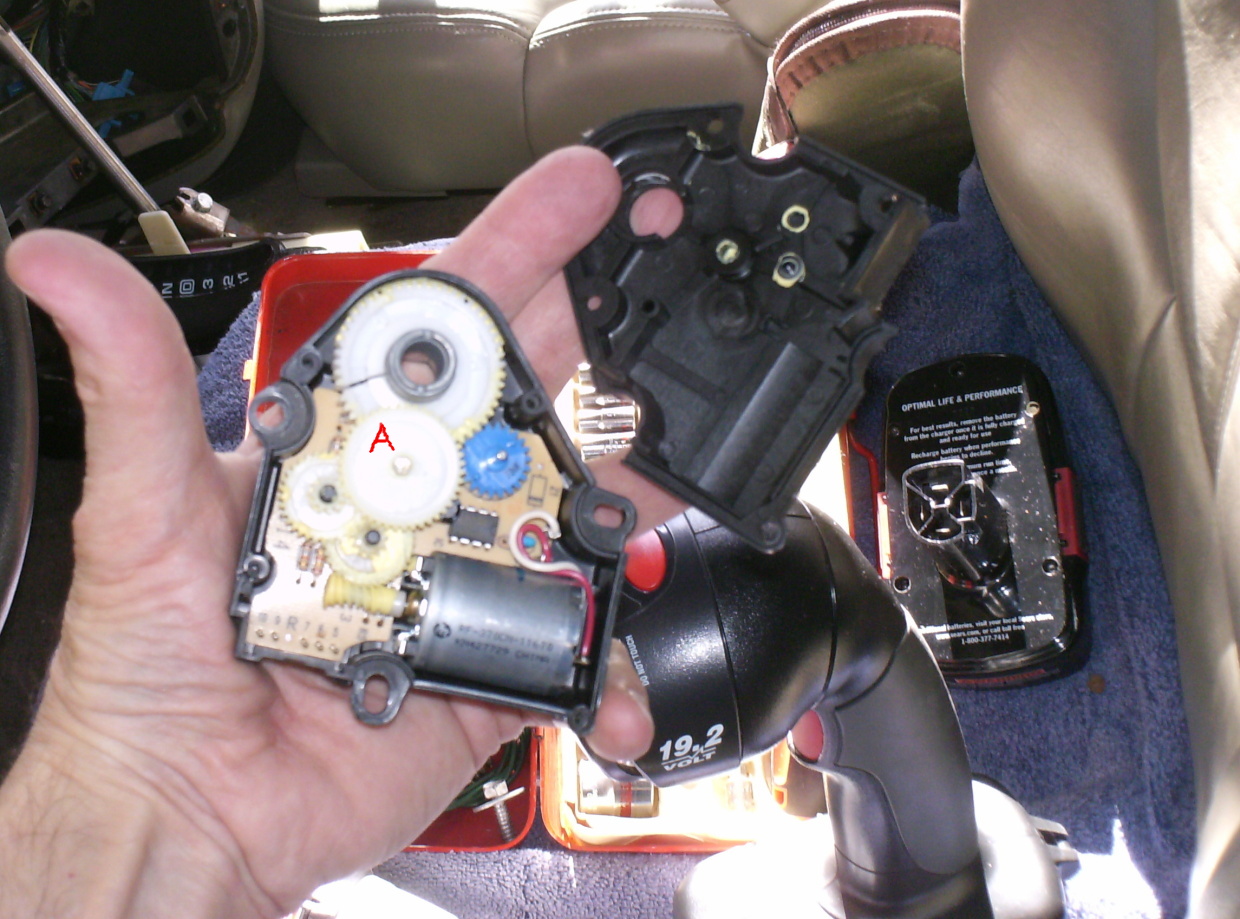
After installing the gears, make sure that the cracked spot does not rotate to mesh with the other smaller gear (the BLUE gear). To do this, leave out the gear noted in the pic as 'A' gear. This is the 'BEFORE' pic - that's why the crack appears in the same spot).
Then rotate the shaft, and note position. Depending on where the crack is on your gear, moving the gear less or more than180' on the shaft will be proper). In my case, the crack's position AFTER movement ended just before contact with the blue gear, from about 11:00 position, to about 3:30 position. Note that this is the actual range of the shaft, and of the duct door in the temperature control function.
The thickness of the washers appears to matter only SLIGHTLY to closing the case - maybe 3/32" - 1/16". For test purposes, I did not completely screw down the cover, to make sure there was no binding.
So to dry fit/test the fix, I installed all the components, withOUT the dash in place. All connectors connected to their respective components, no leads crossed, etc. I re-connected the battery, turned the key 'ON', but no power to the A/C control unit, or to the radio. I did not test the 4WD controller module, or the rear hatch module, or others.
I'm thinking that there is one or more (-) grounds that are integral with hardware mounting. A few harness leads were not connected as well - courtesy lights, door switches... I'll have to re-connect them also, to test the fix. Everything else was connected, but still, power distribution was not complete.
Anybody with ideas on the grounds here???
The cracked spot in the gear is still 'open' with the fix. To try to close the gap, and fix it that way would have been futile, because even with the crack 'opened', it fits tightly on the shaft. It would break open as soon as I tried to re-install the gear on the shaft (or break in another spot - WORSE). Gear slippage is not the problem anyway, I don't believe; rather the other gear hitting the 'open' spot in the cogs.
So since the cracked gear does not move 360', but less than 180', the 'fix' MIGHT work by spinning the gear halfway around on the shaft. For $167, you bet there's some room for ghetto-engineering
After installing the gears, make sure that the cracked spot does not rotate to mesh with the other smaller gear (the BLUE gear). To do this, leave out the gear noted in the pic as 'A' gear. This is the 'BEFORE' pic - that's why the crack appears in the same spot).
Then rotate the shaft, and note position. Depending on where the crack is on your gear, moving the gear less or more than180' on the shaft will be proper). In my case, the crack's position AFTER movement ended just before contact with the blue gear, from about 11:00 position, to about 3:30 position. Note that this is the actual range of the shaft, and of the duct door in the temperature control function.
The thickness of the washers appears to matter only SLIGHTLY to closing the case - maybe 3/32" - 1/16". For test purposes, I did not completely screw down the cover, to make sure there was no binding.
So to dry fit/test the fix, I installed all the components, withOUT the dash in place. All connectors connected to their respective components, no leads crossed, etc. I re-connected the battery, turned the key 'ON', but no power to the A/C control unit, or to the radio. I did not test the 4WD controller module, or the rear hatch module, or others.
I'm thinking that there is one or more (-) grounds that are integral with hardware mounting. A few harness leads were not connected as well - courtesy lights, door switches... I'll have to re-connect them also, to test the fix. Everything else was connected, but still, power distribution was not complete.
Anybody with ideas on the grounds here???
Last edited by Schrade; Feb 20, 2011 at 06:22 PM.
Thread Starter
|
Starting Member
Joined: Mar 2010
Posts: 113
Ok - we let the shaft/gear/nylon washer assembly sit overnight superglue/washer 'fix' (this isn't a daily driver, so we have time to work it here).
The cracked spot in the gear is still 'open' with the fix. To try to close the gap, and fix it that way would have been futile, because even with the crack 'opened', it fits tightly on the shaft. It would break open as soon as I tried to re-install the gear on the shaft (or break in another spot - WORSE). Gear slippage is not the problem anyway, I don't believe; rather the other gear hitting the 'open' spot in the cogs.
So since the cracked gear does not move 360', but less than 180', the 'fix' MIGHT work by spinning the gear halfway around on the shaft. For $167, you bet there's some room for ghetto-engineering .
After installing the gears, make sure that the cracked spot does not rotate to mesh with the other smaller gear (the BLUE gear). To do this, leave out the gear noted in the pic as 'A' gear. This is the 'BEFORE' pic - that's why the crack appears in the same spot).
img.jpg
Then rotate the shaft, and note position. Depending on where the crack is on your gear, moving the gear less or more than180' on the shaft will be proper). In my case, the crack's position AFTER movement ended just before contact with the blue gear, from about 11:00 position, to about 3:30 position. Note that this is the actual range of the shaft, and of the duct door in the temperature control function.
The thickness of the washers appears to matter only SLIGHTLY to closing the case - maybe 3/32" - 1/16". For test purposes, I did not completely screw down the cover, to make sure there was no binding.
So to dry fit/test the fix, I installed all the components, withOUT the dash in place. All connectors connected to their respective components, no leads crossed, etc. I re-connected the battery, turned the key 'ON', but no power to the A/C control unit, or to the radio. I did not test the 4WD controller module, or the rear hatch module, or others.
I'm thinking that there is one or more (-) grounds that are integral with hardware mounting. A few harness leads were not connected as well - courtesy lights, door switches... I'll have to re-connect them also, to test the fix. Everything else was connected, but still, power distribution was not complete.
Anybody with ideas on the grounds here???
The cracked spot in the gear is still 'open' with the fix. To try to close the gap, and fix it that way would have been futile, because even with the crack 'opened', it fits tightly on the shaft. It would break open as soon as I tried to re-install the gear on the shaft (or break in another spot - WORSE). Gear slippage is not the problem anyway, I don't believe; rather the other gear hitting the 'open' spot in the cogs.
So since the cracked gear does not move 360', but less than 180', the 'fix' MIGHT work by spinning the gear halfway around on the shaft. For $167, you bet there's some room for ghetto-engineering
After installing the gears, make sure that the cracked spot does not rotate to mesh with the other smaller gear (the BLUE gear). To do this, leave out the gear noted in the pic as 'A' gear. This is the 'BEFORE' pic - that's why the crack appears in the same spot).
img.jpg
Then rotate the shaft, and note position. Depending on where the crack is on your gear, moving the gear less or more than180' on the shaft will be proper). In my case, the crack's position AFTER movement ended just before contact with the blue gear, from about 11:00 position, to about 3:30 position. Note that this is the actual range of the shaft, and of the duct door in the temperature control function.
The thickness of the washers appears to matter only SLIGHTLY to closing the case - maybe 3/32" - 1/16". For test purposes, I did not completely screw down the cover, to make sure there was no binding.
So to dry fit/test the fix, I installed all the components, withOUT the dash in place. All connectors connected to their respective components, no leads crossed, etc. I re-connected the battery, turned the key 'ON', but no power to the A/C control unit, or to the radio. I did not test the 4WD controller module, or the rear hatch module, or others.
I'm thinking that there is one or more (-) grounds that are integral with hardware mounting. A few harness leads were not connected as well - courtesy lights, door switches... I'll have to re-connect them also, to test the fix. Everything else was connected, but still, power distribution was not complete.
Anybody with ideas on the grounds here???
So I re-connected the battery, turned the key, and it came on. AND IT WORKS!!!
IT WORKS!!!
It's only a dry fit, with the dash COMPLETELY out. Re-assembly will be a chore, but since it's out, I can take pics and make it a write-up, along with pics of the gear fix itself.
Thread Starter
|
Starting Member
Joined: Mar 2010
Posts: 113
Well, you know what they say - if it ain't broke, don't 'fix' it (unless you're government - then the saying is, "Fix it 'til it's broke"  ).
).
Anyway, I took the top of the case off, to take a vid of the gears doing their thing, to post up a How-To on YouBoob .
Not a good idea, to run it with the case open . It kept goin' when it did the calibrate, till it hit the gap - then it stopped. I killed the power, and unplugged it, no problems WHEW!
So I'm cleaning old grease out, to do final install, with new grease, and I'm thinking Dremel the nylon washers to allow the case to close completely (I had left it open a little for the first test, so it wouldn't bind - the washers are just a TAD wide). This way, I could completely close the case on final install.
I decided to carve a little off of the gear at the gap, just in case it went there ever again. Bad idea. Now it DOES go there, and that messes up the calibration at startup.
The reason it DOES (and this is IMPORTANT), is because I did not initially put the gear in the right position once fixed. I thought that 180' would be right regardless of the position of the break, but not so...
To determine the correct position of the re-installed FIXED gear:
1) Rotate the shaft until the stop-block is in the middle of its' range pic 1
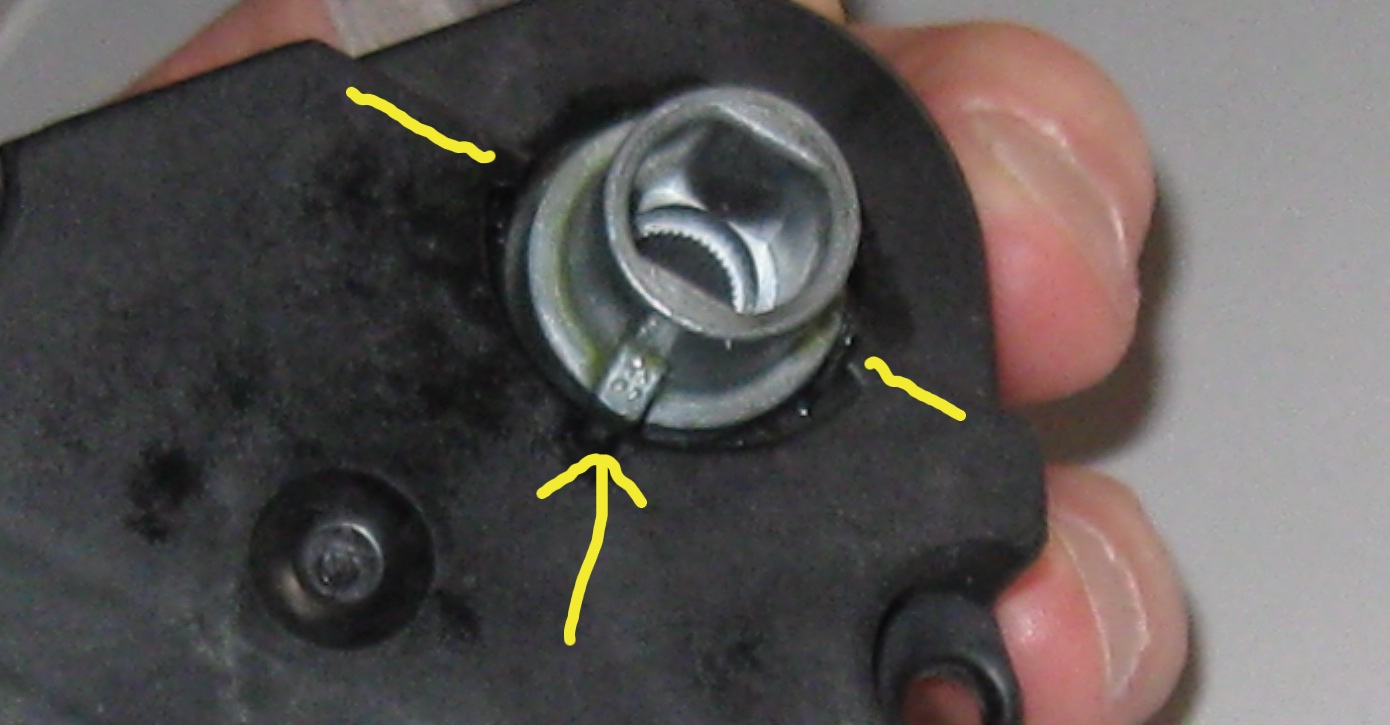
2) place the gear onto the shaft, with the gap at 180' to the blue gear:
Anyway, I took the top of the case off, to take a vid of the gears doing their thing, to post up a How-To on YouBoob
Not a good idea, to run it with the case open
So I'm cleaning old grease out, to do final install, with new grease, and I'm thinking Dremel the nylon washers to allow the case to close completely (I had left it open a little for the first test, so it wouldn't bind - the washers are just a TAD wide). This way, I could completely close the case on final install.
I decided to carve a little off of the gear at the gap, just in case it went there ever again. Bad idea. Now it DOES go there, and that messes up the calibration at startup.
The reason it DOES (and this is IMPORTANT), is because I did not initially put the gear in the right position once fixed. I thought that 180' would be right regardless of the position of the break, but not so...
To determine the correct position of the re-installed FIXED gear:
1) Rotate the shaft until the stop-block is in the middle of its' range pic 1
2) place the gear onto the shaft, with the gap at 180' to the blue gear:


Thread
Thread Starter
Forum
Replies
Last Post
maxvamp
Lighting & Electrical
3
Oct 31, 2020 08:19 AM
svd85
2nd Generation S-series (1995-2005) Tech
0
May 21, 2010 03:43 PM

