
Rear lift glass release button on hatch - HOW TO REPAIR -

Thread Starter
|
Super Member
Joined: Apr 2014
Posts: 1,968
From: Lake City, Florida

Well mine has the button and I have the fob that pops it, so that first statement can't be correct lol
I'm fairly certain that the latch itself that holds the glass shut, also pushes out on the glass when it's popped open, so it sounds like you need to either pull everything apart and make sure nothing in the latch is binding up and/or clean and oil it a little, or replace the latch assembly.
I'm fairly certain that the latch itself that holds the glass shut, also pushes out on the glass when it's popped open, so it sounds like you need to either pull everything apart and make sure nothing in the latch is binding up and/or clean and oil it a little, or replace the latch assembly.
Junior Member
Joined: Oct 2018
Posts: 259
From: NORCAL
I think the glass is just so heavy that it won't pop. Everything else seems to work OK. I added a compression spring near the latch and now it works fine.
Thanks.
Thanks.
Last edited by nomoresubies; May 18, 2019 at 11:35 AM.


Beginning Member
Joined: Jul 2020
Posts: 14
So I can unlatch the back glass on my 2000 blazer from the dash button, and the actuator obviously works because the glass opens up and then I can pop my tailgate open with the interior handle. But if in standing outside the vehicle and I mash the button to pop the rear hatch, I hear absolutely no noise and the hatch doesnt open. Do you think the wiring system has failed between the button and the actuator, or do you think it could still be corrosion inside the button casing that's blocking any kind of electrical spark?? Thanks for your post it has explained how I can get to the actuator and button for replacement (if necessary) but just like anyone else, if I dont HAVE to spend money on a new button and wiring harness then I'm definitely okay with going through this process. I just dont want to go through this process and cause more problems (possibly)
-Chris
OTE=blazen_red_4x4;627629]So it's an all too common issue, the button on the rear gate stops working, but you can still release the lift glass with the button on the dash and the key fob. Believe it or not, it's a super simple fix that doesn't require you buying ANYTHING, just taking something apart and putting it back together (unless you break something in the process...). I've done this repair 4 times now, once on a work vehicle, twice on friends Blazers, and now on the Blazer I own, and it's worked flawlessly every time.
You will need:
*Phillips head screwdriver
*Flat head screwdriver (normal size and small size)
*7mm socket
*10mm socket
*Something to turn those sockets with (a ratchet is fine, but if you have a small battery power impact that'll save you some time)
*15-20 minutes of your time
Start off by removing the handle on the inside of the lower gate by removing the two screws.

Then remove the gate trim panel by removing the two screws on the sides just above the latches, and the one in the center where the glass latches into the gate. Once those are removed, give the trim panel a firm tug upwards from the top of the gate.

Once removed, check the gate to make sure none of the metal retainers are still stuck in it, they like to stay behind sometimes. If there are just pop them out and pop them back onto the trim panel.
Set the panel aside and now you're here.

Couple of things to pop off the back panel before we begin removing it. First, the rod that attaches to the handle we removed earlier. Stick a normal sized flat head screwdriver in between the rod and the latch hing and give it a firm counter clockwise twist, and the rod should pop out of the white plastic holder.


Towards the right side is a small plastic clip sticking out. It's holding a wire against the panel on the other side. It's easier just to pop this out now. Squeeze the tabs together and just push it down into the hold and let it drop into the gate.

Now to pop out the rods going to the latches on either side of the gate. Just take your normal sized screwdriver, place it against the rod, and give the handle of the screwdriver a firm hit with just the palm of your hand and the rod should pop out of the plastic retainer.


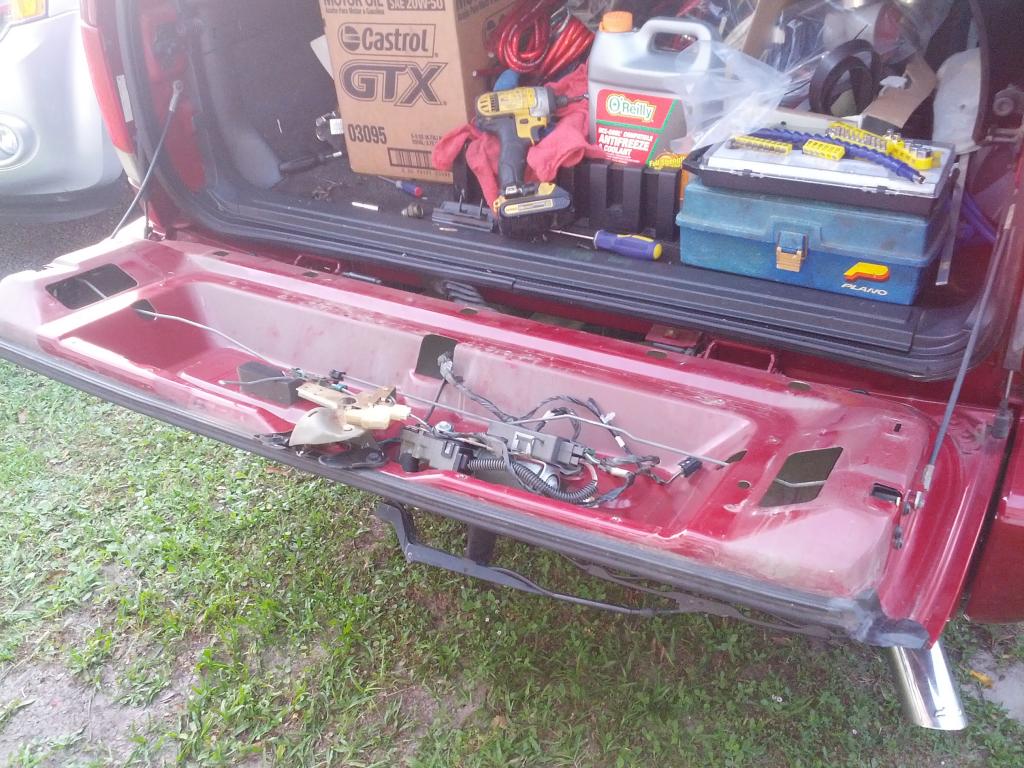
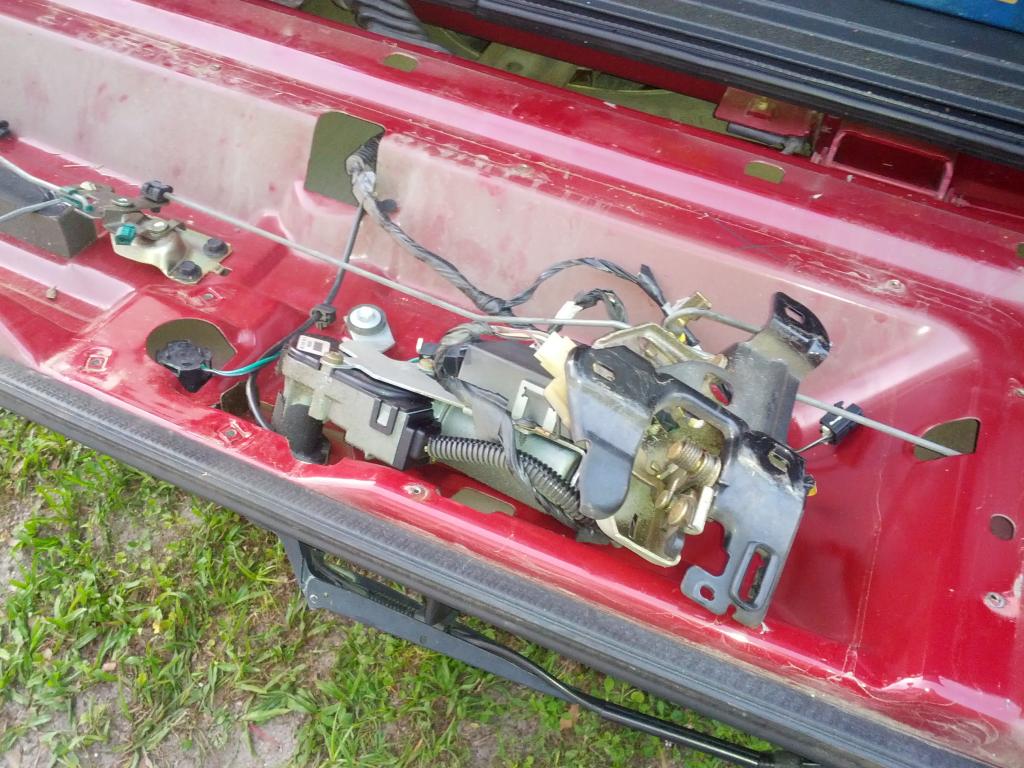
Now is where having a small battery powered impact comes in handy. There are 12, count them, 12, 7mm screws holding the black panel to the gate. Remove all 12 screws. Once they're all removed, you can lift the black panel up and unplug the actuator that's mounted to it (this is the actuator that actually releases the glass, so DON'T BREAK IT)

Good thing to point out. If you're having issues with the glass not opening AT ALL, but you can here the actuator moving, it's most likely the link on the end of the actuator, which can be replaced without replacing the actuator itself. They will snap sometimes... The purple part.
So now we're here.
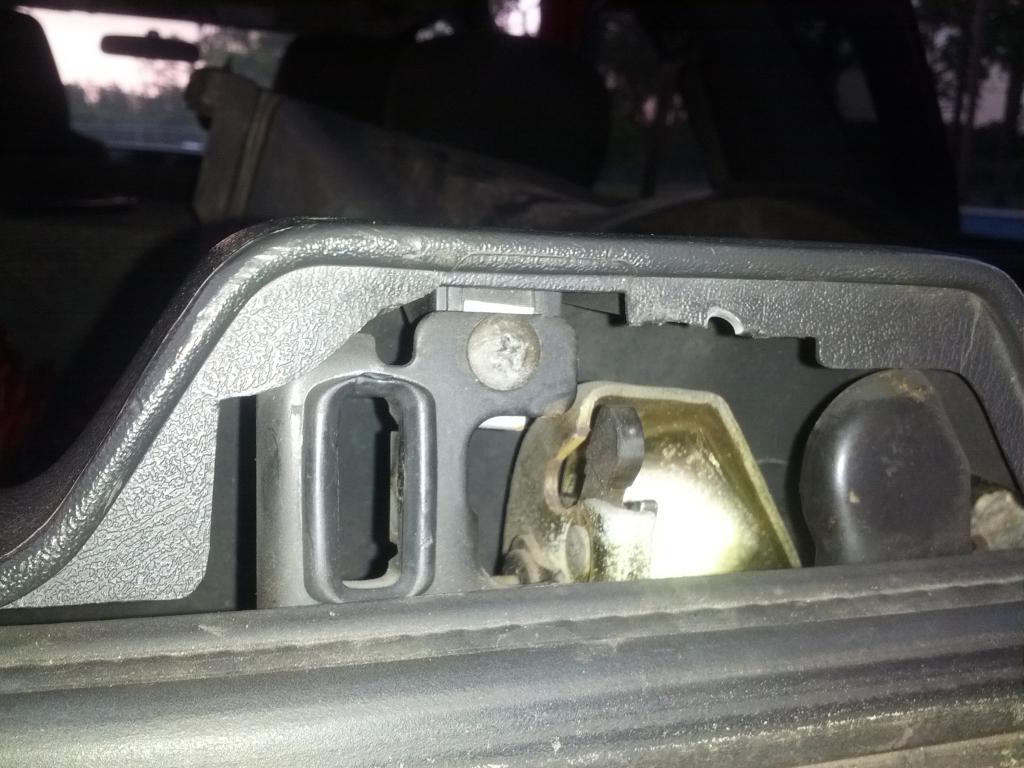
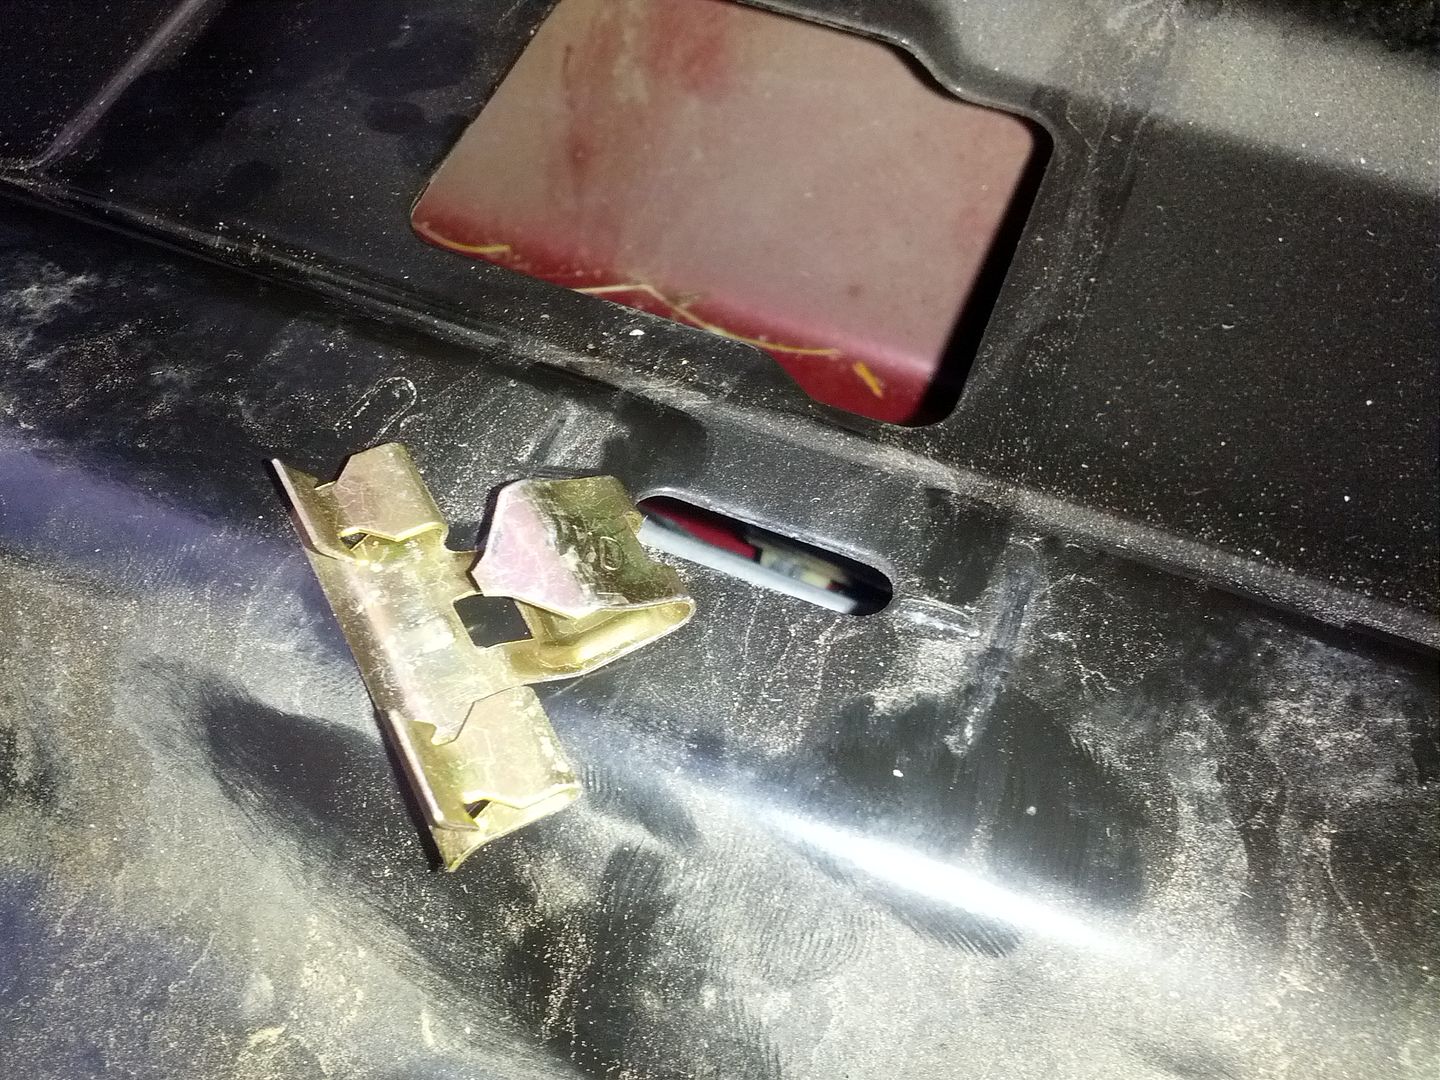
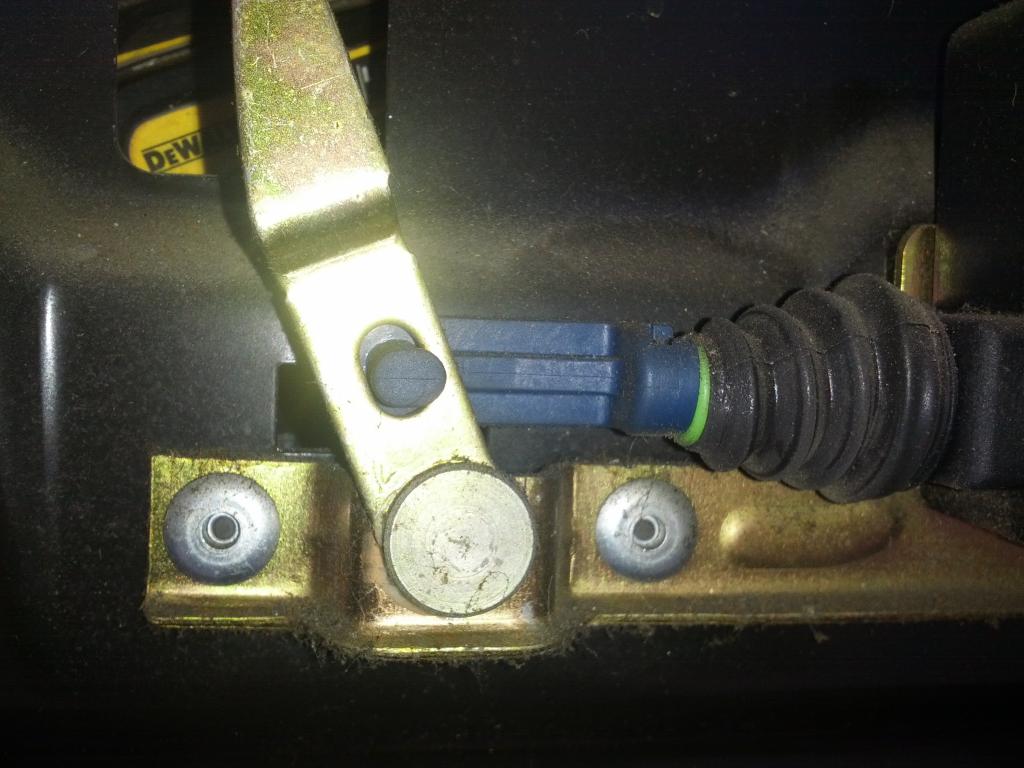
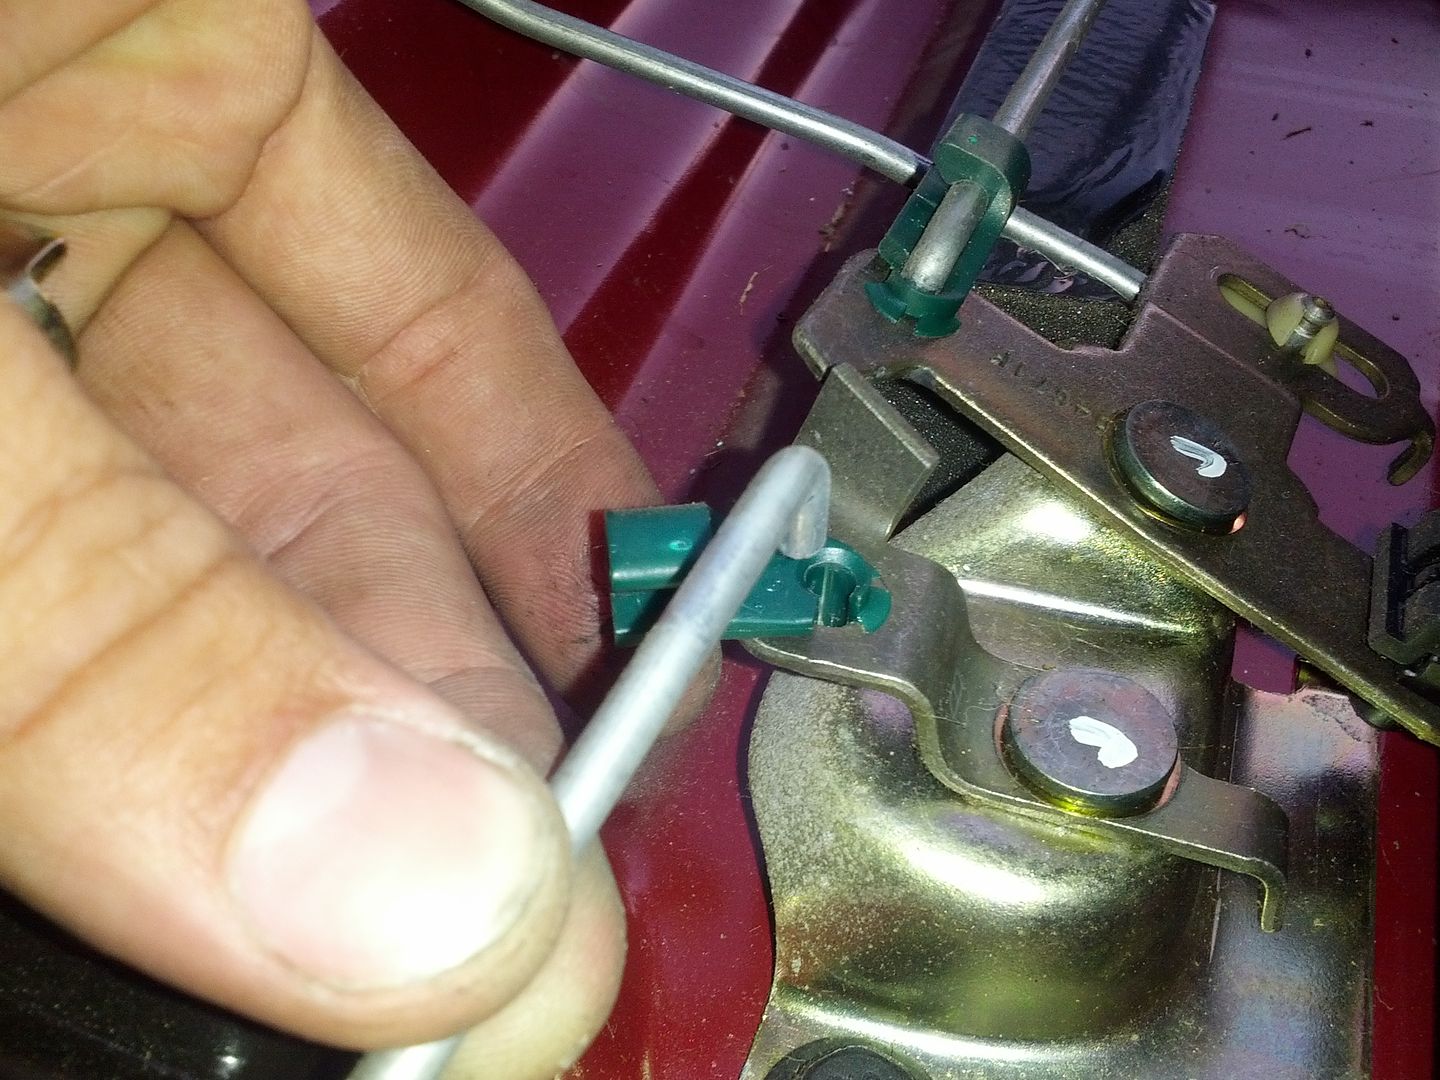
We need to get the latch mechanism out of the way to get to the button. Start off by popping off the rod joint that has the green plastic holder. Then 3 10mm bolts and it lifts off. No need to unplug it, just flop it out of the way.
Now that we can see the button, let's unplug it before we go to removing it. If you trace the wire back to the plug, you'll notice it runs under the bracketry for the rear wiper motor. And of coarse the plug is too big to fit under it... Good news is you don't have to remove the wiper motor assembly, just remove the two 10mm bolts on the bottom and you can lift it up high enough to snake the plug through.

Now that you've got it unplugged and the wire loose, to get the button out, you will need to pop it's retainer clip off. Take your normal sized flathead and pry it over. You'll notice there's a large flange on the right side of it. I've found it easiest to pry near the top of it. It'll take a little wiggling, but you will have to get the retainer completely free of the button in order to get the button out. If it's touching the button at all, it's going to cause you issues in the next step.


Now with the clip all the way over and not touching the button, just press the button down from the back of the gate and out of the bottom. It should just push right through with little effort.


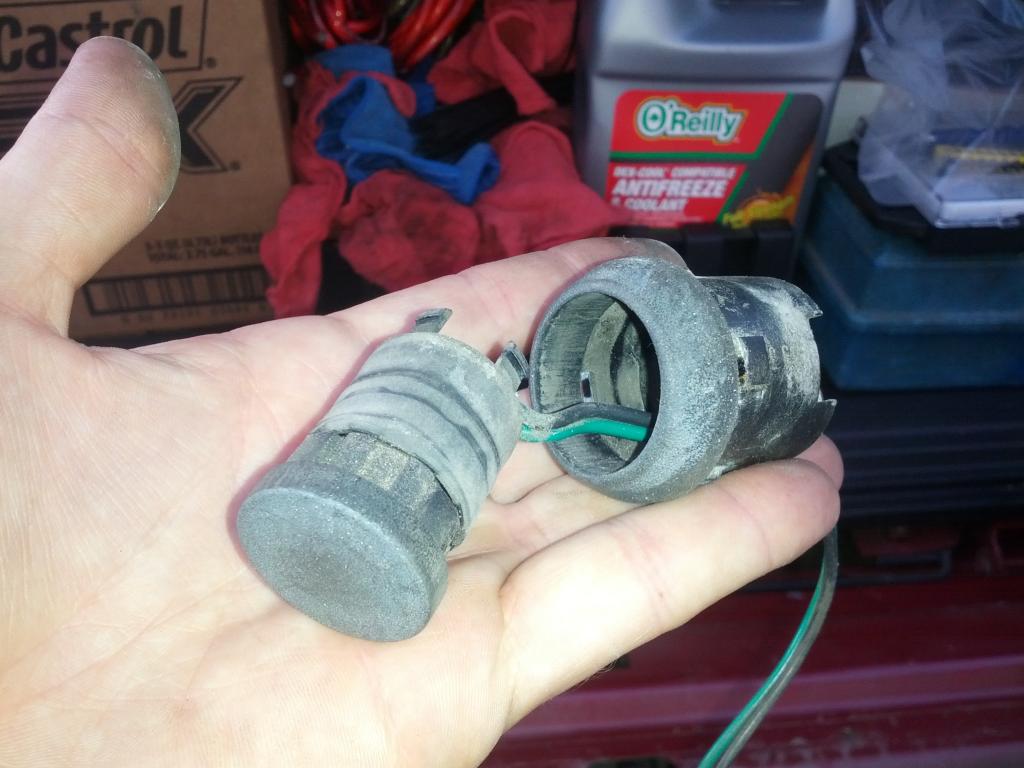
Now to pull the button apart. You'll notice on the back of the button are 4 small tabs. You'll have to depress two of these at the same time to pop one side loose, then do the other two on the opposite side. Once you do that and they all 4 release, the button will separate. The wire will feed through the base of the the button.

Now we need to get the rubber boot off the button. Easiest way I've found to do this is with a small flathead screwdriver. Wedge it in under the boot and work your way around it. Doesn't really matter witch way you go with it, I decided to push it on over the wire so I didn't misplace it.


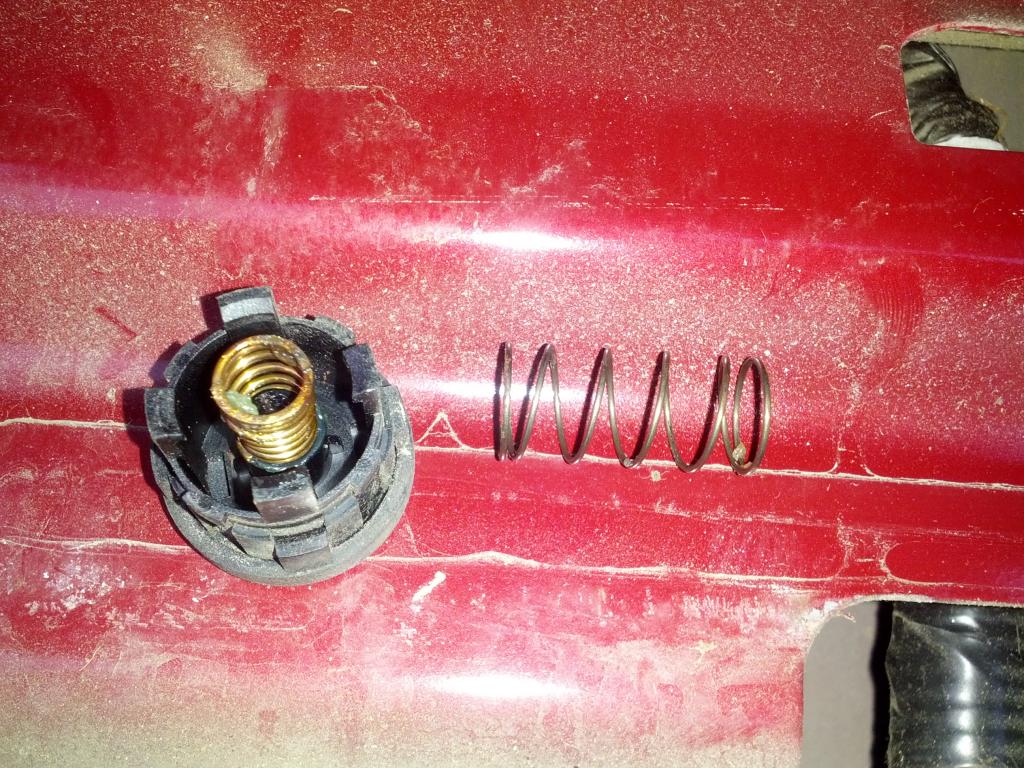
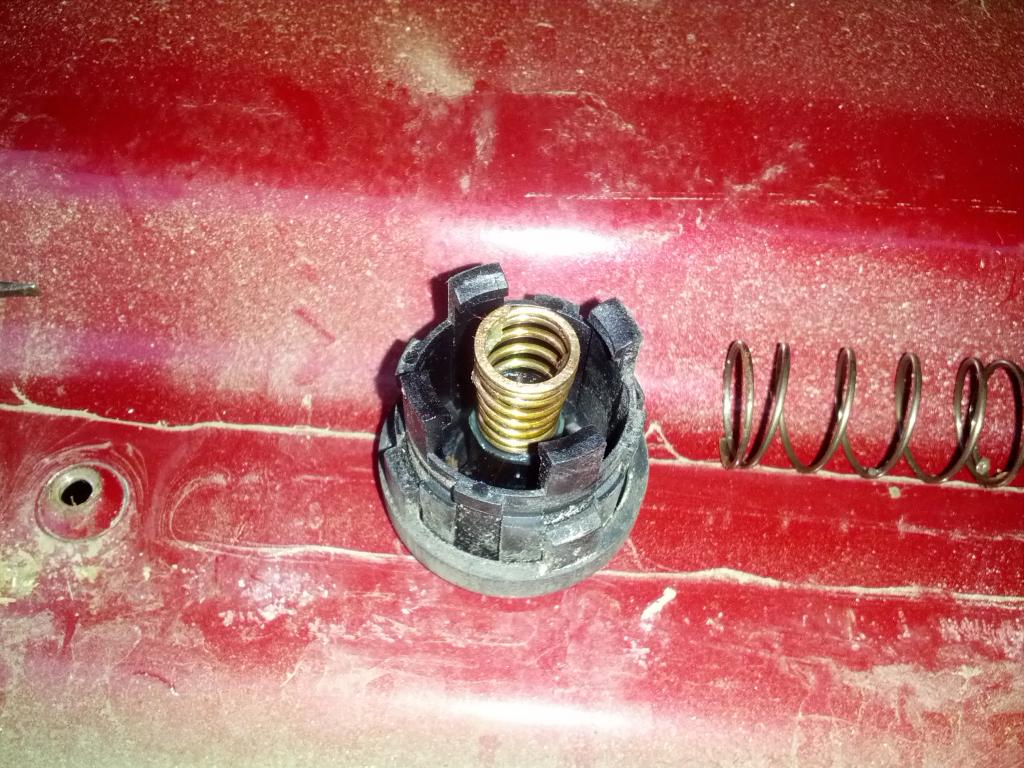
Now if you look at the body of the button, there's 4 more tabs around the outside of it. Take the same small screwdriver and pop those tabs off one at time all the way around to separate the button. Be careful, there's a spring inside that will bounce out of sight if you're not ready for it... It's not under a lot of tension, it's just one of those things that's easy to loose lol.

Now that we've got the button torn apart, we can finally see the culprit!
There's two contacts down inside the button. Take a close look at them. One will more than likely be nice and shiny, and the other, not so much... This dull colored contact is what's causing the button to not work. The corrosion over the years from the small electrical arc that's created when the button is pressed has created enough film over the contact so that it no longer completes the circuit to pop the latch.
Notice how the bottom one is nearly black.

The solution? Take your small flathead and just scrape it on the contact and basically use the tip of it to "sand" the corrosion off. Once you're done they should both look clean and shiny.

Although it's probably not necessary, but this is something I like to do just because you're in there, and it's not going to hurt, is to clean the smaller stiffer spring. The base of it is what contacts those two small contacts you just cleaned. If it is corroded badly too, it can cause problems.
Just move the larger spring out of the way and set it aside and then you can scrap any corrosion off the bottom of the spring.

And that's it! You're done with the repair and haven't spend a dime Only thing left to do is put it all back together in the reverse order you took it apart.
Tip: Before you go throwing everything back together, after you get the button reassembled, plug it and the actuator back in and test the button out first[/QUOTE]
-Chris
OTE=blazen_red_4x4;627629]So it's an all too common issue, the button on the rear gate stops working, but you can still release the lift glass with the button on the dash and the key fob. Believe it or not, it's a super simple fix that doesn't require you buying ANYTHING, just taking something apart and putting it back together (unless you break something in the process...). I've done this repair 4 times now, once on a work vehicle, twice on friends Blazers, and now on the Blazer I own, and it's worked flawlessly every time.
You will need:
*Phillips head screwdriver
*Flat head screwdriver (normal size and small size)
*7mm socket
*10mm socket
*Something to turn those sockets with (a ratchet is fine, but if you have a small battery power impact that'll save you some time)
*15-20 minutes of your time
Start off by removing the handle on the inside of the lower gate by removing the two screws.
Then remove the gate trim panel by removing the two screws on the sides just above the latches, and the one in the center where the glass latches into the gate. Once those are removed, give the trim panel a firm tug upwards from the top of the gate.
Once removed, check the gate to make sure none of the metal retainers are still stuck in it, they like to stay behind sometimes. If there are just pop them out and pop them back onto the trim panel.
Set the panel aside and now you're here.
Couple of things to pop off the back panel before we begin removing it. First, the rod that attaches to the handle we removed earlier. Stick a normal sized flat head screwdriver in between the rod and the latch hing and give it a firm counter clockwise twist, and the rod should pop out of the white plastic holder.
Towards the right side is a small plastic clip sticking out. It's holding a wire against the panel on the other side. It's easier just to pop this out now. Squeeze the tabs together and just push it down into the hold and let it drop into the gate.
Now to pop out the rods going to the latches on either side of the gate. Just take your normal sized screwdriver, place it against the rod, and give the handle of the screwdriver a firm hit with just the palm of your hand and the rod should pop out of the plastic retainer.
Now is where having a small battery powered impact comes in handy. There are 12, count them, 12, 7mm screws holding the black panel to the gate. Remove all 12 screws. Once they're all removed, you can lift the black panel up and unplug the actuator that's mounted to it (this is the actuator that actually releases the glass, so DON'T BREAK IT)
Good thing to point out. If you're having issues with the glass not opening AT ALL, but you can here the actuator moving, it's most likely the link on the end of the actuator, which can be replaced without replacing the actuator itself. They will snap sometimes... The purple part.
So now we're here.
We need to get the latch mechanism out of the way to get to the button. Start off by popping off the rod joint that has the green plastic holder. Then 3 10mm bolts and it lifts off. No need to unplug it, just flop it out of the way.
Now that we can see the button, let's unplug it before we go to removing it. If you trace the wire back to the plug, you'll notice it runs under the bracketry for the rear wiper motor. And of coarse the plug is too big to fit under it... Good news is you don't have to remove the wiper motor assembly, just remove the two 10mm bolts on the bottom and you can lift it up high enough to snake the plug through.
Now that you've got it unplugged and the wire loose, to get the button out, you will need to pop it's retainer clip off. Take your normal sized flathead and pry it over. You'll notice there's a large flange on the right side of it. I've found it easiest to pry near the top of it. It'll take a little wiggling, but you will have to get the retainer completely free of the button in order to get the button out. If it's touching the button at all, it's going to cause you issues in the next step.
Now with the clip all the way over and not touching the button, just press the button down from the back of the gate and out of the bottom. It should just push right through with little effort.
Now to pull the button apart. You'll notice on the back of the button are 4 small tabs. You'll have to depress two of these at the same time to pop one side loose, then do the other two on the opposite side. Once you do that and they all 4 release, the button will separate. The wire will feed through the base of the the button.
Now we need to get the rubber boot off the button. Easiest way I've found to do this is with a small flathead screwdriver. Wedge it in under the boot and work your way around it. Doesn't really matter witch way you go with it, I decided to push it on over the wire so I didn't misplace it.
Now if you look at the body of the button, there's 4 more tabs around the outside of it. Take the same small screwdriver and pop those tabs off one at time all the way around to separate the button. Be careful, there's a spring inside that will bounce out of sight if you're not ready for it... It's not under a lot of tension, it's just one of those things that's easy to loose lol.
Now that we've got the button torn apart, we can finally see the culprit!
There's two contacts down inside the button. Take a close look at them. One will more than likely be nice and shiny, and the other, not so much... This dull colored contact is what's causing the button to not work. The corrosion over the years from the small electrical arc that's created when the button is pressed has created enough film over the contact so that it no longer completes the circuit to pop the latch.
Notice how the bottom one is nearly black.
The solution? Take your small flathead and just scrape it on the contact and basically use the tip of it to "sand" the corrosion off. Once you're done they should both look clean and shiny.
Although it's probably not necessary, but this is something I like to do just because you're in there, and it's not going to hurt, is to clean the smaller stiffer spring. The base of it is what contacts those two small contacts you just cleaned. If it is corroded badly too, it can cause problems.
Just move the larger spring out of the way and set it aside and then you can scrap any corrosion off the bottom of the spring.
And that's it! You're done with the repair and haven't spend a dime
Only thing left to do is put it all back together in the reverse order you took it apart.Tip: Before you go throwing everything back together, after you get the button reassembled, plug it and the actuator back in and test the button out first[/QUOTE]
Beginning Member
Joined: Jul 2020
Posts: 14
Thank you so much for the info, man. Really appreciate it.
QUOTE=ChevyBoy1984;725397]So I can unlatch the back glass on my 2000 blazer from the dash button, and the actuator obviously works because the glass opens up and then I can pop my tailgate open with the interior handle. But if in standing outside the vehicle and I mash the button to pop the rear hatch, I hear absolutely no noise and the hatch doesnt open. Do you think the wiring system has failed between the button and the actuator, or do you think it could still be corrosion inside the button casing that's blocking any kind of electrical spark?? Thanks for your post it has explained how I can get to the actuator and button for replacement (if necessary) but just like anyone else, if I dont HAVE to spend money on a new button and wiring harness then I'm definitely okay with going through this process. I just dont want to go through this process and cause more problems (possibly)
-Chris
OTE=blazen_red_4x4;627629]So it's an all too common issue, the button on the rear gate stops working, but you can still release the lift glass with the button on the dash and the key fob. Believe it or not, it's a super simple fix that doesn't require you buying ANYTHING, just taking something apart and putting it back together (unless you break something in the process...). I've done this repair 4 times now, once on a work vehicle, twice on friends Blazers, and now on the Blazer I own, and it's worked flawlessly every time.
You will need:
*Phillips head screwdriver
*Flat head screwdriver (normal size and small size)
*7mm socket
*10mm socket
*Something to turn those sockets with (a ratchet is fine, but if you have a small battery power impact that'll save you some time)
*15-20 minutes of your time
Start off by removing the handle on the inside of the lower gate by removing the two screws.
Then remove the gate trim panel by removing the two screws on the sides just above the latches, and the one in the center where the glass latches into the gate. Once those are removed, give the trim panel a firm tug upwards from the top of the gate.
Once removed, check the gate to make sure none of the metal retainers are still stuck in it, they like to stay behind sometimes. If there are just pop them out and pop them back onto the trim panel.
Set the panel aside and now you're here.
Couple of things to pop off the back panel before we begin removing it. First, the rod that attaches to the handle we removed earlier. Stick a normal sized flat head screwdriver in between the rod and the latch hing and give it a firm counter clockwise twist, and the rod should pop out of the white plastic holder.
Towards the right side is a small plastic clip sticking out. It's holding a wire against the panel on the other side. It's easier just to pop this out now. Squeeze the tabs together and just push it down into the hold and let it drop into the gate.
Now to pop out the rods going to the latches on either side of the gate. Just take your normal sized screwdriver, place it against the rod, and give the handle of the screwdriver a firm hit with just the palm of your hand and the rod should pop out of the plastic retainer.
Now is where having a small battery powered impact comes in handy. There are 12, count them, 12, 7mm screws holding the black panel to the gate. Remove all 12 screws. Once they're all removed, you can lift the black panel up and unplug the actuator that's mounted to it (this is the actuator that actually releases the glass, so DON'T BREAK IT)
Good thing to point out. If you're having issues with the glass not opening AT ALL, but you can here the actuator moving, it's most likely the link on the end of the actuator, which can be replaced without replacing the actuator itself. They will snap sometimes... The purple part.
So now we're here.
We need to get the latch mechanism out of the way to get to the button. Start off by popping off the rod joint that has the green plastic holder. Then 3 10mm bolts and it lifts off. No need to unplug it, just flop it out of the way.
Now that we can see the button, let's unplug it before we go to removing it. If you trace the wire back to the plug, you'll notice it runs under the bracketry for the rear wiper motor. And of coarse the plug is too big to fit under it... Good news is you don't have to remove the wiper motor assembly, just remove the two 10mm bolts on the bottom and you can lift it up high enough to snake the plug through.
Now that you've got it unplugged and the wire loose, to get the button out, you will need to pop it's retainer clip off. Take your normal sized flathead and pry it over. You'll notice there's a large flange on the right side of it. I've found it easiest to pry near the top of it. It'll take a little wiggling, but you will have to get the retainer completely free of the button in order to get the button out. If it's touching the button at all, it's going to cause you issues in the next step.
Now with the clip all the way over and not touching the button, just press the button down from the back of the gate and out of the bottom. It should just push right through with little effort.
Now to pull the button apart. You'll notice on the back of the button are 4 small tabs. You'll have to depress two of these at the same time to pop one side loose, then do the other two on the opposite side. Once you do that and they all 4 release, the button will separate. The wire will feed through the base of the the button.
Now we need to get the rubber boot off the button. Easiest way I've found to do this is with a small flathead screwdriver. Wedge it in under the boot and work your way around it. Doesn't really matter witch way you go with it, I decided to push it on over the wire so I didn't misplace it.
Now if you look at the body of the button, there's 4 more tabs around the outside of it. Take the same small screwdriver and pop those tabs off one at time all the way around to separate the button. Be careful, there's a spring inside that will bounce out of sight if you're not ready for it... It's not under a lot of tension, it's just one of those things that's easy to loose lol.
Now that we've got the button torn apart, we can finally see the culprit!
There's two contacts down inside the button. Take a close look at them. One will more than likely be nice and shiny, and the other, not so much... This dull colored contact is what's causing the button to not work. The corrosion over the years from the small electrical arc that's created when the button is pressed has created enough film over the contact so that it no longer completes the circuit to pop the latch.
Notice how the bottom one is nearly black.
The solution? Take your small flathead and just scrape it on the contact and basically use the tip of it to "sand" the corrosion off. Once you're done they should both look clean and shiny.
Although it's probably not necessary, but this is something I like to do just because you're in there, and it's not going to hurt, is to clean the smaller stiffer spring. The base of it is what contacts those two small contacts you just cleaned. If it is corroded badly too, it can cause problems.
Just move the larger spring out of the way and set it aside and then you can scrap any corrosion off the bottom of the spring.
And that's it! You're done with the repair and haven't spend a dime Only thing left to do is put it all back together in the reverse order you took it apart.
Tip: Before you go throwing everything back together, after you get the button reassembled, plug it and the actuator back in and test the button out first[/QUOTE][/QUOTE]
thank tou!!!
QUOTE=ChevyBoy1984;725397]So I can unlatch the back glass on my 2000 blazer from the dash button, and the actuator obviously works because the glass opens up and then I can pop my tailgate open with the interior handle. But if in standing outside the vehicle and I mash the button to pop the rear hatch, I hear absolutely no noise and the hatch doesnt open. Do you think the wiring system has failed between the button and the actuator, or do you think it could still be corrosion inside the button casing that's blocking any kind of electrical spark?? Thanks for your post it has explained how I can get to the actuator and button for replacement (if necessary) but just like anyone else, if I dont HAVE to spend money on a new button and wiring harness then I'm definitely okay with going through this process. I just dont want to go through this process and cause more problems (possibly)
-Chris
OTE=blazen_red_4x4;627629]So it's an all too common issue, the button on the rear gate stops working, but you can still release the lift glass with the button on the dash and the key fob. Believe it or not, it's a super simple fix that doesn't require you buying ANYTHING, just taking something apart and putting it back together (unless you break something in the process...). I've done this repair 4 times now, once on a work vehicle, twice on friends Blazers, and now on the Blazer I own, and it's worked flawlessly every time.
You will need:
*Phillips head screwdriver
*Flat head screwdriver (normal size and small size)
*7mm socket
*10mm socket
*Something to turn those sockets with (a ratchet is fine, but if you have a small battery power impact that'll save you some time)
*15-20 minutes of your time
Start off by removing the handle on the inside of the lower gate by removing the two screws.
Then remove the gate trim panel by removing the two screws on the sides just above the latches, and the one in the center where the glass latches into the gate. Once those are removed, give the trim panel a firm tug upwards from the top of the gate.
Once removed, check the gate to make sure none of the metal retainers are still stuck in it, they like to stay behind sometimes. If there are just pop them out and pop them back onto the trim panel.
Set the panel aside and now you're here.
Couple of things to pop off the back panel before we begin removing it. First, the rod that attaches to the handle we removed earlier. Stick a normal sized flat head screwdriver in between the rod and the latch hing and give it a firm counter clockwise twist, and the rod should pop out of the white plastic holder.
Towards the right side is a small plastic clip sticking out. It's holding a wire against the panel on the other side. It's easier just to pop this out now. Squeeze the tabs together and just push it down into the hold and let it drop into the gate.
Now to pop out the rods going to the latches on either side of the gate. Just take your normal sized screwdriver, place it against the rod, and give the handle of the screwdriver a firm hit with just the palm of your hand and the rod should pop out of the plastic retainer.
Now is where having a small battery powered impact comes in handy. There are 12, count them, 12, 7mm screws holding the black panel to the gate. Remove all 12 screws. Once they're all removed, you can lift the black panel up and unplug the actuator that's mounted to it (this is the actuator that actually releases the glass, so DON'T BREAK IT)
Good thing to point out. If you're having issues with the glass not opening AT ALL, but you can here the actuator moving, it's most likely the link on the end of the actuator, which can be replaced without replacing the actuator itself. They will snap sometimes... The purple part.
So now we're here.
We need to get the latch mechanism out of the way to get to the button. Start off by popping off the rod joint that has the green plastic holder. Then 3 10mm bolts and it lifts off. No need to unplug it, just flop it out of the way.
Now that we can see the button, let's unplug it before we go to removing it. If you trace the wire back to the plug, you'll notice it runs under the bracketry for the rear wiper motor. And of coarse the plug is too big to fit under it... Good news is you don't have to remove the wiper motor assembly, just remove the two 10mm bolts on the bottom and you can lift it up high enough to snake the plug through.
Now that you've got it unplugged and the wire loose, to get the button out, you will need to pop it's retainer clip off. Take your normal sized flathead and pry it over. You'll notice there's a large flange on the right side of it. I've found it easiest to pry near the top of it. It'll take a little wiggling, but you will have to get the retainer completely free of the button in order to get the button out. If it's touching the button at all, it's going to cause you issues in the next step.
Now with the clip all the way over and not touching the button, just press the button down from the back of the gate and out of the bottom. It should just push right through with little effort.
Now to pull the button apart. You'll notice on the back of the button are 4 small tabs. You'll have to depress two of these at the same time to pop one side loose, then do the other two on the opposite side. Once you do that and they all 4 release, the button will separate. The wire will feed through the base of the the button.
Now we need to get the rubber boot off the button. Easiest way I've found to do this is with a small flathead screwdriver. Wedge it in under the boot and work your way around it. Doesn't really matter witch way you go with it, I decided to push it on over the wire so I didn't misplace it.
Now if you look at the body of the button, there's 4 more tabs around the outside of it. Take the same small screwdriver and pop those tabs off one at time all the way around to separate the button. Be careful, there's a spring inside that will bounce out of sight if you're not ready for it... It's not under a lot of tension, it's just one of those things that's easy to loose lol.
Now that we've got the button torn apart, we can finally see the culprit!
There's two contacts down inside the button. Take a close look at them. One will more than likely be nice and shiny, and the other, not so much... This dull colored contact is what's causing the button to not work. The corrosion over the years from the small electrical arc that's created when the button is pressed has created enough film over the contact so that it no longer completes the circuit to pop the latch.
Notice how the bottom one is nearly black.
The solution? Take your small flathead and just scrape it on the contact and basically use the tip of it to "sand" the corrosion off. Once you're done they should both look clean and shiny.
Although it's probably not necessary, but this is something I like to do just because you're in there, and it's not going to hurt, is to clean the smaller stiffer spring. The base of it is what contacts those two small contacts you just cleaned. If it is corroded badly too, it can cause problems.
Just move the larger spring out of the way and set it aside and then you can scrap any corrosion off the bottom of the spring.
And that's it! You're done with the repair and haven't spend a dime
Only thing left to do is put it all back together in the reverse order you took it apart.Tip: Before you go throwing everything back together, after you get the button reassembled, plug it and the actuator back in and test the button out first[/QUOTE][/QUOTE]
thank tou!!!
Beginning Member
Joined: Jul 2020
Posts: 14
Walleye Hunter, now that I have a day off I'm gonna give it a shot. Hopefully I'll be able to handle it. Wish me luck. With 100 degree heat, im probably gonna get halfway through the job and hate myself. Lol

Junior Member
Joined: Jun 2020
Posts: 339
In the words of the famous Leon Spinks..."The heat is hot", but that job is actually pretty easy. Good luck with it.